Home>Articles>How To Plumb A Double Kitchen Sink With Disposal And Dishwasher
Articles
How To Plumb A Double Kitchen Sink With Disposal And Dishwasher
Modified: August 16, 2024
Learn how to properly plumb a double kitchen sink with a disposal and dishwasher with these informative articles. Step-by-step instructions and helpful tips for a successful installation.
(Many of the links in this article redirect to a specific reviewed product. Your purchase of these products through affiliate links helps to generate commission for Storables.com, at no extra cost. Learn more)
Introduction
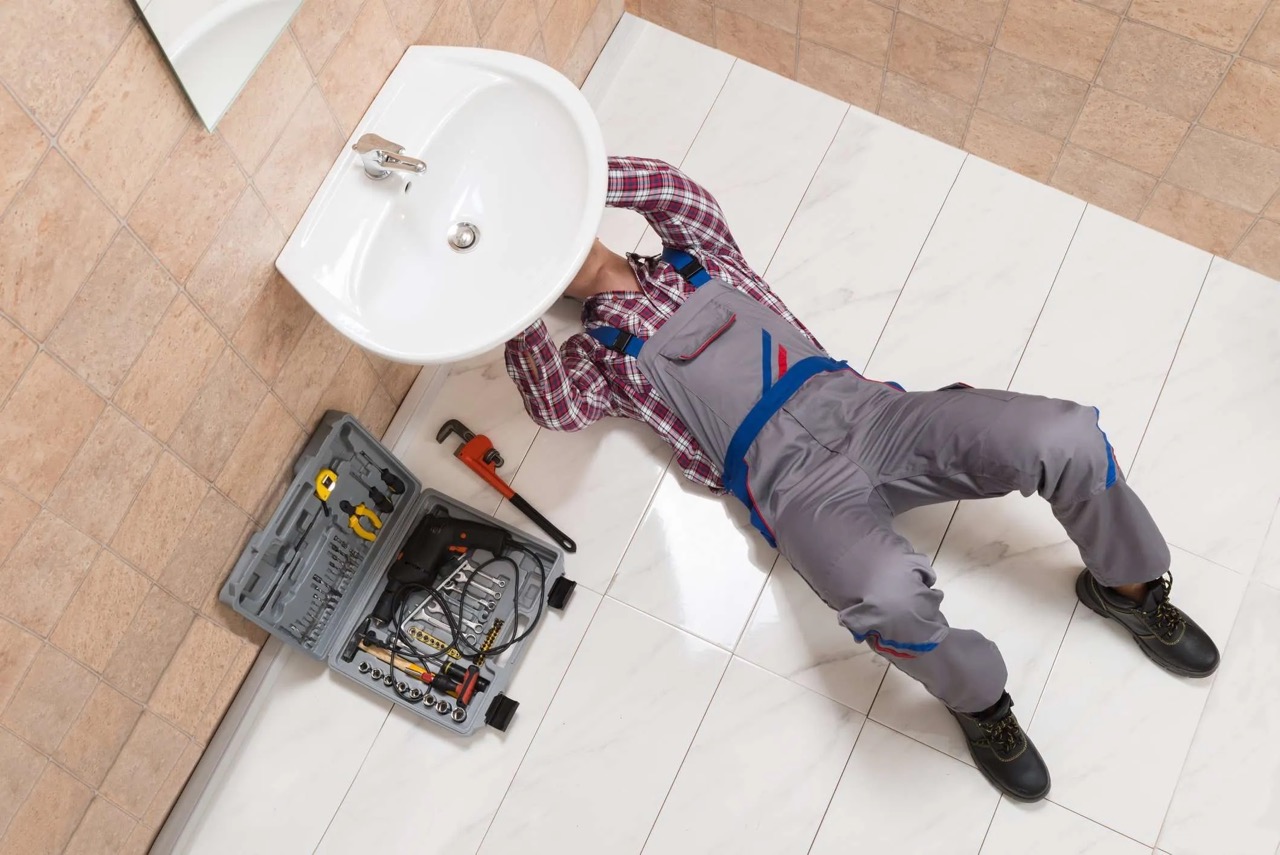
Plumbing a double kitchen sink with a disposal and dishwasher can seem like a daunting task, but with the right tools and a little know-how, you can tackle this project with confidence. Having a properly installed and functioning plumbing system is essential for the smooth operation of your kitchen, as it ensures efficient drainage and prevents any potential leaks or backups.
In this article, we will guide you through the step-by-step process of plumb a double kitchen sink with a disposal and dishwasher. We will cover everything from gathering the necessary tools and materials to testing and adjusting the plumbing connections. So, let’s dive in and get started!
Before you begin, it’s important to familiarize yourself with the layout of your kitchen sink, disposal, and dishwasher. Understanding how these components are interconnected will help you better visualize the plumbing process and ensure everything fits together seamlessly.
Now let’s move on to the first step of the process: gathering the necessary tools and materials.
Key Takeaways:
- Plumbing a double kitchen sink with a disposal and dishwasher requires gathering essential tools, shutting off the water supply, removing old plumbing, and installing new drain lines. Proper connections and testing ensure a well-functioning system.
- Connecting the garbage disposal unit and dishwasher drain line, testing for leaks, and adjusting any loose connections are crucial steps in ensuring a reliable and efficient plumbing system. Regular maintenance and professional assistance can further enhance the functionality of your kitchen sink.
Read more: How To Plumb A Double Kitchen Sink
Step 1: Gather the necessary tools and materials
Before you can start plumbing a double kitchen sink with a disposal and dishwasher, it’s important to gather all the tools and materials you’ll need to complete the project. Here’s a list of essentials:
1. Adjustable wrench: This tool is crucial for tightening and loosening nuts and bolts. Look for a wrench that fits a variety of sizes to ensure you have the right fit for the job.
2. Plumber’s tape: Also known as Teflon tape, plumber’s tape is used to create a watertight seal on threaded connections. It’s inexpensive and easy to use, making it a must-have for any plumbing project.
3. Pipe cutter: You may need to cut some pipes to fit the specific measurements of your double sink setup. A pipe cutter will allow you to make clean and precise cuts without damaging the pipes.
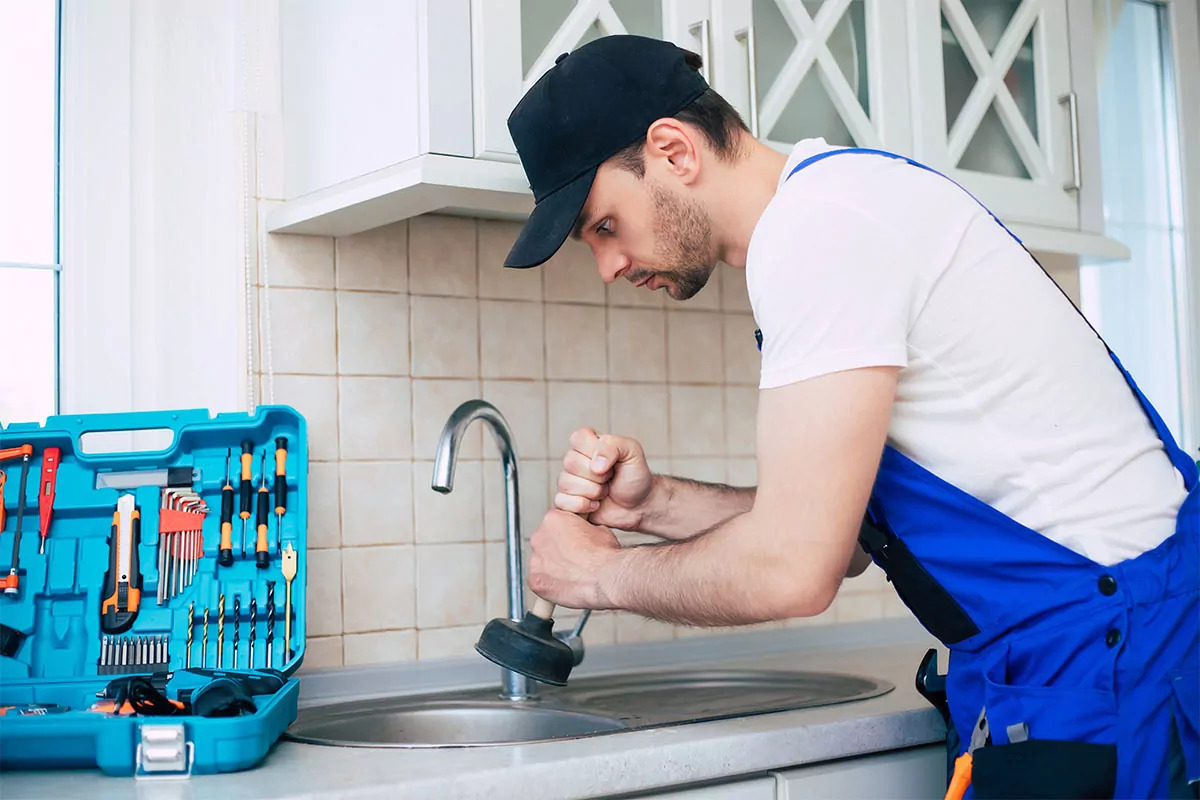
4. Plunger: A plunger can come in handy if you encounter any clogs or blockages in the sink or drain lines. It’s a simple yet effective tool for clearing minor obstructions.
5. PVC pipe and fittings: PVC pipes and fittings are commonly used in plumbing projects due to their durability and affordability. Measure the lengths and sizes needed for your specific setup and purchase accordingly.
6. Rubber gaskets or washers: These small but important components create a watertight seal between pipes and connections. Be sure to have an assortment of sizes on hand to accommodate different plumbing connections.
7. Screwdriver: You’ll need a screwdriver to tighten screws or remove any fasteners that hold pipes or connections in place. It’s best to have both a flathead and a Phillips head screwdriver in your toolkit.
8. Safety goggles and gloves: As with any DIY project, safety should be a priority. Protect your eyes with goggles and your hands with gloves to prevent any potential injuries.
In addition to these tools, you’ll also need a variety of materials such as pipe glue, plumber’s putty, and silicone caulk. These will be used to secure and seal different parts of the plumbing system, ensuring that everything works properly and efficiently.
Once you have gathered all the necessary tools and materials, you’re ready to move on to the next step: shutting off the water supply.
Step 2: Shut off the water supply
Before you begin any plumbing work, it’s crucial to shut off the water supply to avoid any water damage or accidents. Here’s a step-by-step guide on how to do it:
1. Locate the main water shutoff valve: The main water shutoff valve is typically located near the water meter or where the main water line enters your home. It may be in the basement, crawlspace, utility room, or near the water heater.
2. Turn off the water supply: Once you’ve located the main water shutoff valve, use a wrench or your hand to turn the valve clockwise until it is fully closed. This action will stop the water flow to the entire house and ensure you can work on the plumbing system without any complications.
3. Drain any remaining water: After turning off the water supply, open all the faucets in the house, including the kitchen sink faucets, to drain any remaining water in the pipes. This will help prevent any unwanted leaks or spills while working on the plumbing.
4. Test the water supply: Double-check that the water supply is indeed shut off by turning the kitchen sink faucets on and ensuring no water comes out. If you notice any water flow, there may be another valve or shut-off point that you need to locate and close.
By shutting off the water supply, you’re taking a necessary precaution to avoid any potential mess or water damage during the plumbing process. Once you have completed this step, you can move on to the next: removing the old plumbing.
Step 3: Remove the old plumbing
With the water supply shut off, it’s time to remove the old plumbing from the double kitchen sink. Follow these steps to ensure a proper removal:
1. Remove the drain pipes: Start by disconnecting the drain pipes underneath the sink. Use an adjustable wrench to loosen and remove the nuts that secure the drain pipes to the sink’s tailpieces. Keep a bucket or towel handy to catch any residual water or debris that may come out when removing the pipes.
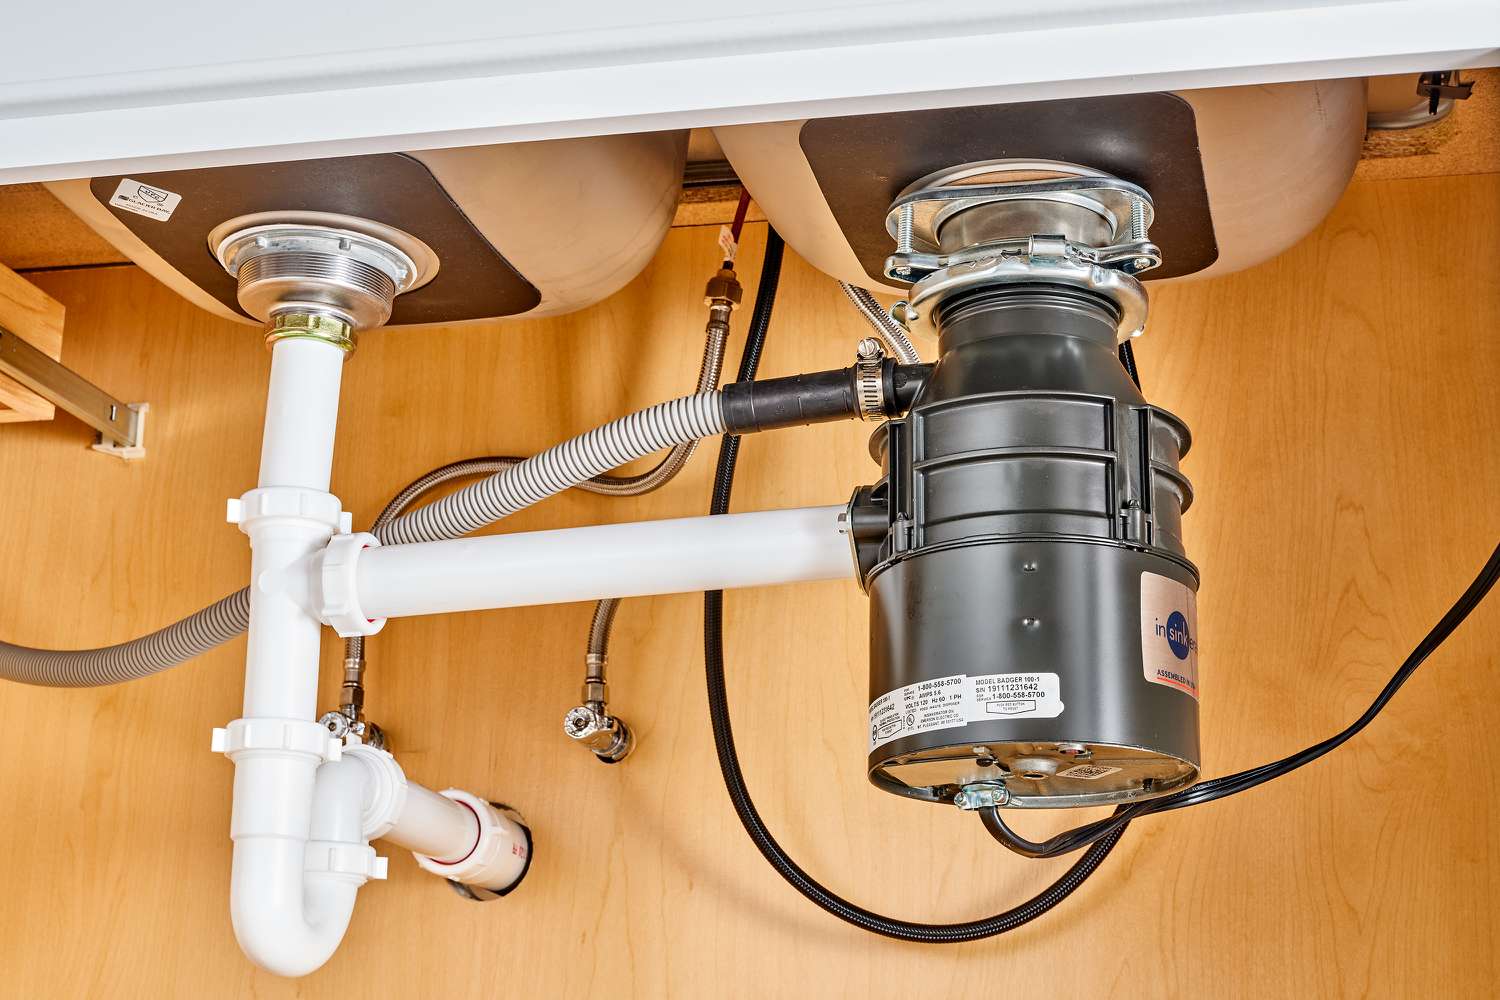
2. Disconnect the garbage disposal unit (if applicable): If your double kitchen sink has a garbage disposal unit, you’ll need to disconnect it from the sink and remove it. First, unplug the garbage disposal from the power source. Then, disconnect the drain pipe that connects the disposal to the sink’s drain system. Loosen and remove any mounting hardware that secures the disposal to the sink.
3. Disconnect the dishwasher drain line: If you have a dishwasher connected to the sink, locate the drain line that connects the dishwasher to the sink’s drain system. Loosen the hose clamp or connector that holds the drain line in place, and disconnect it from the sink’s drain system.
4. Remove any remaining connections: Inspect the area around the sink and disposal to ensure all plumbing connections have been disconnected. If there are any remaining connections or hardware, use a screwdriver or wrench to remove them.
Ensure that you label or take note of each removed component, especially if you plan to reuse any parts or are uncertain about their replacements. This will make it easier to assemble the new plumbing system later on.
Now that you have successfully removed the old plumbing system, it’s time to move on to the next step: installing the new drain lines for the double sink.
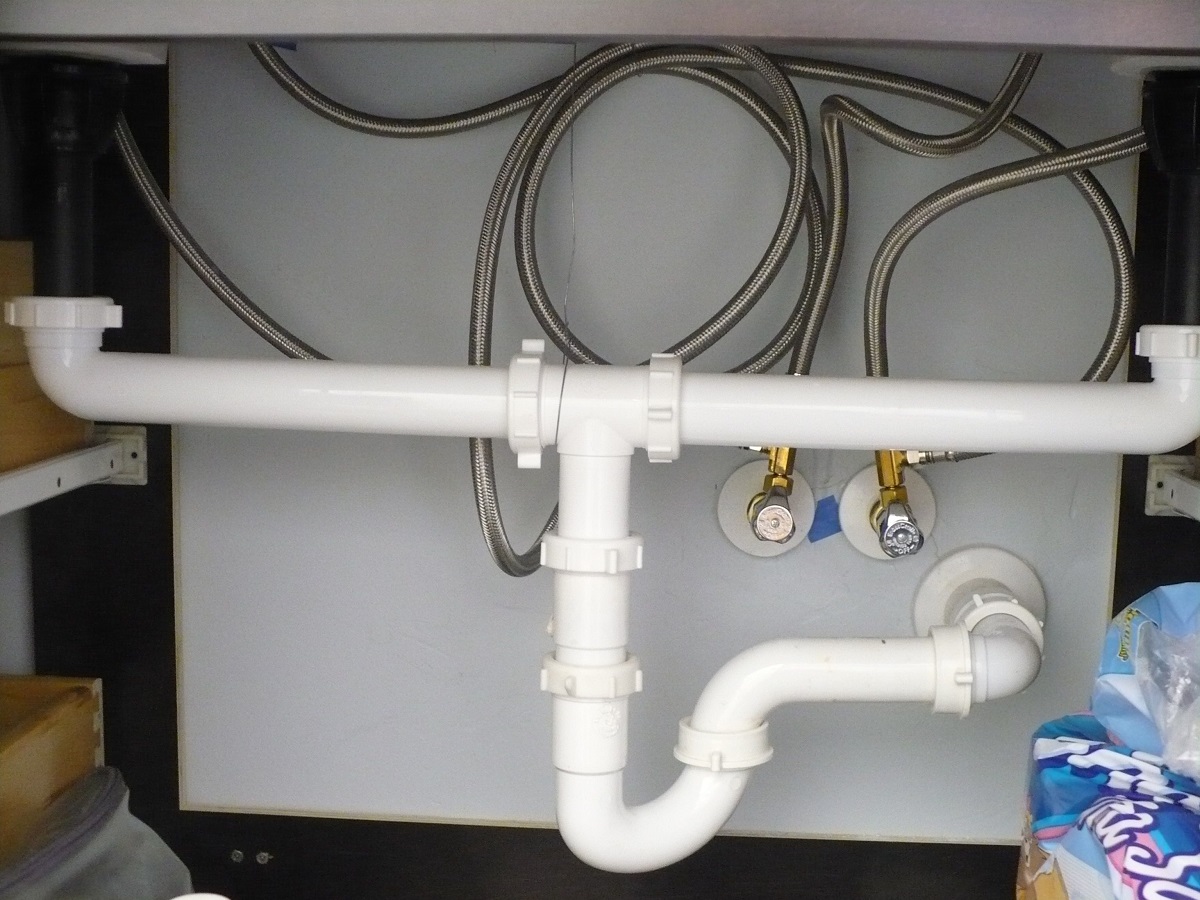
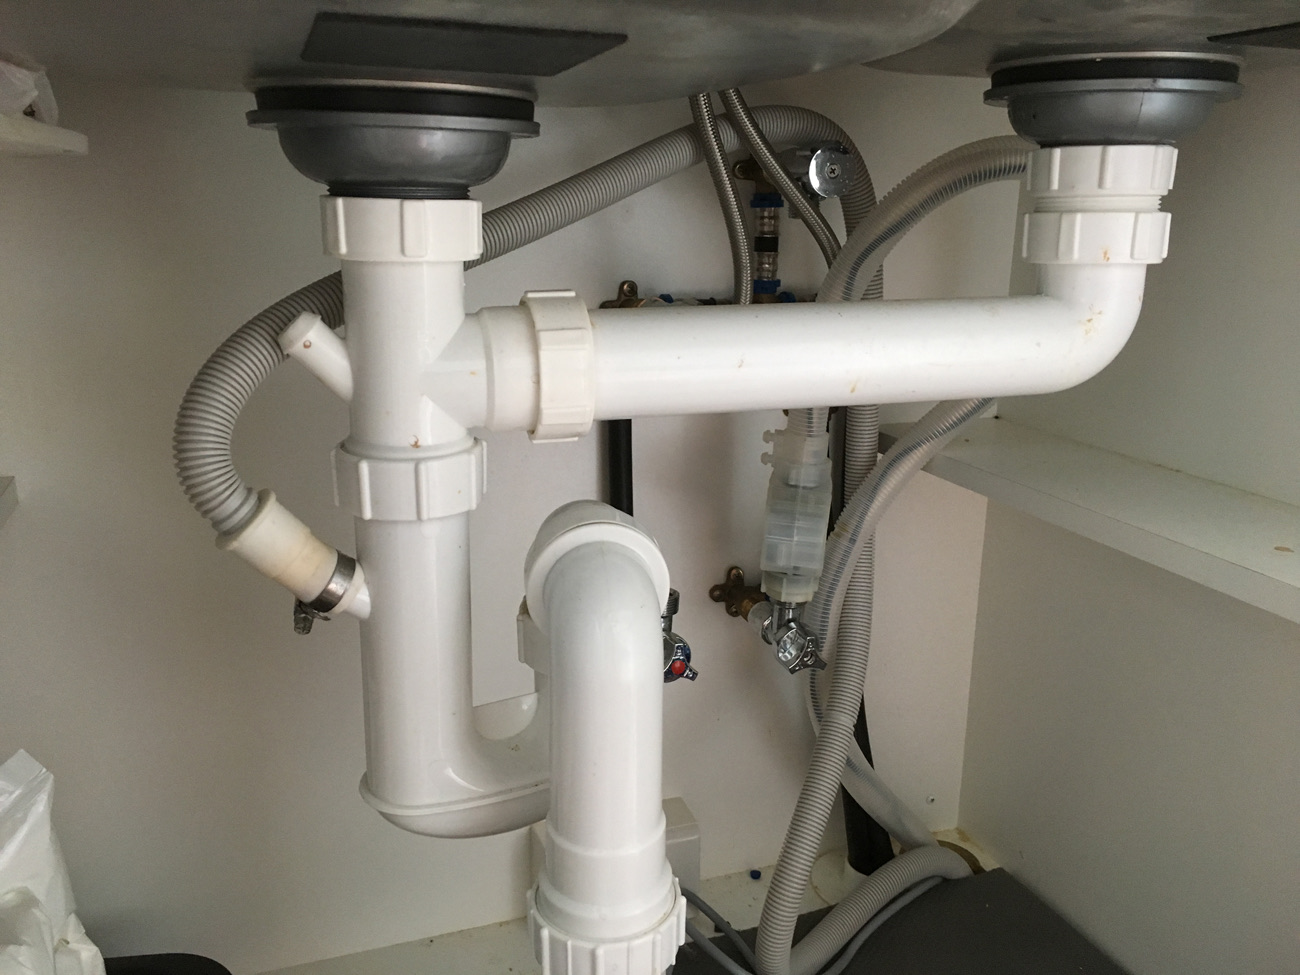
Step 4: Install the new drain lines for the double sink
Now that you have removed the old plumbing, it’s time to install the new drain lines for the double sink. Follow these steps for a successful installation:
1. Measure and cut the new drain pipes: Measure the distance between the wall drain or floor drain and the sink’s tailpieces. Use a PVC pipe cutter to cut the PVC pipes to the appropriate lengths. It’s essential to have accurate measurements to ensure a proper fit.
2. Dry-fit the pipes: Before applying any glue or adhesive, dry-fit the pipes to make sure they align correctly and fit securely. This step allows you to make any necessary adjustments or changes before permanently attaching the pipes.
3. Apply PVC primer and glue: Once you are satisfied with the dry-fit, apply a coat of PVC primer to the outside of the pipe ends and the inside of the fittings. Follow the instructions on the primer can, and after applying the primer, apply PVC glue to the same areas. Quickly insert the pipes into the fittings and hold them firmly for a few seconds to allow the glue to bond.
4. Connect the drain pipes to the sink’s tailpieces: Slide the PVC end of the drain pipes onto the sink’s tailpieces and secure them with slip nuts and washers. Hand-tighten the slip nuts and use an adjustable wrench to give them an extra quarter turn for a snug fit. Be careful not to overtighten, as it may cause damage to the pipes or fittings.
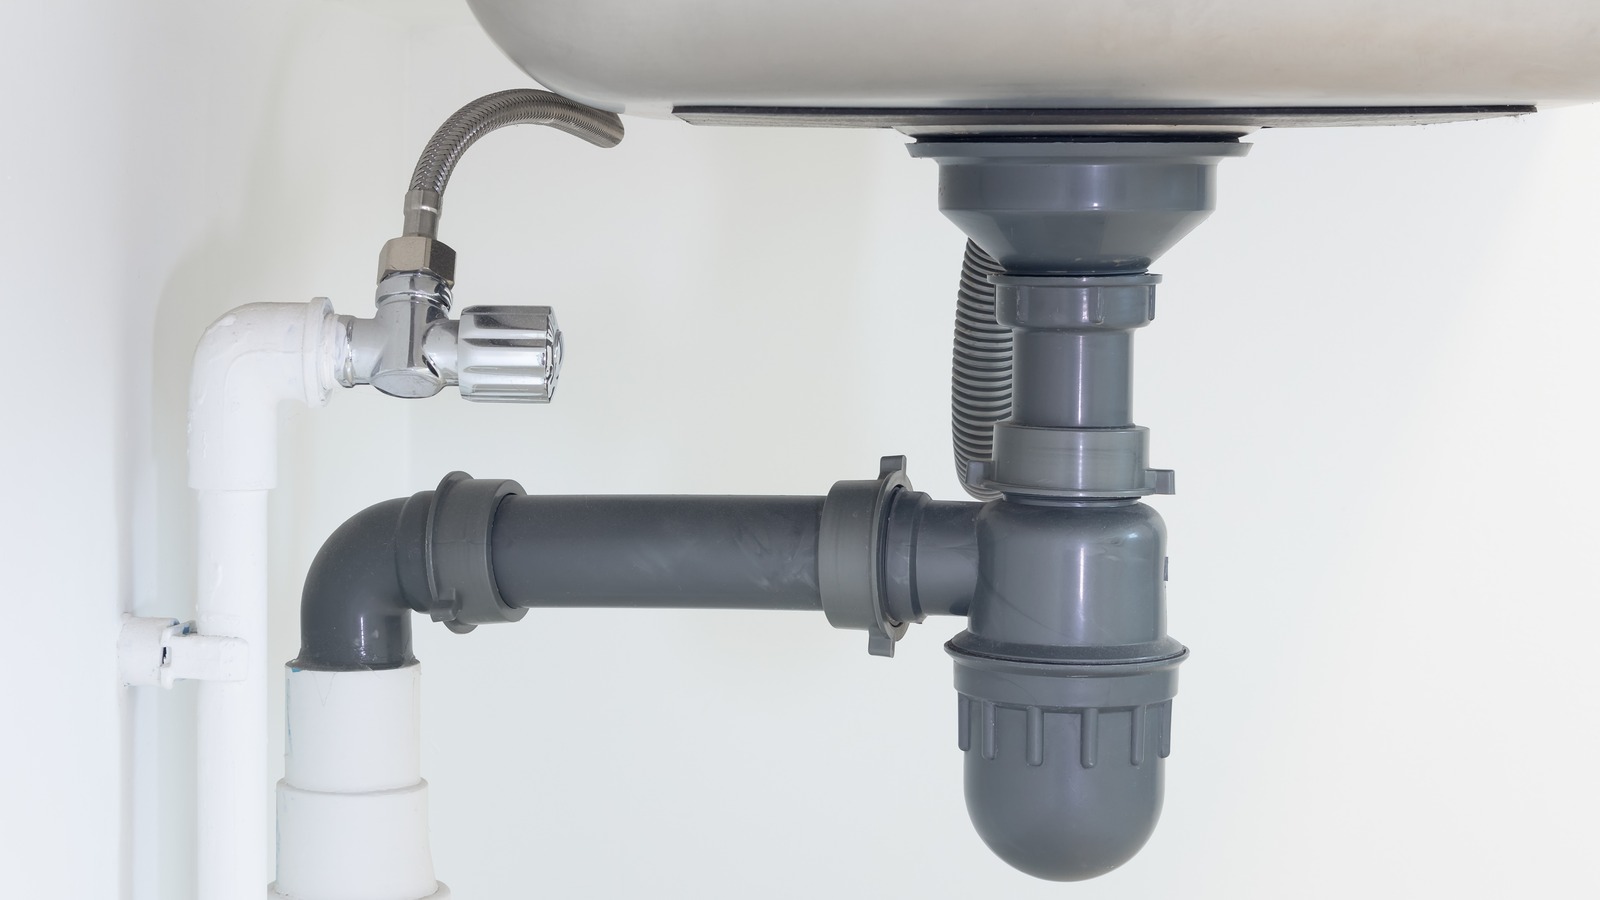
5. Install the P-trap assembly: The P-trap is a curved pipe that prevents unpleasant odors from entering your kitchen. Install the P-trap assembly between the sink’s tailpieces and the wall or floor drain. Secure the connections with slip nuts and washers and ensure the P-trap forms a gentle curve.
6. Check for leaks: Turn on the water supply and let the water flow through the drain lines. Inspect all the connections carefully for any signs of leaks. If you notice any leaks, tighten the slip nuts slightly until the leak stops.
By installing the new drain lines properly, you are ensuring that your double sink will have a reliable and efficient plumbing system. Now that the drain lines are in place, you can move on to the next step: connecting the garbage disposal unit.
When installing a double kitchen sink with a disposal and dishwasher, make sure to properly connect the drain lines and ensure that the disposal and dishwasher are properly vented to prevent any drainage issues.
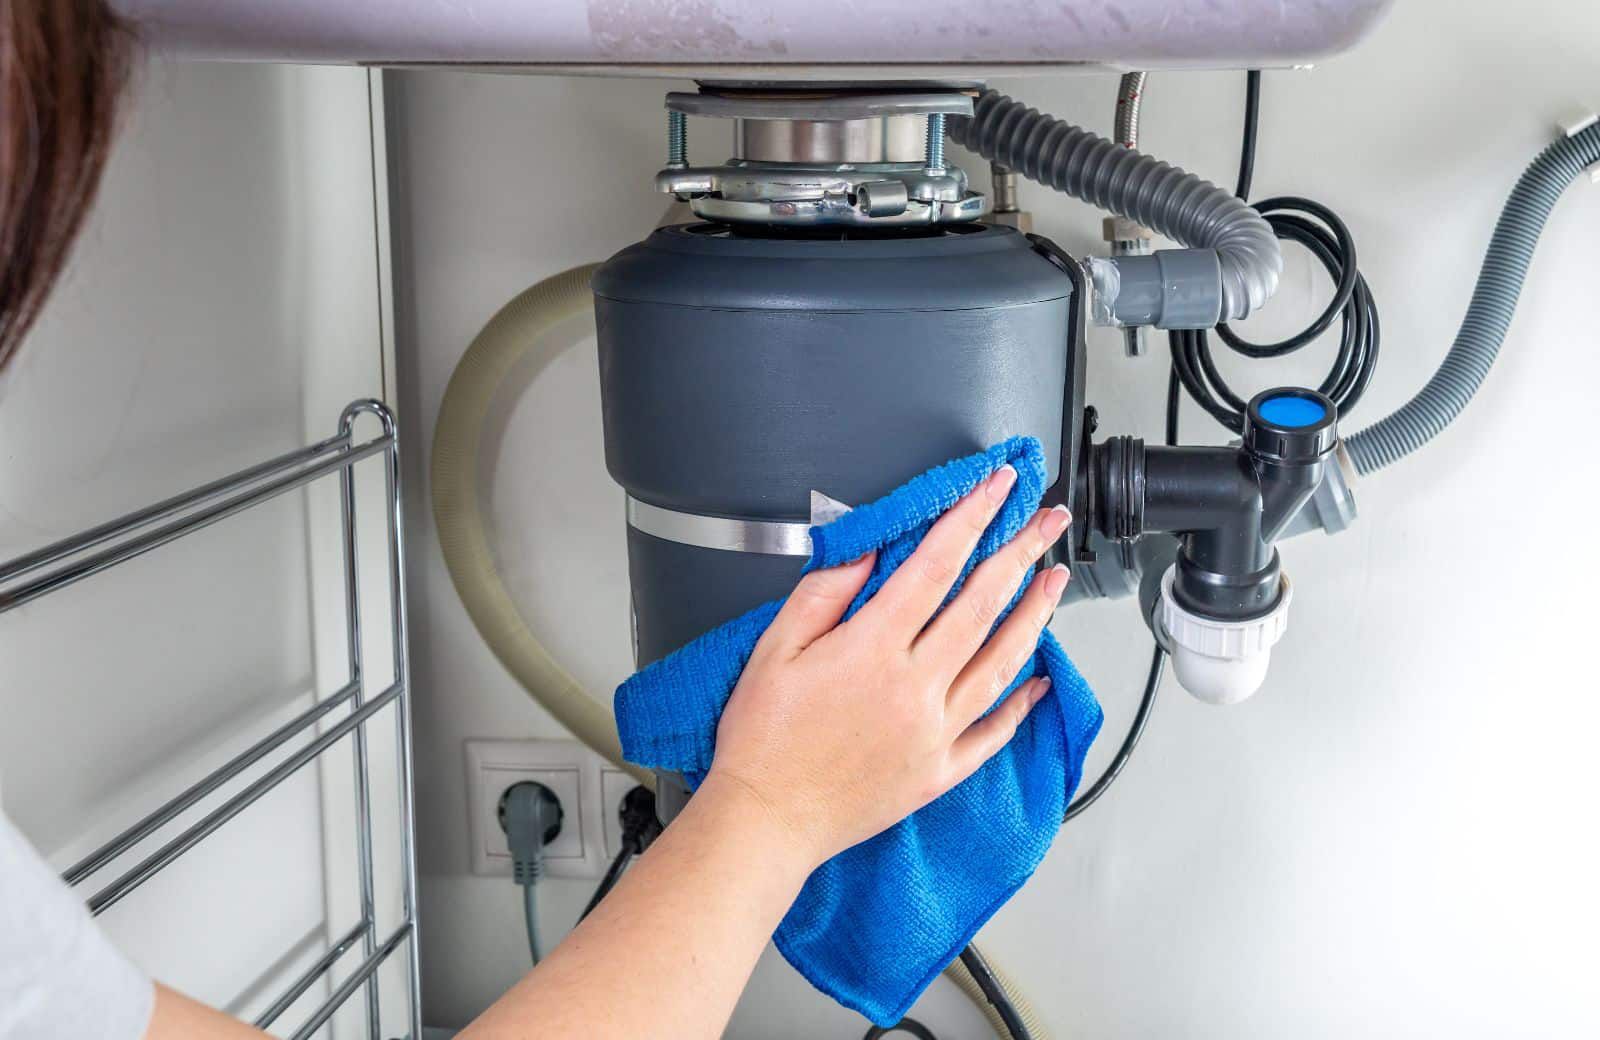
Step 5: Connect the garbage disposal unit
If your double kitchen sink includes a garbage disposal unit, it’s time to connect it to the newly installed drain lines. Follow these steps to properly connect the garbage disposal:
1. Prepare the garbage disposal unit: Before installation, make sure the power to the garbage disposal unit is turned off. Follow the manufacturer’s instructions to remove any packing materials or protective covers from the unit, exposing the mounting hardware and the discharge outlet.
2. Mount the disposal unit: Align the mounting ring on the bottom of the disposal unit with the mounting assembly installed on the sink. Twist the disposal unit clockwise until it locks into place. Refer to the manufacturer’s instructions for any specific details regarding the mounting process.
3. Connect the discharge tube: Locate the discharge outlet on the disposal unit. Attach the discharge tube to the outlet, ensuring a secure fit. Use a locking ring or a hose clamp, depending on the type of connection provided by the manufacturer. Tighten the connection with the appropriate tool.
4. Connect the disposal to the P-trap: Connect the other end of the discharge tube to the P-trap assembly. Slide the tube into the P-trap’s inlet, ensuring a snug fit. Use a locking ring or a hose clamp to secure the connection.
5. Test for leaks and functionality: Turn on the water supply and run water through the disposal unit. Check the connections between the disposal, the drain lines, and the P-trap for any leaks. If you notice any leaks, carefully tighten the connections until the leaks stop. Once everything is secure and leak-free, turn on the power to the disposal unit and test its functionality by running the unit and checking for proper drainage.
Connecting the garbage disposal unit is a crucial step in plumbing a double kitchen sink. By following these steps carefully, you can ensure that the disposal unit is working efficiently and seamlessly integrated with the plumbing system. Now, let’s move on to the next step: connecting the dishwasher drain line.
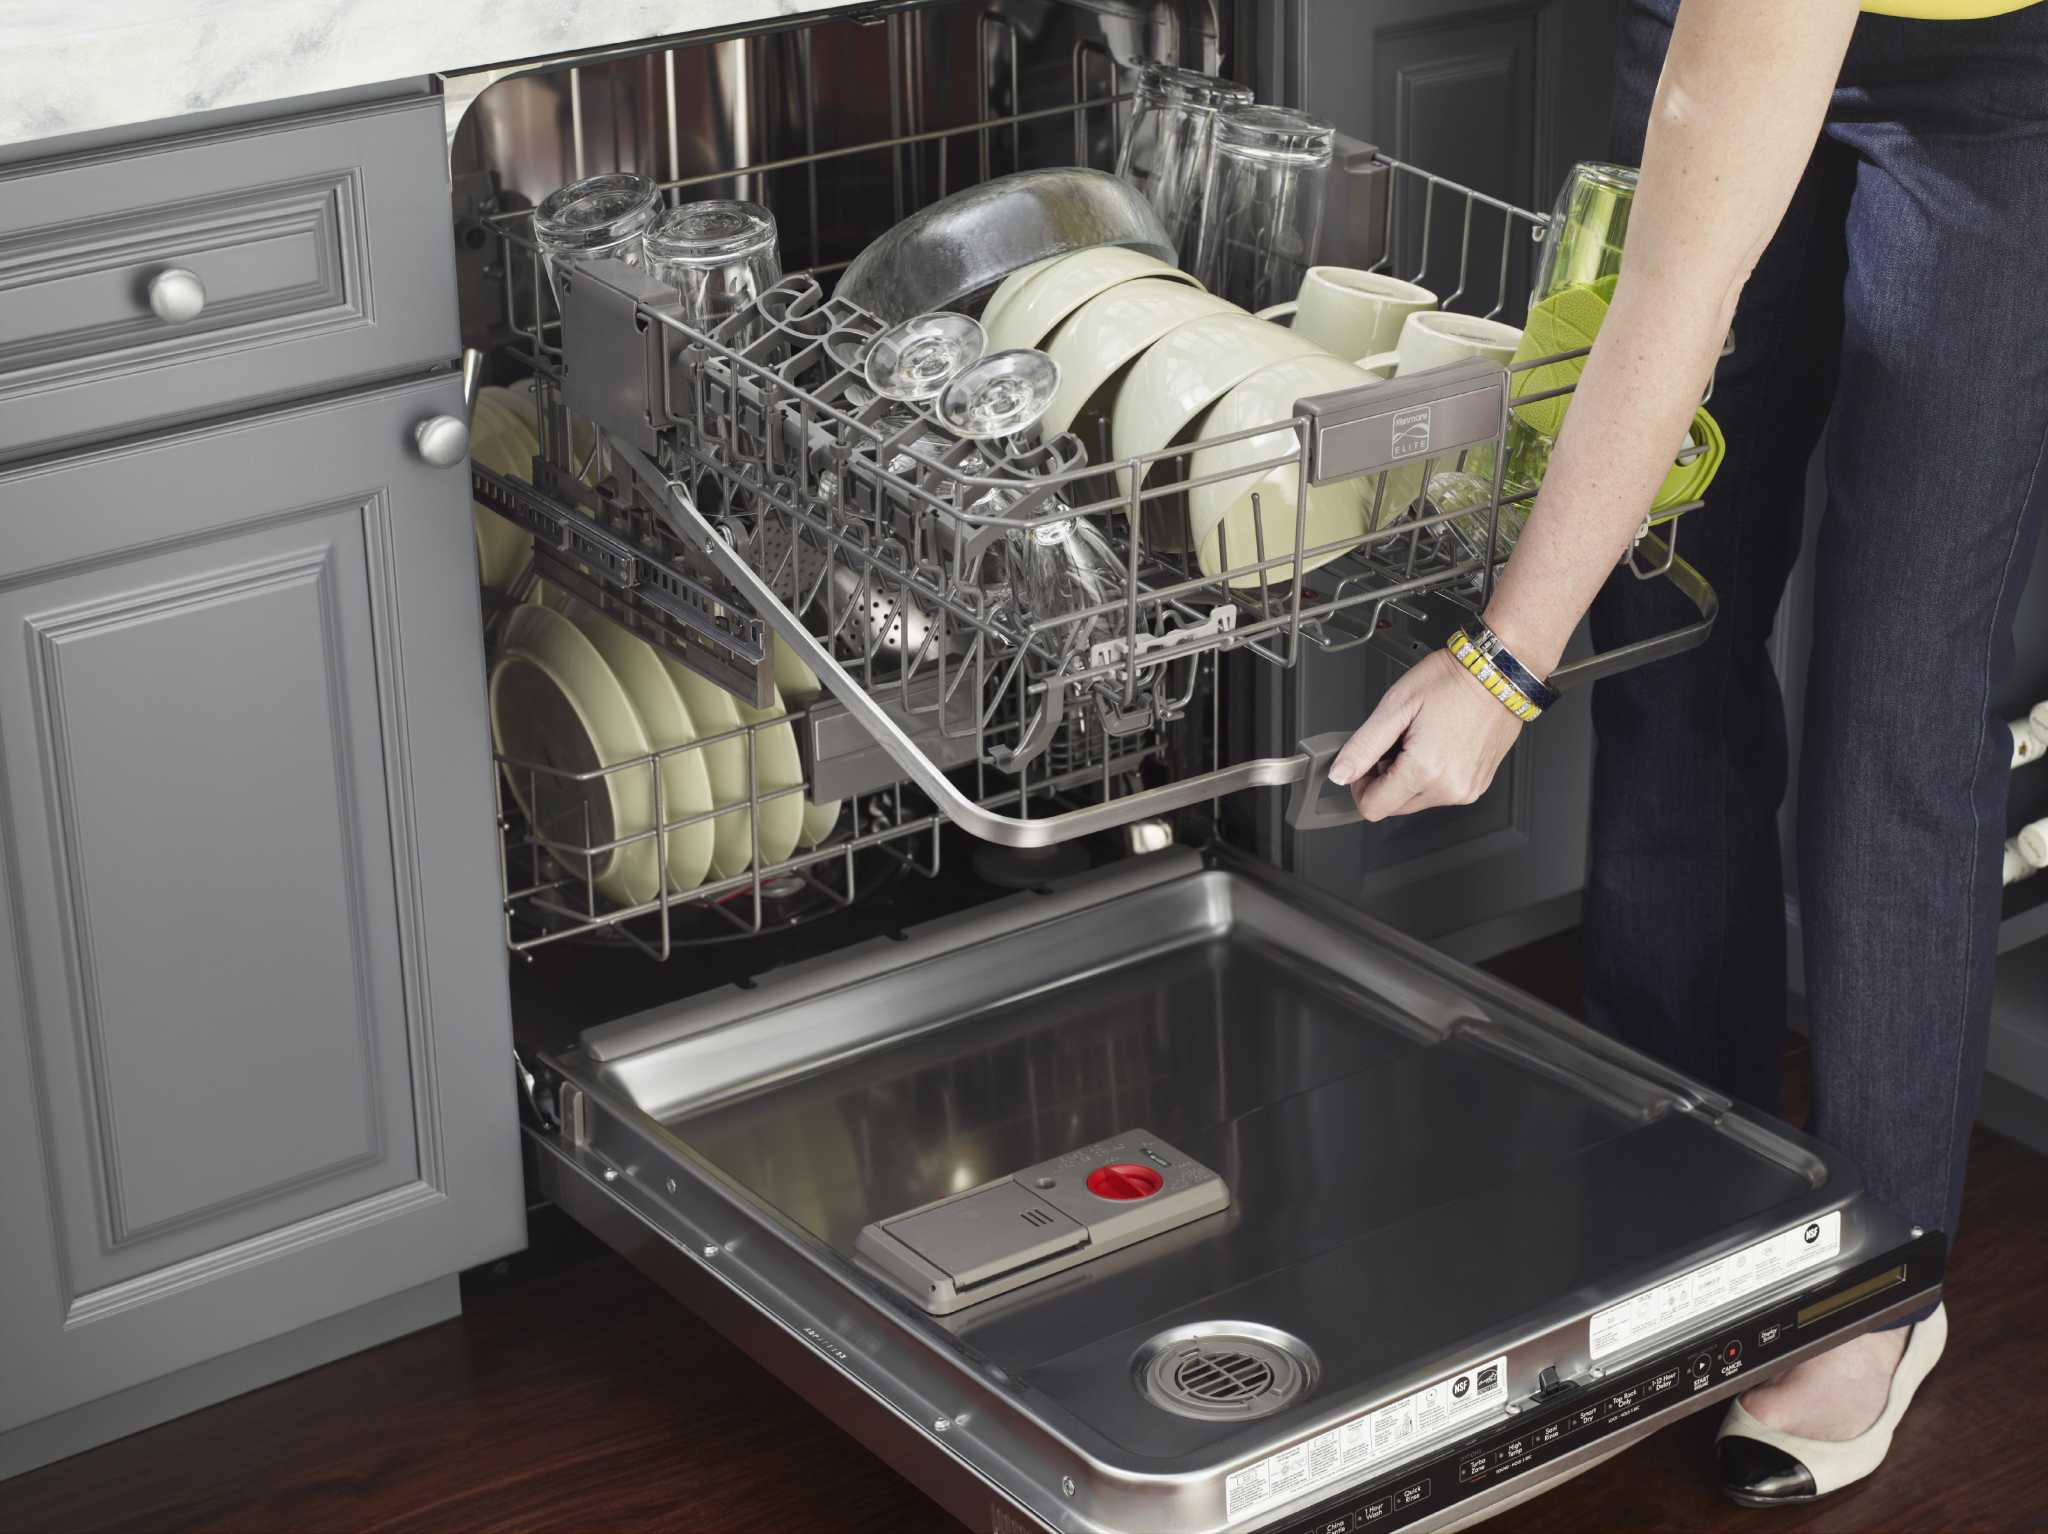
Step 6: Connect the dishwasher drain line
If you have a dishwasher that needs to be connected to the double kitchen sink, it’s important to properly connect the dishwasher drain line to ensure proper drainage. Here’s how to do it:
1. Locate the dishwasher drain line: Take a look under your kitchen sink and locate the dishwasher drain line. It is typically a flexible hose that connects the dishwasher to the sink’s drain system. If you don’t see the drain line, it might be tucked away behind the dishwasher or cabinets.
2. Prepare the dishwasher drain line: If the dishwasher drain line is not already connected to the sink’s drain system, you will need to remove the plug or cap from the sink’s disposal unit. This plug is specifically designed for dishwasher connections and needs to be removed for proper drainage.
3. Connect the dishwasher drain line: Insert one end of the dishwasher drain line onto the outlet of the dishwasher. It may require a clamp or a compression fitting to secure the connection. Make sure it fits tightly and securely.
4. Connect the other end to the sink’s drain system: Attach the other end of the dishwasher drain line to the sink’s drain system. This can be done by inserting it into the disposal unit’s dishwasher inlet or connecting it to a separate branch of the drain system dedicated to the dishwasher. Again, ensure a secure and tight connection.
5. Test for leaks and functionality: Once the connections are made, it’s essential to test for leaks and ensure proper functionality. Run your dishwasher and observe if there are any leaks or standing water. Make sure the water is draining out of the sink properly without any backups or clogs.
By connecting the dishwasher drain line properly, you are ensuring that your dishwasher can effectively drain without any issues. This step completes the installation process of your double kitchen sink with a disposal and dishwasher. However, before wrapping up, let’s move on to the next step: testing the plumbing connections.
Step 7: Test the plumbing connections
Now that you have successfully installed the new drain lines, connected the garbage disposal unit, and attached the dishwasher drain line, it’s time to test the plumbing connections to ensure everything is working properly. Here’s how you can do that:
1. Turn on the water supply: Start by turning on the main water supply to allow water to flow through the plumbing system. Check for any leaks or drips around the newly installed drain lines, connections, and fittings. If you notice any leaks, tighten the slip nuts slightly until the leak stops.
2. Run water through the sink: Turn on the faucets of both sinks in your double kitchen sink. Let the water run for a few minutes and observe if it drains properly. Check for any slow draining or backups. Ensure that the water flows smoothly without any obstructions.
3. Test the garbage disposal: Run water through the disposal unit and turn it on to check its functionality. Make sure that the disposal efficiently grinds and disposes of food waste without any unusual noises or jams. If you encounter any issues, refer to the manufacturer’s instructions for troubleshooting or consult a professional plumber if needed.
4. Run the dishwasher: Start the dishwasher and let it complete a full cycle. Observe if the water drains properly without any backups or overflows. Check under the sink for any leaks or drips from the dishwasher drain line or connections. Ensure that the dishwasher operates smoothly and efficiently.
5. Check for odors and leaks: After running water through the sink and dishwasher, check for any unpleasant odors or noticeable leaks. If you detect any foul smells, there could be an issue with the P-trap or a possible blockage in the drain system. If you find any leaks, identify the source and tighten the connections as necessary.
Testing the plumbing connections ensures that your double kitchen sink with a disposal and dishwasher is functioning as it should. It allows you to address any potential issues before they become major problems and ensures the proper operation of your plumbing system. Continue to the final step to make any necessary adjustments or tighten any loose connections.
Step 8: Adjust and tighten any loose connections
In the final step of plumbing a double kitchen sink with a disposal and dishwasher, it’s important to thoroughly inspect the newly installed plumbing connections and make any necessary adjustments or tighten any loose connections. Follow these steps to ensure all connections are secure:
1. Inspect all connections: Carefully examine each connection point, including the drain pipes, the garbage disposal unit, and the dishwasher drain line. Look for any signs of leaks, loose fittings, or gaps between the pipes and connections. It’s essential to address any issues promptly to avoid potential water damage or plumbing problems in the future.
2. Tighten slip nuts: Using an adjustable wrench, gently tighten the slip nuts on all connections. Be careful not to overtighten, as it could damage the pipes or fittings. Use a firm but gentle grip to ensure the connections are snug and secure. As you tighten, check for any improvements in the stability of the connections.
3. Seal any gaps with plumber’s tape or putty: If you notice any small gaps or areas where water could potentially leak, use plumber’s tape or putty to create a watertight seal. Wrap the threads of pipes with plumber’s tape before reconnecting them, or apply plumber’s putty around the edges of fittings to seal any visible gaps. This step will help prevent leaks and maintain the integrity of the plumbing system.
4. Test the connections: After making adjustments and tightening any loose connections, retest the plumbing system by running water through the sink and dishwasher. Monitor the area for any signs of leaks or drips. If you notice any issues, revisit the specific connection point and retry the tightening process. It may take a few adjustments until all connections are properly secured.
5. Ensure smooth operation: As you run water through the sink and dishwasher, pay attention to the functionality of the plumbing system. Make sure water drains freely without any backups or slow draining. Verify that the garbage disposal unit operates smoothly and efficiently without any unusual noises or jams.
By adjusting and tightening any loose connections, you are ensuring the long-term stability and efficiency of your plumbing system. Regularly inspecting and maintaining the connections will help minimize the risk of leaks, clogs, and other plumbing issues.
With the completion of this step, and the entire process of plumbing a double kitchen sink with a disposal and dishwasher, you can now enjoy your fully functional and well-plumbed kitchen sink. Remember to follow any manufacturer’s guidelines for maintenance and care to keep your plumbing system in excellent condition for years to come.
Read more: How To Disconnect Sink Plumbing
Conclusion
Plumbing a double kitchen sink with a disposal and dishwasher may seem like a complex task, but with the right tools, materials, and guidance, it can be accomplished successfully. By following the step-by-step process outlined in this article, you can confidently tackle this project and enjoy the benefits of a properly functioning kitchen plumbing system.
Throughout the process, we covered essential steps such as gathering the necessary tools and materials, shutting off the water supply, removing the old plumbing, installing the new drain lines, connecting the garbage disposal unit, attaching the dishwasher drain line, testing the plumbing connections, and adjusting and tightening any loose connections.
Remember, safety should always be a priority when working on any plumbing project. Use protective gear, such as safety goggles and gloves, and take extra caution when using tools or working with water-related systems.
Regular maintenance and upkeep of your plumbing system are essential to ensuring its longevity and efficiency. Periodically inspect the connections for any signs of leaks, tighten any loose fittings, and address any issues promptly. This will help prevent water damage and potential plumbing problems down the line.
If you ever feel unsure or overwhelmed, it’s always a good idea to consult a professional plumber who can provide expert advice and assistance. They can provide additional guidance and ensure that everything is correctly installed to avoid any future complications.
By successfully plumbing a double kitchen sink with a disposal and dishwasher, you’re not only enhancing the functionality of your kitchen but also increasing its convenience and efficiency. Proper drainage and a well-designed plumbing system will make your everyday kitchen tasks more enjoyable and hassle-free.
So, with the knowledge you’ve gained from this article, it’s time to roll up your sleeves and take on this plumbing project with confidence. Enjoy the benefits of a well-plumbed double kitchen sink and make your kitchen experience even more delightful!
Ready to tackle more DIY projects around your home? If you're planning to expand your living space outdoors, our guide on outdoor kitchen setup will walk you through the essentials of setting up an efficient outdoor kitchen. Meanwhile, for those looking to ensure their indoor kitchen's efficiency, our detailed instructions on proper dishwasher setup will help you install an air gap for your dishwasher seamlessly. Dive into these articles for practical advice and easy-to-follow steps that will elevate your home improvement skills.
Frequently Asked Questions about How To Plumb A Double Kitchen Sink With Disposal And Dishwasher
Was this page helpful?
At Storables.com, we guarantee accurate and reliable information. Our content, validated by Expert Board Contributors, is crafted following stringent Editorial Policies. We're committed to providing you with well-researched, expert-backed insights for all your informational needs.


0 thoughts on “How To Plumb A Double Kitchen Sink With Disposal And Dishwasher”