
Articles
How To Install A Sink Disposal
Modified: August 27, 2024
Learn how to easily install a sink disposal with our step-by-step articles. Improve your kitchen functionality and keep your pipes clear!
(Many of the links in this article redirect to a specific reviewed product. Your purchase of these products through affiliate links helps to generate commission for Storables.com, at no extra cost. Learn more)
Introduction
Installing a sink disposal can greatly enhance the functionality and convenience of your kitchen. A sink disposal, also known as a garbage disposal, is a device that is installed beneath your kitchen sink and used to shred food waste into small particles that can easily pass through the plumbing system. This not only helps to reduce the amount of food waste that goes into the trash, but it also prevents unpleasant odors and clogged drains.
In this article, we will guide you through the step-by-step process of installing a sink disposal. Whether you are replacing an existing disposal or installing a new one, this comprehensive guide will provide you with all the information you need to complete the installation successfully.
Before we dive into the installation process, it’s important to mention that working with plumbing systems can be complex and should be handled with care. If you don’t feel confident in your abilities or if you encounter any difficulties during the installation, it’s always best to consult a professional plumber for assistance.
Now, let’s gather the necessary tools and materials for the installation process.
Key Takeaways:
- Installing a sink disposal can greatly enhance kitchen functionality by reducing food waste and preventing unpleasant odors and clogged drains. Proper preparation, assembly, and testing are crucial for a successful installation.
- Prioritize safety and seek professional assistance if needed when installing a sink disposal. Once installed, enjoy the convenience of efficient food waste disposal while ensuring responsible usage and regular maintenance for long-term benefits.
Step 1: Gather the necessary tools and materials
Before you begin the installation process, it’s essential to have all the necessary tools and materials on hand. By gathering everything you need upfront, you can streamline the installation and avoid any unnecessary delays or trips to the hardware store.
Here is a list of tools and materials you will need:
- Sink disposal unit
- Plumber’s putty
- Discharge tube and elbow
- Power cord (if not included with disposal unit)
- Adjustable wrench or channel locks
- Screwdriver
- Hacksaw or pipe cutter
- Teflon tape
- Bucket or container
- Rags or towels
- Plastic bag or tarp (to protect the cabinet floor)
It’s important to note that different sink disposals may require specific tools and materials. Be sure to refer to the manufacturer’s instructions that come with your specific disposal unit to ensure you have all the necessary components.
Once you have gathered all the tools and materials, move on to the next step: preparing the area for installation.
Step 2: Prepare the area
Preparing the area before installing a sink disposal is crucial to ensure a smooth and efficient installation process. By taking the time to prepare properly, you can minimize any potential damage to surrounding fixtures and surfaces.
Follow these steps to prepare the area:
- Clear out the space under the sink: Remove any items stored under the sink and set them aside in a safe place. This will give you ample space to work and prevents any potential obstructions.
- Turn off the power: Locate the circuit breaker that controls the power to the kitchen and switch it off. This will ensure your safety while working with electrical components.
- Turn off the water supply: Locate the shut-off valves underneath the sink and turn them clockwise to shut off the water supply. This will prevent any water leakage while the installation is in progress.
- Place a plastic bag or tarp on the cabinet floor: To protect the cabinet floor from any water or debris, place a plastic bag or tarp underneath the sink. This will make the cleanup process much easier.
Once you have prepared the area, move on to the next step: disconnecting the old disposal (if applicable).
Step 3: Disconnect the old disposal (if applicable)
If you are replacing an existing sink disposal, you will need to disconnect it before installing the new one. It’s important to follow proper procedures to ensure a safe and smooth removal process.
Follow these steps to disconnect the old disposal:
- Turn off the power: Before starting any work, ensure that the power to the disposal unit is turned off. Locate the circuit breaker that controls the disposal and switch it off.
- Disconnect the drain pipe: Using an adjustable wrench or channel locks, carefully loosen the slip nuts connecting the drain pipe to the disposal unit. Place a bucket or container under the pipe to catch any water or debris that may come out.
- Disconnect the power cord: If your old disposal unit is wired with a power cord, locate the connection point where it is connected to the electrical supply. Carefully disconnect the wires, ensuring that they are no longer connected to a power source.
- Remove the disposal unit: Once the drain pipe and power cord are disconnected, you can remove the old disposal unit. Carefully unscrew the mounting bracket or locking ring that secures the disposal to the sink flange. Gently lower the unit and set it aside.
- Clean the sink flange: With the old disposal unit removed, take a moment to clean the sink flange and surrounding area. Remove any old plumber’s putty or debris to ensure a clean surface for the new installation.
After completing these steps, you are now ready to move on to the next step: assembling the new sink disposal.
Step 4: Assemble the new sink disposal
Now that you’ve successfully disconnected the old sink disposal, it’s time to assemble the new one. This step is crucial to ensure that all components are properly connected and the disposal functions optimally.
Follow these steps to assemble the new sink disposal:
- Read the manufacturer’s instructions: Before proceeding, carefully read the instructions provided by the manufacturer. Different disposal units may have specific assembly instructions that you need to follow.
- Apply plumber’s putty: Take a small amount of plumber’s putty and roll it into a thin rope-like shape. Place the putty around the sink flange, ensuring that it is evenly distributed. This will help to create a watertight seal when the disposal is installed.
- Attach the mounting bracket or locking ring: Depending on the type of disposal unit you have, you will either use a mounting bracket or a locking ring to secure the unit to the sink flange. Follow the manufacturer’s instructions to properly attach the bracket or ring.
- Connect the power cord: If your disposal unit does not come with a pre-attached power cord, you will need to connect it. Strip the wires at the end of the power cord and connect them to the corresponding wires in the disposal unit. Use wire nuts to secure the connections.
- Attach the discharge tube: Take the discharge tube and attach it to the disposal unit, using the provided gasket or rubber seal to create a tight connection. The tube should be securely fastened to the disposal unit and positioned in a way that allows for easy connection to the drain pipe.
Once you have assembled the new sink disposal, you are now ready to move on to the next step: mounting the disposal unit under the sink.
Read more: How To Fix A Sink Disposal
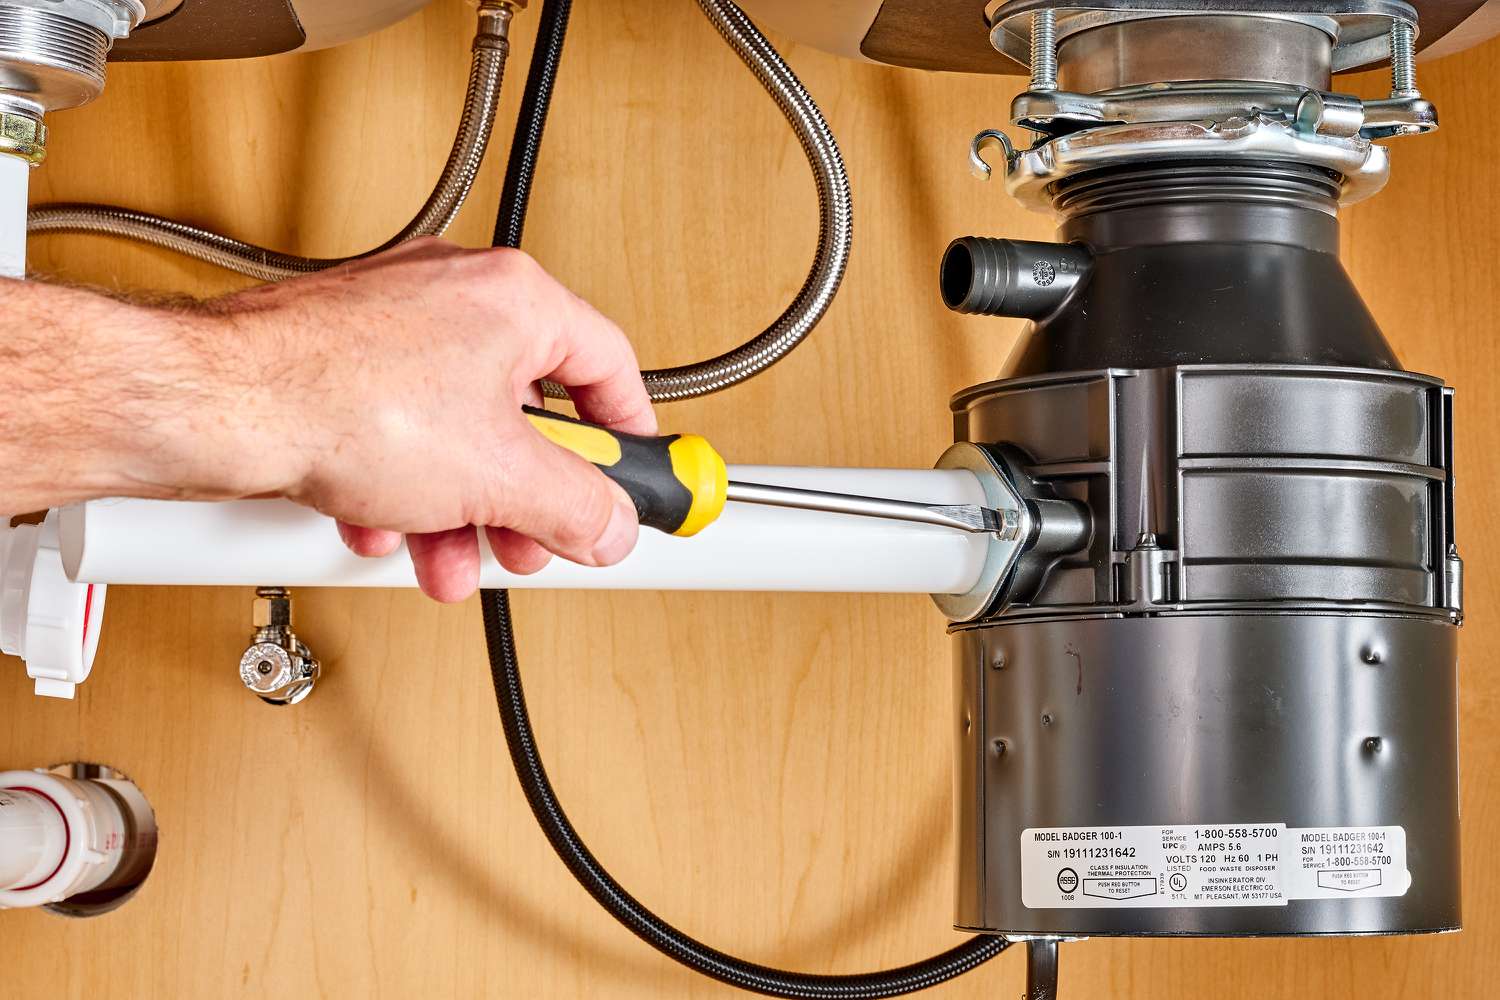
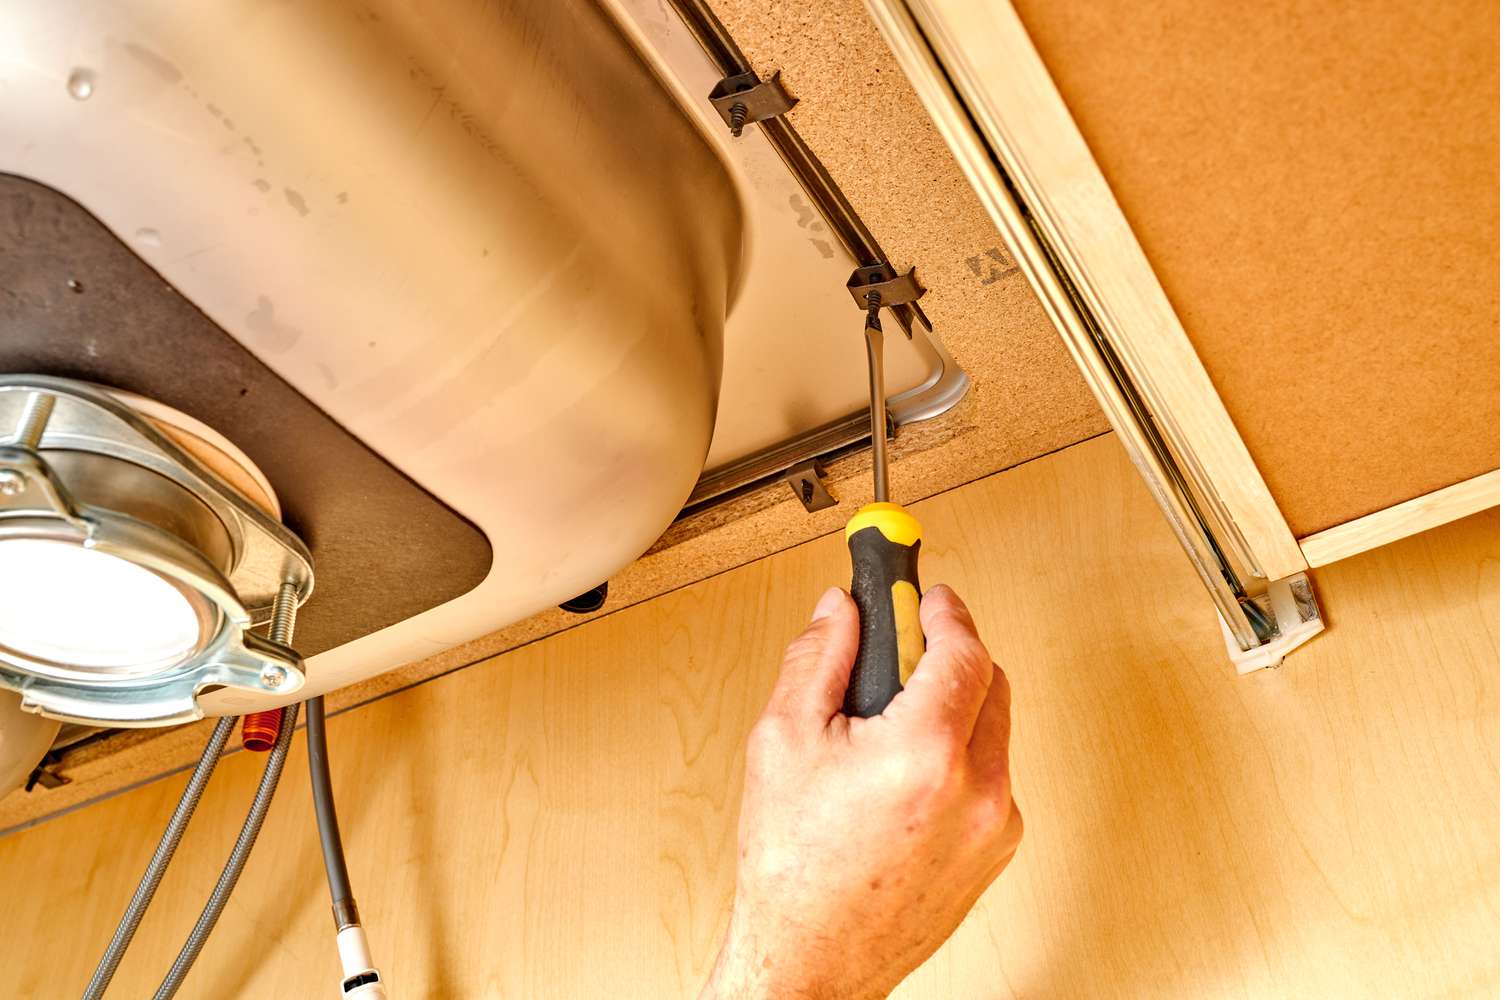
Step 5: Mount the disposal unit under the sink
In this step, you will mount the newly assembled sink disposal unit under the sink. Proper mounting is crucial to ensure stability and prevent any leaks or malfunctions.
Follow these steps to mount the disposal unit under the sink:
- Align the disposal unit: Carefully position the disposal unit so that it is aligned with the sink flange. Ensure that the mounting bracket or locking ring is properly fitted and secure.
- Tighten the mounting bracket or locking ring: Depending on the type of disposal unit, use an adjustable wrench or a specific tool provided by the manufacturer to tighten the mounting bracket or locking ring. Make sure it is securely fastened to hold the disposal unit in place.
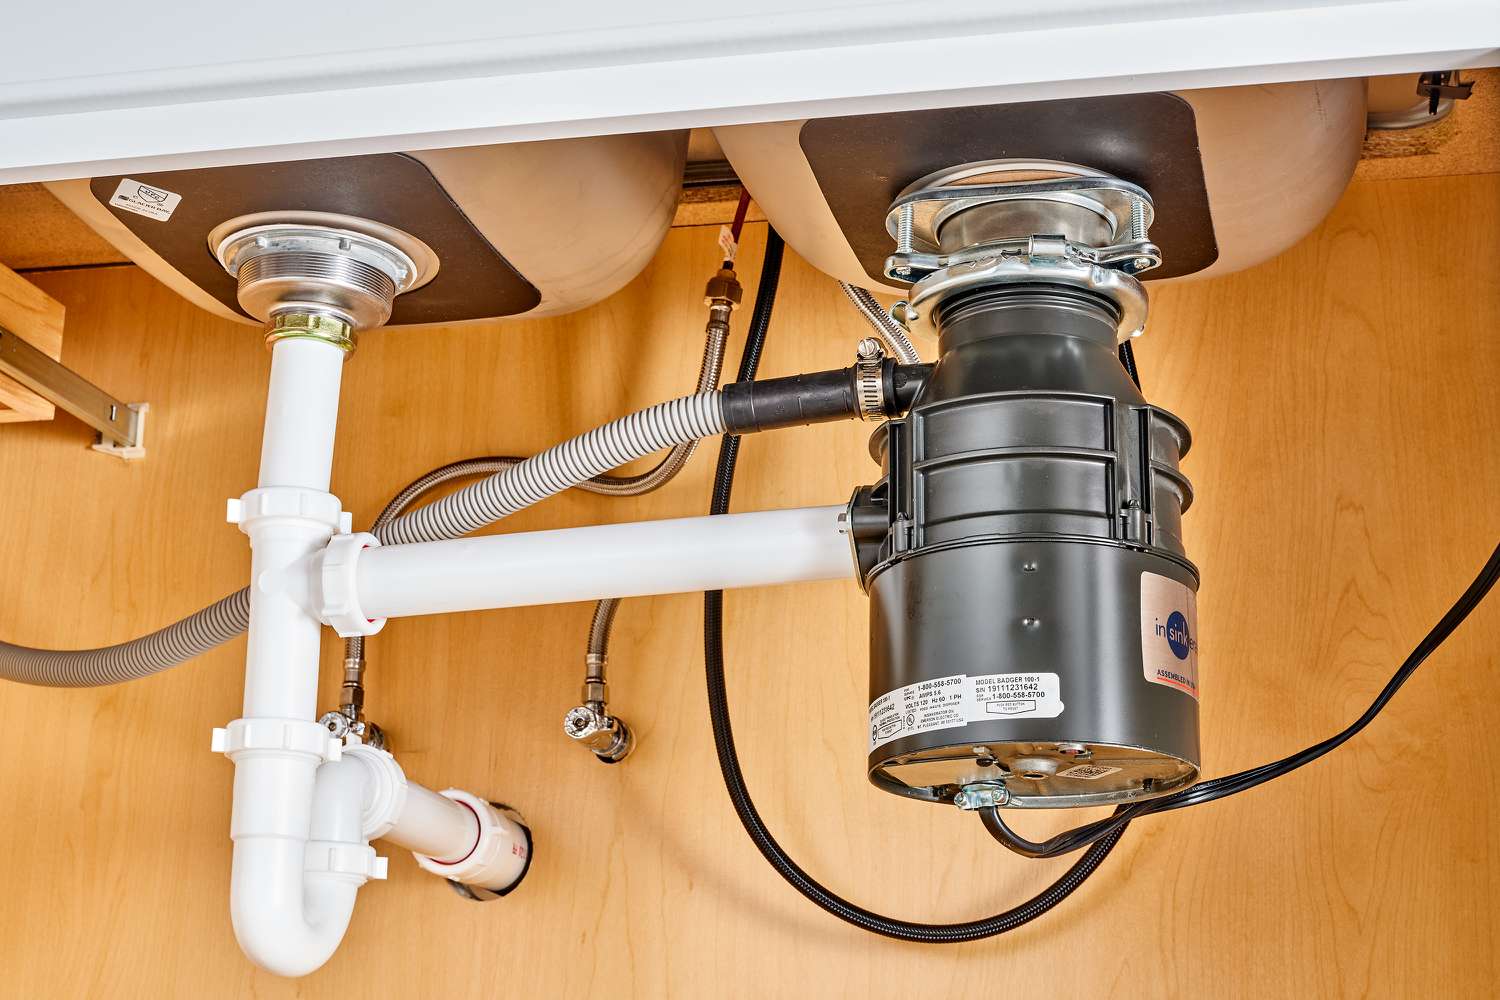
- Connect the discharge tube: Attach the discharge tube from the disposal unit to the drain pipe using the provided gasket or rubber seal. Ensure that it is properly aligned and tightened to prevent any leaks.
- Ensure proper alignment and clearance: Check the alignment of the disposal unit with the drain pipe and the surrounding plumbing. Make any necessary adjustments to ensure proper clearance and alignment. Avoid any sharp bends or kinks in the discharge tube.
- Double-check the mounting stability: Give the disposal unit a gentle shake to ensure it is firmly mounted and stable. If it moves or feels loose, tighten the mounting bracket or locking ring further until it is secure.
Once the sink disposal unit is securely mounted under the sink, you are ready to move on to the next step: connecting the disposal to the drain pipe.
When installing a sink disposal, make sure to connect the discharge pipe to the drain trap and secure it with a slip nut and washer. This will prevent leaks and ensure proper drainage.
Step 6: Connect the disposal to the drain pipe
Now that the sink disposal unit is securely mounted, it’s time to connect it to the drain pipe. This step is essential to ensure proper waste disposal and prevent any leaks or blockages in the plumbing system.
Follow these steps to connect the disposal to the drain pipe:
- Position the disposal outlet: Locate the outlet on the disposal unit where the discharge tube connects. Position the discharge tube so that it aligns with the inlet of the drain pipe.
- Use a compression gasket or slip nut: Depending on the type of drain pipe and disposal unit you have, you will either use a compression gasket or a slip nut to connect the disposal outlet and the drain pipe. Follow the manufacturer’s instructions to ensure the proper method for your specific unit.
- Secure the connection: Tighten the compression gasket or slip nut to create a secure connection between the disposal outlet and the drain pipe. Ensure that it is evenly tightened but not over-tightened, as this can cause damage to the components.
- Check for leaks: Once the connection is made, carefully turn on the water supply and observe for any leaks or drips. If you notice any, tighten the connection further or replace any faulty gaskets or seals.
- Ensure proper alignment: Make sure that there are no sharp bends or kinks in the discharge tube. The alignment between the disposal unit and the drain pipe should be straight and allow for a smooth flow of waste.
Once you have successfully connected the disposal to the drain pipe, you are now ready to move on to the next step: testing the disposal.
Step 7: Test the disposal
After successfully connecting the disposal to the drain pipe, it’s important to test its functionality before completing the installation process. This step allows you to ensure that the disposal unit is working properly and that there are no leaks or blockages in the system.
Follow these steps to test the disposal:
- Turn on the water supply: Carefully turn on the water supply to the sink. This will allow water to flow through the disposal unit and help flush out any debris.
- Check for leaks: Monitor the connection points between the disposal unit, the drain pipe, and the sink for any signs of leaks or drips. If you notice any leaks, tighten the connections or replace any faulty gaskets or seals as necessary.
- Turn on the disposal: Flip the switch or press the button on the disposal unit to turn it on. You should hear the motor running, indicating that the unit is functioning properly.
- Feed small food scraps: Gradually feed small food scraps into the disposal unit while it is running. Ensure that the water is running continuously to help flush the waste. Pay attention to how effectively the disposal shreds and disposes of the food scraps.
- Observe drainage: Watch the water drain from the sink to ensure that there are no clogs or slow drainage issues. If you notice any problems, stop the disposal unit and check the drain pipe for any obstructions.
If the disposal unit operates smoothly without any leaks or drainage issues, you can conclude that the installation was successful. However, if you encounter any problems during the testing process, double-check the connections and consult the manufacturer’s instructions or seek professional assistance if needed.
Once you are satisfied with the performance of the disposal unit, move on to the next step: securing all connections.
Step 8: Secure all connections
Once you have tested the disposal unit and ensured its proper functionality, it’s important to secure all connections to prevent any future issues such as leaks or disconnections. This step will help maintain the efficiency and reliability of your sink disposal.
Follow these steps to secure all connections:
- Tighten any loose connections: Carefully check all the connections, including the disposal unit, the drain pipe, and the sink flange. Use an adjustable wrench or channel locks to tighten any loose or wobbly connections.
- Apply Teflon tape (if needed): If any threaded connections are present, such as on the drain pipe, wrap Teflon tape around the threads before reattaching the components. This will create a tight seal and prevent any potential leaks.
- Ensure proper alignment: Verify that the disposal unit and the drain pipe are aligned correctly, without any sharp bends or kinks in the pipes. This will ensure smooth water flow and efficient waste disposal.
- Double-check for leaks: Turn on the water supply and observe all connections for any signs of leaks or drips. If you notice any leaks, tighten the connections further or replace any faulty gaskets or seals.
- Inspect the electrical connections: If your disposal unit is wired with a power cord, ensure that the electrical connections are secure and protected. Use wire nuts to secure the wires and ensure they are connected properly.
By securing all connections, you can prevent potential issues and prolong the lifespan of your sink disposal. This step adds a final layer of assurance to the installation process.
Once you have completed securing all connections, it’s time to move on to the final step: cleaning up and performing a final check.
Step 9: Clean up and final check
As you near the end of the sink disposal installation process, it’s important to clean up the work area and perform a final check to ensure everything is in proper order. This step adds the finishing touches to your installation and ensures that everything is operating smoothly.
Follow these steps to clean up and perform a final check:
- Clean up any debris: Remove any tools, equipment, or debris from under the sink. Wipe down the area with a rag or towel to remove any water or residue.
- Check for any loose objects: Inspect the area under the sink to ensure that there are no loose objects that could interfere with the proper functioning of the disposal unit or cause any potential hazards.
- Turn on the disposal: Switch on the disposal unit and let it run for a few moments. Listen for any unusual sounds or vibrations that could indicate a problem. If you notice any abnormalities, turn off the disposal and address the issue before proceeding.
- Verify proper drainage: Fill the sink with water and let it drain while the disposal unit is running. Observe the water flow to ensure there are no clogs or slow drainage issues. If necessary, use a plunger or a drain cleaner to clear any blockages.
- Perform a final leak check: Once again, inspect all connections, including the disposal unit, drain pipe, and sink flange, for any signs of leaks or drips. Tighten any connections that appear loose and address any leaks promptly.
By cleaning up the area and performing a final check, you can ensure that the sink disposal installation has been successfully completed and is functioning as intended.
Congratulations! You have now successfully installed a sink disposal. Enjoy the convenience and efficiency it brings to your kitchen.
If you encounter any issues or are unsure about any aspect of the installation process, it’s always advisable to consult a professional plumber for assistance.
Now that you have completed the installation, you can confidently dispose of food waste with ease, knowing that your sink disposal is installed correctly.
Conclusion
Installing a sink disposal can greatly improve the functionality and convenience of your kitchen. By following the step-by-step instructions in this guide, you can successfully install a sink disposal unit and enjoy the benefits it brings.
Throughout the installation process, it’s crucial to gather all the necessary tools and materials, prepare the area properly, and carefully connect the disposal to the drain pipe. Additionally, conducting a thorough test, securing all connections, and performing a final check are essential to ensure a successful installation and proper functioning of the unit.
Remember to always prioritize safety and seek professional assistance if needed. Working with plumbing systems can be complex, and it’s important to approach the installation process with caution.
Once your sink disposal is up and running, you can experience the convenience of disposing of food waste with ease. Not only does a sink disposal help reduce the amount of waste going into landfills, but it also eliminates odors and minimizes the risk of clogged drains.
Regular maintenance and responsible usage of your sink disposal are key to maximizing its lifespan. Avoid disposing of non-food items, fibrous foods, fats, and oils, as they can cause damage or clogs. Remember to always run water when using the disposal to ensure efficient waste disposal and prevent blockages.
By taking the time to properly install and maintain your sink disposal, you can enjoy its benefits for many years to come. Say goodbye to food waste hassles and hello to a cleaner and more efficient kitchen.
Thank you for choosing to install a sink disposal and for following this comprehensive guide. Enjoy the added convenience and environmental benefits it brings to your kitchen.
Now that you've mastered sink disposal installation, why not tackle more home improvement projects? For those eager to enhance their garage, our detailed guide on running overhead electrical wire to your garage is perfect. Ready for another upgrade in your kitchen? Check out our straightforward instructions on installing a new sink faucet. If you're feeling ambitious and crave more DIY projects, our comprehensive coverage on engaging in DIY home improvement tasks offers a variety of exciting challenges.
Frequently Asked Questions about How To Install A Sink Disposal
Was this page helpful?
At Storables.com, we guarantee accurate and reliable information. Our content, validated by Expert Board Contributors, is crafted following stringent Editorial Policies. We're committed to providing you with well-researched, expert-backed insights for all your informational needs.


0 thoughts on “How To Install A Sink Disposal”