Articles
How To Replace A Hard-Wired Smoke Detector
Modified: August 27, 2024
Learn how to replace a hard-wired smoke detector with this informative article. Follow our step-by-step guide for a hassle-free installation process.
(Many of the links in this article redirect to a specific reviewed product. Your purchase of these products through affiliate links helps to generate commission for Storables.com, at no extra cost. Learn more)
Introduction
Replacing a hard-wired smoke detector may seem like a daunting task, but with the right tools and knowledge, it can be a straightforward process. Smoke detectors are crucial for the safety of your home and loved ones, as they alert you to the presence of smoke and potential fire hazards. Over time, smoke detectors can become outdated or malfunction, requiring replacement to ensure they continue to function effectively.
In this article, we will guide you through the steps to replace a hard-wired smoke detector. Whether your old detector is malfunctioning, outdated, or you simply want to upgrade to a newer model with enhanced features, this guide will help you complete the task safely and efficiently.
Before diving into the step-by-step process, it’s essential to emphasize the significance of smoke detectors and their role in protecting your home. Smoke detectors act as an early warning system, alerting you to the presence of smoke and giving you valuable time to evacuate your house and contact emergency services. By maintaining and replacing your smoke detectors as needed, you ensure the ongoing safety of your household.
To successfully replace a hard-wired smoke detector, you’ll need a few tools and materials. First and foremost, make sure to gather a new smoke detector that is compatible with your existing wiring system. It is crucial to select a device that meets the necessary safety and regulatory standards.
In addition to the smoke detector itself, you will also need electrical tape, a flathead screwdriver, and possibly a wire stripper or pliers. It’s essential to have these tools on hand to safely and effectively complete the replacement process. Take time to gather all the necessary tools and materials before starting to save any potential frustration or delays.
Once you have all the required supplies, the next step is to turn off the power supply to the smoke detector. This precautionary measure is crucial to avoid any electrical shocks or accidents during the replacement process. It’s important to locate the correct circuit breaker and switch off the power to the smoke detector’s circuit.
Now that you have an understanding of the importance of smoke detectors and have gathered the necessary tools and materials, we can proceed to the step-by-step process of replacing a hard-wired smoke detector. Follow the subsequent steps to seamlessly replace your old smoke detector with a new one that will provide you with enhanced safety and security.
Key Takeaways:
- Prioritize safety and efficiency when replacing a hard-wired smoke detector by gathering the necessary tools, turning off the power supply, and following the step-by-step process to ensure proper functionality and environmental responsibility.
- By securely mounting and connecting the new smoke detector, testing its functionality, and disposing of the old detector responsibly, you contribute to a safer living environment and ensure ongoing protection for your home and loved ones.
Read more: How To Remove A Hard-Wired Smoke Detector
Step 1: Gather the necessary tools and materials
Before you can begin replacing a hard-wired smoke detector, it’s crucial to gather all the necessary tools and materials. Being prepared ahead of time will make the process smoother and more efficient. Here are the essential items you will need:
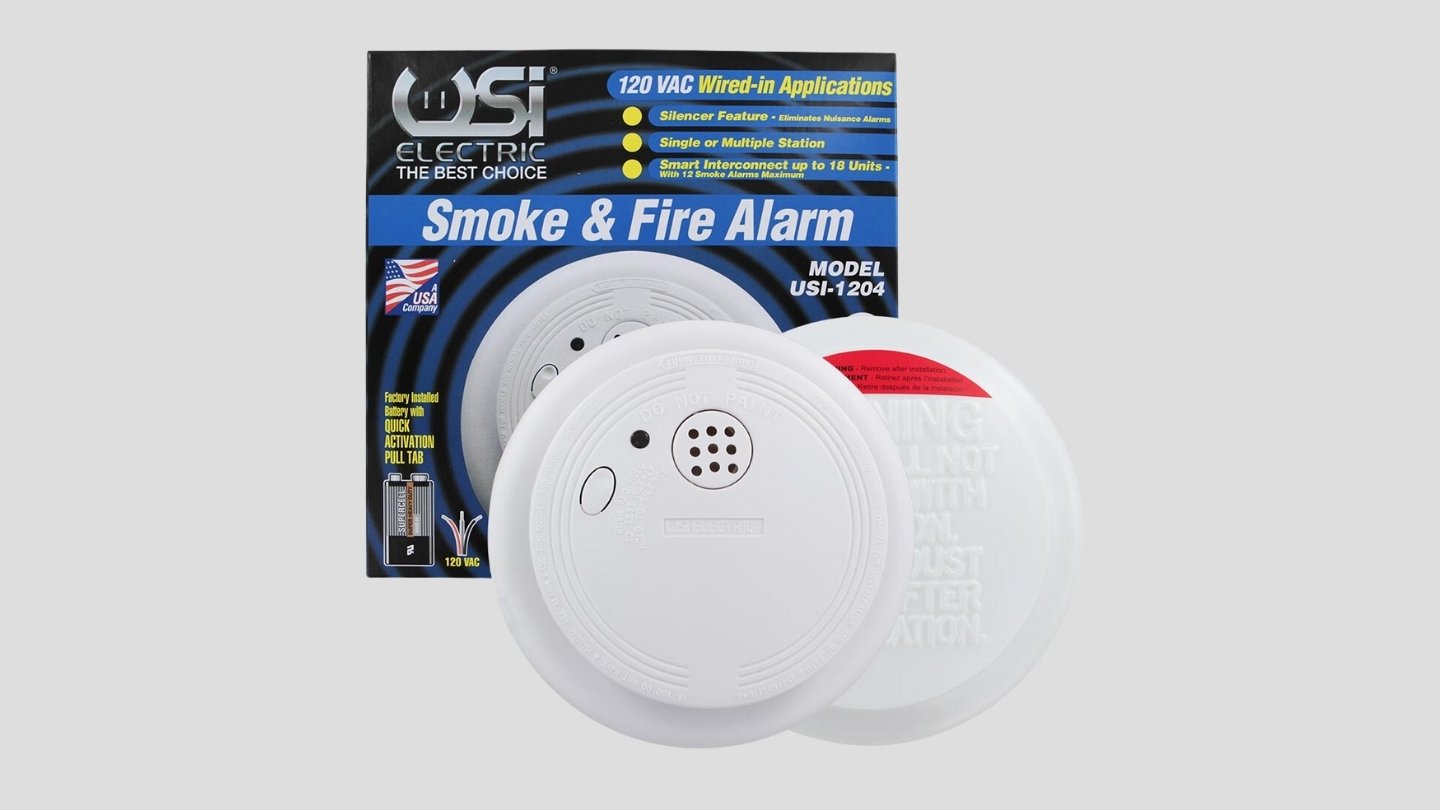
- A new smoke detector: Choose a smoke detector that is compatible with your existing wiring system. Look for a device that meets the necessary safety and regulatory standards. It’s important to select a smoke detector with features that suit your needs, such as battery backup or advanced detection capabilities.
- Electrical tape: This will be used to secure the electrical connections and provide added protection.
- A flathead screwdriver: You’ll need this tool to remove the old smoke detector from the ceiling or wall and to mount the new one.
- Wire strippers or pliers (optional): Depending on the wiring system and connections, you may need wire strippers or pliers to safely disconnect and connect the electrical wires.
By ensuring you have these tools and materials on hand, you can proceed with confidence and avoid any unnecessary delays during the replacement process.
It’s also a good idea to consult the user manual or specific instructions provided by the manufacturer for your particular smoke detector model. These instructions may include additional tools or materials that are specific to your device.
Before proceeding to the next step, take a moment to double-check that you have all the necessary items. This preparation will save you time and frustration and help ensure a successful smoke detector replacement.
Step 2: Turn off the power supply
Before you begin any electrical work, it’s essential to prioritize safety. The second step in replacing a hard-wired smoke detector is to turn off the power supply to avoid any electrical mishaps or accidents. Follow these steps to safely turn off the power:
- Locate the correct circuit breaker: In your main electrical panel, locate the circuit breaker that controls the power to the smoke detector. The breaker should be labeled, indicating which circuit it corresponds to. If it’s not labeled, you may need to identify the correct breaker through trial and error. Be sure to have a flashlight on hand in case the electrical panel area is poorly lit.
- Switch off the circuit breaker: Once you have identified the correct circuit breaker, switch it off by toggling the breaker switch to the “off” position. Typically, this is done by flipping the switch downwards or to the opposite side. It’s essential to ensure that the switch is fully in the “off” position to cut off power to the smoke detector completely.
- Verify power shutdown: To double-check that the power supply is off, try testing the old smoke detector by pressing the test button. If the detector does not activate or make any noise, it’s a good indication that the power has been successfully turned off. However, to be completely certain, you can also use a non-contact voltage tester to ensure that there is no electrical current running through the wires.
Turning off the power is a critical step to prevent electrical shocks or accidents while replacing the smoke detector. It’s important to exercise caution and follow these steps diligently. Remember to inform any household members about the planned power outage, especially if it may affect other electrical devices or appliances.
By taking the time to turn off the power properly, you ensure a safer working environment and minimize the risk of electrical injury during the replacement process.
Step 3: Remove the old smoke detector from the ceiling or wall
Now that you have turned off the power supply, it’s time to remove the old smoke detector from the ceiling or wall. Follow these steps to safely remove the old detector:
- Check for screws or snap-on cover: Inspect the edges of the smoke detector to determine if it is held in place by screws or a snap-on cover. Some detectors have visible screws that need to be removed, while others may have a cover that can be carefully pried off the base.
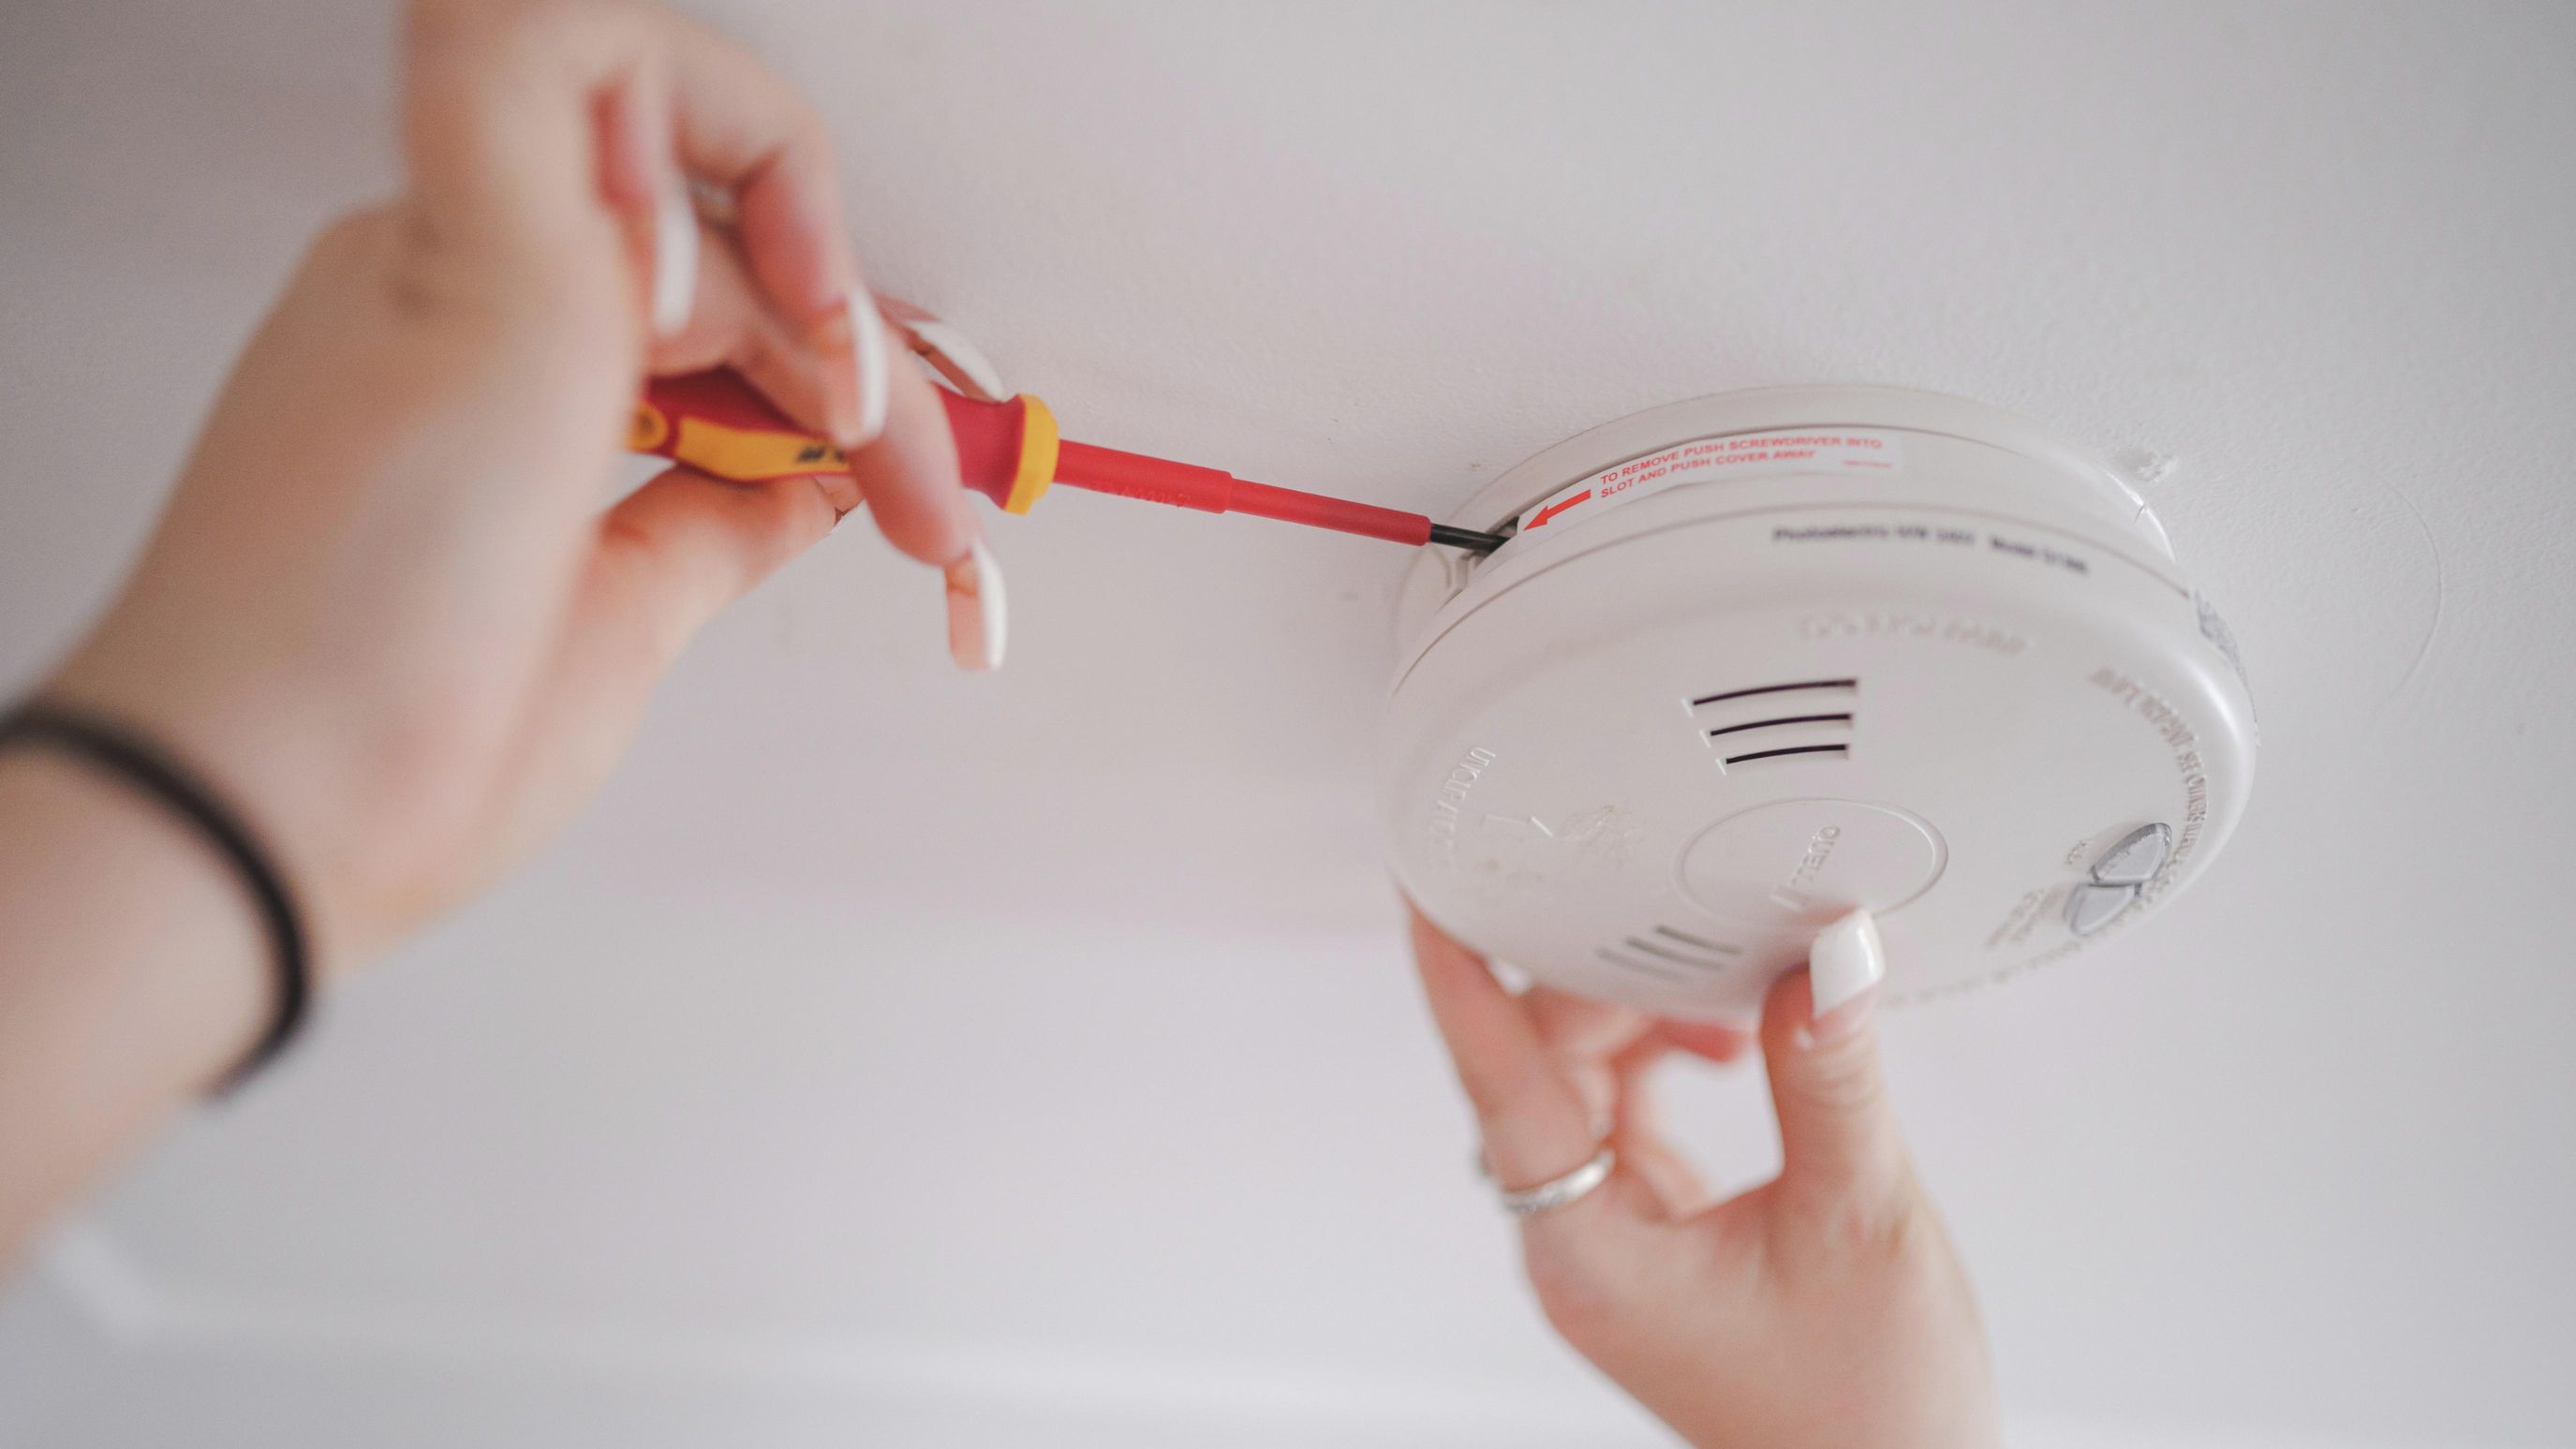
- Remove the screws or snap-on cover: If your detector has screws, use a flathead screwdriver to unscrew and remove them. Place the screws in a secure location, so they don’t get lost. If there is a snap-on cover, carefully insert a flathead screwdriver or a small tool into the gap between the cover and the base. Gently pry the cover off the base, taking care not to damage the detector or surrounding area.
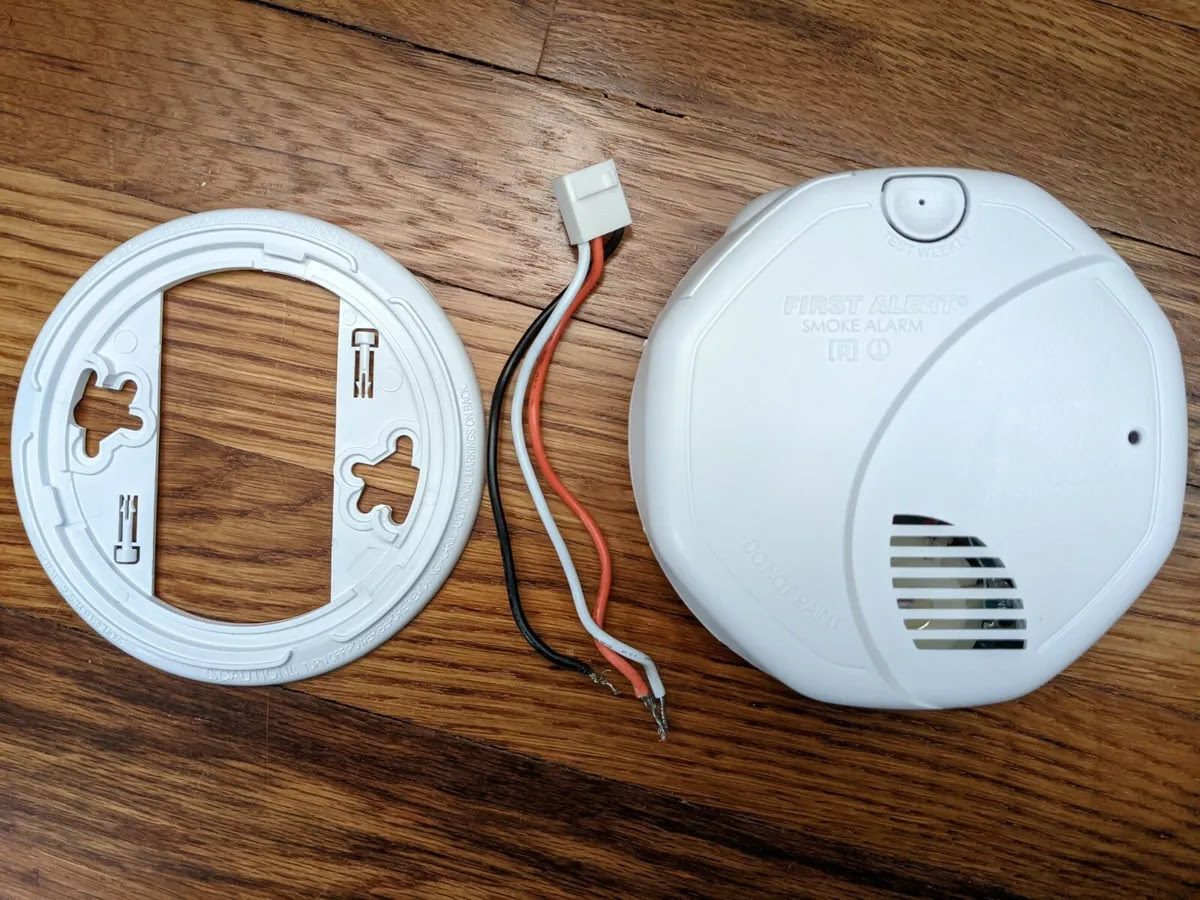
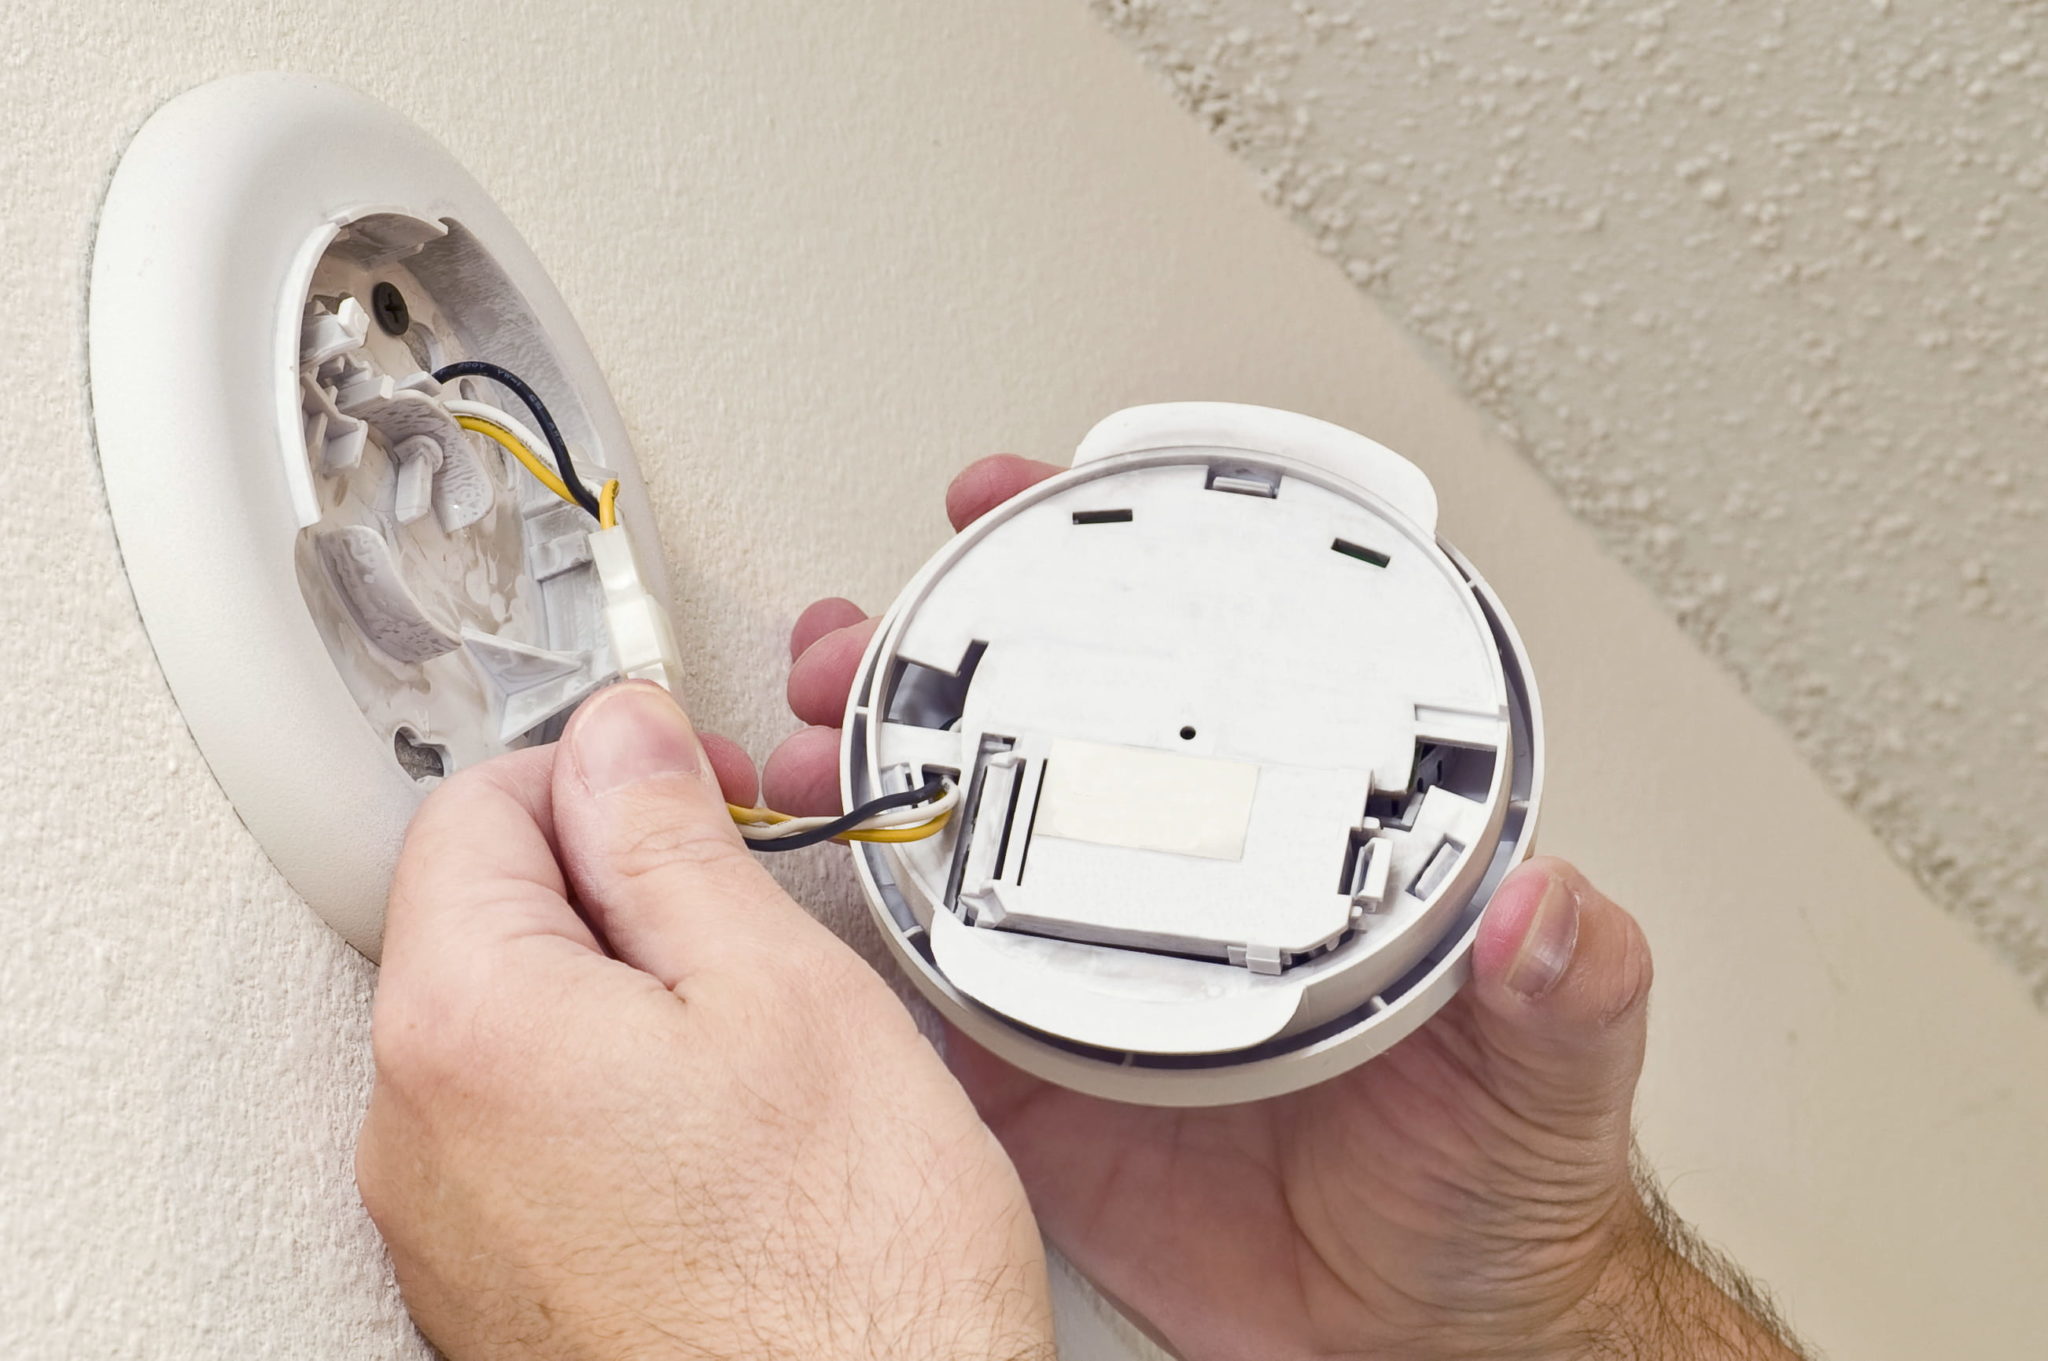
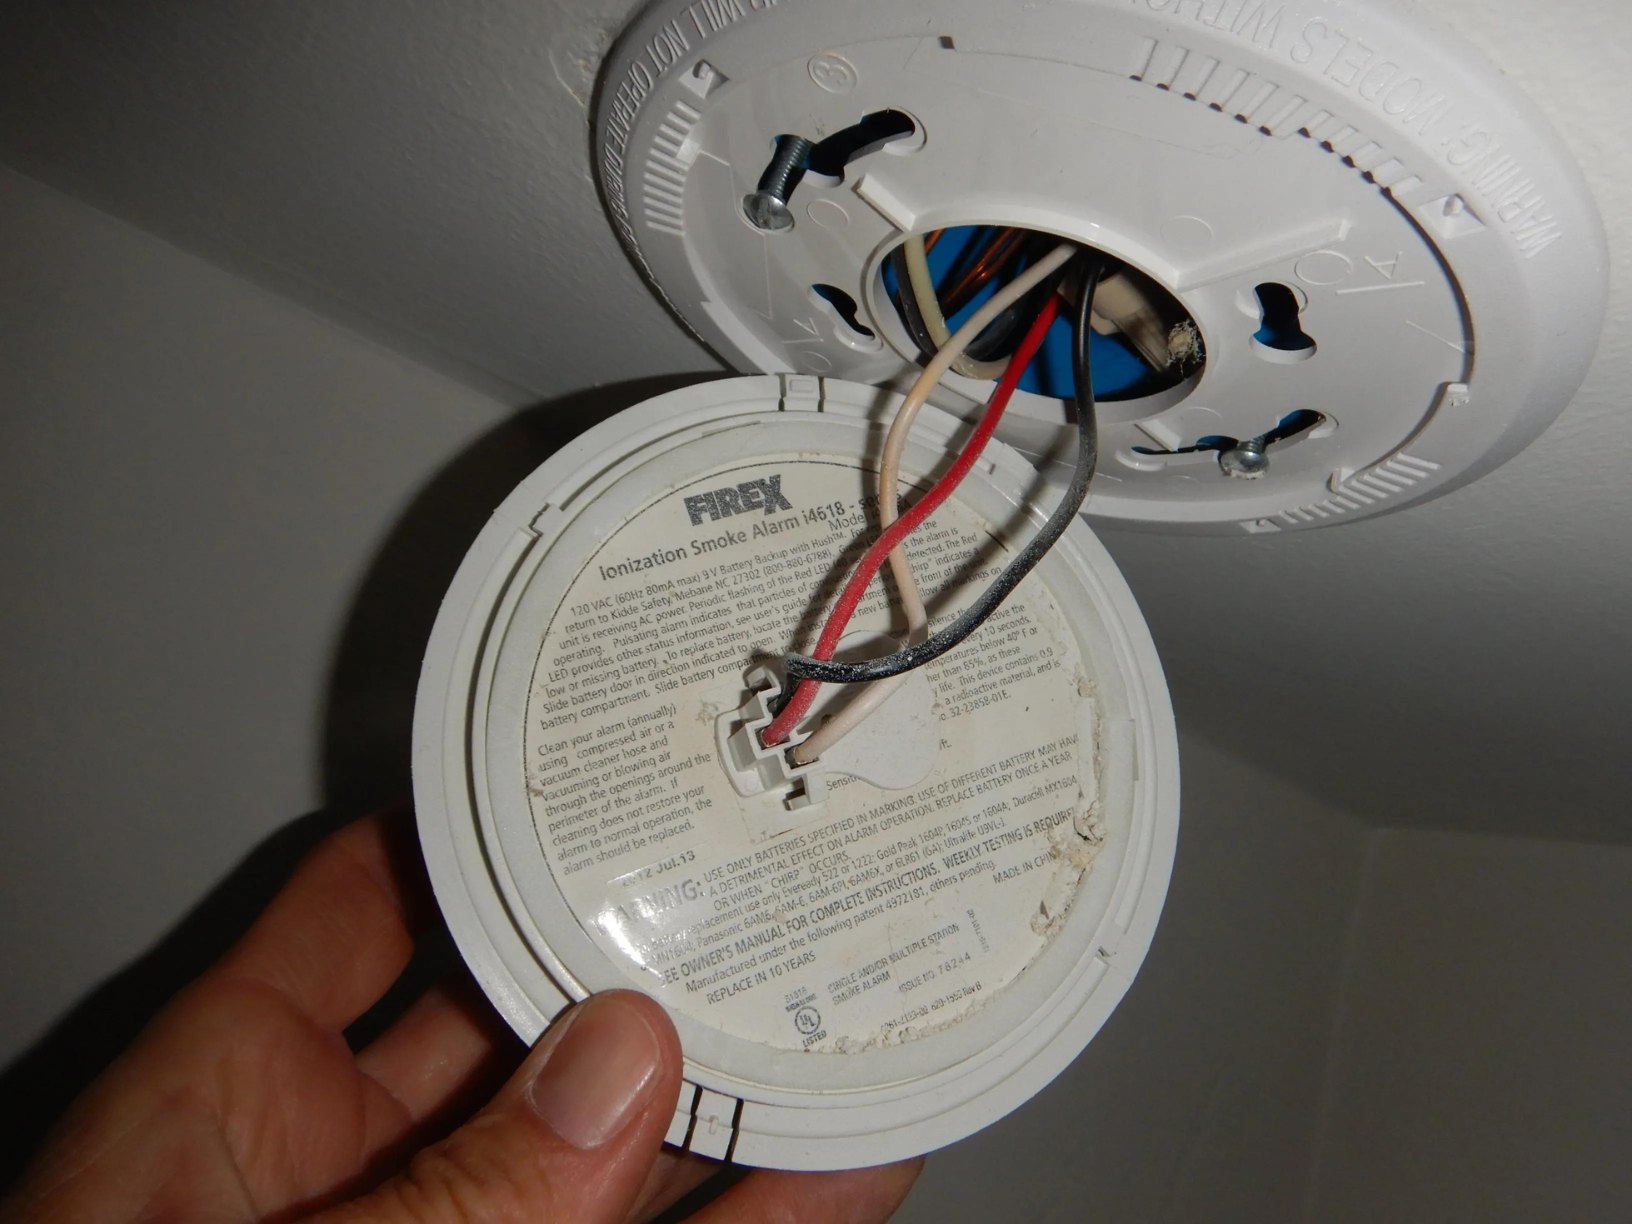
- Disconnect the electrical wires: With the cover removed, you will see the electrical wires connected to the smoke detector. Carefully loosen the wire connectors by turning them counterclockwise or pulling them apart, depending on the type of connection. If the wires are directly connected to the detector, use a screwdriver or pliers to loosen the terminals and remove the wires one by one.
- Detach the old detector from the mounting bracket: Once the electrical connections are detached, gently pull the old detector away from the mounting bracket. Be mindful of any remaining wires to avoid damaging them or causing strain.
Remember to handle the old smoke detector with care to prevent any accidental damage or mishaps. If the detector is connected to a central alarm system, be cautious not to trigger any alarms during the removal process.
Once the old smoke detector is detached from the ceiling or wall, set it aside in a safe location. Do not dispose of it with regular household waste, as it may contain hazardous materials. Check your local regulations for proper disposal methods, which often include taking it to a designated recycling center or contacting local authorities for guidance.
With the old smoke detector removed, you are now ready to move on to the next step: connecting the electrical wires to the new smoke detector.
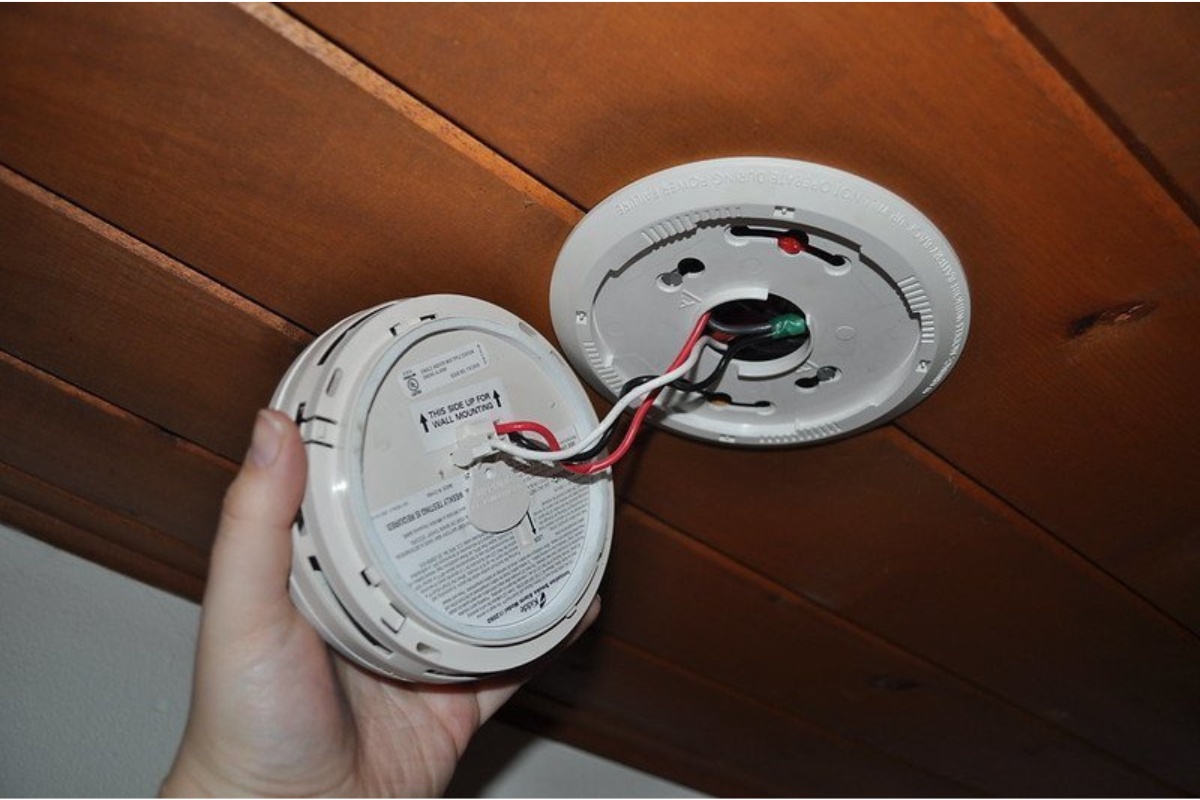
Step 4: Disconnect the electrical wires
Now that you have removed the old smoke detector, the next step is to disconnect the electrical wires from the detector. Follow these steps to safely disconnect the wires:
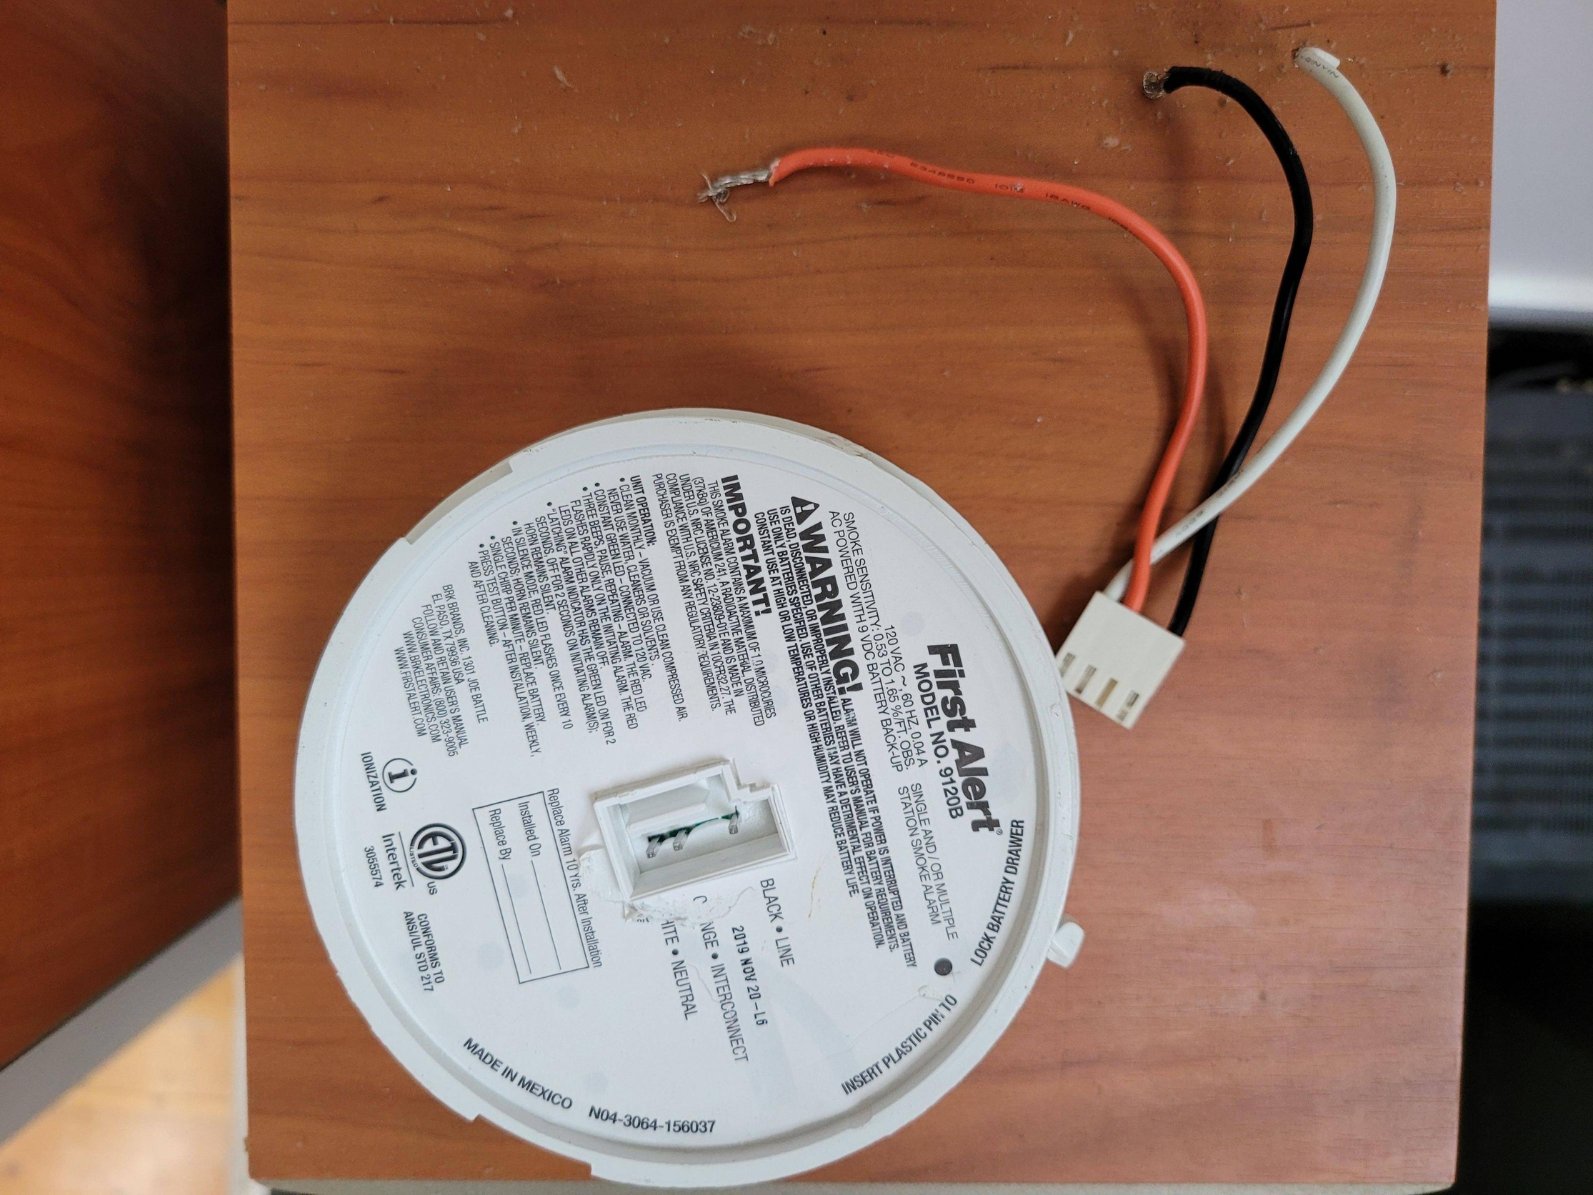
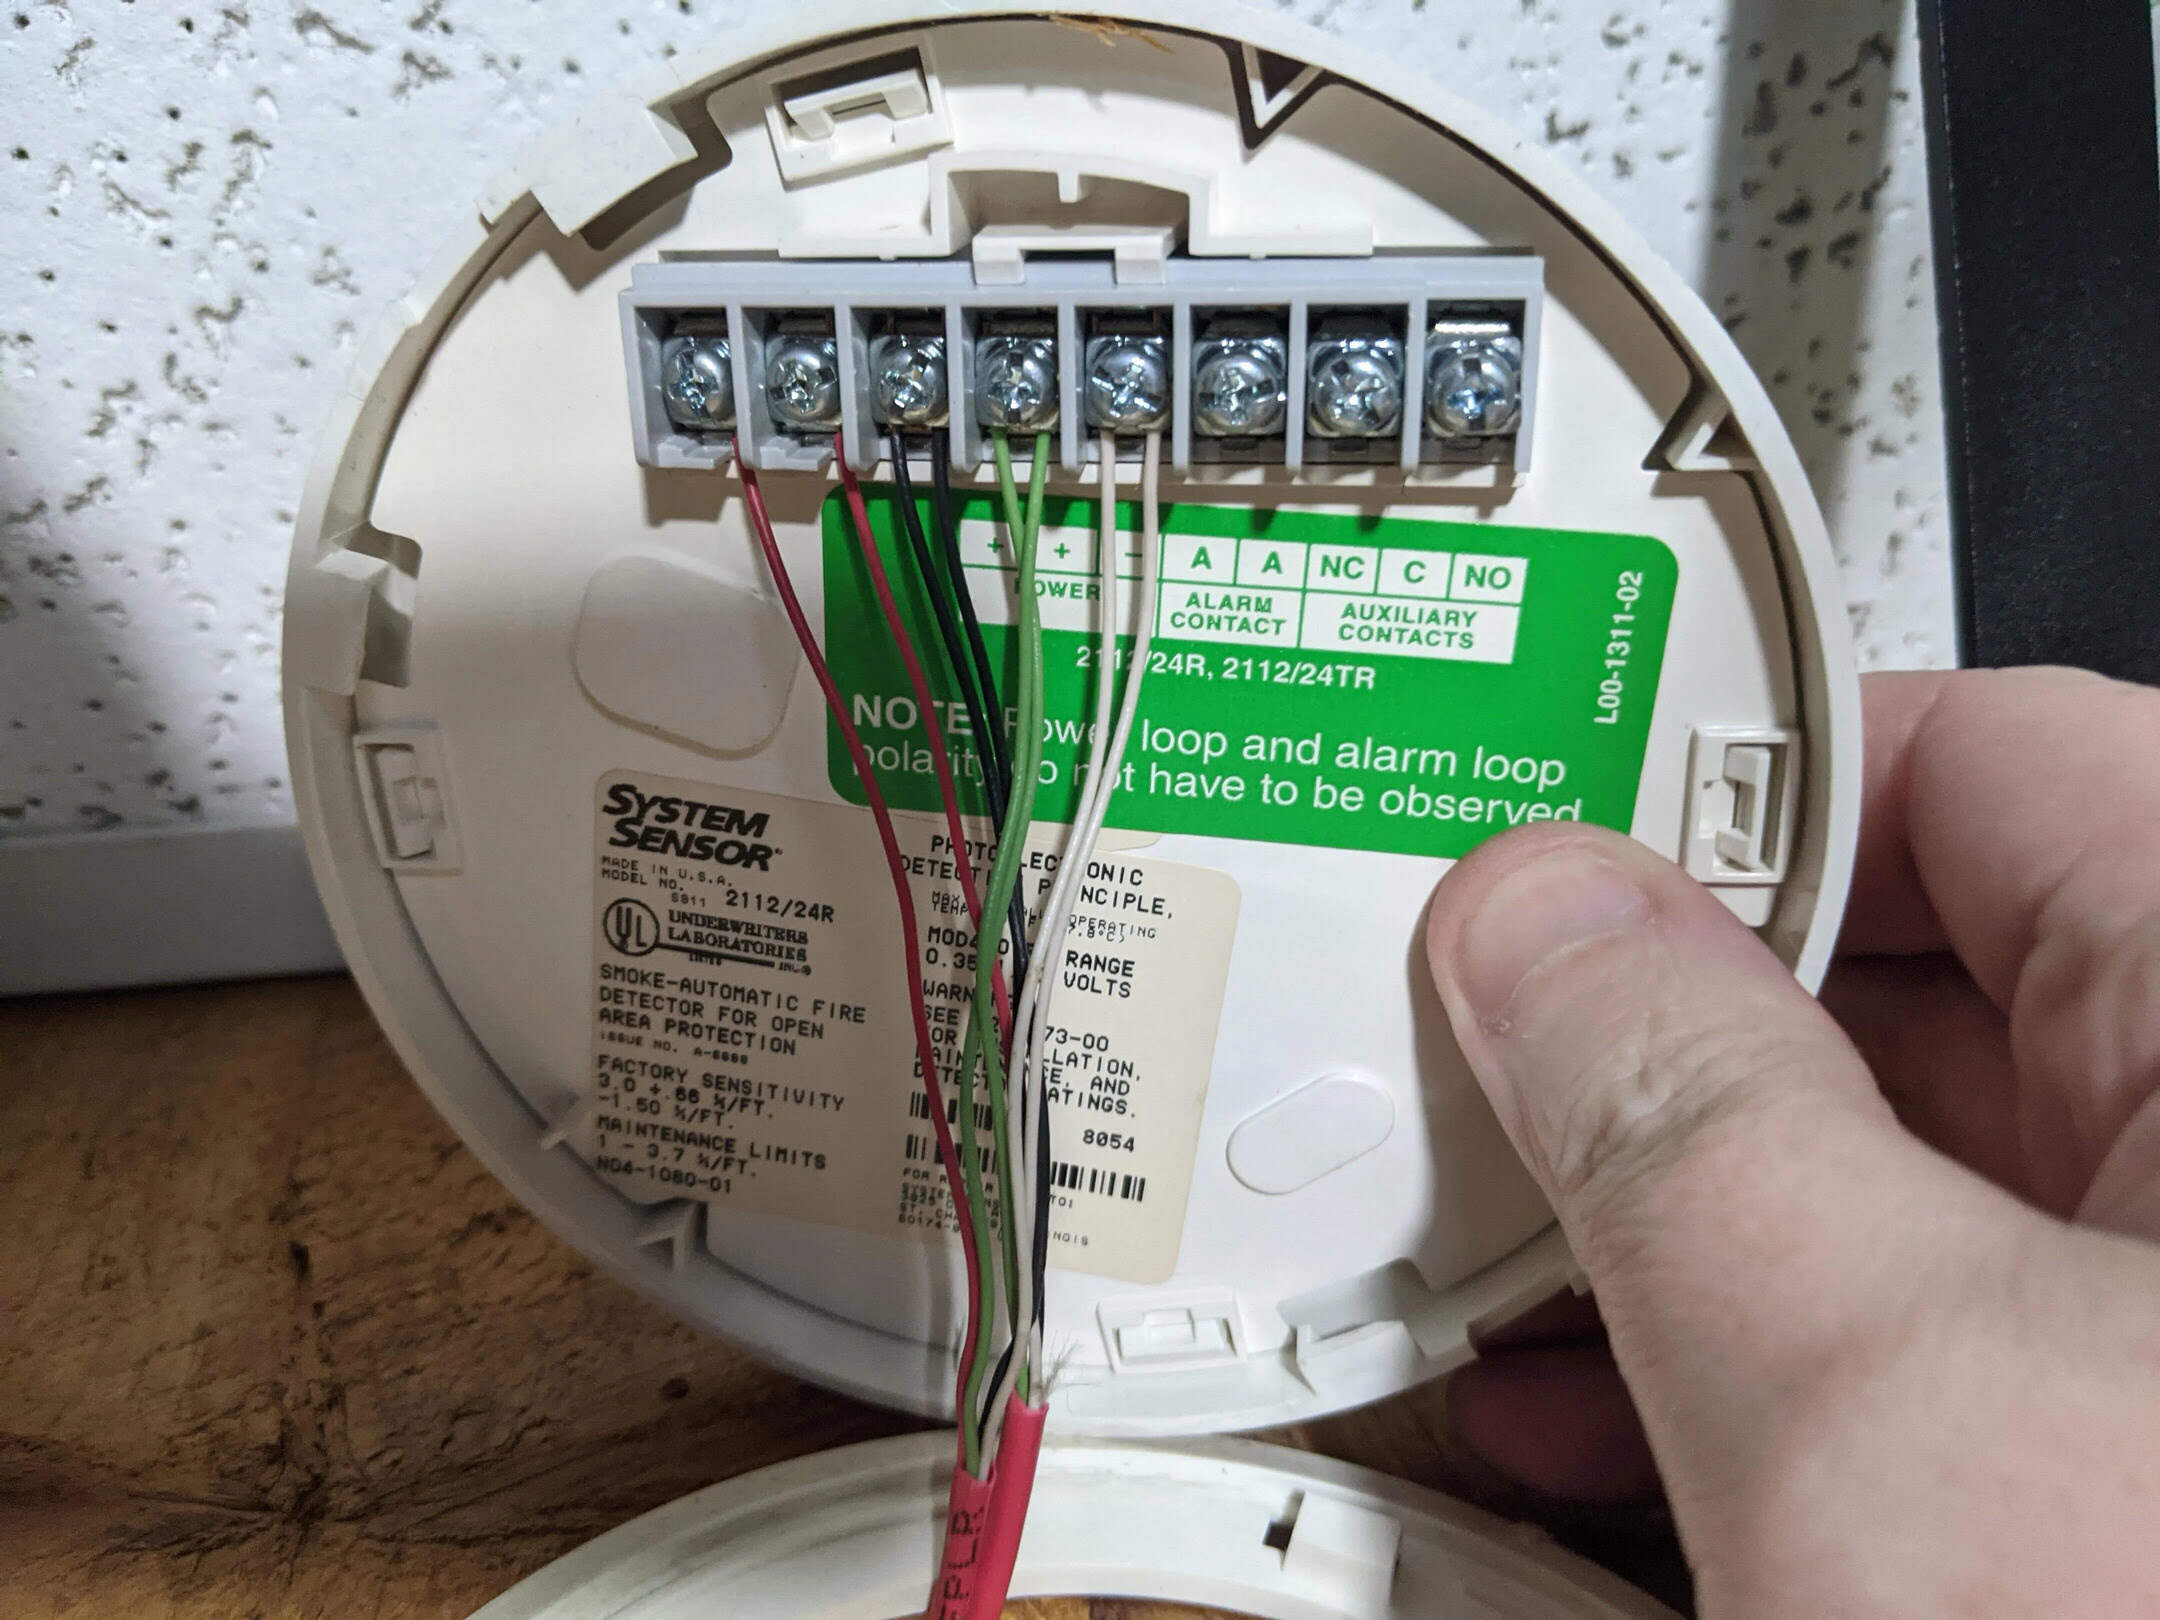
- Examine the electrical connections: Take a moment to inspect the wires and connectors on both the smoke detector and the electrical junction box. Identify the type of connection used, which can vary depending on the wiring system.
- Loosen wire connectors: If your smoke detector uses wire connectors, loosen them by turning them counterclockwise. In some cases, you may need to use pliers to help loosen them. Take care not to damage the wires or connectors during this process.
- Detach screw terminal wires: If your smoke detector uses screw terminals, use a screwdriver to loosen the terminal screws. Turn the screws counterclockwise to loosen them, and then gently pull the wires out of the terminals.
- Take note of wire colors and connections: As you disconnect the wires, it’s essential to pay attention to the specific wire colors and their corresponding connections. This will be useful when connecting the wires to the new smoke detector later on.
During this step, it’s crucial to exercise caution and handle the wires carefully. Avoid pulling or tugging on the wires excessively to prevent any damage or disconnections within the electrical system.
If you encounter any difficulties or are unsure about the wiring connections, it’s best to consult the user manual or contact a qualified electrician for guidance. Your safety and the proper functioning of the replacement smoke detector should always be a priority.
With the electrical wires disconnected from the old smoke detector, you are now ready to move on to the next step: mounting the new smoke detector.
Read more: How To Clean A Hard Wired Smoke Detector
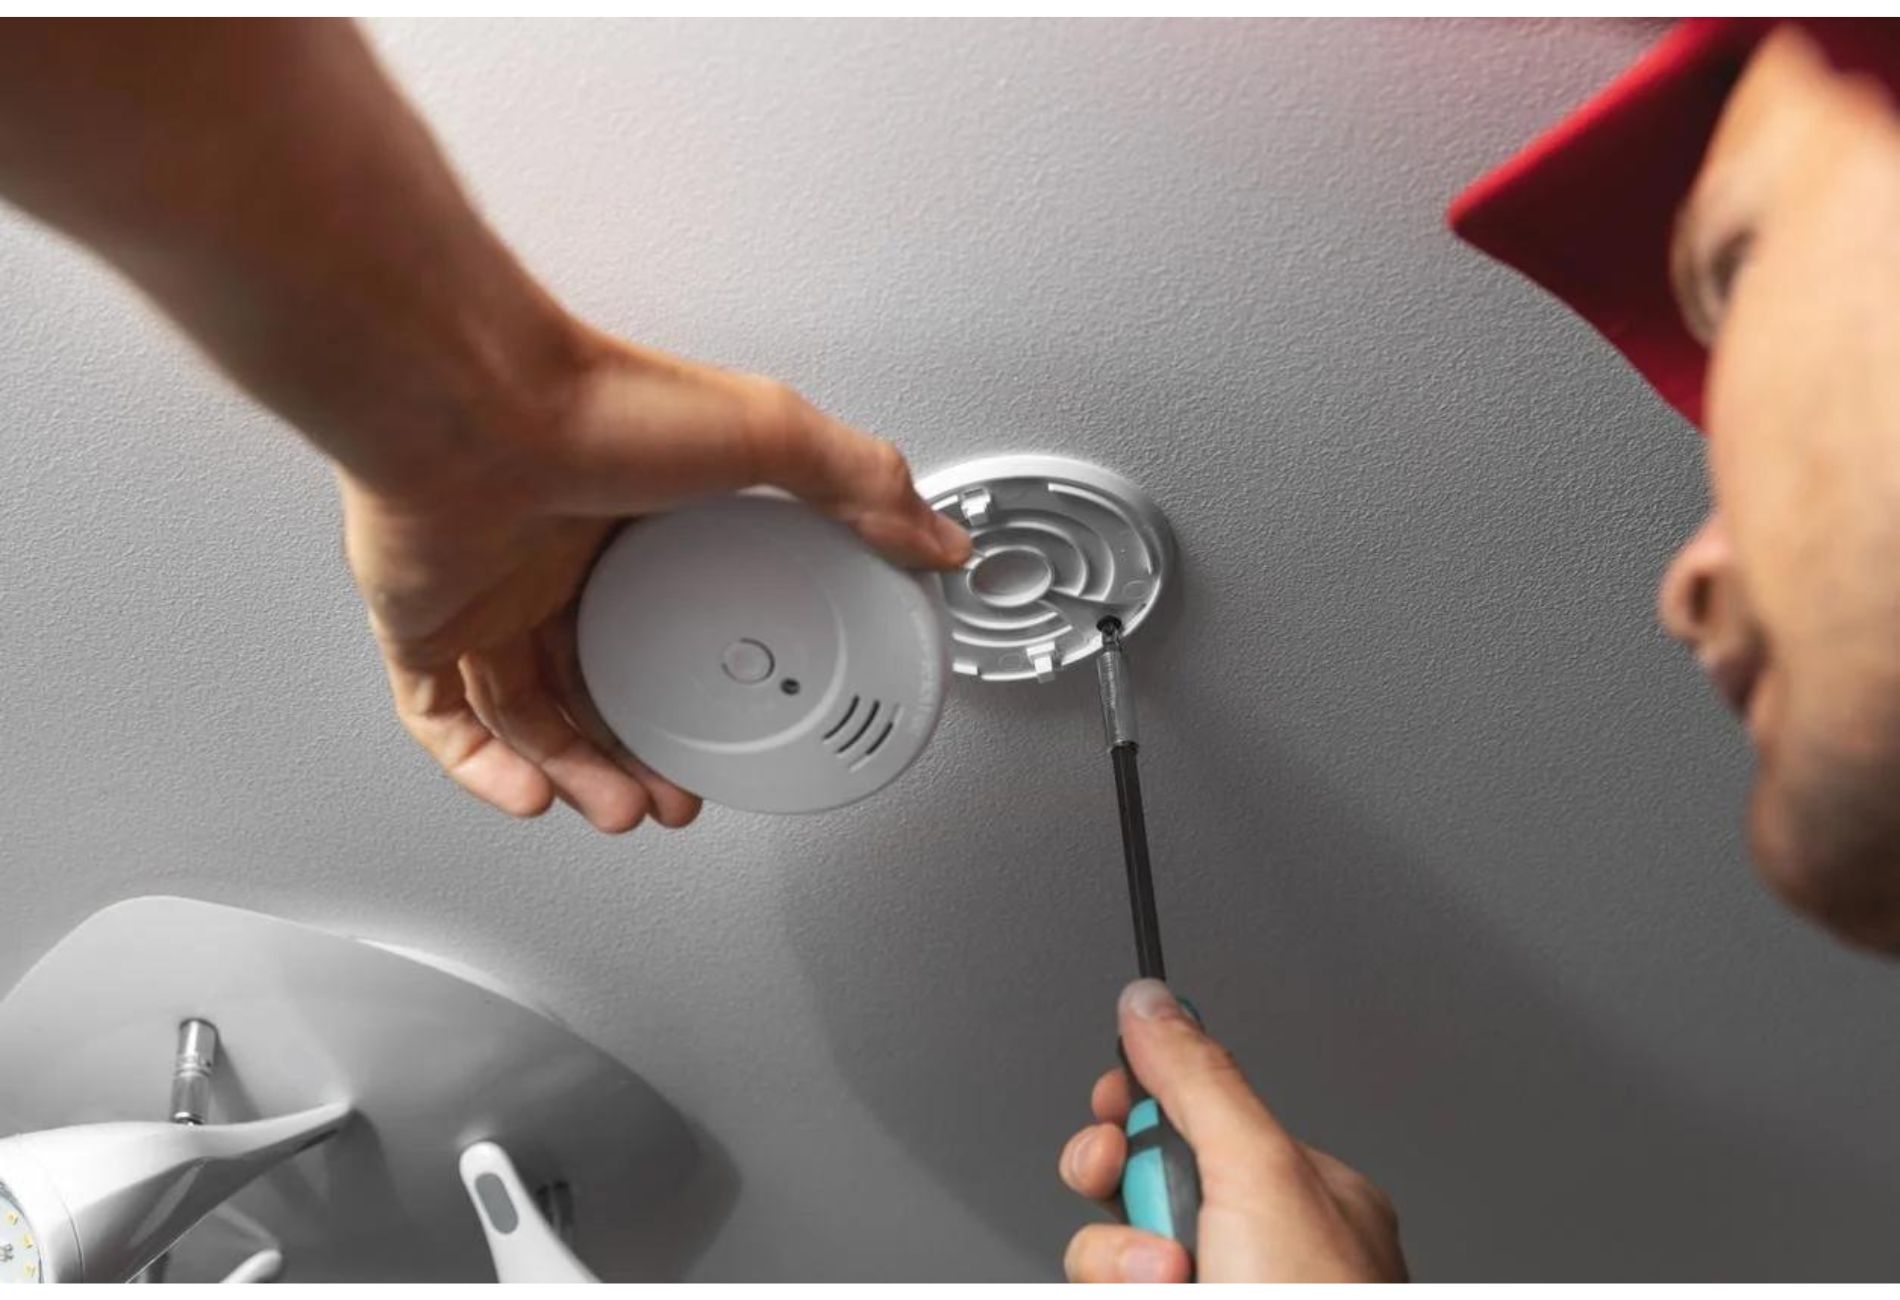
Step 5: Mount the new smoke detector
With the old smoke detector disconnected, it’s time to mount the new smoke detector in its place. Follow these steps to securely mount the new detector:
- Align the mounting bracket: Take the new smoke detector and align its mounting bracket with the existing screw holes or slots on the ceiling or wall. Ensure that the bracket is positioned correctly and level.
- Secure the mounting bracket: Using a screwdriver, insert and tighten the screws provided with the new smoke detector. Make sure the screws are securely fastened to hold the mounting bracket in place. If your detector uses a snap-on cover, align the cover with the bracket and push it into place until you hear a click.
- Double-check the stability: Give the detector a gentle tug to ensure that it is securely mounted and won’t easily come off. The detector should be firmly attached to the mounting bracket without any wobbling or looseness.
When mounting the new smoke detector, it’s important to consider its placement. Ideally, the detector should be installed on the ceiling in the center of a room or hallway. If necessary, consult the user manual or manufacturer’s instructions for specific placement recommendations. Some detectors may have different guidelines, such as installation near sleeping areas or in specific rooms.
Take note of any additional features or sensors on the detector that may require specific positioning. For example, if your new smoke detector also functions as a carbon monoxide (CO) detector, ensure it is positioned at the recommended height for efficient CO detection.
By securely mounting the new smoke detector, you are one step closer to ensuring the safety of your home and loved ones. Once it is securely in place, you can move on to the next step: connecting the electrical wires to the new smoke detector.
When replacing a hard-wired smoke detector, make sure to turn off the power at the circuit breaker before starting the replacement process to ensure safety.
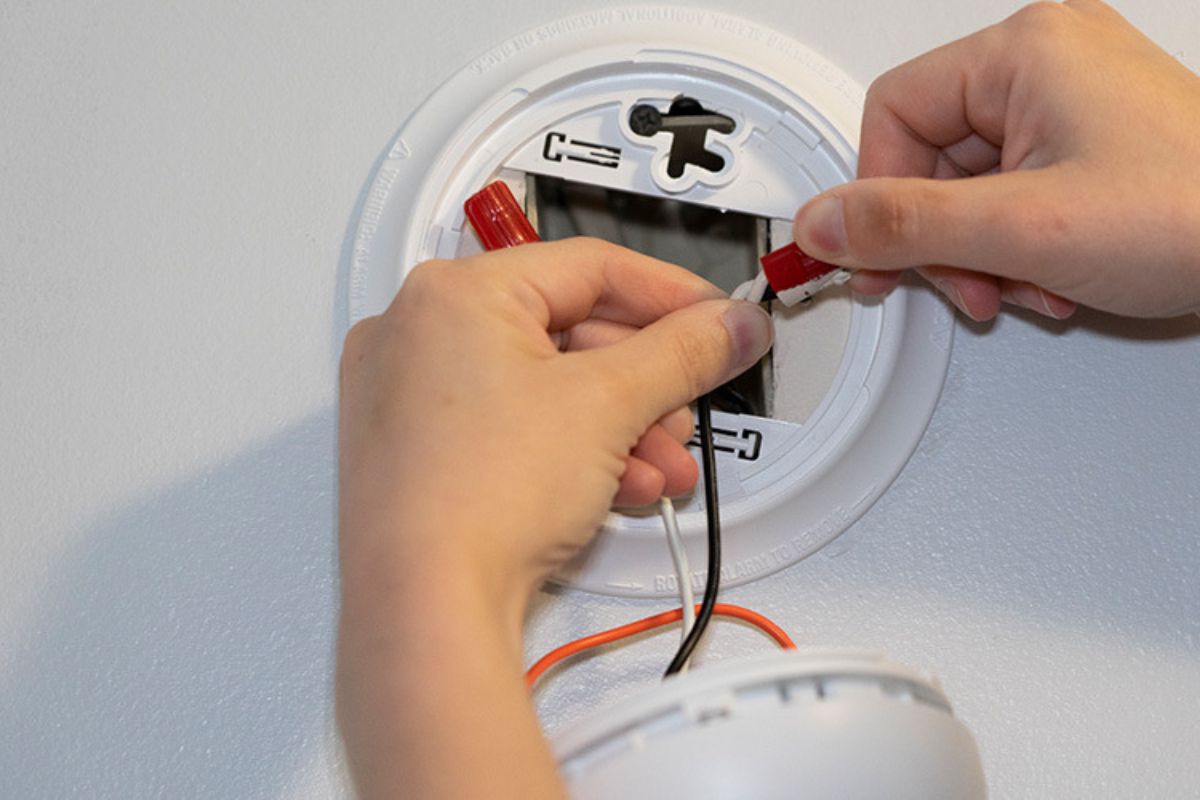
Step 6: Connect the electrical wires to the new smoke detector
Now that the new smoke detector is securely mounted, it’s time to connect the electrical wires and ensure proper functionality. Follow these steps to connect the wires to the new smoke detector:
- Identify the wire colors: Take note of the wire colors from the old smoke detector and match them with the corresponding terminals on the new smoke detector. Typically, the wire colors include black (hot), white (neutral), and sometimes red (interconnected).
- Connect the wires: Starting with the black (hot) wire, insert it into the corresponding terminal on the new smoke detector. Secure it in place by tightening the screw terminal or using a wire connector, depending on the type of connection. Repeat this process for the white (neutral) wire and, if applicable, the red (interconnected) wire.
- Double-check the connections: After connecting all the wires, ensure that they are securely fastened and making good contact with the detector’s terminals. A loose connection can cause the detector to malfunction or provide inaccurate readings.
- Wrap the connections: Once the wires are securely connected, wrap each wire connection with electrical tape. This provides an extra layer of insulation and helps to prevent any accidental contact or short circuits.
It’s important to follow the specific instructions provided by the manufacturer for your particular smoke detector model. Different detectors may have variations in wire connections or additional features that require special attention.
As you connect the wires, be gentle and avoid twisting or straining the wires excessively. This will prevent any damage to the wires and ensure a solid connection for optimal functionality.
Once the electrical wires are securely connected to the new smoke detector, you are ready to move on to the next step: turning the power supply back on.
Step 7: Turn the power supply back on
After successfully connecting the electrical wires to the new smoke detector, it’s time to restore power to the detector. Follow these steps to turn the power supply back on:
- Return to the circuit breaker panel: Go back to the main electrical panel where you previously turned off the power supply to the smoke detector.
- Locate the corresponding circuit breaker: Identify the circuit breaker that controls the power to the smoke detector. It should be the same breaker that you turned off earlier.
- Switch the circuit breaker on: To restore power, flip the circuit breaker switch to the “on” position. This is typically done by flipping the switch upwards or to the original side. Make sure that it is fully in the “on” position to ensure a complete power supply to the detector.
- Verify power restoration: Once the circuit breaker is switched on, you can verify that power has been restored to the smoke detector. Press the test button on the new detector and listen for the alert sound or observe the indicator lights, confirming that the detector is receiving power.
Take a moment to ensure that power has been restored to the smoke detector. If the test button does not produce any response or the detector does not function properly, double-check the connections and repeat the process of turning off the power supply and reconnecting the wires.
Once you have confirmed that the power to the smoke detector has been restored, you can proceed to the next step: testing the new smoke detector for proper functionality.
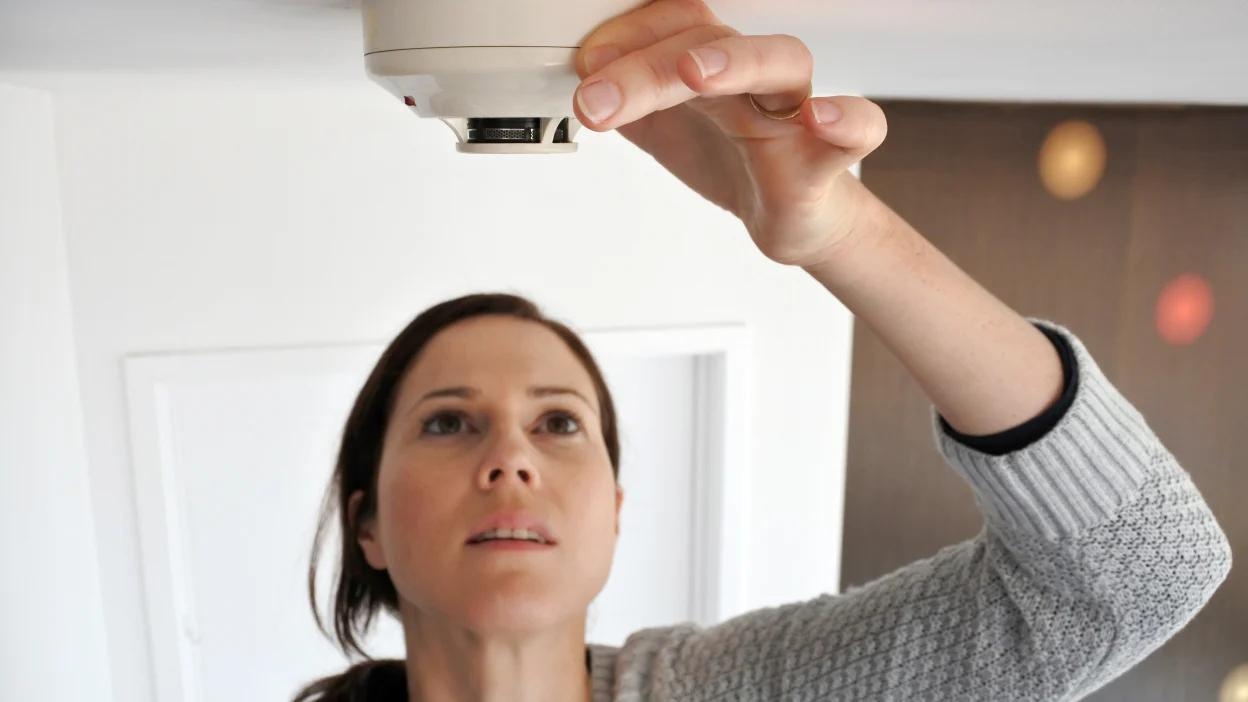
Step 8: Test the new smoke detector
Testing the new smoke detector is a crucial step to ensure that it is functioning correctly and providing the necessary protection for your home. Follow these steps to test the new detector:
- Locate the test button: On the front or side of the new smoke detector, you will find a test button. It is usually labeled with the word “test” or represented by a symbol.
- Press and hold the test button: Press and hold the test button for a few seconds until you hear a loud and distinct alarm sound. You may also see the indicator lights flashing or hear a verbal message indicating that the test is successful.
- Listen for the alarm sound: Pay attention to the sound of the alarm. It should be loud and clear, indicating that the smoke detector is working properly.
- Observe the indicator lights (if applicable): Some smoke detectors have indicator lights that display the status of the device. Check if the lights are functioning correctly and following the manufacturer’s guidelines.
If the alarm sound is weak, muffled, or nonexistent, double-check the electrical connections and ensure that the battery backup (if applicable) is properly installed and functional. Refer to the user manual or contact the manufacturer for troubleshooting guidance if necessary.
It’s important to note that testing the smoke detector periodically is essential for its ongoing effectiveness. Follow the manufacturer’s recommendations for regular testing intervals, which are typically every month or every few months.
By testing the new smoke detector, you can be confident that it is operational and ready to provide early detection of potential fire hazards in your home.
Once you have successfully tested the new detector, you can proceed to the final step: disposing of the old smoke detector properly.
Step 9: Dispose of the old smoke detector properly
Proper disposal of the old smoke detector is essential to ensure environmental safety and compliance with local regulations. Follow these steps to dispose of the old smoke detector responsibly:
- Check local regulations: Research the regulations and guidelines specific to your area regarding the disposal of electronic waste, such as smoke detectors. Many regions have designated recycling centers or special collection events for electronic devices.
- Contact local authorities: Reach out to your local waste management or recycling facility to inquire about their procedures for disposing of old smoke detectors. They can provide you with specific instructions or direct you to the appropriate resources.
- Follow manufacturer’s instructions: Consult the manufacturer’s instructions or the packaging of the old smoke detector for any disposal recommendations. Some manufacturers may offer their own recycling or take-back programs for their products.
- Prepare for disposal: If necessary, remove any batteries from the old smoke detector before disposing of it. Some detectors may contain hazardous materials that require special handling or disposal methods.
- Transport safely: If you need to bring the old detector to a recycling facility, make sure to package it securely to avoid any damage during transport. Consider placing the detector in a sturdy box or container to prevent any accidents or spills.
- Dispose at designated facility: Take the old smoke detector to a designated recycling center or follow the instructions provided by the local authorities for proper disposal. Avoid throwing it in regular trash bins or dumping it in landfills.
By disposing of the old smoke detector responsibly, you contribute to environmental sustainability and prevent any potential harm caused by improper disposal methods.
Once you have completed all the steps, you have successfully replaced the hard-wired smoke detector in your home. Congratulations! Your new smoke detector will provide the necessary safety and peace of mind, alerting you to any potential fire hazards.
Remember to regularly test and maintain your smoke detectors to ensure their ongoing effectiveness in safeguarding your home and loved ones.
Keep in mind that while this article provides a general guide, it’s always recommended to consult the manufacturer’s instructions or seek professional assistance if you have any doubts or concerns about replacing a hard-wired smoke detector.
Thank you for following this comprehensive guide. Stay safe!
Conclusion
Replacing a hard-wired smoke detector is an essential task when it comes to ensuring the safety and security of your home. By following the step-by-step guide outlined in this article, you can confidently and efficiently replace your old smoke detector with a new one that meets the necessary safety standards.
We began by emphasizing the importance of smoke detectors in alerting you to potential fire hazards, providing you with valuable time to evacuate and contact emergency services. We then discussed the necessary tools and materials you will need for the replacement process, including a new smoke detector, electrical tape, a flathead screwdriver, and wire strippers or pliers.
Throughout the guide, we stressed the significance of safety and encouraged you to take precautions such as turning off the power supply before starting the replacement process. This ensures a safe working environment and minimizes the risk of electrical accidents.
We then walked you through each step, from removing the old smoke detector to disconnecting the electrical wires, mounting the new smoke detector, and connecting the wires to the new device. Each step was explained in detail to help you complete the replacement process with confidence.
We advised you to test the new smoke detector to verify its proper functioning and to dispose of the old one responsibly according to local regulations and guidelines. By following these steps, you contribute to environmental safety and ensure that electronic waste is handled appropriately.
In conclusion, replacing a hard-wired smoke detector is a necessary task that should not be overlooked. By being proactive and replacing outdated or malfunctioning detectors, you can provide a safer living environment for you and your loved ones.
Remember to regularly test and maintain your smoke detectors to ensure their ongoing effectiveness. Check the user manual or manufacturer’s instructions for any additional recommendations or specific requirements for your particular smoke detector model.
Thank you for taking the time to read this comprehensive guide. Stay vigilant, stay safe, and prioritize the protection of your home through regular maintenance and proper replacement of your smoke detectors.
Frequently Asked Questions about How To Replace A Hard-Wired Smoke Detector
Was this page helpful?
At Storables.com, we guarantee accurate and reliable information. Our content, validated by Expert Board Contributors, is crafted following stringent Editorial Policies. We're committed to providing you with well-researched, expert-backed insights for all your informational needs.

0 thoughts on “How To Replace A Hard-Wired Smoke Detector”