Articles
How To Replace Brushes In Electric Motor
Modified: September 1, 2024
Learn how to replace brushes in an electric motor with our informative articles. Get step-by-step instructions and expert tips for a smooth replacement process.
(Many of the links in this article redirect to a specific reviewed product. Your purchase of these products through affiliate links helps to generate commission for Storables.com, at no extra cost. Learn more)
Introduction
Electric motors are vital components in various devices and machines, enabling them to perform their intended functions efficiently. Over time, the brushes in an electric motor can wear out, resulting in diminished performance or even complete failure. When this happens, it is important to replace the brushes to restore the motor’s functionality.
In this article, we will guide you through the process of replacing brushes in an electric motor. Whether you are a DIY enthusiast or someone who wants to save money by performing the task yourself, this step-by-step guide will help you accomplish the job effectively.
Before we dive into the detailed steps, let’s quickly go over the tools and materials you will need for the job:
- Replacement brushes
- Screwdriver set
- Cleaning brush
- Rag or cloth
- Needle-nose pliers
- Safety goggles
- Disposable gloves
Once you have gathered these tools and materials, you are ready to begin the process of replacing the brushes in your electric motor. But, before we proceed, it is crucial to ensure your safety by disconnecting the power supply. This will prevent any potential accidents or injuries during the procedure.
Now that we have covered the introduction and the required tools and materials, let’s move on to the first step: disconnecting the power supply.
Key Takeaways:
- Proper maintenance of electric motor brushes is essential for optimal performance. Following safety precautions, gathering the right tools, and methodically replacing the brushes can extend the motor’s lifespan and ensure efficient operation.
- Regular inspection and cleaning, along with adherence to safety guidelines, are crucial for maintaining the motor’s functionality. By following the step-by-step guide and performing final checks, you can enjoy the continued use of your electric motor for various applications.
Read also: 13 Amazing Electric Motor Brushes for 2025
Step 1: Gather necessary tools and materials
Before you start replacing the brushes in your electric motor, it is essential to gather all the necessary tools and materials. Having everything prepared beforehand will ensure a smooth and uninterrupted workflow.
Here is a list of the tools and materials you will need:
- Replacement brushes: These are the new brushes that will be installed in place of the old ones. Make sure to purchase the correct size and type of brushes that are compatible with your specific motor model. You can usually find this information in the motor’s manual or consult a professional if needed.
- Screwdriver set: This will be used to remove the screws holding the motor’s cover in place. Different screwdrivers may be required depending on the type of screws used in your motor.
- Cleaning brush: A small brush, such as a toothbrush or a dedicated electronics cleaning brush, will be used to clean the brush holder and surrounding area.
- Rag or cloth: This will be used to wipe away any debris or dust that may have accumulated inside the motor.
- Needle-nose pliers: These pliers will come in handy for removing and handling the old brushes, especially if they are difficult to reach.
- Safety goggles: It’s crucial to protect your eyes during the process, as there may be flying debris or small particles.
- Disposable gloves: These gloves will provide an extra layer of protection for your hands and prevent any contamination from oils or debris.
Once you have gathered all the necessary tools and materials, make sure to have them within reach during the entire process. This will save you time and prevent any unnecessary interruptions.
Now that you are equipped with the required tools and materials, it’s time to move on to the next step: disconnecting the power supply.
Step 2: Disconnect power supply
Before you begin working on the electric motor, it is crucial to prioritize safety by disconnecting the power supply. This step will prevent accidental start-ups or electrical shocks that can cause harm.
Follow these steps to safely disconnect the power supply:
- Identify the power source: Locate the power cord or switch that supplies electricity to the motor. It is usually located near the motor or on the main power panel.
- Turn off the power: If there is a switch, turn it off. If the motor is connected to a power outlet, unplug it.
- Use a voltage tester: To ensure that the power is completely disconnected, use a voltage tester to check for any remaining electrical current. This tool will indicate if there is still power flowing through the motor.
Always remember to put safety first and never skip this crucial step. By disconnecting the power supply, you greatly reduce the risk of electrical accidents or damage to the motor.
Once the power supply is safely disconnected, you are ready to move on to the next step: removing the motor cover to access the brushes.
Step 3: Remove motor cover
After disconnecting the power supply, the next step is to remove the motor cover. The motor cover is typically held in place by screws or clips, which you will need to remove to gain access to the brushes.
Follow these steps to remove the motor cover:
- Identify the screws or clips: Take a close look at the motor cover to locate the screws or clips that are securing it in place. These may be located on the sides, bottom, or back of the motor.
- Use the appropriate tool: Depending on the type of screws used, use the appropriate screwdriver from your set to loosen and remove the screws. If the motor cover is secured with clips, use a flathead screwdriver or a similar tool to carefully pry them open.
- Set aside the screws or clips: As you remove each screw or clip, set them aside in a safe place to avoid misplacing or losing them.
- Remove the motor cover: Once all the screws or clips are removed, gently lift or slide off the motor cover. Be cautious if the cover is connected to any wires or cables, as you may need to disconnect them before fully removing the cover.
With the motor cover removed, you now have clear access to the brushes inside the motor. Take a moment to inspect the condition of the brushes and prepare to remove the old brushes in the next step.
Next up is step 4: locating and removing the old brushes.
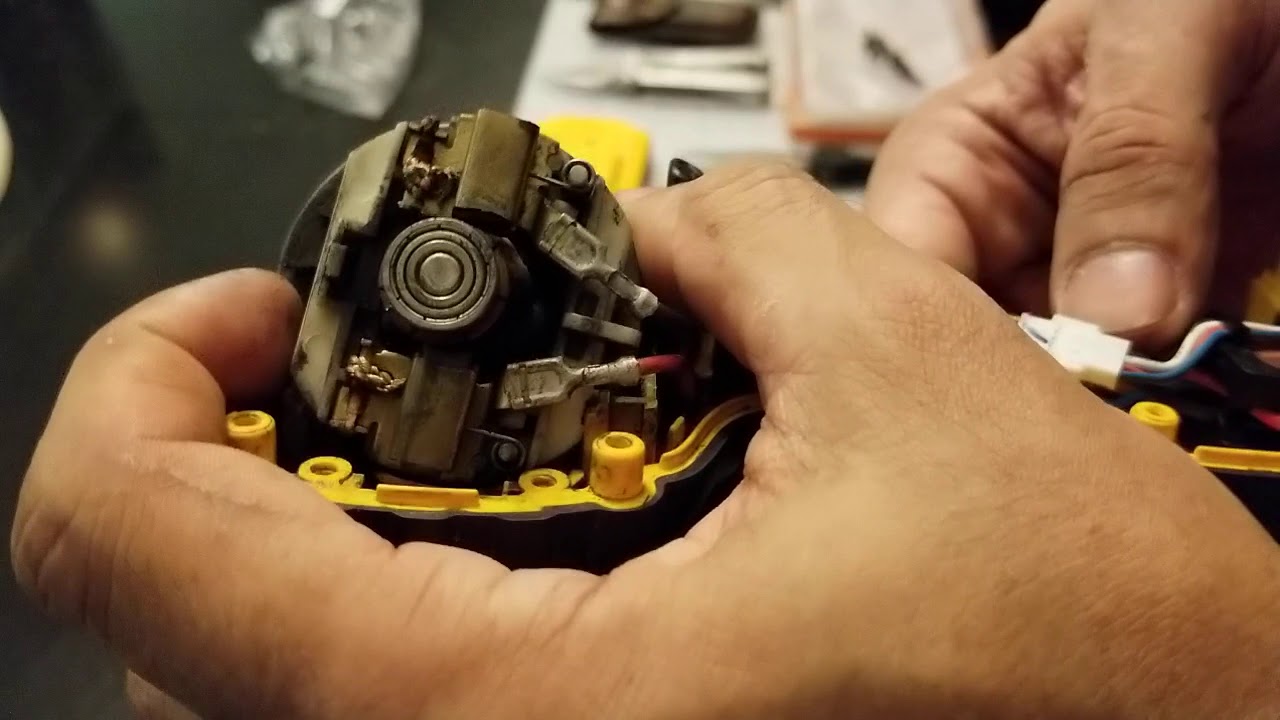
Step 4: Locate and remove old brushes
Now that you have removed the motor cover, it’s time to locate and remove the old brushes. The brushes are small, typically made of carbon or graphite, and are responsible for conducting electrical current within the motor.
Follow these steps to locate and remove the old brushes:
- Identify the brush holders: Look for small, rectangular or cylindrical components near the motor’s rotating shaft. These are the brush holders, and they house the brushes.
- Inspect the brushes: Take a closer look at the brushes to assess their condition. Check for signs of wear such as uneven bristle lengths, excessive wear, or frayed edges. If the brushes appear significantly worn or damaged, they need to be replaced.
- Release the tension springs (optional): In some motors, the brushes are held in place by tension springs. If this is the case, use a small pair of needle-nose pliers to gently pull or release the tension springs, allowing the brushes to retract.
- Remove the old brushes: Firmly grasp the old brushes one by one with your needle-nose pliers and gently pull them straight out of the brush holders. Be careful not to damage the brush holders or bend the brushes during removal.
As you remove each old brush, take note of their orientation and make sure to keep track of which brush came from each brush holder. This will help ensure that you install the new brushes correctly in the next step.
Now that you have successfully located and removed the old brushes, it’s time to move on to step 5: cleaning the brush holder.
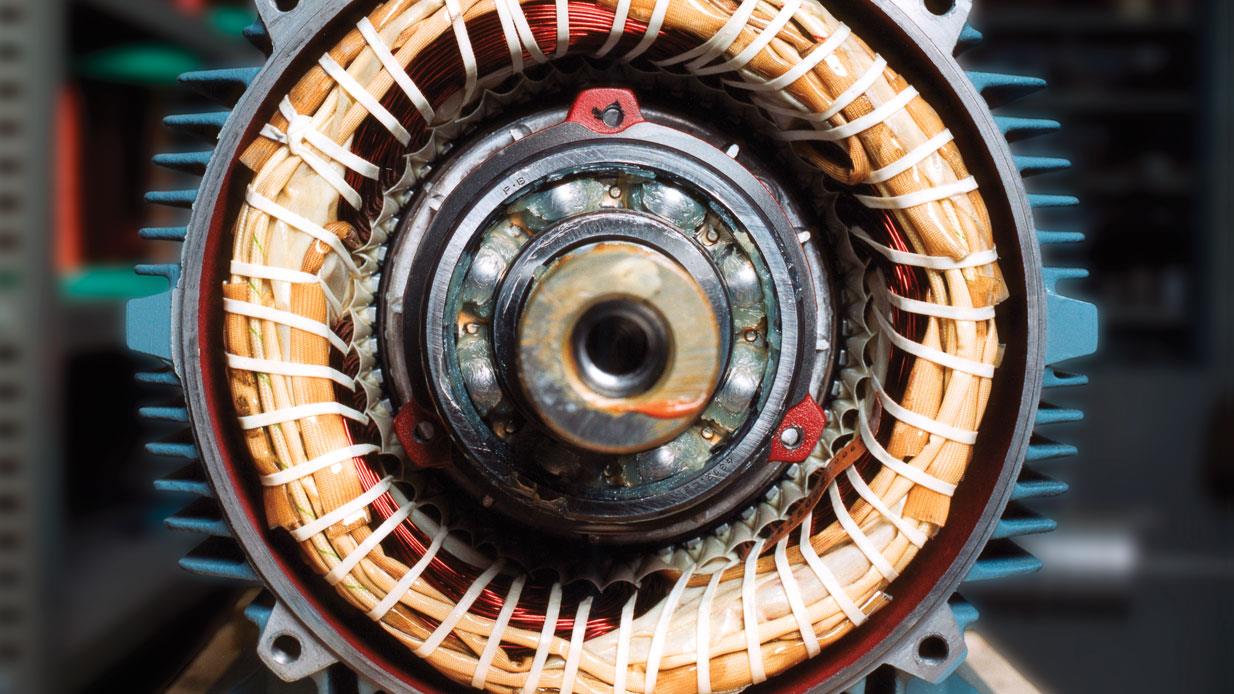
Step 5: Clean brush holder
After removing the old brushes, it is important to clean the brush holder before installing the new brushes. Over time, dust, debris, and carbon residue can accumulate in the brush holder, which can affect the performance and longevity of the new brushes.
Follow these steps to clean the brush holder:
- Prepare a cleaning solution: Mix a small amount of mild detergent or alcohol with water to create a cleaning solution. Alternatively, you can use compressed air or a specialized electronics cleaner.
- Dip a cleaning brush or cloth: Dip a small cleaning brush or cloth into the cleaning solution. Ensure that it is only slightly damp, as you want to avoid excessive moisture that could seep into the motor.
- Gently clean the brush holder: Carefully insert the cleaning brush or cloth into the brush holder and gently scrub the inner walls. Move the brush or cloth back and forth to remove any debris or residue. Pay extra attention to the corners and edges of the brush holder.
- Remove any excess liquid: After cleaning, use a dry cloth or compressed air to remove any excess liquid from the brush holder. Ensure that the brush holder is completely dry before proceeding.
It is crucial to be gentle while cleaning the brush holder to avoid damaging its delicate components. Additionally, always take precautions to prevent moisture from entering the motor, as this can lead to electrical malfunctions.
With the brush holder cleaned and ready, it’s time to move on to step 6: installing the new brushes in the brush holders.
When replacing brushes in an electric motor, make sure to disconnect the power source and carefully remove the old brushes. Clean the brush holders and install the new brushes, ensuring they are properly aligned and making good contact with the commutator.
Step 6: Install new brushes
Now that the brush holder is clean and free from debris, it’s time to install the new brushes. Proper installation of the new brushes is crucial to ensure optimal performance and longevity of the electric motor.
Follow these steps to install the new brushes:
- Check the orientation: Before installing the new brushes, check their orientation and ensure they are positioned correctly. Consult the motor’s manual or reference any markings on the brushes for guidance.
- Align the brush with the holder: Align the new brush with its designated holder and carefully insert it. Make sure the brush fits securely and is seated properly within the holder.
- Check for proper contact: Ensure that the brush makes smooth and even contact with the motor’s commutator or armature. This will ensure efficient electrical contact and prevent any issues with motor performance.
- Repeat for all brush holders: Install the remaining new brushes in the same manner, one brush at a time, until all the brush holders are filled with the new brushes.
Take your time during this step to ensure that each new brush is installed correctly and securely. It is important to handle the brushes with care to avoid damaging their delicate bristles or interfering with their proper functionality.
With the new brushes successfully installed, you are now ready to move on to step 7: reassembling the motor.
Step 7: Reassemble motor
After installing the new brushes, the next step is to reassemble the motor. Proper reassembly is necessary to ensure that all components are securely in place and the motor functions correctly.
Follow these steps to reassemble the motor:
- Retrieve the motor cover: Locate the motor cover that you previously removed and ensure it is clean and free from any debris or dust.
- Align the motor cover: Position the motor cover over the motor in the correct orientation. Ensure that any wires or cables connected to the motor cover are properly aligned and not trapped underneath.
- Secure the motor cover: Use the appropriate screws or clips that you removed earlier to secure the motor cover back in place. Tighten the screws or close the clips firmly, but be careful not to overtighten them to avoid damaging the motor or cover.
- Confirm a snug fit: Ensure that the motor cover is tightly secured and there are no loose or protruding parts that could potentially interfere with the motor’s performance.
Double-check that you have reassembled the motor correctly and that all necessary components are in their proper place. This will help prevent any issues or malfunctions during the operation of the motor.
With the motor successfully reassembled, move on to step 8: testing the motor to ensure it is working properly.
Step 8: Test the motor
After reassembling the motor, it is important to test it to ensure that the new brushes are functioning properly. Testing the motor will help verify that it is running smoothly and efficiently before putting it back into regular use.
Follow these steps to test the motor:
- Reconnect the power supply: Plug in the power cord or switch on the power supply, ensuring that the motor is safely connected.
- Power on the motor: Turn on the motor and observe its performance. Listen for any unusual noises, vibrations, or irregularities in its operation.
- Check for proper brush contact: Inspect the brush holders and verify that the new brushes are making good contact with the motor’s commutator or armature. Ensure there is no sparking or excessive heat generated during operation.
- Observe the motor’s functionality: Run the motor under different loads or speeds, if applicable, to see how it performs. Pay attention to any changes in performance compared to before the brush replacement.
- Monitor for any issues: Watch for any signs of overheating, smoke, or burning smells, which could indicate a problem with the motor or brushes. If you notice any issues, immediately disconnect the power supply and inspect the motor further.
Testing the motor is crucial to ensure its proper functioning and identify any potential issues early on. If you encounter any problems during the testing phase, it may indicate a need for further inspection or adjustments to the brush installation.
With the motor successfully tested and functioning properly, you can proceed to step 9: final checks and safety precautions.
Read more: How To Replace Bathroom Fan Motor
Step 9: Final checks and safety precautions
Before considering the brush replacement process complete, it is important to perform final checks and follow safety precautions to ensure the motor’s optimal performance and your safety.
Follow these steps for final checks and safety precautions:
- Inspect connections and fastenings: Carefully examine all connections, screws, and fastenings to ensure they are tight and secure. Loose connections can cause electrical issues or affect the motor’s performance.
- Clean the motor exterior: Use a clean cloth or compressed air to remove any dust or debris from the motor’s exterior. Keeping the motor clean can prevent buildup that can hinder its performance or affect cooling.
- Perform regular maintenance: Going forward, make it a habit to regularly clean and inspect the motor to ensure its longevity and optimal operation. Consult the motor’s manual for specific maintenance recommendations.
- Dispose of old brushes properly: If the old brushes are worn out or damaged beyond repair, dispose of them safely according to local regulations. Recycle them if possible, as they may contain materials that can be reused.
- Observe safety guidelines: Despite completing the brush replacement process, always adhere to safety guidelines when working with electric motors. Use protective gear such as safety goggles and gloves, and avoid working on live motors.
By performing these final checks and following safety precautions, you can ensure that the motor is in good working condition and ready for use.
Completing the replacement of brushes in an electric motor not only restores its functionality but also extends its lifespan. With proper maintenance and care, you can enjoy the continued use of the motor for various applications.
Congratulations on successfully replacing the brushes in your electric motor! You have completed all the necessary steps to enhance its performance and ensure its longevity.
Finally, remember that if you are uncomfortable with carrying out the process yourself or encounter any difficulties during the brush replacement, it is always recommended to seek the assistance of a professional technician.
Thank you for following this step-by-step guide, and we hope it has been helpful in your brush replacement journey!
Happy motor maintenance!
Conclusion
Replacing brushes in an electric motor is a crucial maintenance task that ensures the motor’s optimal performance and longevity. By following the step-by-step guide outlined in this article, you can successfully replace the brushes and restore your motor to its full functionality.
We started by gathering the necessary tools and materials, including replacement brushes, a screwdriver set, cleaning brush, rag or cloth, needle-nose pliers, safety goggles, and disposable gloves. Safety is a priority, so we emphasized the importance of disconnecting the power supply before proceeding with any work on the motor.
We then walked through the process, guiding you through each step. From removing the motor cover to locating and removing the old brushes, cleaning the brush holder, installing the new brushes, reassembling the motor, and finally, testing the motor for proper function. We also emphasized the significance of performing final checks and following safety precautions.
Remember, regular maintenance and care are essential to the continued optimal operation of your electric motor. Establish a routine of inspecting and cleaning the motor, and follow the manufacturer’s recommendations for maintenance to ensure its longevity.
By successfully replacing the brushes and performing necessary maintenance tasks, you can enjoy the continued use of your electric motor for various applications. Keep in mind that if you are unsure or uncomfortable with performing the brush replacement yourself, it is always best to seek the assistance of a professional technician.
Thank you for following this comprehensive guide on how to replace brushes in an electric motor. We hope this article has been informative and helpful in your motor maintenance endeavors. Keep your motor running smoothly and enjoy its reliable performance!
Happy motor maintenance!
Frequently Asked Questions about How To Replace Brushes In Electric Motor
Was this page helpful?
At Storables.com, we guarantee accurate and reliable information. Our content, validated by Expert Board Contributors, is crafted following stringent Editorial Policies. We're committed to providing you with well-researched, expert-backed insights for all your informational needs.
0 thoughts on “How To Replace Brushes In Electric Motor”