Articles
How To Snake Bathroom Sink
Modified: August 24, 2024
Learn how to effectively snake your bathroom sink with our informative articles. Get tips and step-by-step instructions to unclog your sink and keep it running smoothly.
(Many of the links in this article redirect to a specific reviewed product. Your purchase of these products through affiliate links helps to generate commission for Storables.com, at no extra cost. Learn more)
Introduction
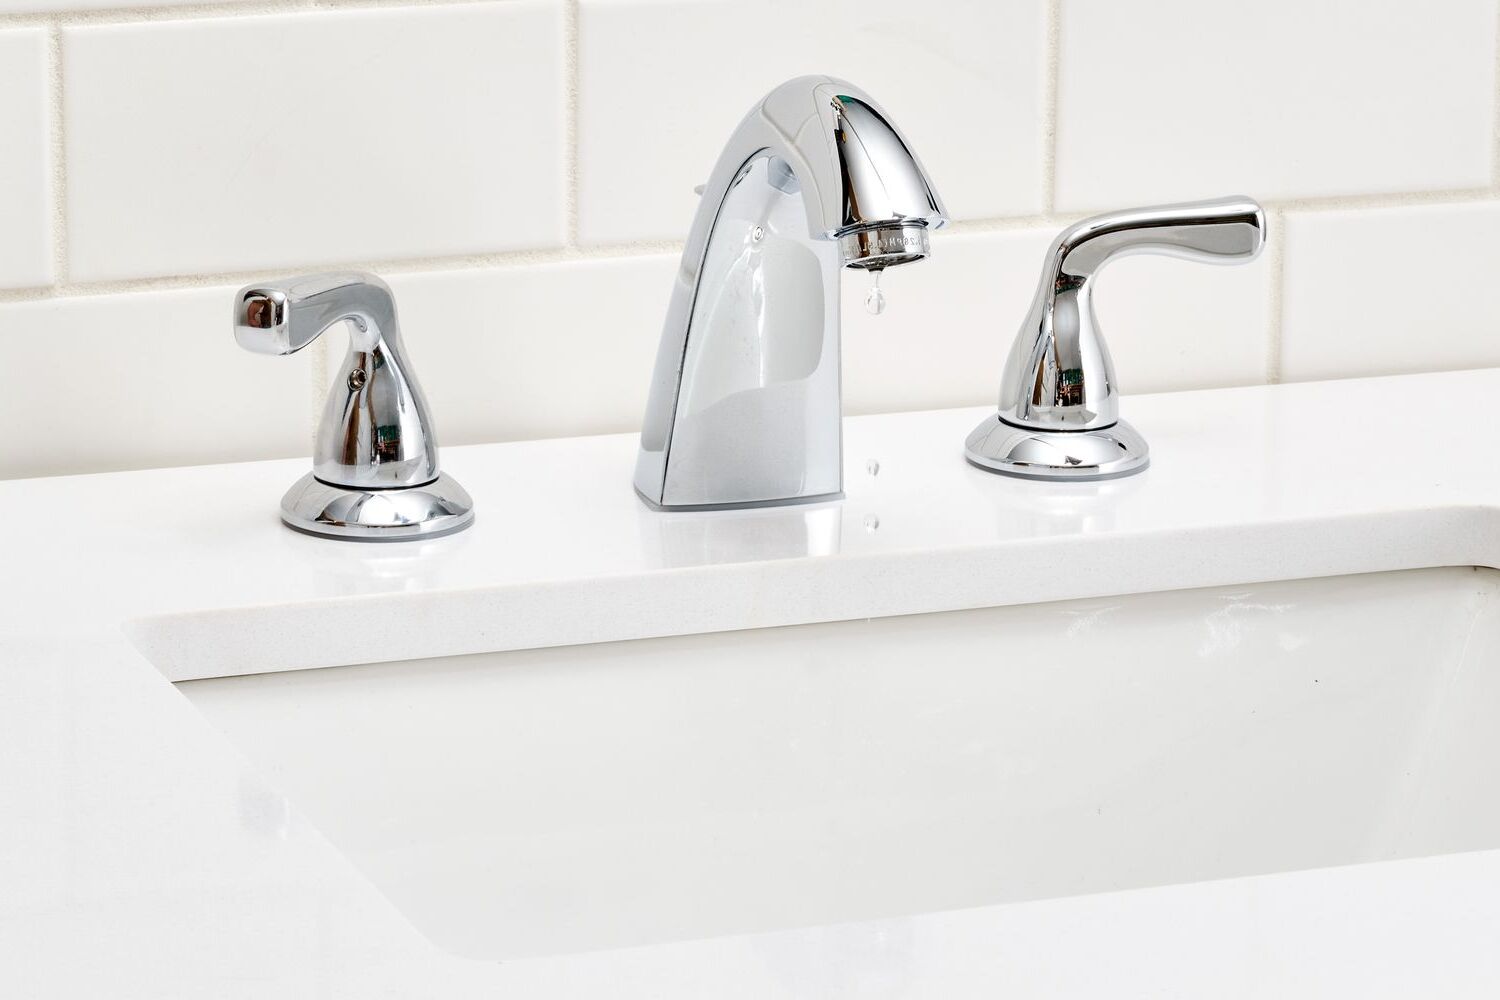
Dealing with a clogged bathroom sink can be a frustrating experience. A slow-draining or completely blocked sink can disrupt your daily routine and create an unpleasant environment in your bathroom. While there are various methods to unclog a sink, one effective solution is using a snake.
In this article, we will guide you through the process of using a snake to unclog your bathroom sink. A snake, also known as a drain auger or plumber’s snake, is a long flexible tool that helps to dislodge and remove debris causing the blockage in your drain.
Before diving into the step-by-step process, it’s important to gather the necessary tools to complete the job effectively. You’ll need:
- A snake or drain auger
- Gloves
- Pliers
- A bucket or bowl
- A towel or rag
- A flashlight (optional)
With these tools ready, you’re prepared to tackle the clog and restore the flow of water in your bathroom sink. Let’s get started!
Key Takeaways:
- Easily tackle clogged bathroom sinks using a snake, a practical and effective DIY solution. Follow the step-by-step guide for a rewarding and efficient unclogging experience.
- Regular maintenance and preventive measures can help avoid future clogs. Practice good habits and confidently handle minor plumbing issues with the knowledge gained from snaking your bathroom sink.
Read more: How To Unclog Toilet With Snake
Step 1: Gather the necessary tools
Before you begin the process of snaking your bathroom sink, it’s crucial to gather all the necessary tools. Having them at hand will make the task much smoother and more efficient.
First and foremost, you’ll need a snake or drain auger. This is the main tool used to clear the clog. A snake is a long, flexible metal cable with a handle at one end and a coiled wire or drill-like tip at the other end. It is designed to navigate through the pipes and break up or remove the blockage.
In addition to the snake, it’s recommended to wear gloves to protect your hands during the process. Plumbing can be messy, and you’ll want to avoid direct contact with any debris or potentially harmful substances that may be causing the clog.
Next, have a pair of pliers handy. These will be used to remove the drain stopper or any other obstacles that may be obstructing the entry point of the snake into the drain. Sometimes, sink stoppers can be easily lifted or twisted off by hand, but having pliers provides extra leverage if needed.
Be sure to grab a bucket or bowl to catch any water or debris that may come up during the unclogging process. This will help minimize any mess and make cleanup easier. Additionally, have a towel or rag nearby to wipe any surfaces that may become wet or dirty.
Lastly, while not required, having a flashlight can be helpful, especially if your bathroom sink has poor lighting. The flashlight will assist you in seeing inside the drain and identifying any potential blockages or other issues that may need attention.
With these tools gathered and prepared, you are now ready to move on to the next step: preparing the area around the bathroom sink for the unclogging process.
Step 2: Prepare the area
Before diving into the process of snaking your bathroom sink, it’s important to prepare the area to ensure a smooth and clean unclogging process.
Start by removing any items from around the sink that could potentially get in the way or become damaged during the process. Move toothbrushes, soap dispensers, and any other personal items to a safe location.
Next, cover the surrounding countertop or vanity with a towel or old cloth. This will protect the surface from any water or debris that may splash out during the unclogging process.
If you have a cabinet underneath the sink, open the door and clear out any items stored inside that could obstruct your access to the plumbing. This will give you more room to work comfortably and efficiently.
It’s also a good idea to locate the water shut-off valves for the sink. In the event of any leaks or accidents during the unclogging process, you can quickly shut off the water supply to prevent any further damage.
Lastly, make sure you have adequate lighting in the area. Natural light or a well-placed lamp can help you see the drain clearly and identify any potential issues or blockages.
With the area properly prepared, you’re now ready to move on to the next step: removing the drain stopper.
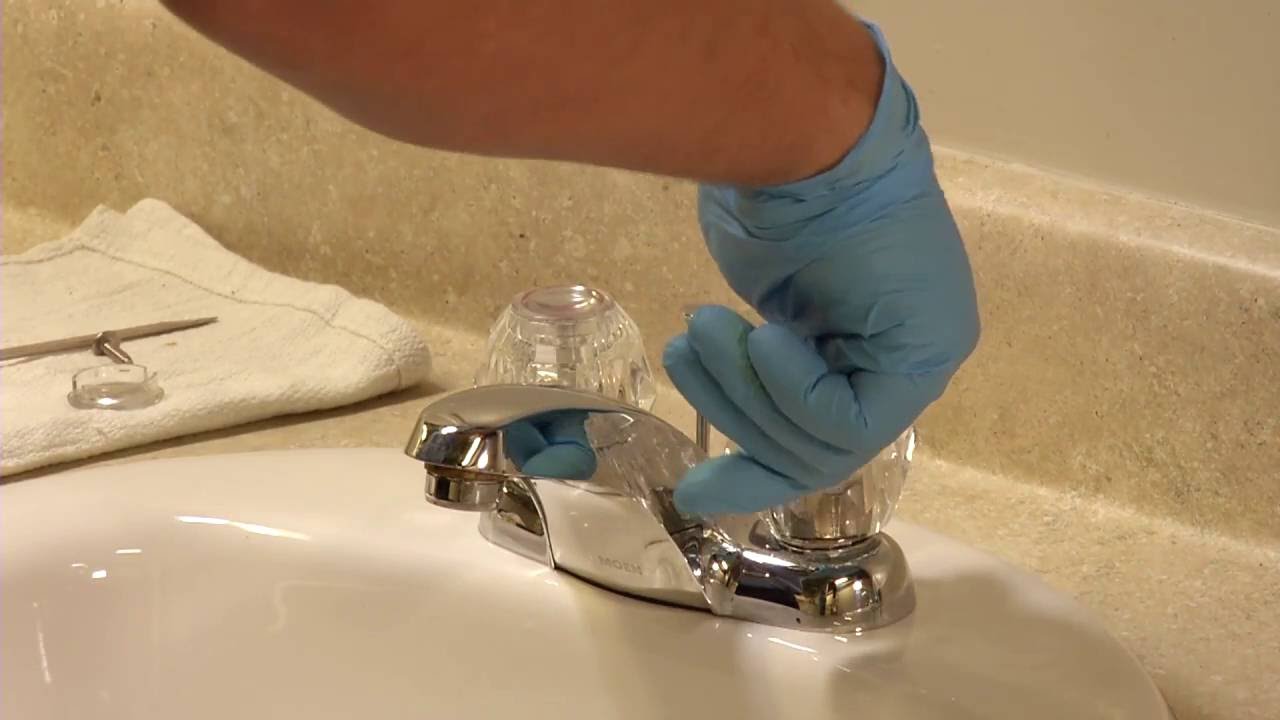
Step 3: Remove the drain stopper
Before you can begin snaking your bathroom sink, you’ll need to remove the drain stopper. This is necessary to gain access to the drain and allow the snake to navigate through the pipes.
The method for removing the drain stopper may vary depending on the type of stopper you have. The two most common types are a pop-up stopper and a lift-and-turn stopper.
If you have a pop-up stopper, follow these steps:
- Look for a small lever or knob located on the back or side of the stopper underneath the sink. This is the mechanism that controls the movement of the stopper.
- Using your pliers, grip the lever or knob firmly and give it a gentle pull or twist to release the stopper.
- Once the stopper is released, lift it out of the drain, taking care not to damage any surrounding parts.
If you have a lift-and-turn stopper, follow these steps:
- Look for a flat surface or small cross-shaped piece on top of the stopper.
- Using your pliers, grip the flat surface or cross-shaped piece and give it a quarter-turn counterclockwise to loosen the stopper.
- Once the stopper is loosened, lift it out of the drain carefully.
If your sink has a different type of stopper, consult the manufacturer’s instructions or seek professional guidance specific to your sink model.
After removing the drain stopper, place it aside in a safe location. Now, you have clear access to the drain, and you’re ready to proceed to the next step: inserting the snake into the drain.
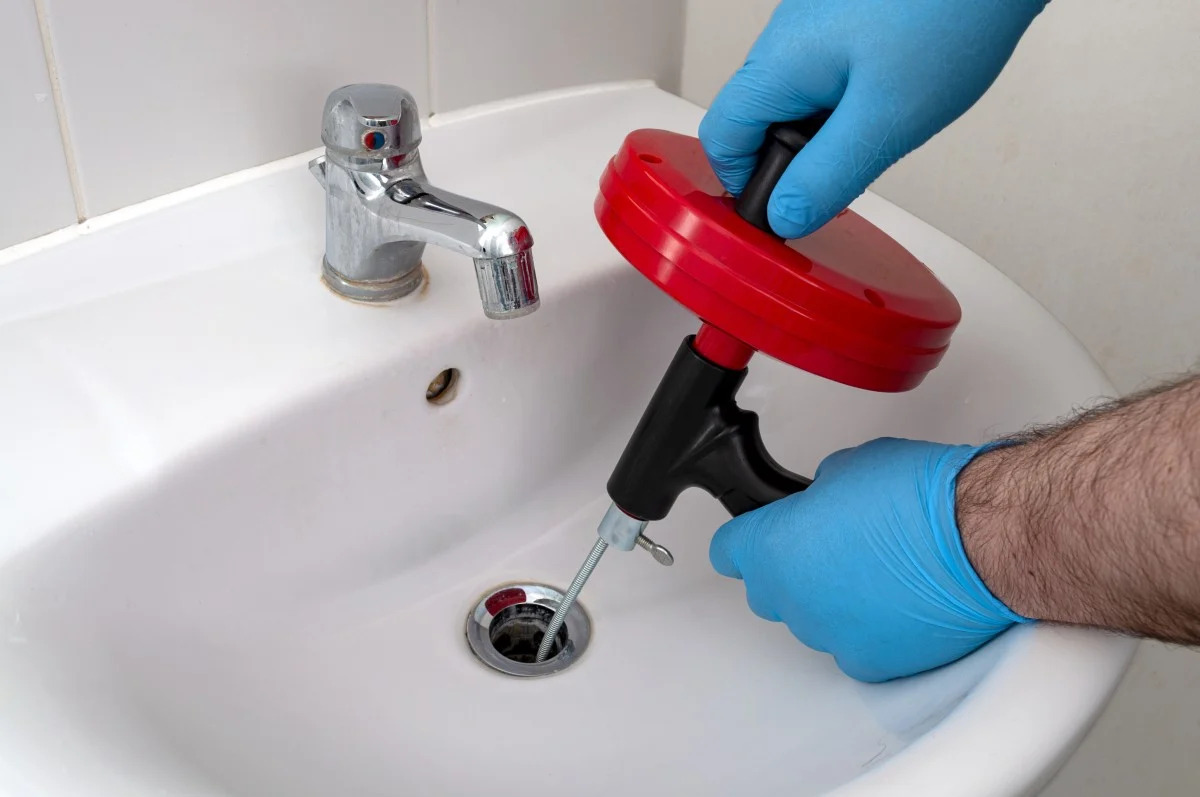
Step 4: Insert the snake into the drain
Now that you’ve successfully removed the drain stopper, it’s time to insert the snake into the drain. This is where the actual unclogging process begins.
Start by positioning yourself in a comfortable position near the bathroom sink. Make sure you have a clear view of the drain opening and easy access to the snake.
Hold the handle of the snake firmly and guide the coiled wire or drill-like tip into the drain opening. Slowly push the snake into the drain while gently turning the handle clockwise. The goal is to let the snake work its way through the pipes and reach the clog.
As you insert the snake, be mindful of any resistance or obstacles you may encounter. If you feel significant resistance, it’s possible that you’ve reached the clog. In this case, turning the handle counterclockwise while pushing and pulling the snake in and out can help break up the clog or grasp onto it for removal.
Continue feeding the snake into the drain until you’ve reached the maximum length of the snake or you feel that the clog has been dislodged. Be patient and take your time to ensure thorough coverage of the drain.
It’s important to note that you should avoid applying excessive force or using a forceful jerking motion while manipulating the snake. This can potentially damage the pipes or cause the snake to get stuck.
With the snake successfully inserted into the drain, you’re ready to move on to the next step: maneuvering the snake to break up or remove the clog.
To snake a bathroom sink, start by removing the stopper and using a drain snake to clear any clogs. Feed the snake down the drain and twist it to break up and remove any blockages. Flush the drain with hot water to ensure it’s clear.
Step 5: Maneuver the snake
Now that the snake is inserted into the drain, it’s time to maneuver it to break up or remove the clog. The key is to move the snake in a way that allows it to effectively dislodge any debris causing the blockage.
Begin by slowly rotating the snake handle clockwise while applying gentle pressure. This rotation helps to navigate the snake through the twists and turns of the pipes. As you rotate, continue pushing the snake further into the drain, gradually increasing the pressure if necessary.
As you maneuver the snake, be prepared for resistance or a change in the feel of the snake’s movement. This can indicate that you’ve reached the clog or encountered a particularly stubborn blockage. In this case, continue rotating the snake while applying gentle back-and-forth or up-and-down motions to dislodge the debris.
It’s important to be patient and avoid forcing the snake. Gentle and steady movements are more effective than rough or aggressive actions, which can potentially damage the plumbing system.
If you encounter a particularly stubborn clog or the snake gets stuck, do not try to force it further. This can lead to more serious plumbing issues. Instead, consider pulling the snake back and repositioning it to attack the clog from a different angle.
Continue maneuvering the snake through the drain until you feel a significant reduction in resistance or until you’re confident that the blockage has been dislodged. This may be indicated by a sudden release of water or improved drainage in the sink.
With the clog loosened or removed, you’re ready to move on to the next step: removing the snake from the drain and testing the drain’s functionality.
Step 6: Remove the snake and test the drain
After successfully maneuvering the snake and dislodging the clog, it’s time to remove the snake from the drain and test the functionality of the sink.
To remove the snake, carefully reverse the process of inserting it. Slowly rotate the handle counterclockwise while simultaneously guiding the snake out of the drain. Take your time to ensure that the snake is fully removed and doesn’t get caught or tangled in the pipes.
Once the snake is completely extracted from the drain, set it aside in a clean area and assess its condition. If you notice any debris or residue on the snake, use a rag or paper towel to wipe it off before storing it away.
With the snake removed, it’s time to test the drain. Run water in the bathroom sink and observe the flow. If the water drains freely and there are no signs of any blockages, congratulations! You’ve successfully cleared the clog.
If, however, the water still drains slowly or there are indications of a partial blockage, you may need to repeat the snaking process or consider alternative methods to fully resolve the issue. Stubborn or persistent clogs may require professional assistance.
As you test the drain, be attentive to any unusual smells, sounds, or leaks. If you notice any of these, it’s recommended to investigate further or seek professional help to prevent any potential plumbing problems.
With the drain functioning properly, you’re almost done. There’s just one more step to complete: cleaning up the area.
Step 7: Clean up the area
Now that you’ve successfully unclogged the bathroom sink, it’s time to clean up the area and restore it to its original condition.
Start by removing the towel or cloth that was placed to protect the countertop or vanity. Shake it out or wash it, if necessary, to remove any debris or water that may have accumulated during the unclogging process.
Next, dispose of any collected debris or residue that was caught by the bucket or bowl. Empty it into a garbage bag and seal it tightly to prevent any odors or mess.
Take a damp cloth or sponge and wipe down the surrounding surfaces, including the sink, faucet, and any areas that may have come into contact with water or cleaning agents. This will remove any splashes, stains, or residue.
If there are any cleaning products or chemicals that were used during the unclogging process, make sure to properly store them or dispose of them according to local regulations. Follow the instructions on the packaging for safe handling and disposal.
Lastly, replace the drain stopper if it was removed earlier. Ensure it is inserted properly and functioning correctly. If the stopper is damaged or not working as intended, consider replacing it to prevent future drainage issues.
With the area cleaned up and restored, you can now admire your unclogged bathroom sink and enjoy the improved functionality it provides.
Remember to regularly maintain your sink and practice good habits to prevent future clogs. Avoid pouring grease or large amounts of food particles down the drain, use mesh screens or strainers to catch debris, and run hot water or a mixture of vinegar and baking soda down the drain periodically to keep it clear.
By following these preventive measures and knowing how to use a snake to unclog your bathroom sink, you’ll be well-equipped to tackle any future drainage issues that may arise.
Congratulations on successfully snaking your bathroom sink and restoring its proper function!
Conclusion
Clogged bathroom sinks can be a major inconvenience, but with the right tools and knowledge, you can easily tackle the problem yourself. Using a snake to unclog your bathroom sink is a practical and effective solution that can save you time and money.
In this article, we provided a comprehensive guide on how to snake your bathroom sink. We covered the necessary tools, the preparation of the area, the removal of the drain stopper, the insertion and maneuvering of the snake, the testing of the drain, and the final cleanup.
By following these steps, you can effectively clear most common clogs and restore the flow of water in your bathroom sink. However, it’s important to remember that some clogs may require professional assistance or alternative methods if they prove to be stubborn or persistent.
Regular maintenance and preventive measures can go a long way in avoiding future clogs. Remember to practice good habits, such as avoiding pouring greasy substances and large food particles down the sink, and using mesh screens or strainers to catch debris. Periodically running hot water or a mixture of vinegar and baking soda down the drain can also help keep it clear.
With the knowledge and ability to snake your bathroom sink, you can tackle minor plumbing issues confidently and maintain a smoothly functioning sink. However, always exercise caution and seek professional help if you’re unsure or encounter more complex plumbing problems.
Unclogging your own bathroom sink can be a rewarding experience, and with practice, you’ll become more proficient and efficient in handling such situations. Remember to take your time, be patient, and always prioritize safety.
We hope this guide has been informative and helpful in assisting you with snaking your bathroom sink. Now it’s time to put your newfound knowledge into action and enjoy a fully functional and unclogged bathroom sink!
Frequently Asked Questions about How To Snake Bathroom Sink
Was this page helpful?
At Storables.com, we guarantee accurate and reliable information. Our content, validated by Expert Board Contributors, is crafted following stringent Editorial Policies. We're committed to providing you with well-researched, expert-backed insights for all your informational needs.


0 thoughts on “How To Snake Bathroom Sink”