
Articles
How To Take Apart A Whirlpool Washer
Modified: February 28, 2024
Learn how to easily take apart your Whirlpool washer with this step-by-step guide! Follow our expert articles for a stress-free disassembly process.
(Many of the links in this article redirect to a specific reviewed product. Your purchase of these products through affiliate links helps to generate commission for Storables.com, at no extra cost. Learn more)
Introduction
Whirlpool washers are well-known for their durability and performance. However, there may come a time when you need to take apart your Whirlpool washer for repairs or maintenance. Whether you are troubleshooting an issue or replacing a faulty component, disassembling the washer can be a daunting task if you are unfamiliar with the process.
In this article, we will guide you through the step-by-step process of taking apart a Whirlpool washer. We will provide you with safety precautions, a list of required tools, and detailed instructions for each stage of disassembly. By following these guidelines, you can effectively dismantle your washer and successfully address any problems you may encounter.
Before we begin, it is crucial to emphasize the importance of safety. Always ensure that your washer is unplugged before attempting any disassembly. Additionally, we recommend wearing protective gloves and eyewear to avoid injury. If you are uncertain about any part of the process, consult the user manual or seek professional assistance.
With that in mind, let us move on to the first step of taking apart your Whirlpool washer.
Key Takeaways:
- Prioritize safety by unplugging the washer, wearing protective gear, and working in a well-lit area. Use the right tools and handle components with care to successfully disassemble your Whirlpool washer.
- Follow the step-by-step process to remove the control panel, disconnect wiring harnesses, and remove panels and components. Always refer to the user manual or seek professional help if unsure.
Read more: How To Take Apart Washer
Safety Precautions
When working with any appliance, including a Whirlpool washer, it is essential to prioritize your safety. Taking proper precautions can help prevent accidents and ensure a smooth disassembly process. Here are some safety measures to keep in mind:
- Unplug the Washer: Before you begin the disassembly process, make sure that the washer is unplugged from the power source. This will eliminate the risk of electrical shock while handling the internal components. Safety should always be the first priority.
- Wear Protective Gear: When working with your Whirlpool washer, it is advisable to wear protective gloves and eyewear. These will safeguard your hands and eyes from any potential injuries. Additionally, wearing closed-toe shoes can protect your feet from accidental falls or part drops.
- Work in a Well-lit Area: Ensure that the workspace is well-lit to clearly see the components and any potential hazards. Proper lighting will help you navigate the disassembly process without any accidents or mishaps.
- Handle Sharp Objects with Care: During the disassembly process, you may come across sharp edges or pointed objects. Take caution when handling these components to prevent cuts or punctures. If necessary, use appropriate tools, such as pliers or gloves, to handle sharp objects safely.
- Avoid Excessive Force: While taking apart the washer, be gentle and avoid applying excessive force. Incorrect handling or excessive force can lead to component damage or personal injury. If a part is not coming off easily, double-check for any fasteners or screws that may be holding it in place.
- Read the User Manual: If you are unsure about any aspect of the disassembly process, refer to the user manual provided with your Whirlpool washer. The manual will provide specific instructions and safety guidelines for your model. Familiarize yourself with the manual before starting any repairs or maintenance.
By following these safety precautions, you can minimize the risk of accidents and work confidently while disassembling your Whirlpool washer. With the necessary safety measures in place, you can proceed to gather the tools required for the disassembly process.
Tools Required
Before you begin disassembling your Whirlpool washer, it’s important to gather the necessary tools. Having the right tools on hand will make the process easier and more efficient. Here are the tools you’ll need:
- Socket Set: A socket set with various sizes of sockets will be essential for removing bolts and screws throughout the disassembly process. Make sure you have both metric and standard sizes to accommodate different fasteners.
- Screwdriver Set: A set of screwdrivers, including both flathead and Phillips-head, will be required for removing screws and disconnecting electrical connections.
- Pliers: Pliers will come in handy for gripping and removing stubborn parts, such as hose clamps or wire connectors.
- Adjustable Wrench: An adjustable wrench will be useful for loosening and tightening nuts and bolts of various sizes.
- Needle Nose Pliers: Needle nose pliers are long, skinny pliers with a pointed end. These pliers are ideal for reaching into tight spaces and gripping small connectors or wires.
- Putty Knife: A putty knife can be used to pry and remove panels or gaskets without causing damage.
- Torque Wrench: A torque wrench is recommended for tightening critical fasteners to the specified torque value during reassembly.
- Shop Vacuum: A shop vacuum will be useful for cleaning up any water or debris that may be present during the disassembly process.
- Container for Small Parts: It’s a good idea to have a container or magnetic tray to keep track of small parts, such as screws or washers, to prevent them from getting lost.
With these tools readily available, you will be well-prepared to begin disassembling your Whirlpool washer. Take a moment to double-check that you have all the necessary tools before proceeding to the next steps.
Step 1: Unplug the Washer
The first and most crucial step before disassembling your Whirlpool washer is to ensure that it is completely disconnected from the power source. Unplugging the washer will prevent any electrical shocks or accidents during the disassembly process.
To unplug the washer, follow these steps:
- Locate the power cord at the back of the washer.
- Gently pull the power plug out of the wall outlet.
- Make sure the power cord is not tangled or obstructed.
Once the washer is unplugged, it is safe to proceed with the disassembly process. It is now time to move on to the next step: removing the control panel.
Note: Some washers may have a dedicated power switch instead of a power plug. In such cases, turn off the power switch before proceeding with the disassembly.
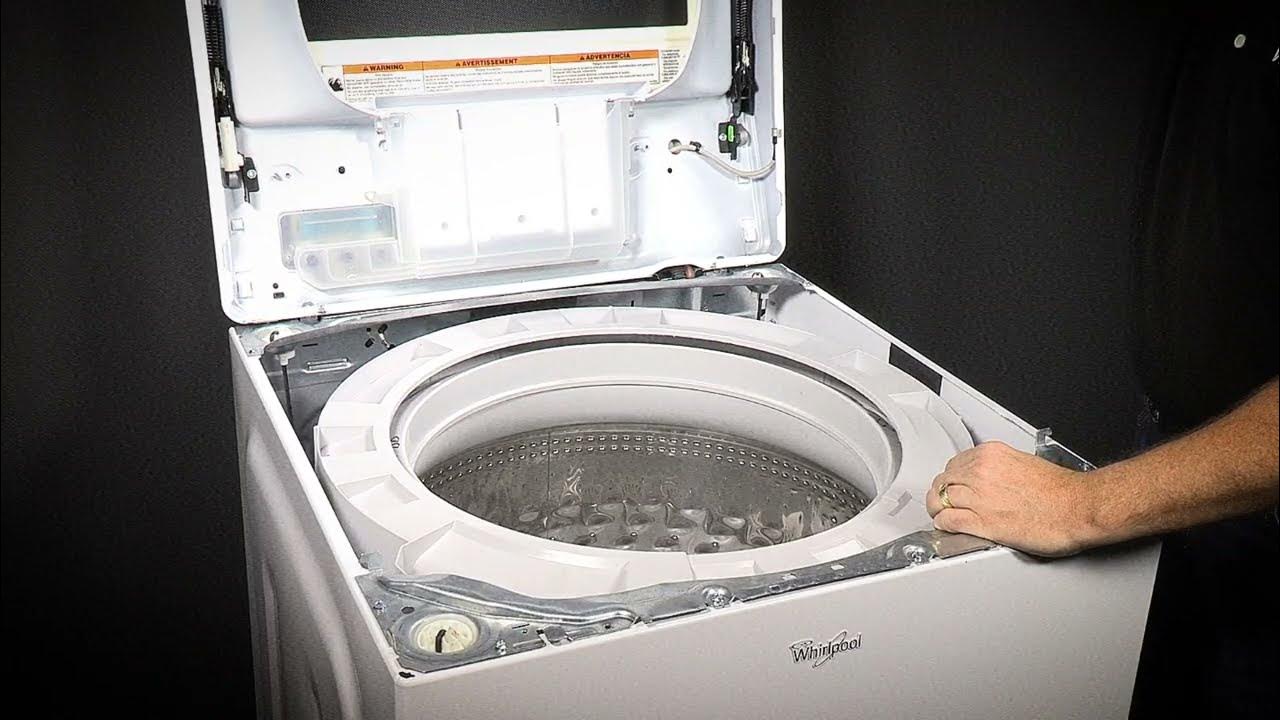
Step 2: Remove the Control Panel
Once you have unplugged the washer, it’s time to remove the control panel. The control panel houses the buttons and controls that operate the washer’s functions. Removing the control panel will provide access to the internal components of the washer.
Follow these steps to remove the control panel:
- Locate the screws or fasteners that secure the control panel to the washer’s top panel.
- Using a suitable screwdriver or socket wrench, remove the screws or fasteners. Set them aside in a safe place.
- Gently lift the control panel from one side and tilt it forward. Be careful not to strain or damage any wiring harnesses or connectors attached to the control panel.
- If there are any electrical connections or wiring harnesses connected to the control panel, carefully disconnect them by gently pulling out the connectors or detaching the wiring harnesses.
- Once the control panel is completely disconnected, set it aside in a safe location.
It is important to handle the control panel with care to avoid damaging any delicate components or wiring. If you encounter any difficulties during the removal process, refer to the user manual for your specific Whirlpool washer model or consult with a professional.
With the control panel successfully removed, you have completed the second step of disassembling your Whirlpool washer. The next step will be to disconnect the wiring harnesses. Keep reading to proceed to the next stage of disassembly.
Read more: How To Take Apart Maytag Washer
Step 3: Disconnect the Wiring Harness
After removing the control panel, the next step in disassembling your Whirlpool washer is to disconnect the wiring harness. The wiring harness connects various electrical components and controls within the washer. Disconnecting the wiring harness will allow for easier removal of the top panel and provide access to the internal parts of the appliance.
Follow these steps to disconnect the wiring harness:
- Identify the wiring harness that connects the control panel to the main body of the washer. It will consist of a bundle of wires with connectors joined together.
- Gently detach the connectors by pulling them apart. Avoid pulling on the wires themselves, as this can cause damage.
- For connectors with locking tabs, release the tabs by gently pressing or lifting them while pulling the connectors apart.
- If necessary, take note of the arrangement or take a picture of the connections to ensure proper reconnection during assembly.
It is essential to handle the wiring harness with care to prevent any damage to the wires or connectors. If you encounter any resistance or difficulties in disconnecting the wiring harness, double-check for any locking mechanisms or tabs that may need to be released for proper disconnection.
Once you have successfully disconnected the wiring harness, you can proceed to the next step of removing the top panel. This will allow for further disassembly of the washer components. Read on to learn how to remove the top panel of your Whirlpool washer.
Step 4: Remove the Top Panel
With the control panel and wiring harness disconnected, it’s time to remove the top panel of your Whirlpool washer. Removing the top panel will provide access to the internal components and make it easier to continue disassembling the washer.
Follow these steps to remove the top panel:
- Locate the screws or fasteners that secure the top panel to the main body of the washer. These are usually located at the back of the washer.
- Using a suitable screwdriver or socket wrench, remove the screws or fasteners. Keep them in a safe place for reassembly later.
- Carefully lift the top panel from the front of the washer, tilting it toward the back. Be cautious of any wiring harnesses or connectors that may still be attached.
- If there are any wiring harnesses or connectors attached to the top panel, gently disconnect them. Take note of the arrangement or take pictures to ensure proper reconnection during assembly.
- Set the top panel aside in a safe location.
When removing the top panel, be mindful of any delicate parts or wires to avoid damaging them. If you encounter any difficulties or are unsure about the process, consult the user manual for your specific Whirlpool washer model or seek professional assistance.
With the top panel successfully removed, you have completed the fourth step of disassembling your Whirlpool washer. Next, we will move on to disconnecting the lid switch wiring. Continue reading to learn how to proceed.
Before taking apart a Whirlpool washer, always unplug the machine and turn off the water supply. Use the appropriate tools and follow the manufacturer’s instructions or a reliable guide.
Step 5: Disconnect the Lid Switch Wiring
After removing the top panel, the next step in disassembling your Whirlpool washer is to disconnect the lid switch wiring. The lid switch is a safety feature that prevents the washer from running when the lid is open. Disconnecting the lid switch wiring will allow for further disassembly of the washer and access to the internal components.
Follow these steps to disconnect the lid switch wiring:
- Locate the lid switch, which is usually located near the door hinge or on the underside of the top panel.
- Identify the wiring harness connected to the lid switch.
- Gently disconnect the connectors of the wiring harness. Depending on the type of connector, you may need to press, lift, or slide a locking mechanism before pulling the connectors apart.
- Ensure the connectors are fully detached and free from any obstructions.
Handle the lid switch and wiring harness connectors with care to prevent any damage. If you encounter any resistance or difficulties in disconnecting the lid switch wiring, double-check for any locking mechanisms or tabs that may need to be released for proper disconnection.
Once you have successfully disconnected the lid switch wiring, you can proceed to the next step, which is removing the front panel of your Whirlpool washer. This will allow for further disassembly and access to the internal components. Keep reading to learn how to remove the front panel.
Step 6: Remove the Front Panel
Now that you have disconnected the lid switch wiring, it’s time to remove the front panel of your Whirlpool washer. Removing the front panel will provide access to the inner components of the washer, such as the drum, motor, and pump.
Follow these steps to remove the front panel:
- Locate the retaining screws or clips that secure the front panel to the washer’s cabinet. These are typically located at the top or bottom corners of the front panel.
- Using a suitable screwdriver or pliers, remove the screws or release the clips to detach the front panel from the cabinet.
- Gently pull the front panel towards you, ensuring that it is released from any clips or hooks holding it in place.
- Set the front panel aside in a safe location.
When removing the front panel, be cautious of any attached wires, hoses, or connectors that may still be connected. If necessary, carefully disconnect these components to fully remove the front panel.
It’s important to handle the front panel with care to avoid any damage or bending. If you encounter any difficulties during the removal process, refer to the user manual for your specific Whirlpool washer model or consult with a professional.
With the front panel successfully removed, you have completed the sixth step of disassembling your Whirlpool washer. Now you can move on to the next step, which is disconnecting the door lock assembly. Read on to learn how to proceed with the disassembly process.
Read more: How To Take Apart Stackable Washer/Dryer
Step 7: Disconnect the Door Lock Assembly
After removing the front panel, the next step in disassembling your Whirlpool washer is to disconnect the door lock assembly. The door lock assembly is responsible for securing the washer’s door during operation. Disconnecting it will allow for further disassembly and access to the internal components.
Follow these steps to disconnect the door lock assembly:
- Locate the door lock assembly, which is typically located near the front of the washer’s cabinet.
- Identify the wiring harness connected to the door lock assembly.
- Gently disconnect the connectors of the wiring harness. Depending on the type of connector, you may need to press, lift, or slide a locking mechanism before pulling the connectors apart.
- Ensure the connectors are completely detached and free from any obstructions.
Handle the door lock assembly and wiring harness connectors with care to prevent any damage. If you encounter any resistance or difficulties in disconnecting the door lock assembly, double-check for any locking mechanisms or tabs that may need to be released for proper disconnection.
Once you have successfully disconnected the door lock assembly, you can proceed to the next step, which is removing the tub cover. This will provide access to the inner components of the washer. Keep reading to learn how to remove the tub cover.
Step 8: Remove the Tub Cover
After disconnecting the door lock assembly, the next step in disassembling your Whirlpool washer is to remove the tub cover. The tub cover is the protective barrier that covers the drum and other inner components of the washer. Removing it will allow for further access to the tub assembly and other internal parts.
Follow these steps to remove the tub cover:
- Locate the screws or fasteners that secure the tub cover to the washer’s cabinet. These screws are typically located along the sides or back of the washer.
- Using a suitable screwdriver or socket wrench, remove these screws or fasteners and set them aside in a safe place.
- Gently lift the tub cover, being mindful of any wires or hoses that may still be connected.
- If there are any wires or hoses still attached to the tub cover, carefully disconnect them. Take note of their positions or use markers for easy reassembly later.
- Once all connections are detached, lift the tub cover completely and set it aside.
Handle the tub cover with care to avoid any damage. If you encounter any difficulties or are unsure about the process, consult the user manual for your specific Whirlpool washer model or seek professional assistance.
With the tub cover successfully removed, you have completed the eighth step of disassembling your Whirlpool washer. The next step will involve disconnecting the hoses and drain pump. Read on to learn how to proceed with the disassembly process.
Step 9: Disconnect the Hoses and Drain Pump
After removing the tub cover, the next step in disassembling your Whirlpool washer is to disconnect the hoses and drain pump. Disconnecting these components will allow for further disassembly and access to the inner parts of the washer.
Follow these steps to disconnect the hoses and drain pump:
- Identify the hoses connected to the washer’s drum and drain pump. These hoses are usually located at the back or bottom of the washer.
- Using pliers or your hand, loosen any hose clamps or connectors that secure the hoses in place.
- Gently pull the hoses away from the drum and drain pump. Be prepared for any excess water to drain out, so have a towel or bucket nearby to contain any spills.
- If there are any electrical connections or wiring harnesses attached to the drain pump, carefully disconnect them by gently pulling out the connectors or detaching the wiring harnesses.
- Once all hoses and electrical connections are detached, set them aside in a safe location.
When disconnecting hoses or the drain pump, be cautious of any water or debris that may be present. It is advisable to have a shop vacuum or towel ready to catch any water that may spill during this step.
Handle the hoses and electrical connections with care to prevent any damage. If you encounter any difficulties or are unsure about the process, refer to the user manual for your specific Whirlpool washer model or consult with a professional.
With the hoses and drain pump successfully disconnected, you have completed the ninth step of disassembling your Whirlpool washer. Next, we will move on to removing the agitator and basket. Read on to learn how to proceed.
Step 10: Remove the Agitator and Basket
After disconnecting the hoses and drain pump, the final step in disassembling your Whirlpool washer is to remove the agitator and basket. Removing these components will provide access to the drum and other internal parts for further maintenance or repairs.
Follow these steps to remove the agitator and basket:
- Start by removing the agitator, which is the central column inside the drum.
- Check for any screws or bolts at the top or bottom of the agitator. Use a suitable tool, such as a socket wrench or pliers, to remove these fasteners if present.
- If the agitator does not have any visible screws or bolts, it may be held in place by a friction fit. In this case, firmly grip the agitator and shake it back and forth while pulling upwards to loosen and remove it.
- Once the agitator is removed, focus on removing the basket, which is the drum itself.
- Inspect the drum for any retaining clips or fasteners that may be holding it in place.
- If there are any retaining clips, use a screwdriver or pliers to release them and remove the basket. Follow the instructions in the user manual for your specific Whirlpool washer model if necessary.
- If there are no retaining clips, the basket should lift out easily once the agitator is removed.
Handle the agitator and basket with care to avoid any damage. If you encounter any difficulties or are unsure about the process, consult the user manual for your specific Whirlpool washer model or seek professional assistance.
With the agitator and basket successfully removed, you have completed the final step of disassembling your Whirlpool washer. Congratulations! You can now proceed with the necessary repairs, maintenance, or component replacements. When reassembling the washer, follow these steps in reverse order and refer to the user manual for proper installation instructions.
Always prioritize your safety and exercise caution while working with the internal components of your Whirlpool washer. If you are unsure about any aspect of the disassembly or repair process, it is recommended to consult a professional technician for assistance.
Thank you for following this step-by-step guide on how to disassemble a Whirlpool washer. We hope this information has been helpful, and wish you success with your washer maintenance or repairs.
Read more: How Long Does A Whirlpool Washer Take
Conclusion
Disassembling a Whirlpool washer may seem like a daunting task, but with the right guidance and a little patience, it can be accomplished successfully. In this comprehensive guide, we have provided you with step-by-step instructions on how to safely and effectively take apart your Whirlpool washer for repairs, maintenance, or component replacements.
We started by emphasizing the importance of safety precautions, ensuring that you unplug the washer and use protective gear throughout the process. We also highlighted the tools you will need to have on hand, such as a socket set, screwdrivers, pliers, and more.
Each step of the disassembly process was outlined in detail, from removing the control panel and disconnecting the wiring harness to taking off the top panel and front panel. We covered the steps for disconnecting the lid switch wiring, removing the tub cover, disconnecting the door lock assembly, and disconnecting the hoses and drain pump. Finally, we explained how to remove the agitator and basket, allowing for complete access to the internal components.
Remember that safety should always be your top priority, and if at any point you feel unsure or overwhelmed, it is recommended to consult the user manual for your specific Whirlpool washer model or seek assistance from a professional technician.
We hope that this guide has been informative and helpful in empowering you to disassemble your Whirlpool washer with confidence. By following these steps and taking the necessary precautions, you will be able to successfully address any maintenance or repair needs and ensure the optimal performance of your washer.
Thank you for using this guide, and we wish you the best of luck in your washer disassembly and maintenance endeavors!
Frequently Asked Questions about How To Take Apart A Whirlpool Washer
Was this page helpful?
At Storables.com, we guarantee accurate and reliable information. Our content, validated by Expert Board Contributors, is crafted following stringent Editorial Policies. We're committed to providing you with well-researched, expert-backed insights for all your informational needs.

0 thoughts on “How To Take Apart A Whirlpool Washer”