Articles
How To Take Apart Stackable Washer/Dryer
Modified: October 18, 2024
Learn how to take apart stackable washer/dryer with our step-by-step articles. Find expert tips and instructions to safely disassemble your appliance.
(Many of the links in this article redirect to a specific reviewed product. Your purchase of these products through affiliate links helps to generate commission for Storables.com, at no extra cost. Learn more)
Introduction
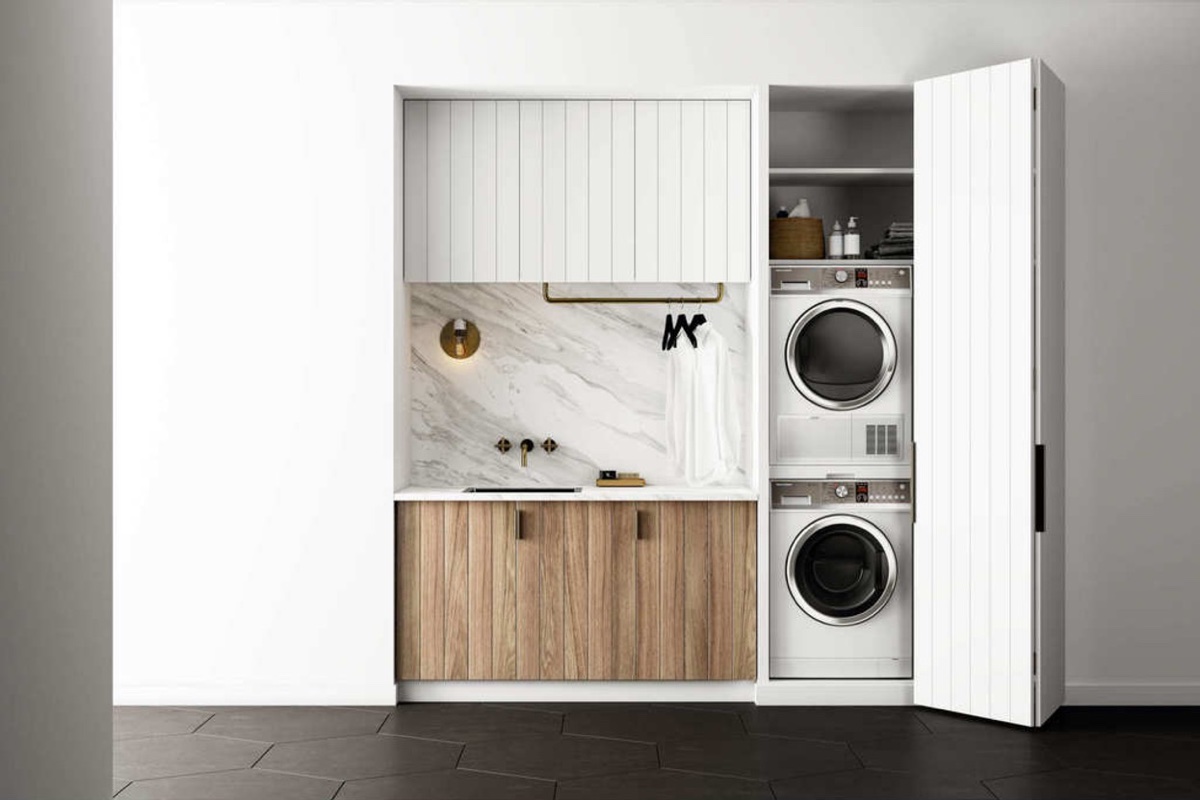
A stackable washer and dryer unit is a convenient space-saving appliance that combines both washing and drying functionalities in one compact unit. It is often used in apartments, small homes, or even in certain commercial settings where space is limited.
However, there may come a time when you need to disassemble the stackable washer and dryer, either to access certain components for repairs or for moving the units to a new location. Taking apart a stackable washer and dryer may seem like a daunting task, but with the right tools and knowledge, you can easily tackle this project.
In this article, we will guide you step-by-step on how to take apart a stackable washer and dryer. Before starting, it is important to note that the specific instructions may vary depending on the make and model of your unit. It is always recommended to consult the owner’s manual for detailed instructions or seek professional assistance if you are unsure.
Now, let’s gather the tools needed and discuss some safety precautions before diving into the disassembly process.
Key Takeaways:
- Prioritize safety by disconnecting the power, wearing protective gear, and being cautious of sharp edges and electrical components when disassembling a stackable washer and dryer. Taking necessary safety precautions ensures a smooth and accident-free disassembly experience.
- Thoroughly cleaning and inspecting the components before reassembling the units ensures optimal performance and helps identify potential issues. Following the reverse order of the disassembly process and testing the units after reassembly ensures they are in proper working condition.
Read more: How To Take Apart A Lamp
Tools Needed
Before you begin the process of taking apart a stackable washer and dryer, it is important to gather the necessary tools so that you have everything you need readily available. Here are the tools you will need:
- Phillips screwdriver
- Flathead screwdriver
- Adjustable wrench
- Pliers
- Nut driver set
- Socket wrench set
- Putty knife
- Protective gloves
- Protective goggles
Having these tools on hand will make the disassembly process much smoother and more efficient. You may also find it helpful to have a flashlight to illuminate certain areas as you work.
Now that you have gathered the necessary tools, it’s important to keep safety in mind while disassembling the stackable washer and dryer. Let’s discuss some safety precautions you should follow.
Safety Precautions
When taking apart a stackable washer and dryer, it’s important to prioritize safety to prevent any accidents or injuries. Here are some safety precautions to keep in mind:
- Ensure that the power to the washer and dryer unit is completely turned off. This will help avoid any electrical shock or damage.
- Wear protective gloves to protect your hands from sharp edges, electrical components, or any potential hazards.
- Wear protective goggles to shield your eyes from any debris or particles that may be released during the disassembly process.
- Follow any additional safety instructions provided by the manufacturer in the owner’s manual.
- Make sure to work in a well-ventilated area to prevent inhalation of any fumes that may be present.
- Take your time and work carefully. Rushing through the disassembly process can lead to mistakes or accidents.
- If you are unsure about any step or component, consult the owner’s manual or consider seeking professional assistance.
- Keep small components and screws in a safe place to avoid losing them during the disassembly process.
- When working with electrical components, be cautious of live wiring and take necessary precautions.
- If you encounter any difficulty or resistance during the disassembly process, stop and assess the situation before proceeding.
By following these safety precautions, you can minimize the risk of accidents and ensure a safe disassembly process. Let’s move on to the first step of the disassembly process, which is turning off the power to the washer and dryer.
Step 1: Turn off the Power
Before you begin disassembling the stackable washer and dryer, it is crucial to turn off the power supply to ensure your safety. Follow these steps to turn off the power:
- Locate the power cord or plug of the stackable unit.
- Unplug the power cord from the electrical outlet.
- If the power cord is inaccessible, you may need to turn off the circuit breaker or remove the appropriate fuse from the electrical panel.
- Double-check by trying to turn on the unit to ensure that it is completely disconnected from the power source.
Turning off the power eliminates the risk of electrical shock or damage during the disassembly process. Once you have confirmed that the power is disconnected, you can proceed to the next step, which is removing the dryer from the washer unit.
Remember, safety should always be your top priority. If you have any doubts or concerns about turning off the power or handling electrical components, it is advisable to seek assistance from a qualified professional.
In the next step, we will guide you on how to safely remove the dryer from the washer unit.
Step 2: Remove the Dryer from the Washer
Once you have turned off the power and ensured your safety, it’s time to proceed with removing the dryer from the washer unit. Follow these steps:
- Locate and remove any screws or fasteners that secure the dryer to the washer unit. These may be located at the top or back of the units.
- Depending on the make and model, there may be brackets or clips that attach the dryer to the washer. Use a screwdriver or wrench to loosen and remove these brackets or clips.
- Once the dryer is detached from the washer, carefully slide it away from the washer unit, maintaining a firm grip to prevent it from falling or tipping over.
- Set the dryer aside in a safe location where it won’t obstruct your working area.
Removing the dryer from the washer allows you to have better access to the internal components of both units. Now that the dryer is separated, you can proceed with disconnecting the power source in the next step.
Remember to take your time and work with caution throughout the disassembly process. If you encounter any difficulties or are unsure about any step, refer to the owner’s manual or consider seeking professional assistance.
In the next step, we will guide you on how to disconnect the power source from the stackable washer and dryer units.
Read more: How To Take A Dryer Apart
Step 3: Disconnect the Power Source
With the dryer removed from the washer unit, the next step in disassembling a stackable washer and dryer is to disconnect the power source. Follow these steps:
- Locate the power cord of the stackable washer and dryer.
- Inspect the power cord for any damage or frayed wires. If you notice any issues, it is recommended to replace the cord before proceeding.
- Unplug the power cord from the electrical outlet.
- Inspect the plug for any damage or signs of wear. If the plug is damaged, it is advisable to replace it with a new one.
- Follow the power cord inside the units, and disconnect it from any wiring or connectors.
- Take note of the connections and wiring configuration, as you will need to reconnect them during the reassembly process.
Disconnecting the power source ensures that there is no electricity flowing through the units, minimizing any potential electrical hazards. Remember to handle electrical components with caution and avoid pulling on the cords forcefully.
Now that the power source is disconnected, the next step is to disconnect the water supply in order to fully disassemble the units. We’ll cover that in Step 4 of the process.
Step 4: Disconnect the Water Supply
To continue the disassembly process of a stackable washer and dryer, you need to disconnect the water supply. Follow these steps:
- Locate the water supply hoses connected to the back of the washer unit. These hoses are usually connected to the hot and cold water faucets.
- Turn off the water supply valves by rotating them clockwise until they are fully closed.
- Using pliers or an adjustable wrench, loosen the fittings that connect the water supply hoses to the washer unit. Be cautious of any water that may spill out when loosening these fittings.
- Once the fittings are loose, gently pull the water supply hoses away from the unit.
- Have a bucket or towel ready to catch any excess water that may still be in the hoses or connections.
- If there are any additional water supply connections, such as drain hoses or auxiliary hoses, disconnect them following the same procedures.
By disconnecting the water supply properly, you prevent any potential water leaks and ensure a smooth disassembly process. Remember to handle the water supply hoses with care and avoid twisting or bending them excessively.
With the water supply disconnected, you can now move on to the next step, which involves detaching the drain hose from the stackable washer and dryer units.
Step 5: Detach the Drain Hose
In this step, we’ll guide you through detaching the drain hose from the stackable washer and dryer units. Disconnecting the drain hose is important to prevent any water from spilling during the disassembly process. Follow these steps:
- Locate the drain hose connected to the back of the washer unit. It is usually found near the bottom of the unit.
- If the drain hose is secured with a clamp or bracket, use pliers or a screwdriver to loosen and remove it.
- Once the clamp or bracket is removed, gently pull the drain hose away from the unit. You may need to tilt the unit slightly to ease the removal.
- Have a bucket or towel ready to catch any residual water in the drain hose.
- If the drain hose is connected to a standpipe or a wall drain, disconnect it at the point of connection.
- Inspect the drain hose for any blockages or damage. If necessary, clean or replace the drain hose before reassembly.
Properly detaching the drain hose ensures that no water spills out during the disassembly process. Remember to handle the drain hose carefully to avoid any kinks or damage.
Now that the drain hose is disconnected, we can move on to the next step, which involves unfastening the washer and dryer units from each other.
Step 6: Unfasten the Washer and Dryer Units
Now that you have disconnected the power, water supply, and drain hose, it’s time to unfasten the washer and dryer units from each other. This step is crucial for separating the units and gaining access to their individual components. Follow these steps:
- Inspect the front and sides of the stackable units for any screws, clips, or brackets that secure the washer and dryer together.
- Using a Phillips screwdriver or a nut driver set, remove any screws that hold the units together. Pay attention to any hidden screws, such as those underneath the control panel or at the back of the units.
- If there are any clips or brackets, carefully release them using pliers, a flathead screwdriver, or an adjustable wrench.
- Check for any additional fasteners or connections that join the units together. These may vary depending on the make and model of your stackable washer and dryer.
- Keep track of the removed screws, clips, or brackets, as you will need them during the reassembly process.
By unfastening the washer and dryer units, you are preparing them for separation in the next step. Double-check to ensure that all fasteners have been removed before proceeding.
Now that the units are ready for separation, let’s move on to Step 7, where we will guide you on how to lift and separate the washer and dryer units.
Read more: How To Take Apart A Dresser
Step 7: Lift and Separate the Units
With the washer and dryer units unfastened, it’s time to lift and separate them from each other. This step requires caution and careful maneuvering to avoid any damage or injuries. Follow these steps:
- Enlist the help of a second person to ensure a safe and smooth separation of the units. Stackable washer and dryer units can be heavy and awkward to handle alone.
- Position yourselves on opposite sides of the units to balance the weight evenly.
- Each person should firmly grip their designated unit, making sure to have a secure hold.
- With synchronized effort, lift the units slowly and steadily, being mindful of any protruding or delicate components.
- Carefully separate the units by moving them away from each other, ensuring a safe distance and avoiding any unnecessary strain on the attached hoses or wires.
- Set the units down on a stable and flat surface, away from any obstructions.
When lifting and separating the units, it’s crucial to maintain a proper stance and use your legs rather than your back to avoid strain or injury. Take your time and communicate with your partner to ensure a smooth and controlled separation process.
Now that the washer and dryer units are separated, we can proceed to the next steps, which involve disassembling the individual components of the washer unit. Let’s move on to Step 8.
Before taking apart a stackable washer/dryer, make sure to unplug the unit and turn off the water supply. Also, take photos or make notes of the connections to help with reassembly.
Step 8: Remove the Washer Control Panel
Now that the washer and dryer units are separated, we can focus on disassembling the individual components of the washer unit. The first component to remove is the control panel. Follow these steps:
- Locate the control panel on the front of the washer unit. It is typically situated above the drum and contains various buttons and knobs for operating the washer.
- Inspect the control panel for any screws or clips that secure it to the washer unit.
- Using a Phillips screwdriver or a nut driver set, remove any screws that hold the control panel in place. Keep the screws in a safe place for reassembly later.
- If there are any clips or brackets, carefully release them using pliers or a flathead screwdriver. Be gentle to avoid damaging the control panel or washer unit.
- Once the screws and clips are removed, gently lift the control panel from the washer unit, taking care not to strain any of the connected wires or cables.
- If there are any wire connections, carefully detach them by gently pulling them apart or using a flathead screwdriver to release any locking mechanisms.
- Set the control panel aside in a safe location where it won’t get damaged during the rest of the disassembly process.
Removing the control panel allows for easier access to the internal components of the washer unit. Take your time and be mindful of the wire connections to avoid any damage or accidental disconnection.
In the next steps, we will guide you through disconnecting the washer components and removing the washer cabinet. Let’s move on to Step 9.
Step 9: Disconnect Washer Components
With the control panel removed, we can now focus on disconnecting the various components inside the washer unit. This step involves disconnecting wires, hoses, and other connections that are essential for the washer’s operation. Follow these steps:
- Locate the wiring harnesses inside the washer unit. These harnesses are bundles of wires that connect different parts of the washer.
- Carefully disconnect the wiring harnesses by gently pulling them apart. If there are any locking mechanisms, use a flathead screwdriver to release them.
- Take note of the specific connections and their positions to ensure proper reassembly later.
- Next, locate any hoses that are connected to the washer unit, such as the water inlet hoses or drain hose.
- Use pliers or an adjustable wrench to loosen and disconnect the hose fittings from their respective connections.
- Be prepared to catch any residual water that may spill out when disconnecting the hoses, especially the drain hose.
- Inspect the hoses for any damage or blockages. Clean or replace them as necessary.
- Lastly, check for any other components that are connected to the washer unit, such as sensors, switches, or pumps.
- If these components can be easily disconnected, follow the manufacturer’s instructions or consult the owner’s manual for proper removal.
By disconnecting the various components inside the washer unit, you are preparing it for the removal of the washer cabinet, which we will cover in the next step. Take your time and pay close attention to the connections to avoid any damage or confusion during reassembly.
In Step 10, we will guide you through removing the washer cabinet itself.
Step 10: Remove Washer Cabinet
Now that you have disconnected the various components inside the washer unit, it’s time to remove the washer cabinet. The cabinet is the outer shell of the washer that houses the internal components. Removing the cabinet will give you access to the inner workings of the washer. Follow these steps:
- Before proceeding, ensure that you have fully disconnected all the necessary components as outlined in Step 9.
- Locate any screws or clips that secure the washer cabinet to the base of the unit. These may be located at the front, sides, or back of the washer.
- Using the appropriate tools, such as a Phillips screwdriver or a nut driver set, remove these screws or release the clips to free the washer cabinet.
- Once the fasteners are removed, carefully lift the cabinet upwards to detach it from the base. It may require some gentle wiggling or rocking to fully separate the cabinet.
- Have a helper support the weight of the cabinet as you lift it off, as it can be bulky and heavy.
- Set the removed washer cabinet aside in a safe location where it won’t be damaged during the rest of the disassembly process.
By removing the washer cabinet, you have gained access to the internal components of the washer unit. This will allow for easier inspection, cleaning, and potential repairs. Remember to take your time and handle the cabinet with care to avoid any damage.
In the next steps, we will guide you through removing the components of the dryer unit. Let’s move on to Step 11.
Read more: How To Take Apart A Rubbermaid Shed
Step 11: Remove Dryer Components
Now that you have successfully disassembled the washer unit, it’s time to focus on the dryer components. Disassembling the dryer allows for cleaning, maintenance, or repair of the individual parts. Follow these steps to remove the dryer components:
- Inspect the interior of the dryer to identify the specific components that need to be removed. These components may include the lint trap, drum, heating element, or belt.
- Refer to the dryer’s owner’s manual or consult the manufacturer’s instructions for specific guidance on removing these components.
- Typically, the lint trap is located at the front of the dryer. Slide it out or lift it up to remove it.
- If you need to remove the drum, follow the manufacturer’s instructions. This often involves removing the dryer’s front panel to access the drum and its support rollers or glides.
- For the heating element or belt, consult the dryer’s manual for the recommended removal procedure. This may involve accessing the back or the top of the dryer unit.
- As you remove each component, keep track of any screws, clips, or brackets that need to be removed or released.
- Place the removed components in a safe location where they won’t be damaged and can easily be reassembled when needed.
By removing the dryer components, you can thoroughly clean and inspect them for any issues. This ensures proper functioning and extends the lifespan of your dryer. Take your time and follow the manufacturer’s instructions to prevent any damage or confusion during the reassembly process.
In Step 12, we will guide you through taking apart the dryer cabinet itself.
Step 12: Take Apart the Dryer Cabinet
With the dryer components removed, the next step is to take apart the dryer cabinet. Taking apart the dryer cabinet will give you access to the inner workings of the machine, allowing for thorough cleaning, maintenance, or repairs. Follow these steps to take apart the dryer cabinet:
- Before proceeding, make sure you have disconnected the power and have taken the necessary safety precautions as outlined earlier.
- Inspect the dryer cabinet for any visible screws or fasteners holding it together. These may be located on the back, the sides, or underneath the dryer.
- Using the appropriate tools, such as a Phillips screwdriver or a nut driver set, remove the screws and fasteners that secure the cabinet panels together.
- Go slowly and methodically, removing one panel at a time. Keep screws organized and set them aside in a safe place for reassembly.
- Continue removing panels until the entire dryer cabinet is disassembled, exposing the inner components, such as the motor, belt, and blower assembly.
- Take care not to force any panels or parts to avoid damaging them.
By taking apart the dryer cabinet, you can thoroughly clean the interior, inspect and replace any faulty components, and ensure optimal performance of your dryer. Remember to take your time and exercise caution during the disassembly process to prevent any damage or injury.
In the next step, we will guide you through removing the dryer drum. Let’s move on to Step 13.
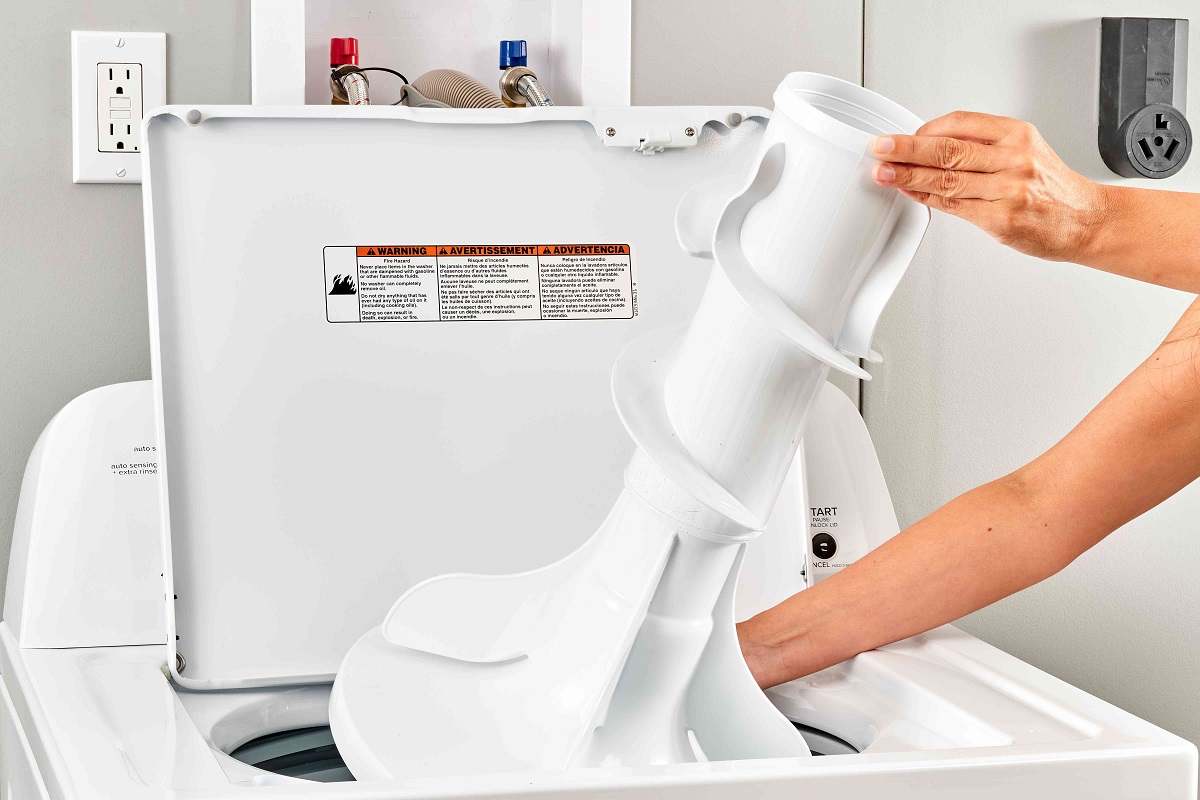
Step 13: Remove Dryer Drum
In this step, we will guide you through removing the dryer drum. The drum is the central component of the dryer that rotates and tumbles the clothes during the drying cycle. Removing the drum allows for deeper cleaning, maintenance, or replacement of parts if necessary. Follow these steps:
- Refer to the dryer’s owner’s manual or consult the manufacturer’s instructions for specific guidance on removing the drum.
- Locate the drum support rollers or glides, which are typically located at the back of the dryer cabinet.
- Using a screwdriver or a wrench, release the mounting brackets or clips that secure the drum support rollers or glides.
- Once the mounting brackets or clips are released, carefully lift the drum away from the support rollers or glides.
- Take note of the belt that wraps around the drum and connects it to the motor. You may need to release or detach the belt to completely remove the drum.
- Inspect the drum for any signs of damage or wear. Clean the drum and the support rollers or glides, or replace them if necessary.
Removing the dryer drum allows for a thorough cleaning of the drum itself and the surrounding components. It also provides an opportunity to inspect and replace any worn-out or faulty parts. Take your time and follow the manufacturer’s instructions to ensure a successful removal process.
In the next step, we will guide you on how to clean and inspect the components you have removed before reassembling the units. Let’s move on to Step 14.
Step 14: Clean and Inspect Components
Now that you have disassembled the stackable washer and dryer units, it’s time to clean and inspect the components you have removed. Cleaning and inspecting the components is crucial for maintaining the efficiency and longevity of your appliances. Follow these steps to clean and inspect the components:
- Start by cleaning the components using a mild detergent or a specialized cleaning solution recommended by the manufacturer.
- Use a soft cloth or sponge to gently remove any dirt, dust, or residue from the surfaces of the components. For stubborn stains or grime, you may need to use a brush or a scrubbing pad.
- Rinse the components thoroughly with clean water, ensuring all cleaning agents are removed.
- Leave the components to air dry completely before moving on to the inspection process.
- Inspect each component for any signs of damage, wear, or corrosion. Pay special attention to electrical connections, hoses, belts, and moving parts.
- Look for loose or disconnected wires, cracks or breaks in plastic components, and any signs of rust or deterioration.
- If you discover any damaged or faulty components, consider repairing or replacing them before reassembling the units.
- Take this opportunity to clean the interior of the washer and dryer units as well. Remove any accumulated lint, dust, or debris using a vacuum cleaner or a lint brush.
- Inspect the interior of the units for any signs of damage or blockages.
Cleaning and inspecting the components of the stackable washer and dryer units ensure optimal performance and help identify any potential issues. By addressing any problems before reassembling, you can avoid further complications or breakdowns. Take your time and be thorough in your cleaning and inspection process.
In the final steps, we will guide you through reassembling the units. Let’s move on to Step 15.
Read more: How To Take Apart A Kitchen Faucet
Step 15: Reassemble the Units
After cleaning and inspecting the components of the stackable washer and dryer units, it’s time to reassemble the units. Reassembling the units requires careful attention to detail and following the reverse order of the disassembly process. Follow these steps to reassemble the units:
- Start by reattaching the cleaned and inspected components back into their respective places. Follow any manufacturer instructions or guidelines for proper installation.
- Begin with the dryer components, such as the drum, heating element, belt, and lint trap. Ensure proper alignment and secure any screws, clips, or brackets as necessary.
- Move on to the washer components, including the drum, control panel, wiring harnesses, and hoses. Connect the wires and hoses securely, making sure to follow the correct configurations you noted during the disassembly process.
- Prepare the washer cabinet by aligning and attaching the panels according to the manufacturer’s instructions. Insert and tighten any screws or fasteners to secure the cabinet in place.
- Carefully lift and align the dryer unit onto the washer unit. Ensure that both units are securely connected.
- Reconnect the power source to the washer and dryer units. Plug in the power cord and restore the electrical supply by turning on the circuit breaker or inserting the appropriate fuse.
- Reconnect the water supply hoses to the washer unit, ensuring proper tightness and no leaks.
- Reattach the drain hose to its original connection if applicable.
Take your time during the reassembly process, double-checking all connections and alignments. Refer to the owner’s manual or manufacturer instructions if you encounter any difficulties or have any questions. Once reassembled, test the units to ensure they are functioning properly before using them.
Congratulations! You have successfully reassembled your stackable washer and dryer units. By following these steps and taking proper care of your appliances, you can ensure their continued performance and longevity.
If you are unsure about any step or encounter any issues during the process, it is always recommended to seek assistance from a qualified professional to avoid any potential damage or safety hazards.
Remember to consult the owner’s manual or manufacturer’s instructions for any specific details or guidelines related to your specific make and model of stackable washer and dryer units.
Conclusion
Disassembling and reassembling a stackable washer and dryer unit may seem like a challenging task, but with the right tools, knowledge, and patience, it can be accomplished successfully. By following the step-by-step guide in this article, you can safely and effectively take apart your stackable washer and dryer units.
Throughout the disassembly process, it is crucial to prioritize safety by disconnecting the power source, wearing protective gear, and being cautious of sharp edges and electrical components. Taking the necessary safety precautions ensures a smooth and accident-free disassembly experience.
Once the units are disassembled, each component can be individually cleaned, inspected, and repaired or replaced if necessary. Paying attention to the condition of the components allows for optimal performance and prolongs the lifespan of your appliances.
When it’s time to reassemble the units, carefully following the reverse order of the disassembly process helps ensure a successful reassembly. Take your time to align and secure each component, referring to the manufacturer’s instructions if needed. Testing the units after reassembly ensures they are in proper working condition before resuming normal use.
Remember, if you are unsure about any step or encounter difficulties during the disassembly or reassembly process, it’s always wise to consult the owner’s manual or seek assistance from a professional to avoid any damage or safety hazards.
By taking apart and reassembling your stackable washer and dryer units, you can maintain their efficiency, address any issues, and potentially avoid costly repairs or replacements. Regular maintenance and care will prolong the life of your appliances and ensure they continue to serve you for years to come.
We hope this comprehensive guide has provided you with the knowledge and confidence to successfully take apart and reassemble your stackable washer and dryer units. Enjoy the benefits of a clean and well-maintained laundry appliance setup!
After mastering how to dismantle your stackable washer/dryer, why not discover more useful spaces around your home? Dive into our detailed guide on setting up and optimizing your laundry room. You'll find practical tips for making this often-overlooked space functional and appealing, ensuring every square inch works hard for your home's cleanliness and efficiency.
Frequently Asked Questions about How To Take Apart Stackable Washer/Dryer
Was this page helpful?
At Storables.com, we guarantee accurate and reliable information. Our content, validated by Expert Board Contributors, is crafted following stringent Editorial Policies. We're committed to providing you with well-researched, expert-backed insights for all your informational needs.


0 thoughts on “How To Take Apart Stackable Washer/Dryer”