
Articles
How To Take Apart A Honeywell Fan
Modified: October 28, 2024
Learn how to efficiently disassemble a Honeywell fan with our informative articles. Gain step-by-step instructions and expert tips to make the process easier and safer.
(Many of the links in this article redirect to a specific reviewed product. Your purchase of these products through affiliate links helps to generate commission for Storables.com, at no extra cost. Learn more)
Introduction
Welcome to the ultimate guide on how to take apart a Honeywell fan! Whether you’re looking to clean your fan thoroughly or troubleshoot a problem, disassembling your Honeywell fan is a crucial step. In this article, we will walk you through a step-by-step process of taking apart your fan safely and efficiently. By following these instructions, you will be able to access and clean the different components of your fan, ensuring optimum performance and longevity.
Before we dive into the disassembly process, it’s important to note that each Honeywell fan model may have slight variations in terms of design and assembly. Therefore, it’s always a good idea to consult your fan’s user manual for specific instructions and precautions. Additionally, make sure to unplug your fan before starting the disassembly process to avoid any potential electrical hazards.
Now that you’re ready, let’s gather the necessary tools and materials before we begin disassembling your Honeywell fan.
Key Takeaways:
- Keep your Honeywell fan running smoothly by regularly disassembling, cleaning, and reassembling its components. This ensures optimal performance and longevity, providing you with a refreshing breeze for years to come.
- Prioritize safety by unplugging your fan before disassembling it, and handle the components with care throughout the cleaning and reassembly process. Regular maintenance ensures a cleaner and healthier indoor environment.
Read more: How To Clean Fan Without Taking It Apart
Tools and Materials Needed
Before starting the disassembly process, you’ll need the following tools and materials:
- Phillips head screwdriver
- Flathead screwdriver
- Clean cloth or microfiber towel
- Mild detergent or cleaning solution
- Water
- Soft-bristle brush
The Phillips head screwdriver will be used to remove the screws that hold the front grill, motor housing, and other components together. The flathead screwdriver can be handy for prying open any clips or disconnecting wires, if necessary.
A clean cloth or microfiber towel will be used to wipe down and clean the different components of your fan. If there are stubborn stains or dirt buildup, you can use a mild detergent or cleaning solution diluted in water to clean the parts more thoroughly.
Lastly, a soft-bristle brush can be used to gently remove any dust or debris from hard-to-reach areas, such as the motor housing or blade assembly.
Once you have gathered all the necessary tools and materials, we can now move on to the step-by-step process of taking apart your Honeywell fan.
Step 1: Unplug the Fan
The first and most important step before beginning the disassembly process is to unplug the fan from the power source. This ensures your safety throughout the entire procedure and prevents any risk of electric shock.
To unplug the fan, locate the power cord at the back or bottom of the fan. Gently pull the plug out of the electrical outlet and set it aside.
It’s important to note that for some Honeywell fan models, the power cord may be permanently fixed to the fan body. In such cases, you can still proceed with the disassembly process by ensuring the fan is completely powered off or by turning off the circuit breaker of the room in which the fan is located.
Take a moment to visually inspect the fan and ensure that there are no loose or damaged wires. If you notice any frayed wires or loose connections, it’s recommended to have a professional electrician address the issue before proceeding with the disassembly process.
Once you have unplugged the fan and ensured its safety, you’re now ready to move on to the next step: removing the front grill.
Step 2: Remove the Front Grill
With the fan unplugged, it’s time to remove the front grill. The front grill is designed to protect the blades and prevent any accidents while the fan is in operation. Removing the front grill will give you access to the blades and internal components.
To remove the front grill, start by locating the release tabs or screws that secure it in place. Depending on the model, you may find release tabs on the sides, top, or bottom of the grill. If there are screws, use a Phillips head screwdriver to unscrew them.
Once you have identified the release tabs or unscrewed the screws, gently push or pull the front grill away from the main body of the fan. Be cautious not to apply excessive force to avoid damaging any parts.
In some cases, there may be clips or latches holding the front grill in place. If this is the case, carefully pry open the clips or release the latches using a flathead screwdriver. Take your time and ensure the front grill is fully detached before proceeding.
After removing the front grill, you can set it aside for cleaning. We’ll cover more about cleaning the grill and blades in a later step.
Now that the front grill is removed, you will have a clear view of the blades and the motor housing. This will allow you to proceed to the next step, which is removing the blades.
Step 3: Remove the Blades
Now that the front grill is removed, it’s time to remove the fan blades. Removing the blades will allow you to clean them thoroughly and access the motor housing for maintenance if needed.
Start by locating the center nut or bolt that secures the blades to the motor shaft. In most Honeywell fan models, the blades are attached using a center nut. Use a Phillips head screwdriver or a wrench to loosen and remove the nut in a counterclockwise direction.
Once the center nut is removed, carefully lift the blades away from the motor shaft. Take note of the position and orientation of the blades to ensure you can reassemble them correctly later.
As you remove the blades, be cautious as they may still be connected to the motor with wires. If this is the case, gently disconnect the wires by unplugging the connectors or loosening the wire connections, taking care not to damage any delicate components in the process.
Set the blades aside in a safe location away from the work area. You can clean them later along with the other components of the fan.
With the blades removed, you’ll now have a clear view of the motor housing and other internal components. This allows you to proceed to the next step: disassembling the motor housing.
Remember to handle the blades with care to avoid any accidents or damage. Take your time with this step to ensure a smooth and safe process.
When taking apart a Honeywell fan, start by unplugging the fan and removing the front grill. Use a screwdriver to remove the screws holding the fan together, then carefully separate the front and back panels to access the internal components.
Read more: How To Take Apart A Lamp
Step 4: Disassemble the Motor Housing
Now that the fan blades are removed, it’s time to disassemble the motor housing. This will give you access to the motor and other internal components, allowing you to clean and inspect them.
Start by locating any screws or clips that secure the motor housing in place. These may be located on the sides or bottom of the fan. Use a Phillips head screwdriver to unscrew the screws or gently pry open the clips using a flathead screwdriver.
Once the screws or clips are removed, carefully separate the motor housing from the main body of the fan. Take note of any wires or connectors that are still attached to the motor housing and gently disconnect them, ensuring not to pull or tug too forcefully.
With the motor housing detached, you can now proceed to clean and inspect the motor and other internal components. Use a clean cloth or a soft-bristle brush to remove any dust or debris from the motor and other hard-to-reach areas.
If there are any stubborn stains or dirt buildup, you can use a mild detergent or cleaning solution diluted in water. Dip the cloth in the solution and gently wipe down the motor and other components, taking care not to saturate them with liquid.
Remember to let the motor housing and other components dry completely before reassembling the fan. This will prevent any moisture from damaging the electrical components.
With the motor housing disassembled, cleaned, and inspected, you can move on to the next step: cleaning the other components of the fan, such as the blades and front grill.
Take your time with this step and ensure the motor housing is handled with care to avoid any damage. Safety should always be a priority when working with electrical components.
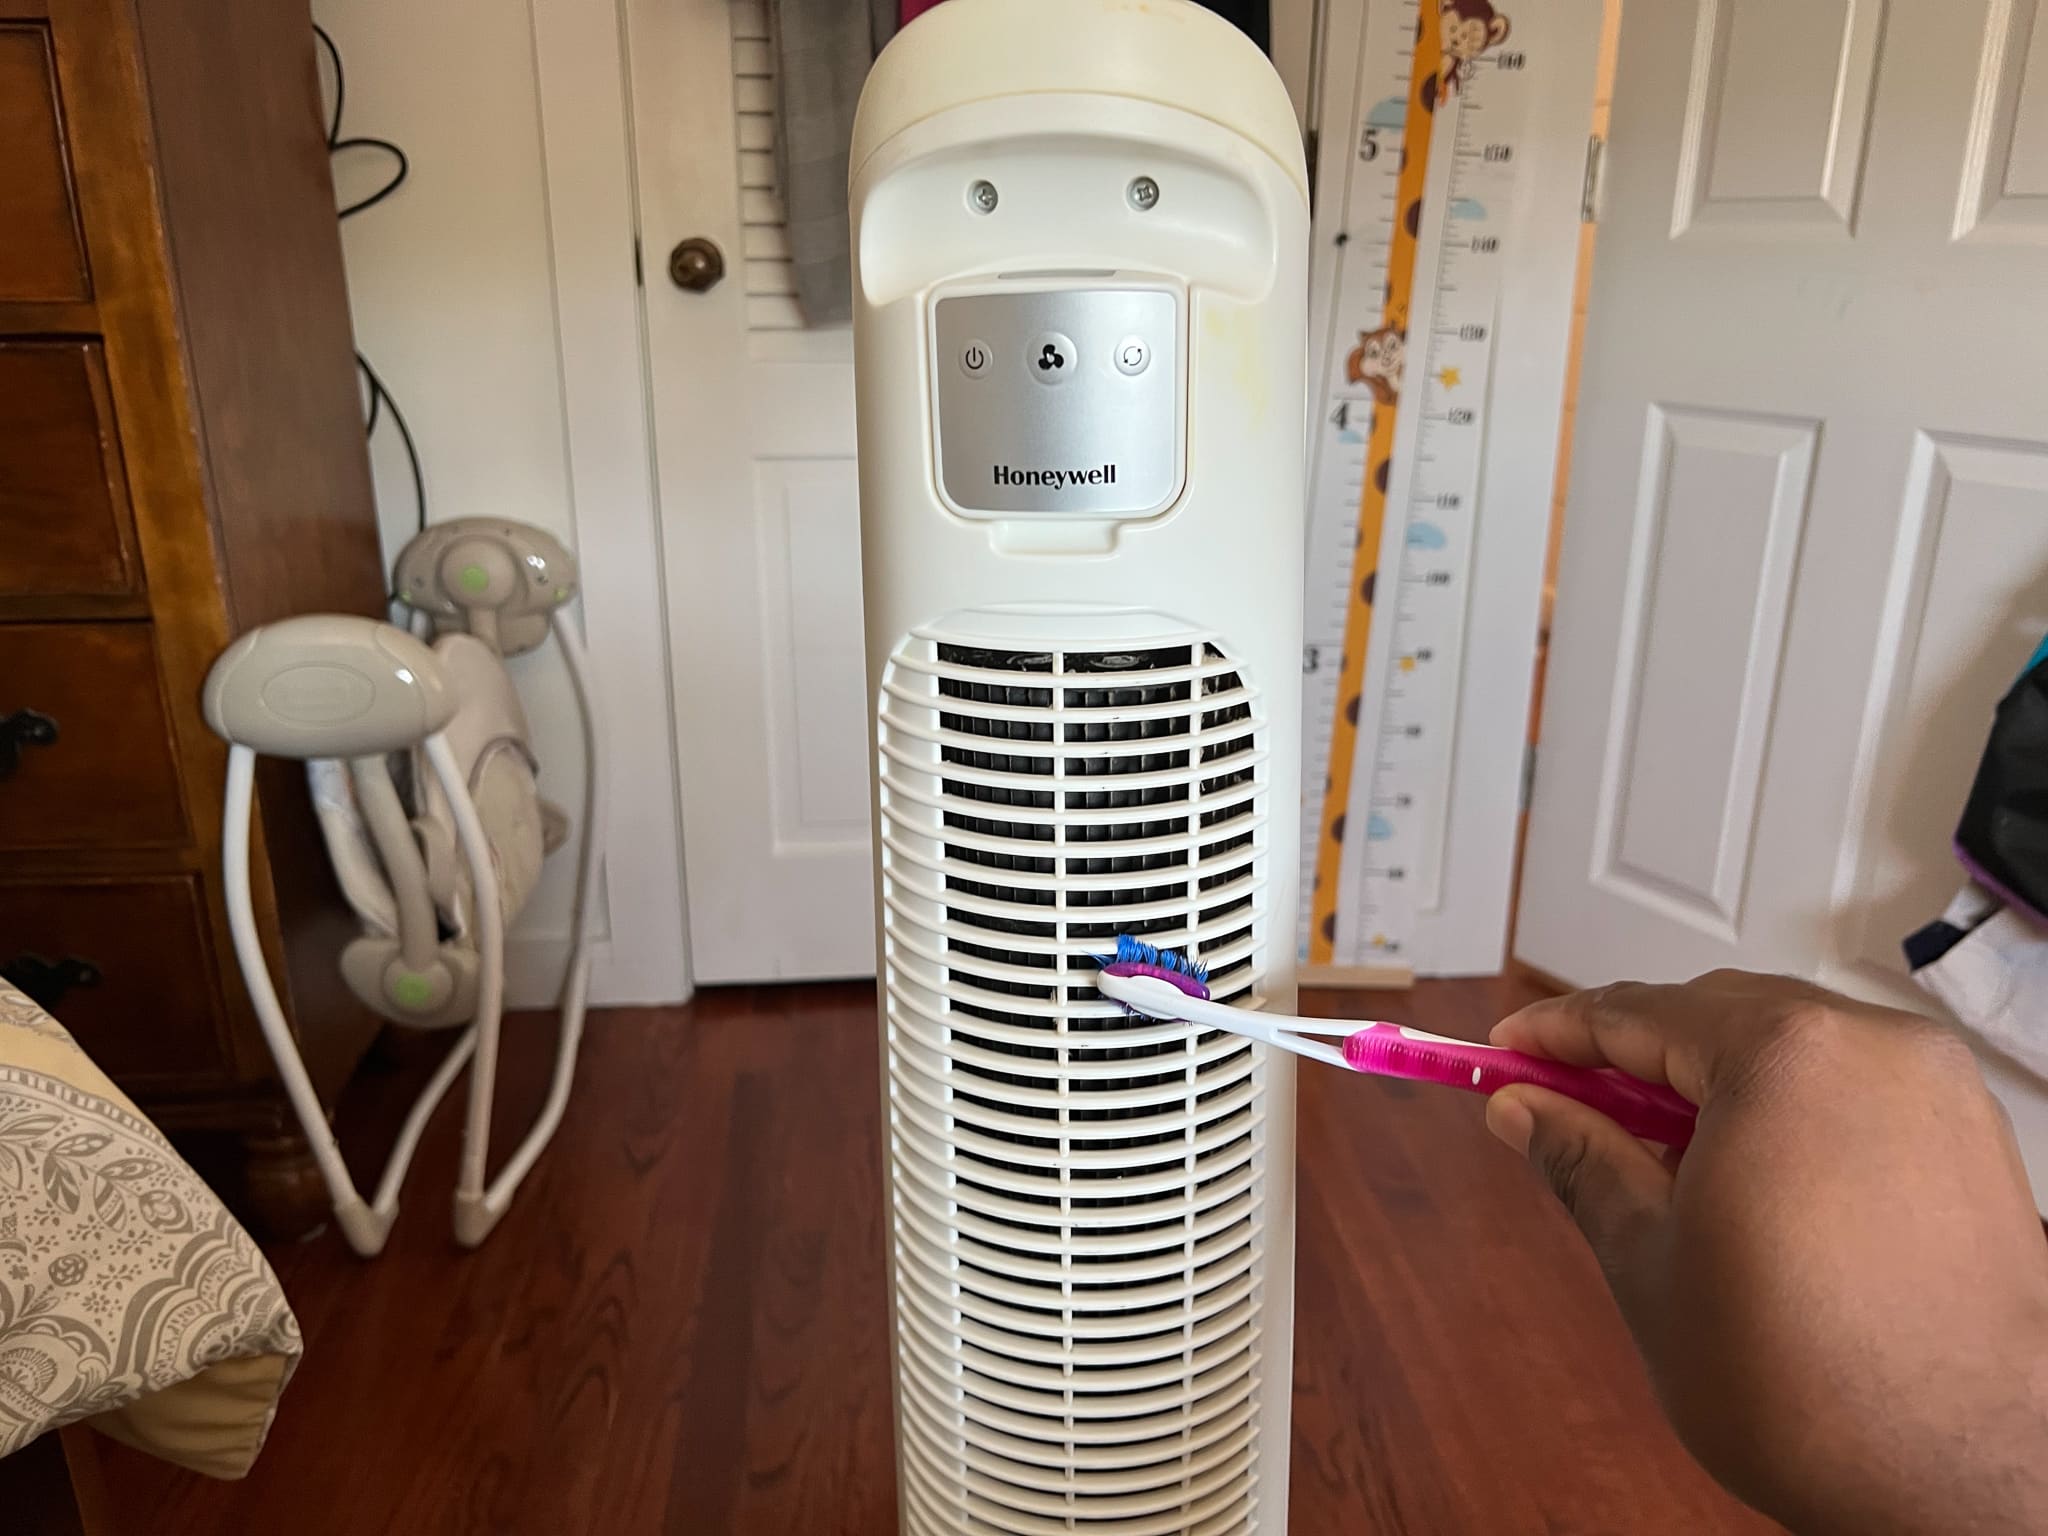
Step 5: Clean the Components
Now that you have disassembled the fan and have access to its different components, it’s time to clean them thoroughly. Cleaning the components will not only improve the fan’s performance but also help maintain its longevity.
Start by cleaning the blades and front grill. These two components are usually the most visible areas where dust and dirt accumulate.
To clean the blades, use a soft-bristle brush or a clean cloth to gently remove any dust or debris. If there are stubborn stains or dirt buildup, you can dampen the cloth with a mild detergent or cleaning solution diluted in water. Wipe down the blades, ensuring all areas are cleaned. Avoid excessive moisture that may damage the motor or electrical components.
Next, move on to cleaning the front grill. The grill may have accumulated dust and dirt on both sides. Wipe it down using a clean cloth or rinse it under running water if it is detachable and waterproof. If needed, use a brush to remove stubborn dirt or grease from the grill’s crevices.
For the motor housing and other internal components, use a soft-bristle brush or a clean cloth to remove any dust or debris. Take care not to use excessive moisture, as this could damage the electrical components. If necessary, use a mild detergent or cleaning solution diluted in water to wipe down the motor housing. Let all components dry completely before reassembling the fan.
If there are any filters or air purifying elements in your Honeywell fan, check the manufacturer’s instructions on how to clean them. Some filters may be washable, while others may need to be replaced. Follow the appropriate cleaning instructions to maintain the effectiveness of these components.
Once all the components are clean and dry, you are now ready to reassemble your Honeywell fan and enjoy its refreshed performance.
Proceed to the next step for instructions on how to reassemble the fan.
Remember to be thorough in your cleaning process and take your time to ensure all components are properly cleaned. This will help maintain the fan’s efficiency and prolong its lifespan.
Step 6: Reassemble the Fan
Now that you have cleaned all the components of your Honeywell fan, it’s time to reassemble it. Following the correct reassembly process will ensure that all the parts fit together properly and that your fan functions optimally.
Start by reattaching the motor housing to the main body of the fan. Align the tabs or screw holes and gently push the motor housing until it is securely in place. If there were any wires or connectors that were disconnected during the disassembly process, make sure to reconnect them properly.
Next, reattach the fan blades to the motor shaft. Align the blades with the motor shaft and slide them onto the shaft. Once in place, secure them by tightening the center nut in a clockwise direction using a Phillips head screwdriver or wrench.
After securing the blades, it’s time to reattach the front grill. Align the tabs or screw holes on the grill with the corresponding slots or screw posts on the fan body. Gently push or screw the front grill into place until it is securely attached.
Once all the components are reassembled, it’s a good idea to give the fan a quick test to ensure everything is working properly. Plug the fan back into the power source and turn it on. Observe the blades and listen for any unusual noises. If everything looks and sounds normal, you have successfully reassembled your Honeywell fan!
If you encounter any issues or problems during the reassembly process, consult the user manual or consider seeking assistance from a professional technician or the manufacturer’s customer support.
Now that your fan is reassembled, you can enjoy its refreshed performance and improved air circulation. Don’t forget to regularly clean and maintain your fan to keep it running smoothly for years to come.
With the reassembly complete, congratulations! You have successfully taken apart and reassembled your Honeywell fan. Enjoy the cool breeze and the renewed efficiency of your fan!
Conclusion
Congratulations on successfully learning how to take apart a Honeywell fan! By following the step-by-step instructions in this guide, you were able to safely and efficiently disassemble your fan, clean its components, and reassemble it back to its optimal condition.
Regular maintenance and cleaning of your fan are essential to ensure its longevity and efficient performance. By taking the time to clean the blades, front grill, motor housing, and other components, you remove dust, dirt, and debris that can hinder the fan’s airflow and efficiency. This not only improves the fan’s performance but also contributes to a cleaner and healthier indoor environment.
Remember to follow the specific instructions outlined in your fan’s user manual, as different models may have slight variations in the disassembly and reassembly process. Safety should always be a priority, so make sure to unplug your fan before starting the process and handle the components with care.
By regularly cleaning and maintaining your Honeywell fan, you can enjoy its refreshing breeze for a long time. Keep in mind that if you encounter any complex issues or difficulties during the disassembly or reassembly process, it’s always a good idea to reach out to a professional technician or contact the manufacturer’s customer support for assistance.
Thank you for reading this comprehensive guide on how to take apart a Honeywell fan. We hope it has been informative and helpful in guiding you through the process. Now, you can enjoy a cleaner and more efficient fan that provides you with comfort and fresh air whenever you need it.
Frequently Asked Questions about How To Take Apart A Honeywell Fan
Was this page helpful?
At Storables.com, we guarantee accurate and reliable information. Our content, validated by Expert Board Contributors, is crafted following stringent Editorial Policies. We're committed to providing you with well-researched, expert-backed insights for all your informational needs.


0 thoughts on “How To Take Apart A Honeywell Fan”