Articles
How To Take Apart Maytag Washer
Modified: August 27, 2024
Learn step-by-step instructions on how to take apart a Maytag washer in this informative article. Discover valuable tips and tricks for disassembly and troubleshooting.
(Many of the links in this article redirect to a specific reviewed product. Your purchase of these products through affiliate links helps to generate commission for Storables.com, at no extra cost. Learn more)
Introduction
When your Maytag washer starts experiencing issues or you need to replace a faulty part, knowing how to take it apart can save you a significant amount of money on repair costs. While it may seem intimidating at first, with the right tools and a little guidance, disassembling your Maytag washer is a manageable task that can be completed by any DIY enthusiast.
In this article, we will provide you with step-by-step instructions on how to take apart your Maytag washer safely and efficiently. By following these instructions, you will be able to access the various components of your washer, such as the motor, pump, and agitator, allowing you to diagnose and fix any issues that may arise.
Before we dive into the disassembly process, it’s essential to note that safety should always be a top priority. Make sure to unplug the washer from the power source and turn off the water supply before attempting any repairs. Additionally, it’s recommended to wear protective gloves and safety glasses throughout the process to protect yourself from any potential harm.
Now that we’ve covered the necessary safety precautions, let’s take a look at the tools and materials you will need for this disassembly project.
Key Takeaways:
- Disassembling and reassembling your Maytag washer is a manageable DIY project that can save you money on repairs. Follow safety precautions, use the right tools, and take your time for a successful outcome.
- By mastering the disassembly process, you gain a deeper understanding of your washer’s inner workings, empowering you to tackle future issues and keep your Maytag washer running smoothly for years to come.
Read more: How To Take Apart A Whirlpool Washer
Safety Precautions
Before you begin the process of taking apart your Maytag washer, it’s important to prioritize safety. By following these precautions, you can ensure a secure and accident-free disassembly:
- Disconnect the power: Unplug the washer from the electrical outlet to prevent any risk of electric shock. This step should be done before starting any repairs or disassembly.
- Turn off the water supply: Locate the water supply valves and shut them off to avoid any water leakage during the disassembly process.
- Protective gear: Wear protective gloves and safety glasses to shield your hands and eyes from potential injuries. This is particularly important when dealing with sharp edges or moving parts.
- Secure the area: Ensure you have a clean and well-lit workspace to carry out the disassembly. Clear any clutter or obstacles that may hinder your progress or pose a safety hazard.
- Follow the manufacturer’s instructions: Consult your Maytag washer’s user manual for specific safety guidelines and instructions for disassembly. Each model may have unique requirements.
- Take pictures or label components: As you disassemble the washer, consider taking pictures or labeling the components. This will help you remember the order and placement of each part during reassembly.
- Be cautious of sharp edges: Pay close attention to any sharp edges or protruding parts when handling the disassembled components. Take care to avoid cuts or injuries.
- Handle electronics with care: If you encounter any electronic components during the disassembly, be cautious and handle them delicately. Avoid excessive force or rough handling, as this may cause damage.
- Work systematically: Take your time and approach the disassembly process in a systematic manner. Keep track of which parts go where and maintain an organized workspace to avoid confusion.
By adhering to these safety precautions, you can protect yourself and ensure a smooth and accident-free disassembly process. Now that you’re aware of the safety measures, let’s move on to the tools and materials you’ll need for taking apart your Maytag washer.
Tools and Materials Needed
Before you begin disassembling your Maytag washer, it’s important to gather the necessary tools and materials. Here is a list of items you will need:
- Phillips screwdriver: This type of screwdriver is commonly used for most screws found on Maytag washers. Make sure to have both a smaller size and a larger size on hand.
- Flat-head screwdriver: A flat-head screwdriver can be helpful for prying or removing certain components from your Maytag washer.
- Socket wrench set: A socket wrench set with various sizes will be needed to loosen and remove nuts and bolts during the disassembly process.
- Pliers: Having a pair of pliers, preferably both regular and needle-nose, will assist in gripping and disconnecting components, such as hoses and wire connectors.
- Adjustable wrench: An adjustable wrench can be useful for tightening or loosening certain fittings or connections on your Maytag washer.
- Putty knife or scraper: A putty knife or scraper can help in removing any adhesive or gasket material that may be present during the disassembly process.
- Bucket or container: Having a bucket or container nearby will allow you to collect any water that may spill out during the disassembly, especially when disconnecting hoses.
- Labels or markers: Using labels or markers can help you keep track of the various components and their respective positions as you take them apart.
- Cleaning supplies: It’s a good idea to have cleaning supplies, such as a rag, mild detergent, and a brush, to clean any dirty or dusty components you encounter during the disassembly.
Make sure to gather all the necessary tools and materials before starting the disassembly process. Having everything readily available will save you time and prevent the frustration of having to search for missing items. Now that you’re well-prepared, let’s move on to the step-by-step process of taking apart your Maytag washer.
Step 1: Disconnecting the Washer
The first step in taking apart your Maytag washer is to disconnect it from the power source and turn off the water supply. Follow these steps to safely disconnect your washer:
- Unplug the washer: Locate the electrical outlet where your washer is plugged in and unplug it. This will ensure that there is no power running to the appliance during the disassembly process.
- Shut off the water supply: Locate the water supply valves behind or near the washer. Turn them clockwise to shut off the water flow. This step will prevent any water leakage during the disassembly.
- Disconnect the water hoses: Using pliers or an adjustable wrench, loosen the nuts connecting the water hoses to the back of the washer. Once loose, remove the hoses and place them in a bucket or container to catch any residual water.
- Disconnect the drain hose: Locate the drain hose at the back of the washer. Remove any clamps or connections holding it in place, and then gently pull the hose out of the wall drain or standpipe. Again, have a bucket or container nearby to catch any water that may come out.
- Move the washer away from the wall: With the hoses and drain hose detached, carefully move the washer away from the wall to provide you with space to work on the disassembly process.
Once you have completed these steps, your Maytag washer is safely disconnected and ready for the next stages of disassembly. In the next step, we will explain how to remove the control panel to gain access to the internal components of the washer.
Step 2: Removing the Control Panel
After disconnecting the washer and creating space to work, the next step is to remove the control panel. This will allow you to access the internal components of your Maytag washer. Follow these steps to remove the control panel:
- Locate the screws: Look for screws securing the control panel to the washer’s top or front. These screws are typically located at the back or sides of the control panel.
- Use a screwdriver: Using a Phillips screwdriver, carefully remove the screws. Place them in a safe location to avoid misplacing them.
- Disconnect the wiring harness: Once the screws are removed, gently lift up the control panel. Look for the wiring harness that connects it to the washer’s main body. Usually, there will be a disconnect plug that you can easily separate to detach the control panel from the washer.
- Set aside the control panel: After disconnecting the wiring harness, carefully set aside the control panel in a safe place where it won’t get damaged. You may want to place it on a soft cloth or towel to prevent scratching the surface.
Now that the control panel of your Maytag washer has been successfully removed, you have gained access to the internal components. In the next step, we will explain how to remove the top and front panels to further dismantle your washer. Stay tuned!
Read more: How To Take Apart Stackable Washer/Dryer
Step 3: Removing the Top and Front Panels
Now that the control panel is out of the way, it’s time to remove the top and front panels of your Maytag washer. This will allow you to access the inner workings of the machine. Follow these steps to successfully remove the top and front panels:
- Locate the screws: Look for screws at the back of the washer that are securing the top panel. These screws may be hidden behind a plastic or metal cover.
- Remove the screws: Using a Phillips screwdriver, carefully remove the screws that are holding the top panel in place. Set the screws aside for reassembly later.
- Lift the top panel: Once the screws are removed, gently lift up the top panel from the back of the washer. It may be hinged at the front, so be cautious not to damage any wires or components that may be attached.
- Remove the front panel screws: With the top panel lifted, locate the screws that are holding the front panel in place. These screws are usually found near the top, along the inner edges of the washer.
- Disconnect the wiring harness: Once the screws are removed, carefully disconnect any wiring harnesses or connectors that are attaching the front panel to the washer’s main body. Take note of their positions or take photos for reference during reassembly.
- Remove the front panel: After disconnecting the wiring harness, gently pull the front panel forward and lift it out of the chassis of the washer. Set it aside in a safe location.
With the top and front panels successfully removed, you now have a clear view of the inner components of your Maytag washer. In the next step, we will guide you through the process of detaching the door assembly. Keep reading!
Step 4: Detaching the Door Assembly
Now that the top and front panels are removed, the next step is to detach the door assembly of your Maytag washer. This will allow you to access the tub and other internal components. Follow these steps to successfully detach the door assembly:
- Locate the door latches: Look for the door latches on the front of the washer. These are typically located on either side of the door opening.
- Release the door latches: Using your fingers or a small flat-head screwdriver, carefully release the door latches by pulling them towards the center of the washer. This will release the door assembly from the front panel.
- Disconnect the wiring harness: Once the door latches are released, look for the wiring harness that connects the door switch to the washer’s main body. Disconnect the wiring harness carefully to separate the door assembly.
- Set aside the door assembly: After disconnecting the wiring harness, gently set aside the door assembly in a safe place. Take note of any screws or attachments that may need to be removed for reassembly later.
With the door assembly detached, you now have better access to the tub and other components inside your Maytag washer. In the next step, we will guide you through the process of disconnecting and removing the tub. Stay tuned!
Before taking apart a Maytag washer, always unplug the machine and turn off the water supply to avoid any accidents. It’s also a good idea to consult the user manual for specific instructions.
Step 5: Disconnecting and Removing the Tub
Now that the door assembly is out of the way, it’s time to disconnect and remove the tub from your Maytag washer. Follow these steps to successfully disconnect and remove the tub:
- Disconnect the tub suspension: Look for the tub suspension rods or springs that hold the tub in place. Using pliers or a wrench, disconnect and remove any clips, hooks, or brackets that secure the suspension rods.
- Remove the agitator: If your Maytag washer has an agitator, you will need to remove it before attempting to take out the tub. Follow the manufacturer’s instructions for removing the agitator, which may involve unscrewing or pulling it off the center post.
- Disconnect the drum support: Look for any bolts or screws that are securing the drum support brackets to the tub. Using a socket wrench or screwdriver, remove these fasteners to disconnect the drum support.
- Disconnect the tub hoses: Locate the hoses that are connected to the tub. These may include the drain hose and any other inlet or outlet hoses. Use pliers to loosen and disconnect the hose clamps, and carefully remove the hoses from the tub.
- Detach the tub from the frame: Once all connections and attachments have been removed, carefully lift and detach the tub from the frame of the washer. You may need to tilt or maneuver the tub to release it from any remaining clips or brackets.
- Set aside the tub: After removing the tub, place it in a safe and secure location. Take note of any additional components or attachments that may need to be removed for reassembly later.
With the tub disconnected and removed from your Maytag washer, you now have access to the motor, belt, and other internal components. In the next step, we will guide you through the process of removing the motor and belt. Stay tuned!
Step 6: Removing the Motor and Belt
With the tub out of the way, it’s time to remove the motor and belt from your Maytag washer. Follow these steps to successfully remove the motor and belt:
- Locate the motor: Identify the motor, which is typically located at the bottom or back of the washer. It is connected to the drum and drives the belt that powers the agitator and spin cycle.
- Disconnect the wiring harness: Before removing the motor, make sure to disconnect the wiring harness that connects it to the washer’s electrical system. Carefully disconnect any plugs or connectors, taking note of their positions for reassembly.
- Release the tension on the belt: To remove the belt, you’ll need to release the tension. Look for the belt tension pulley or adjuster and use a wrench or pliers to relieve the tension by either loosening the pulley bolt or adjusting the tensioner.
- Remove the belt: With the tension released, slip the belt off the motor pulley and drum. Take note of the belt’s orientation and condition for reassembly later.
- Remove the motor: Locate the mounting bolts or screws that secure the motor to the washer’s frame. Using a socket wrench or screwdriver, carefully remove these fasteners and gently lift the motor out of its position.
- Set aside the motor: Once the motor is removed, place it in a safe and clean area. Take note of any additional components or attachments that may need to be removed for reassembly later.
With the motor and belt successfully removed from your Maytag washer, you now have access to other components such as the pump and hoses. In the next step, we will guide you through the process of removing the pump and hoses. Continue reading to learn more!
Read more: How To Take Apart A Lamp
Step 7: Removing the Pump and Hoses
With the motor and belt out of the way, it’s time to remove the pump and associated hoses from your Maytag washer. Follow these steps to successfully remove the pump and hoses:
- Locate the pump: The pump is typically located at the bottom or back of the washer, near the motor. It is responsible for draining water from the tub.
- Disconnect the pump hoses: Using pliers, loosen the hose clamps that secure the pump hoses in place. Slide the clamps away from the pump and carefully detach the hoses from the pump. Have a bucket or towel ready as there may be residual water in the hoses.
- Remove the mounting screws or clips: Look for any screws or clips that are securing the pump to the washer’s frame. Use a screwdriver or pliers to remove these fasteners and free the pump from its position.
- Detach the pump: Once the pump is freed from its mounting, carefully pull it away from the washer’s frame, taking care not to damage any other components. Set the pump aside in a clean and safe area.
- Inspect the pump and hoses: Take this opportunity to inspect the pump and hoses for any signs of damage or clogs. Clean or replace them if necessary before reassembly.
With the pump and hoses successfully removed from your Maytag washer, you now have access to other components such as the agitator and any additional parts. In the next step, we will guide you through the process of taking apart the agitator. Keep reading to learn more!
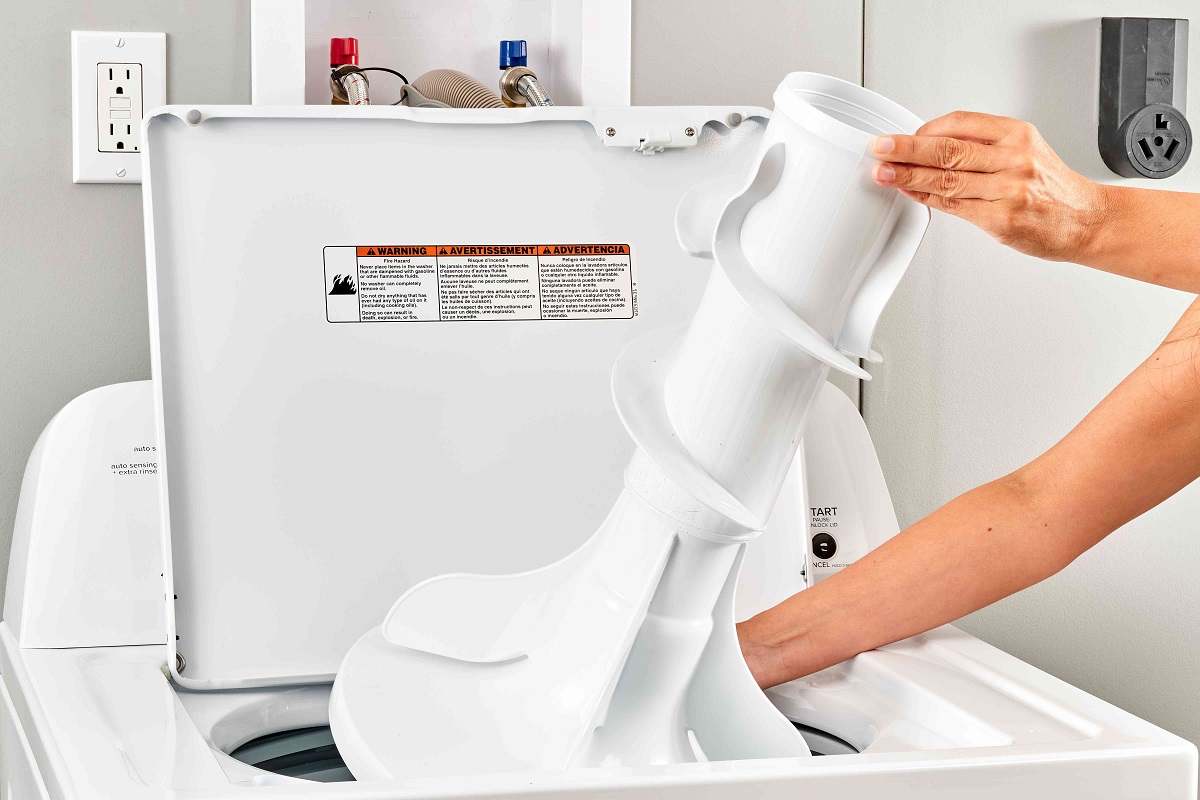
Step 8: Taking Apart the Agitator
Now that the pump and hoses are out of the way, it’s time to take apart the agitator in your Maytag washer. The agitator is responsible for creating the motion that helps clean your clothes. Follow these steps to successfully take apart the agitator:
- Identify the agitator: The agitator is located in the center of the washer’s drum and is responsible for creating the washing action.
- Remove the cap or fabric softener dispenser: If your Maytag washer has a cap or fabric softener dispenser on top of the agitator, gently pry it off to expose the agitator’s retaining bolt.
- Loosen or remove the agitator bolt: Using a socket wrench or pliers, loosen or remove the bolt that secures the agitator to the agitator shaft. It may be tightly fastened, so you may need to apply some force.
- Remove the agitator: Once the bolt is removed, lift the agitator up and out of the drum. It may be snugly fitted, so you may need to use some gentle rocking or twisting motion to free it from the drum.
- Disassemble the agitator: Depending on the model of your Maytag washer, the agitator may consist of multiple pieces. Carefully separate the different parts of the agitator, taking note of their order and orientation for reassembly.
- Clean or replace agitator components: Take this opportunity to clean any buildup or debris from the agitator components. If any parts are damaged or worn, consider replacing them before reassembling the agitator.
With the agitator successfully taken apart, you can now thoroughly clean or replace its components as needed. In the next step, we will guide you through the process of removing any additional components that may be present. Stay tuned!
Step 9: Removing Any Additional Components
In addition to the main components we have covered so far, there may be other additional components in your Maytag washer that need to be removed. These components can vary depending on the model of your washer and any specific features it may have. Follow these steps to identify and remove any additional components:
- Refer to the user manual: Consult the user manual or documentation provided with your Maytag washer. It will often contain information about any additional components, along with instructions on how to remove them.
- Inspect the washer: Take a close look at the interior of your washer and identify any additional components that are present. This may include items such as filters, switches, sensors, or brackets.
- Disconnect wiring or connectors: If any additional components are attached via wiring or connectors, carefully disconnect them. Take note of their positions and how they are connected for easier reassembly.
- Remove any mounting screws or clips: For components that are mounted, locate and remove any screws or clips that are affixing them to the washer’s frame. Use the appropriate tools, such as a screwdriver or pliers, to remove these fasteners.
- Gently remove the components: Once all the necessary connections and fasteners are removed, gently remove the additional components from the washer. Take care not to force or damage any fragile parts.
- Set aside the components: Place the removed components in a safe location, keeping them organized and protected from damage. If needed, label or take photographs for reference during reassembly.
By following these steps, you can identify and successfully remove any additional components found in your Maytag washer. With all the necessary parts now removed, you’re ready to move on to the final step: reassembling your washer. Let’s proceed to the next step to complete the process!
Step 10: Reassembling the Washer
After successfully disassembling and inspecting the components of your Maytag washer, it’s time to put everything back together. Follow these steps to reassemble your washer:
- Refer to documentation or photographs: If you took photographs or labeled the components during disassembly, refer to them now as a guide for reassembling the washer. Alternatively, consult the user manual or any documentation provided by Maytag for specific instructions.
- Begin with additional components: Start by reattaching any additional components that you had removed. Follow the reverse order of the disassembly steps, ensuring that all wiring connections are securely reconnected and any mounting screws or clips are properly fastened.
- Reinstall the agitator: If the agitator was disassembled, carefully reassemble it according to the order and orientation you noted during disassembly. Place the agitator back into the drum and tighten the retaining bolt to secure it in place. Replace any caps or fabric softener dispenser if applicable.
- Attach the pump and hoses: Position the pump back into its original location and secure it with the mounting screws or clips. Reconnect the pump hoses, ensuring that the hose clamps are tightened to prevent any leaks. Double-check that all connections are secure and properly aligned.
- Reinstall the motor and belt: Place the motor back into its designated position and secure it with the mounting bolts or screws. Slip the belt back onto the motor pulley and drum, ensuring proper alignment and tension. Use a wrench or pliers to restore tension to the belt if necessary.
- Reconnect the tub: Carefully position the tub back into the washer’s frame, taking care to align any tabs or notches. Reconnect any suspension rods or springs that secure the tub in place. Ensure all connections are secure and tighten any clips or fasteners that hold the drum support.
- Reattach the front and top panels: Place the front panel back onto the washer, aligning any clips or hooks. Secure it with the screws that were removed earlier. Lift the top panel back into place, ensuring it is properly seated, and reinstall the screws that hold it down.
- Connect the door assembly: Reconnect the wiring harness for the door switch and position the door assembly back onto the front panel. Engage the door latches by pushing them into place. Ensure a secure and proper fit.
- Reconnect the hoses and power supply: Attach the water hoses to the appropriate connections at the back of the washer, tightening the hose clamps securely. Also, reconnect the drain hose. Finally, plug the washer back into the electrical outlet and turn on the water supply.
- Test the washer: Once everything is reassembled, run a test cycle to ensure that the washer is functioning properly. Check for any leaks or unusual noises during operation.
By following these steps, you can successfully reassemble your Maytag washer. Take your time, follow the instructions carefully, and double-check all connections and fastenings to ensure everything is in place. Once you’ve confirmed that the washer is working correctly, you can enjoy its renewed functionality and reliability.
Remember, if you encounter any difficulties or are unsure about any steps, it’s always recommended to consult a professional or reach out to Maytag customer support for assistance. Happy washing!
Read more: How To Take A Dryer Apart
Conclusion
Disassembling and reassembling your Maytag washer may seem like a daunting task, but with the right tools, knowledge, and precautions, it can be a rewarding DIY project. By following the step-by-step instructions provided in this guide, you have learned how to safely and efficiently take apart your washer to access and repair its internal components.
Throughout the process, we emphasized the importance of safety precautions, such as disconnecting the power and water supply, wearing protective gear, and working in a clean and organized workspace. These measures are crucial to ensure your well-being and avoid any mishaps during the disassembly or reassembly.
We discussed the tools and materials needed for the job, including screwdrivers, pliers, wrenches, and labels. Having these items prepared beforehand will save you time and make the process smoother and more efficient.
The step-by-step instructions covered disconnecting the washer, removing the control panel, top and front panels, door assembly, tub, motor and belt, pump and hoses, agitator, and any additional components. Each step was accompanied by detailed guidance to help you successfully complete each task.
Finally, we provided instructions on reassembling the washer, ensuring that all components are correctly positioned, securely attached, and properly connected. Running a test cycle after reassembly will help confirm that everything is functioning as expected.
Remember, if you encounter any difficulties or are unsure about any steps, it’s always recommended to consult a professional or reach out to Maytag customer support for assistance. Their expertise can provide further guidance and resolution for any complex issues that may arise.
By mastering the art of disassembling and reassembling your Maytag washer, not only can you save money on repairs and maintenance, but you also gain a deeper understanding of your appliance’s inner workings. Now you have the skills and knowledge to tackle any future issues and keep your Maytag washer running smoothly for years to come.
Thank you for choosing this guide, and we hope it has been helpful in your journey to maintain and repair your Maytag washer!
Now that you've mastered disassembling your Maytag washer, why not broaden your home care knowledge? Our next guide offers essential insights into routine house upkeep. Regular maintenance ensures your living space remains in top shape, preventing costly repairs. Dive into our practical advice and make smart, informed decisions to keep your home running smoothly year-round.
Frequently Asked Questions about How To Take Apart Maytag Washer
Was this page helpful?
At Storables.com, we guarantee accurate and reliable information. Our content, validated by Expert Board Contributors, is crafted following stringent Editorial Policies. We're committed to providing you with well-researched, expert-backed insights for all your informational needs.


0 thoughts on “How To Take Apart Maytag Washer”