Articles
How To Take Apart Kitchenaid Mixer
Modified: October 19, 2024
Learn how to take apart your Kitchenaid mixer with our helpful articles. Find step-by-step instructions and tips from our experts to simplify the process.
(Many of the links in this article redirect to a specific reviewed product. Your purchase of these products through affiliate links helps to generate commission for Storables.com, at no extra cost. Learn more)
Introduction
In the modern kitchen, a quality stand mixer is an invaluable tool that can make culinary tasks much easier. One brand that stands out in the industry is KitchenAid, known for producing high-quality and durable stand mixers. However, like any complex piece of machinery, there may come a time when you need to take apart your KitchenAid mixer for cleaning, repairs, or maintenance.
While the idea of dismantling your beloved KitchenAid mixer may seem intimidating, fear not! With the right tools, a little patience, and the right steps, you can safely and easily take apart your KitchenAid mixer.
In this article, we will guide you through the process of disassembling your KitchenAid mixer step by step. Whether you need to clean the hard-to-reach areas, replace a broken part, or simply satisfy your curiosity about the inner workings of this powerful appliance, this guide will provide you with the knowledge and confidence to do so.
Before we begin, it’s important to note that disassembling your KitchenAid mixer may void your warranty. If your mixer is still under warranty, it is recommended to contact KitchenAid’s customer support for assistance.
Now, let’s gather the necessary tools and get started on disassembling your KitchenAid mixer!
Key Takeaways:
- Disassembling and reassembling your KitchenAid mixer is a manageable and rewarding experience with the right tools and step-by-step guidance. Prioritize safety, take precautionary measures, and consult the manufacturer’s manual if needed.
- Remember to handle internal components with care, take note of their arrangement, and conduct a test run after reassembly to ensure proper functionality. Enjoy the benefits of a clean, well-maintained appliance for your culinary endeavors.
Read more: How To Take Mixer Off Kitchenaid
Tools Needed
Before you embark on the journey of taking apart your KitchenAid mixer, it’s essential to have the right tools on hand to ensure a smooth disassembly process. Here are the tools you will need:
- Flathead screwdriver: A flathead screwdriver will be indispensable when removing screws and prying off coverings.
- Phillips screwdriver: A Phillips screwdriver is necessary for removing specific screws that may be present in your KitchenAid mixer.
- Hex key or Allen wrench: Depending on the model of your KitchenAid mixer, you may require a hex key or Allen wrench to loosen specific components.
- Small prying tool: A small prying tool, such as a plastic spudger or a thin putty knife, can be handy for gently dislodging parts and connectors without causing damage.
- Clean cloth or towel: Having a clean cloth or towel nearby will enable you to wipe away any dirt or debris that you may encounter during the disassembly process.
- Cleaning brushes: Soft bristle brushes or toothbrushes can assist in reaching and cleaning hard-to-reach nooks and crannies.
- Lubricant: Depending on the condition of your mixer, you may need some lubricant to maintain or restore the smooth operation of certain components.
Make sure you have these tools readily available before you begin the disassembly process. This will save you time and frustration as you navigate the various components of your KitchenAid mixer.
Step 1: Preparation
Before diving into the disassembly process, it’s important to take a few preparatory measures to ensure a smooth and successful endeavor. Follow these steps to prepare your workspace and mixer:
- Unplug the mixer: Before you begin working on your KitchenAid mixer, always ensure that it is completely disconnected from the power source. This step is crucial to avoid any accidental injuries or damage.
- Clean the exterior: Give your mixer a quick wipe down with a clean cloth or towel to remove any surface dirt or grime that may have accumulated. This will prevent any debris from falling into the internal components when you start taking it apart.
- Gather your tools: Verify that you have all the necessary tools mentioned in the previous section readily available. Keeping them within reach will allow for a seamless disassembly process without needing to search for tools in the middle of the procedure.
- Find a well-lit and spacious workspace: Look for a flat, well-lit area where you can comfortably work on your mixer. Make sure you have enough space to spread out the different components and tools without feeling cramped.
- Create a clear work surface: Clear away any clutter or debris from your workspace to ensure that you have ample space to move around and organize the disassembled parts. This will prevent any accidental damage or loss of small components.
- Take photographs or notes: If you are concerned about not being able to remember the exact placement or order of specific components, consider taking photographs of the mixer before starting the disassembly process. Alternatively, you can also make detailed notes to serve as a reference during reassembly.
By following these preparatory steps, you will be ready to embark on the disassembly journey with confidence. With a clean workspace, the necessary tools, and a disconnected mixer, you are now ready to proceed to the next step: Removing the attachment hub cover.
Step 2: Removing the Attachment Hub Cover
Now that you have prepared your workspace and gathered the necessary tools, it’s time to start disassembling your KitchenAid mixer. The first step is to remove the attachment hub cover. Follow these instructions:
- Locate the attachment hub cover: The attachment hub cover is the circular piece located at the front of the mixer, just above the attachment hub. It is usually labeled with the “KitchenAid” logo.
- Secure the mixer: Hold the mixer firmly with one hand to prevent it from sliding or moving during the removal process. This will ensure stability and prevent any accidental damage.
- Insert the flathead screwdriver: Insert the flathead screwdriver into the small gap between the attachment hub cover and the mixer body. Gently apply pressure to pry the cover loose.
- Pry off the attachment hub cover: Slowly and carefully pry around the edges of the attachment hub cover using the flathead screwdriver. Apply even pressure to release the cover from its locked position.
- Remove the attachment hub cover: Once the attachment hub cover has been sufficiently loosened, you can remove it by lifting it away from the mixer body. Set it aside in a safe place for reassembly later.
Be cautious while removing the attachment hub cover, as it may be tightly secured and require some effort to pry it loose. Take your time and ensure that you do not use excessive force that could potentially damage the cover or mixer.
With the attachment hub cover successfully removed, you are now ready to move on to the next step: Disconnecting the power cord.
Step 3: Disconnecting the Power Cord
With the attachment hub cover removed, you can now turn your attention to disconnecting the power cord. Follow these steps to safely disconnect the power cord from your KitchenAid mixer:
- Verify that the mixer is unplugged: Before proceeding, double-check that your KitchenAid mixer is completely unplugged from the power source. This is crucial to avoid any electrical accidents during the disassembly process.
- Locate the power cord: Look for the power cord that is connected to the back of the mixer. It is typically located near the bottom.
- Identify the power cord clip: Near the base of the mixer where the power cord enters, you will find a small clip that secures the cord in place.
- Release the power cord clip: Use your fingers or a small prying tool to gently release the power cord clip. Apply slight pressure to lift the clip and free the power cord.
- Remove the power cord: Once the power cord clip is released, you can safely disconnect the power cord from the mixer. Carefully pull the cord out of the clip and set it aside.
It’s essential to handle the power cord with care to avoid any damage to the cord or the internal wiring. Take your time to ensure a smooth disconnection, and be mindful of any delicate components around the power cord area.
With the power cord successfully disconnected, you have completed another step in the disassembly process. The next step will cover removing the accessory cap.
Read more: How To Clean Kitchenaid Mixer
Step 4: Removing the Accessory Cap
Now that you have disconnected the power cord, it’s time to remove the accessory cap from your KitchenAid mixer. Follow these steps to safely remove the accessory cap:
- Locate the accessory cap: The accessory cap is the round cover located at the top of the mixer, just above where the attachments are inserted.
- Identify the notch: On the side of the accessory cap, you will find a small notch or tab.
- Press and rotate: Place your thumb or finger on the notch and press down gently. While pressing down, rotate the accessory cap counterclockwise.
- Continue rotating: Keep rotating the accessory cap counterclockwise until it becomes loose and can be lifted off the mixer.
- Remove the accessory cap: Once the accessory cap is loose, simply lift it off the mixer and set it aside.
During the process of removing the accessory cap, be mindful of any resistance or tightness. If the cap feels stuck, double-check that you have fully depressed the notch and continue to rotate it gently until it releases.
With the accessory cap successfully removed, you have completed another important step in the disassembly process. The next step will cover unscrewing the planetary.
Before disassembling your KitchenAid mixer, unplug it and remove any attachments. Refer to the user manual for specific instructions on how to safely take it apart.
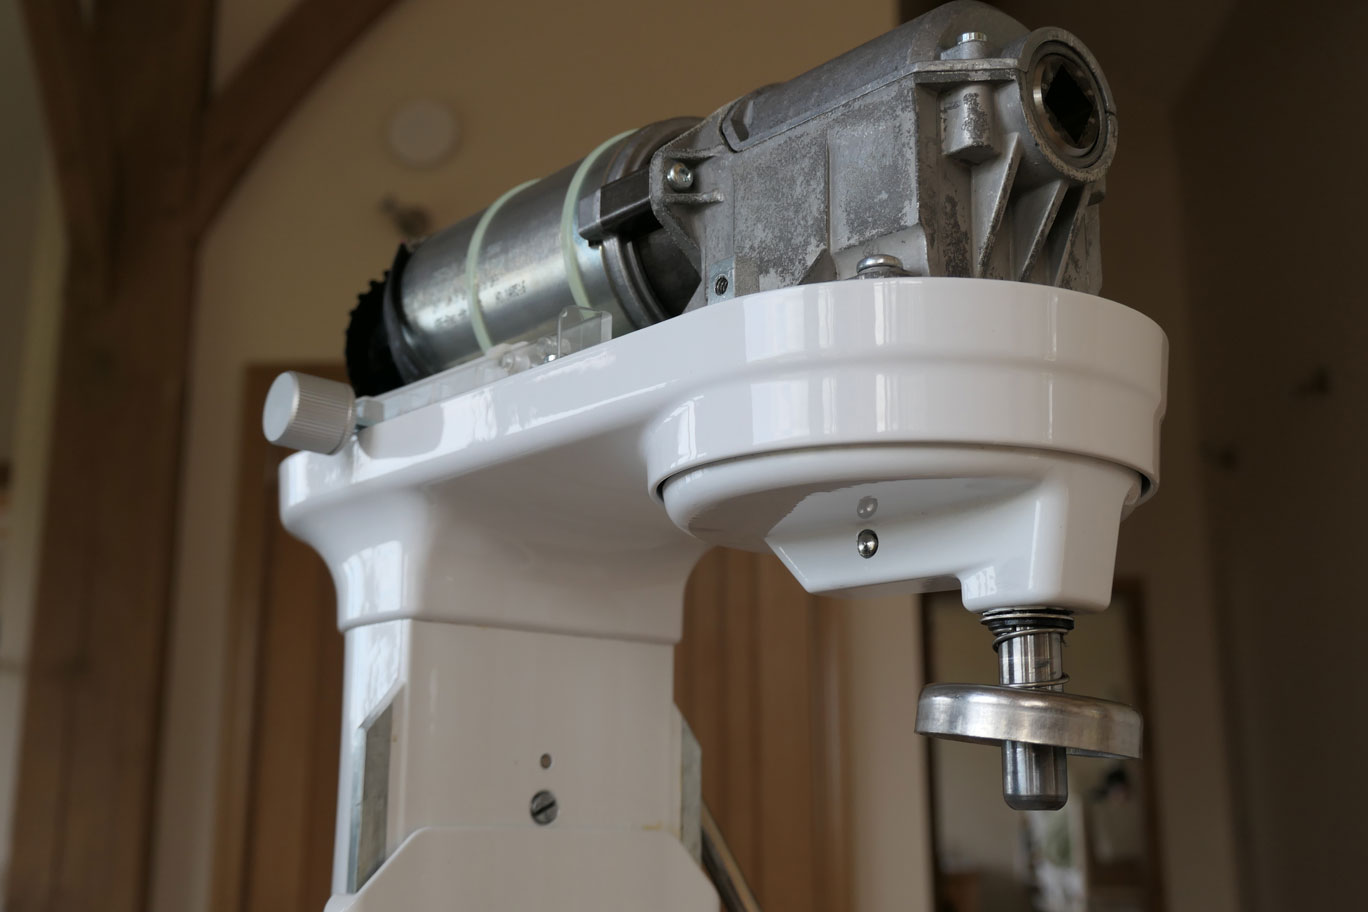
Step 5: Unscrewing the Planetary
With the accessory cap removed, you can now proceed to unscrew the planetary from your KitchenAid mixer. The planetary refers to the rotating part at the bottom of the mixer bowl. Follow these steps to safely unscrew the planetary:
- Locate the planetary: The planetary is the circular component that sits at the bottom of the mixer bowl, above the attachment hub.
- Secure the mixer: Hold the mixer firmly with one hand to prevent it from sliding or moving during the unscrewing process.
- Find the planetary attachment knob or screw: Look for a knob or screw at the center of the planetary. It is typically located at the top, inside the attachment hub.
- Use the appropriate tool: Depending on your KitchenAid mixer model, you will need either a flathead screwdriver or a hex key/Allen wrench to unscrew the planetary.
- Insert the tool and turn counterclockwise: Insert the tool into the attachment knob or screw and turn it counterclockwise. Apply gradual pressure until the planetary starts to loosen.
- Continue unscrewing: Keep turning the attachment knob or screw counterclockwise until the planetary is fully unscrewed from the mixer bowl.
- Remove the planetary: Once the planetary is unscrewed, lift it out of the mixer bowl and set it aside.
Be cautious not to force or use excessive pressure while unscrewing the planetary. Take your time and ensure that you are turning the attachment knob or screw in the correct direction to avoid any damage.
With the planetary successfully unscrewed, you have completed another significant step in the disassembly process. The next step will cover removing the motor housing screws.
Step 6: Removing the Motor Housing Screws
Now that you have unscrewed the planetary, it’s time to move on to removing the motor housing screws. These screws secure the motor housing in place. Follow these steps to safely remove the motor housing screws:
- Locate the motor housing screws: The motor housing screws are usually located on the sides or back of the mixer. They secure the motor housing to the main body of the mixer.
- Identify the screws: Look for the Phillips screws or any other type of screws that are holding the motor housing in place.
- Choose the right screwdriver: Depending on the type of screws, use the appropriate screwdriver to remove them. In most cases, a Phillips screwdriver will be required.
- Start unscrewing: Insert the screwdriver into the screws and turn them counterclockwise to loosen them. Make sure to apply firm, but gentle, pressure to avoid stripping the screws.
- Remove the screws: Once the screws are fully loosened, remove them from the mixer. Keep them in a safe place where they won’t get lost.
Be sure to remember the order and location of the screws as you remove them. This will help ensure that you can easily reassemble the mixer later on.
With the motor housing screws successfully removed, you have completed another important step in the disassembly process. The next step will cover separating the motor housing from the main body of the mixer.
Step 7: Separating the Motor Housing
With the motor housing screws removed, you can now proceed to separate the motor housing from the main body of the mixer. Follow these steps to safely separate the motor housing:
- Prepare a clean workspace: Clear a clean, flat surface where you can safely place the motor housing once it is detached from the mixer body. This will help prevent any damage to the housing or other parts.
- Hold the mixer securely: Grasp the main body of the mixer with one hand, ensuring a firm grip to prevent any accidental dropping or movement during the separation process.
- Gently pull the motor housing: Using your free hand, slowly and steadily pull the motor housing away from the main body of the mixer. Apply even pressure and avoid any jerking or twisting motions.
- Continue separating: As you pull the motor housing, you may encounter some resistance due to tightness or snug fitting of internal components. Take your time and continue applying gentle pressure until the motor housing is fully separated from the body.
- Set aside the motor housing: Once the motor housing is detached, place it on the prepared workspace and handle it with care to avoid any unnecessary damage or misalignment of internal components.
While separating the motor housing, be cautious of any wires or connections that may still be attached. Take note of their positions and gently detach them if necessary, ensuring that you don’t pull or damage them in the process.
With the motor housing successfully separated from the main body of the mixer, you have completed another significant step in the disassembly process. The next step will cover accessing the internal components of the mixer.
Read more: How To Turn On A Kitchenaid Mixer
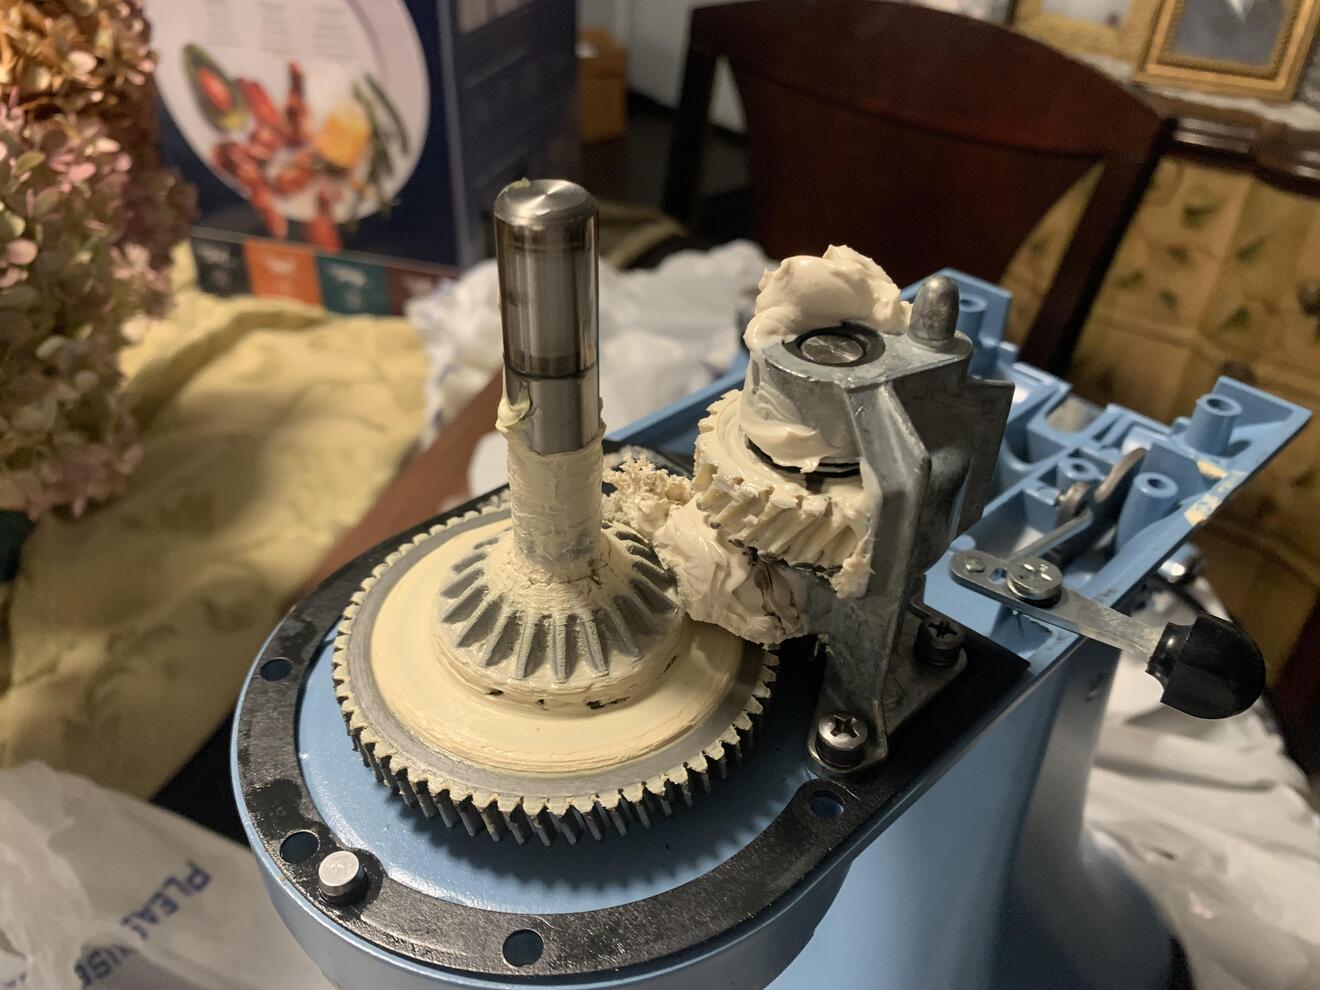
Step 8: Accessing the Internal Components
With the motor housing removed, you now have access to the internal components of your KitchenAid mixer. Follow these steps to safely navigate and access the internal parts:
- Survey the internal components: Take a moment to observe and familiarize yourself with the layout and arrangement of the internal components. This will give you an understanding of how everything fits together and make reassembly easier later on.
- Inspect for visible dirt or debris: Use a flashlight or a well-lit area to inspect the internal components for any visible dirt, debris, or wear and tear. Cleaning or replacing any components may be necessary at this stage.
- Take pictures or notes: If you feel it would be useful, take pictures or detailed notes of the internal components’ arrangement. This will serve as a reference during reassembly and help ensure everything is properly reinstalled.
- Clean the internal components: Utilizing a soft bristle brush or a toothbrush, gently clean any visible dirt or debris from the internal components. Be careful not to apply excessive force that could damage delicate parts.
- Inspect and lubricate moving parts (if necessary): If you notice any moving parts that appear dry or are not operating smoothly, consider lubricating them with a food-safe lubricant recommended by the manufacturer. This will help maintain the performance and longevity of your mixer.
While accessing the internal components, it’s important to handle them with care and avoid applying excessive force. If you encounter any components that seem difficult to remove or disassemble, consult the manufacturer’s manual or seek professional assistance to prevent damage.
With the internal components accessed and potentially cleaned and lubricated, you have successfully reached an important stage in the disassembly process. The final step will cover reassembling your KitchenAid mixer.
Step 9: Reassembling the Mixer
After successfully accessing and attending to the internal components of your KitchenAid mixer, it’s time to reassemble all the parts. Follow these steps to ensure a smooth and successful reassembly:
- Refer to your notes or photos: If you took notes or pictures during the disassembly process, now is the time to refer back to them. This will help you properly organize and reinstall the components in the correct order.
- Begin with the motor housing: Take the motor housing and carefully align it with the main body of the mixer. Gently slide it back into place, ensuring a secure fit.
- Reattach the motor housing screws: Retrieve the motor housing screws that you set aside earlier and insert them into their respective holes. Use the appropriate screwdriver to tighten them, but avoid overtightening, as it could cause damage to the housing or other components.
- Replace the planetary: Take the planetary that you removed earlier and position it back into the mixer bowl. Align it with the attachment hub and slowly twist it clockwise until it securely attaches to the mixer.
- Reinstall the accessory cap: Place the accessory cap back on top of the mixer, aligning it properly. Apply gentle pressure and rotate it clockwise until it locks into place.
- Reconnect the power cord: Retrieve the power cord and insert it back into the clip near the base of the mixer. Ensure it is securely fastened, providing a stable connection.
- Reattach the attachment hub cover: Position the attachment hub cover over the attachment hub opening and press it firmly until it snaps into place.
As you reassemble the mixer, take your time and ensure that each component is properly aligned and securely fastened. Double-check all connections and attachments before moving on to the next step.
With the mixer successfully reassembled, give it a final visual inspection to ensure everything is in its correct position. Plug it in and conduct a test run to ensure it functions properly before using it for your cooking and baking needs.
Congratulations! You have now completed the process of disassembling and reassembling your KitchenAid mixer. By following these steps, you have gained a better understanding of the inner workings of your mixer and have the knowledge to perform maintenance or repairs when needed.
Remember, if you encounter any difficulties or are unsure about any part of the process, it’s always recommended to consult the manufacturer’s manual or seek professional assistance.
Conclusion
Disassembling and reassembling your KitchenAid mixer may seem like a daunting task, but with the right tools and step-by-step guidance, it can be a manageable and rewarding experience. Whether you need to clean hard-to-reach areas, replace a broken part, or simply satisfy your curiosity about the inner workings of this powerful appliance, this guide has provided you with the knowledge and confidence to do so.
Throughout the disassembly process, it’s important to prioritize safety and take precautionary measures by ensuring the mixer is unplugged and handling components with care. By preparing your workspace, gathering the necessary tools, and following each step diligently, you can successfully take apart your KitchenAid mixer.
As you engage in the disassembly process, remember that your warranty may be voided. If your mixer is still under warranty, consider reaching out to KitchenAid’s customer support for assistance or clarification.
After successfully disassembling and accessing the internal components, it’s crucial to take note of their arrangement, clean them if necessary, and handle with care to prevent any damage. Reassembling the mixer follows a reverse order, guided by your notes or photographs taken during the disassembly process.
By taking the time to properly reassemble your mixer, you can ensure that all components are securely in place and ready for use. Conducting a test run after the reassembly process is essential to validate the functionality of your mixer before engaging in any cooking or baking tasks.
Remember, if you encounter any difficulties or feel unsure about any step of the disassembly or reassembly process, it’s always recommended to consult the manufacturer’s manual or seek professional assistance.
With this comprehensive guide, you now have the knowledge and skills to confidently take apart and reassemble your KitchenAid mixer. Enjoy the benefits of a clean, well-maintained appliance and continue to create culinary masterpieces with ease.
Now that you've mastered disassembling your Kitchenaid mixer, why stop there? If you're facing issues with your unit's ice maker, our guide on KitchenAid repair offers practical solutions to get that sorted swiftly. And for those times when DIY fixes won't cut it, our article on where to fix KitchenAid mixers provides reliable advice on finding expert service providers, ensuring your mixer keeps running smoothly.
Frequently Asked Questions about How To Take Apart Kitchenaid Mixer
Was this page helpful?
At Storables.com, we guarantee accurate and reliable information. Our content, validated by Expert Board Contributors, is crafted following stringent Editorial Policies. We're committed to providing you with well-researched, expert-backed insights for all your informational needs.


0 thoughts on “How To Take Apart Kitchenaid Mixer”