Articles
How To Take Apart Washer
Modified: May 6, 2024
Learn how to easily take apart your washer with these informative articles. Step-by-step guides and helpful tips to make the process smooth and efficient.
(Many of the links in this article redirect to a specific reviewed product. Your purchase of these products through affiliate links helps to generate commission for Storables.com, at no extra cost. Learn more)
Introduction
Welcome to our guide on how to take apart a washer. Whether you’re looking to repair a faulty component, clean a clogged drain, or simply curious about the inner workings of your washing machine, this step-by-step tutorial will walk you through the process. Taking apart a washer may seem like a daunting task, but with the right tools, equipment, and safety precautions, you can successfully dismantle it without causing any damage.
Before we dive into the details, it’s important to note that each washing machine model may have slight variations in terms of design and disassembly methods. Therefore, it’s always a good idea to consult the manufacturer’s manual or look for specific instructions for your particular washer model.
In this guide, we will provide a general overview of the steps involved in taking apart a washer. Keep in mind that working with appliances can be dangerous, so it’s crucial to prioritize your safety throughout the process. That being said, let’s get started!
Key Takeaways:
- Prioritize safety by following essential precautions, such as unplugging the washer, wearing protective gear, and working in a well-ventilated area. Document the disassembly process for smooth reassembly and consult the manufacturer’s manual for specific instructions.
- Successfully dismantling the washer provides valuable insights into its inner workings, allowing for thorough inspection, cleaning, and repair. However, if unsure, seek professional assistance, and remember to follow the reverse order of disassembly for reassembly.
Read more: How To Take Apart A Whirlpool Washer
Safety Precautions
Before embarking on the task of taking apart your washer, it’s essential to ensure your safety. Here are some important safety precautions to keep in mind:
- Disconnect the power: Unplug the washer from the electrical outlet to avoid the risk of electric shock. If the washer is hardwired, switch off the circuit breaker dedicated to the appliance.
- Protective gear: Wear protective gloves and safety goggles to safeguard your hands and eyes from potential injuries.
- Work in a well-ventilated area: If you’re working indoors, open windows or doors to ensure proper ventilation. This will help prevent the build-up of fumes or odors that may be emitted during the disassembly process.
- Keep the floor clear: Remove any obstacles or tripping hazards from your work area. Ensure a clean and clutter-free environment to avoid accidents.
- Take pictures: As you disassemble the washer, consider taking pictures of each step. This will help you remember the correct order and placement of components when it’s time for reassembly.
- Read the manual: Familiarize yourself with the specific safety instructions provided by the manufacturer. Pay attention to any warnings or precautions specific to your washer model.
- Additional precautions: If you’re unsure about any aspect of the disassembly process, it’s best to seek professional assistance. It’s always better to be safe than sorry.
By adhering to these safety precautions, you’ll minimize the risk of accidents and ensure a smooth and secure disassembly process. Now that we’ve covered the safety essentials, let’s move on to the tools and equipment you’ll need.
Tools and Equipment Needed
Before you begin taking apart your washer, gather the following tools and equipment:
- Screwdriver set: A set of screwdrivers with different sizes and types, including both flathead and Phillips head screwdrivers.
- Pliers: Adjustable pliers or tongue-and-groove pliers will come in handy for gripping and loosening various components.
- Socket wrench set: A set of socket wrenches with various sizes will be useful for removing bolts and nuts.
- Hammer: A lightweight hammer can be helpful for gently tapping and loosening stubborn parts.
- Hex keys: Also known as Allen wrenches, hex keys are necessary for removing screws with hexagonal heads.
- Putty knife: A putty knife or a flat-edged tool can be used to pry and detach certain components.
- Tub wrench: Depending on your washer model, you may need a specialized tub wrench to remove the tub retaining nut.
- Towel or cloth: Keep a towel or cloth nearby to wipe away any water or detergent spills during the disassembly process.
- Container or bag: Prepare a container or bag to store the screws, bolts, and small parts you remove. This will help keep everything organized and prevent loss.
Having these tools and equipment readily available will make the disassembly process smoother and more efficient. If you don’t already own some of these tools, you may be able to find them at your local hardware store or online. Once you have everything prepared, you’re ready to begin taking apart your washer. In the next step, we’ll start by unplugging the washer and ensuring it’s disconnected from the power source.
Step 1: Unplug the Washer
The first and most crucial step in taking apart a washer is to unplug it from the power source. This step is essential to ensure your safety and prevent any potential electrical accidents.
Locate the electrical outlet or the circuit breaker dedicated to the washer and switch it off. If the washer is hardwired, you may need to turn off the main power supply to the appliance. This will completely disconnect it from the electricity, eliminating the risk of electric shock.
Once you’ve turned off the power, double-check that the washer is indeed disconnected by trying to turn it on. Ensure that the control panel is not illuminated, and the machine does not respond to any commands.
Unplugging the washer also provides an opportunity for it to cool down if it has been recently running. Some parts, such as the motor and heating elements, can become hot during operation. By allowing the machine to cool down before disassembly, you reduce the risk of burning yourself on hot surfaces.
Remember to exercise caution and treat all parts of the washer as if they are still energized until you have verified that the power source is completely disconnected. This will ensure your safety throughout the disassembly process.
With the washer safely unplugged, we can move on to the next step: Removing the control panel.
Step 2: Remove the Control Panel
Now that the washer is safely unplugged, we can begin the process of removing the control panel. The control panel houses the buttons, dials, and display screen that allow you to operate the washer.
To remove the control panel, follow these steps:
- Locate the screws: Look for the screws holding the control panel in place. These are typically found on the top or the back of the panel.
- Remove the screws: Use a screwdriver to carefully remove the screws. Place them in a container or bag so they don’t get lost.
- Separate the control panel: Once you’ve removed the screws, gently pull or tilt the control panel forward to release it from its housing. Be mindful of any wires or connectors that may be attached to the panel.
- Disconnect the wiring harness: If there are wiring harnesses connecting the control panel to other components, carefully detach them by gently pulling the connectors apart. Avoid pulling on the wires themselves, as this may damage them.
Once the control panel is completely detached, set it aside in a safe location. Be careful not to damage any delicate buttons or display screens during the process.
Removing the control panel will give you access to the internal components of the washer, making it easier to proceed with the disassembly. However, be cautious around any exposed wires or connectors, as they may still be live if the power supply hasn’t been completely disconnected.
With the control panel out of the way, we can move on to the next step: Detaching the top panel of the washer.
Read more: How To Take Apart Maytag Washer
Step 3: Detach the Top Panel
With the control panel removed, the next step in taking apart your washer is to detach the top panel. The top panel covers the internal components of the machine and may need to be removed to access other parts during the disassembly process.
Follow these steps to detach the top panel:
- Locate the retaining clips: Look for the retaining clips at the front of the washer, typically positioned a few inches from each corner. These clips secure the top panel in place.
- Release the retaining clips: Using a putty knife or a flat-edged tool, insert it between the top panel and the washer’s body. Gently push the clips inward while lifting up on the top panel. This will release the clips and allow the panel to lift up.
- Lift and remove the top panel: Once the retaining clips are released, lift the top panel upward and towards the back of the washer. Be mindful of any wires or hoses that may still be connected to the panel.
Set the top panel aside in a safe location, ensuring that it doesn’t get damaged or scratched during the disassembly process.
With the top panel removed, you’ll have a clearer view of the inner components of the washer and easier access to other parts that may require attention or repair.
Keep in mind that some washer models may have additional screws or fasteners securing the top panel in place. If you don’t see any retaining clips on the front, consult the manufacturer’s manual or search for specific instructions for your particular washer model.
Now that the top panel is detached, we can move on to the next step: Disconnecting the wiring harnesses.
Step 4: Disconnect the Wiring Harnesses
Now that the top panel is removed, the next step in taking apart your washer is to disconnect the wiring harnesses. These are the connections that provide power and communication between various components of the machine.
Follow these steps to disconnect the wiring harnesses:
- Identify the wiring harnesses: Look for the bundles of wires connected to different parts of the washer. These harnesses may be secured with clips or held in place by connectors.
- Release the clips or connectors: If the wiring harnesses are held in place with clips, gently squeeze or pry the clips to release them. If they are secured with connectors, carefully detach the connectors by pulling them apart.
- Label or take pictures: As you disconnect the wiring harnesses, consider labeling them or taking pictures for reference later. This will help ensure that you reconnect everything correctly during reassembly.
- Inspect the wires: While you’re disconnecting the wiring harnesses, inspect the wires for any signs of damage or wear. If you notice any frayed wires or loose connections, make a note of them for further inspection or repair.
Be gentle and avoid yanking on the wires when disconnecting the harnesses, as this may cause damage. Take your time and ensure that each connector is fully detached before moving on to the next one.
Setting aside the disconnected wiring harnesses in a safe location will help prevent them from getting tangled or damaged during the rest of the disassembly process.
With the wiring harnesses disconnected, we can now proceed to the next step: Removing the water supply hoses.
Step 5: Remove the Water Supply Hoses
Next in the process of taking apart your washer is removing the water supply hoses. These hoses connect the washer to the water source and allow water to flow into the machine during the wash cycle.
Follow these steps to remove the water supply hoses:
- Locate the water supply valves: Look for the valves that control the water supply to the washer. These are typically located near the back of the machine, close to where the hoses are connected.
- Turn off the water supply: Using either a wrench or your hand, turn the valves clockwise to shut off the water supply to the washer.
- Prepare a towel or cloth: Place a towel or cloth underneath the area where the hoses are connected. This will catch any water that may spill out when removing the hoses.
- Disconnect the hoses: Using a pair of pliers or wrench, loosen the hose connections by turning them counterclockwise. Once loosened, carefully remove the hoses by pulling them away from the washer. Be prepared for some water to come out of the hoses.
- Inspect the hoses: While the hoses are detached, it’s a good opportunity to inspect them for any signs of cracks, damage, or mineral build-up. If you notice any issues, consider replacing the hoses before reassembling the washer.
Take your time when removing the water supply hoses to ensure that you don’t damage any of the connections or cause any leaks. Twist the hoses gently, applying steady pressure to loosen them without excessive force.
Once the hoses are removed, you can set them aside for cleaning or replacement, if necessary. Be sure to keep them in a safe location where they won’t get damaged or tangled with other components.
Now that the water supply hoses are disconnected, we can move on to the next step: Removing the drain hose.
Before taking apart a washer, always unplug it and turn off the water supply. Refer to the manufacturer’s manual for specific instructions and use proper tools for the job.
Step 6: Take Out the Drain Hose
In this step, we will focus on removing the drain hose from your washer. The drain hose is responsible for carrying wastewater out of the machine during the wash and rinse cycles.
Follow these steps to take out the drain hose:
- Locate the drain hose: Look for the drain hose connected to the back of your washer. It is usually attached to a drain pump or a drain outlet.
- Prepare a container or towel: Place a container or a towel underneath the area where the drain hose is connected. This will catch any water that may spill out during the removal process.
- Loosen the clamp or connector: Depending on your washer model, the drain hose may be secured with a clamp or connector. Use pliers or a screwdriver to loosen and remove the clamp or disconnect the connector.
- Pull out the drain hose: Carefully pull the drain hose away from the washer, ensuring that it doesn’t snag on any other components. Be prepared for some water to drain out of the hose.
- Inspect the drain hose: While the drain hose is removed, take a moment to inspect it for any signs of damage or blockage. If you notice any cracks, kinks, or clogs, consider replacing the hose before reassembling the washer.
Take your time when removing the drain hose to prevent any spills or accidents. If the hose is stubborn, wiggle it gently while pulling to loosen it from its connection point.
Once the drain hose is detached, set it aside in a safe location, away from any potential damage or tangles. You can clean or replace it later if needed.
Now that the drain hose is taken out, we can proceed to the next step: Unbolting the back panel of the washer.
Read more: How To Take Apart Stackable Washer/Dryer
Step 7: Unbolt the Back Panel
The next step in taking apart your washer is to unbolt the back panel. The back panel provides access to various components and allows for easier maintenance and repair.
Follow these steps to unbolt the back panel:
- Ensure the washer is stable: Make sure the washer is stable and won’t wobble or move while you’re working on it. If necessary, place the machine against a wall or use supports to keep it steady.
- Remove the screws: Using a screwdriver or socket wrench, locate and remove the screws that secure the back panel. The number and placement of screws will vary depending on your washer model.
- Set aside the screws: As you remove the screws, keep them in a safe container or bag to prevent them from getting lost. You’ll need them later when reassembling the washer.
- Remove the back panel: Once all the screws are removed, gently pull the back panel away from the washer to detach it. Be mindful of any wires or hoses that may still be connected to the panel.
Set the back panel aside in a safe location, making sure it doesn’t get damaged or scratched. Keep in mind that the back panel provides access to critical components, so handle it with care.
With the back panel removed, you’ll have a clear view of the internal parts of the washer, including the motor, belts, and other components that may require inspection or replacement.
Now that the back panel is unbolted, we can move on to the next step: Accessing and disconnecting the motor.
Step 8: Access and Disconnect the Motor
In this step, we will focus on accessing and disconnecting the motor of your washer. The motor is a critical component that drives the drum or agitator during the wash and spin cycles.
Follow these steps to access and disconnect the motor:
- Locate the motor: Look for the motor, which is usually positioned at the bottom or the back of the washer. It is often connected to the drum or agitator through a belt or a direct-drive system.
- Inspect the motor connections: Take a moment to familiarize yourself with the motor connections and wiring. Note the locations of any mounting brackets, clips, or screws that secure the motor in place.
- Disconnect the motor wiring harness: Using pliers or your fingers, carefully disconnect the wiring harness that connects the motor to the washer’s electrical system. Gently pull the connectors apart, being cautious not to damage any wires.
- Remove the mounting brackets: If the motor is held in place by mounting brackets or screws, use the appropriate tools to remove them. Set the brackets and screws aside in a safe place for reassembly.
- Take out the motor: Once the wiring harness and mounting brackets are disconnected, carefully pull the motor away from its housing. If the motor is attached with screws, make sure all the screws are removed before attempting to remove the motor.
When handling the motor, be mindful of its weight and take care not to drop it or damage any of its components. Place it in a safe location away from potential damage or interference.
With the motor disconnected, you’ll have better access to other components of the washer, such as belts, pulleys, or the drum itself, depending on the design of your machine.
Now that the motor is disconnected, we can proceed to the next step: Detaching the drive belt.
Step 9: Detach the Drive Belt
In this step, we will focus on detaching the drive belt from your washer. The drive belt is responsible for transferring power from the motor to other moving parts, such as the drum or agitator.
Follow these steps to detach the drive belt:
- Locate the drive belt: The drive belt is typically wrapped around the motor pulley and another pulley connected to the drum or agitator. Take note of how the belt is positioned before proceeding.
- Relieve the belt tension: With one hand, grasp the belt near the motor pulley and pull it to relieve tension. This will make it easier to remove the belt from the pulleys.
- Slip the belt off the pulleys: While holding the belt tension, carefully slip the belt off the motor pulley and the pulley connected to the drum or agitator. Take your time and make sure the belt is fully removed.
- Inspect the belt: While the belt is detached, it’s a good opportunity to inspect it for any signs of wear, cracks, or stretching. If the belt shows any signs of damage, consider replacing it before reassembling the washer.
When removing the drive belt, be cautious not to stretch or distort it excessively. Proper handling of the belt will ensure its longevity and prevent any issues with the washer’s performance.
Set the detached drive belt aside in a safe location, away from any potential damage or tangles. If you plan to reuse the belt, keep it in a clean and dry area until the reassembly process.
With the drive belt detached, you’ll have better access to other components of the washer, such as the drum or agitator, depending on the design of your machine.
Now that the drive belt is removed, we can move on to the next step: Taking out the drum or agitator.
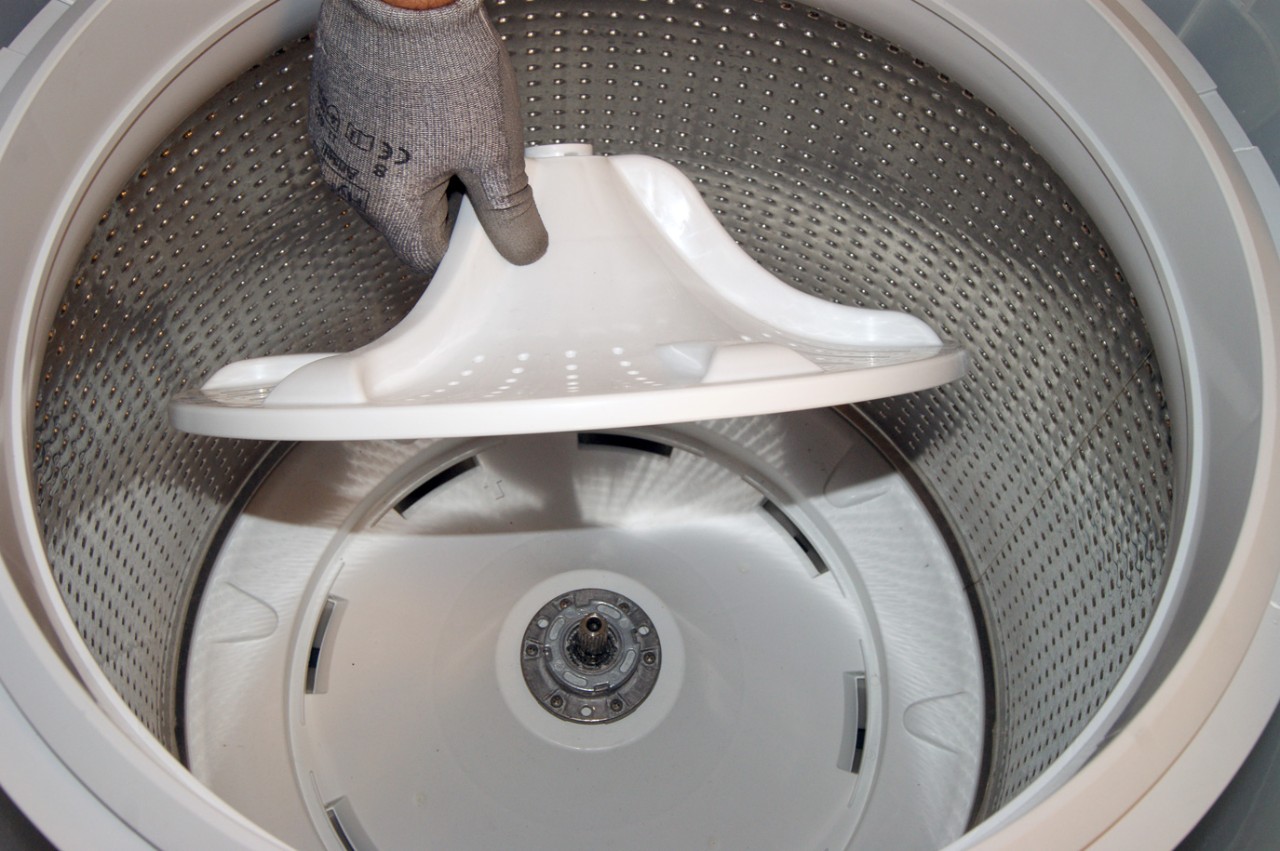
Step 10: Remove the Drum or Agitator
In this step, we will focus on removing the drum or agitator from your washer. The drum or agitator is the central component that facilitates the washing and spinning of your laundry.
Follow these steps to remove the drum or agitator:
- Identify the type of washer: Depending on the type of washer you have, either a drum or an agitator will be present. The removal process differs slightly for each, so identify which one your washer has.
- Drum Removal:
- Inspect the drum: Take a moment to examine the drum and identify any fasteners or mounting brackets that may be securing it in place.
- Remove the fasteners: Using the appropriate tools, such as a wrench or screwdriver, remove any screws, bolts, or clips that are securing the drum to the washer frame.
- Carefully lift out the drum: Once all the fasteners are removed, gently lift the drum out of the washer frame. Be mindful of any wires, hoses, or other connections that may still be attached to the drum.
- Agitator Removal:
- Inspect the agitator: Take a closer look at the agitator and note any fasteners, such as screws or bolts, that hold it in place.
- Remove the fasteners: Using the appropriate tools, loosen and remove any fasteners that secure the agitator to the washer’s transmission shaft or base.
- Gently lift out the agitator: Once the fasteners are removed, carefully lift the agitator out of the washer. Be cautious not to damage any surrounding parts or connections.
Whether you’re removing the drum or the agitator, it’s important to handle them with care during the process. These components can be bulky and heavy, so make sure you have a firm grip and get assistance if needed.
Set the removed drum or agitator aside in a safe location, where it won’t be damaged or interfere with the rest of the disassembly process.
With the drum or agitator removed, you’ll have a more comprehensive view of the inner workings of the washer and better access to other components, such as the tub or outer housing.
Now that the drum or agitator is out, we can proceed to the next step: Separating the tub from the outer housing.
Read more: How To Take A Dryer Apart
Step 11: Separate the Tub from the Outer Housing
In this final step of taking apart your washer, we will focus on separating the tub from the outer housing. This step will allow you to access and inspect the tub, as well as clean or repair any components within the outer housing.
Follow these steps to separate the tub from the outer housing:
- Inspect the tub connections: Take a moment to examine the tub and identify any fasteners, brackets, or clips that may be securing it to the outer housing.
- Remove the fasteners: Using the appropriate tools, such as a wrench or screwdriver, remove any screws, bolts, or clips that are holding the tub in place. These fasteners may be located at the bottom or sides of the washer.
- Disconnect any remaining connections: Check for any remaining connections, such as hoses or drainage pipes, that may still be attached to the tub. Carefully detach these connections by following the specific instructions provided by your washer’s manufacturer.
- Lift out the tub: Once all the fasteners and connections are removed, carefully lift the tub out of the outer housing. Ensure that you have a firm grip and be mindful of its weight and size.
Set the separated tub aside in a safe and clean location, away from any potential damage or interference. This will allow you to further inspect and clean the tub, as well as access other components within the outer housing, if needed.
With the tub separated from the outer housing, you have successfully dismantled your washer. Take this opportunity to inspect all components, clean them thoroughly, and address any maintenance or repair tasks that may be necessary.
Once you have completed your inspection, cleaning, and any necessary repairs, you can begin the reassembly process following the reverse order of the disassembly steps.
Remember to consult the manufacturer’s manual or any specific instructions for your washer model to ensure proper reassembly and functionality.
Congratulations! You have successfully learned how to take apart your washer and gained valuable insights into its inner workings.
Disclaimer: Taking apart a washer can be complex, and if you are not confident in your abilities or have any concerns, it is recommended to seek professional assistance.
Conclusion
Throughout this comprehensive guide, we have walked you through the process of taking apart your washer. From safety precautions to disconnecting the wiring harnesses, removing the control panel, and unbolt the back panel, we covered each step in detail. By following these instructions, you can successfully disassemble your washer, gaining access to various components for inspection, cleaning, or repair.
It is important to remember that working with appliances can be hazardous, so always prioritize your safety by following the recommended safety precautions. These include unplugging the washer, wearing appropriate protective gear, working in a well-ventilated area, and properly handling tools and equipment.
As you proceed with taking apart your washer, it is crucial to document the disassembly process. Use labels, take pictures, or carefully organize the components and fasteners that you remove. Proper documentation will greatly assist you during the reassembly process, ensuring that everything is correctly put back together.
Additionally, keep in mind that each washer model may have slight variations in design, disassembly methods, and component placement. Therefore, it is always recommended to consult the manufacturer’s manual or search for specific instructions related to your particular washer model.
Ultimately, dismantling your washer can provide valuable insights into how it operates and help you troubleshoot and address any issues that may arise. However, if you are unsure about any aspect of the disassembly process or encounter difficulties, it is always advisable to seek professional assistance.
Once you have completed the necessary maintenance or repairs, you can follow the reverse order of the disassembly steps to reassemble your washer. Take your time, refer to your documentation, and ensure that each component is properly connected and secured.
We hope this guide has empowered you with the knowledge and confidence to take apart your washer. Remember, a well-maintained and properly functioning washer can prolong its lifespan and maintain its efficiency.
Happy repairing!
Now that you've mastered dismantling a washer, why stop there? Dive into our comprehensive guide on how to do home repair for more practical advice on maintaining your living space. This resource covers everything from fixing leaky faucets to patching up drywall, ensuring you're well-equipped to handle common household issues. Keep your home in top shape without needing to call in the experts!
Frequently Asked Questions about How To Take Apart Washer
Was this page helpful?
At Storables.com, we guarantee accurate and reliable information. Our content, validated by Expert Board Contributors, is crafted following stringent Editorial Policies. We're committed to providing you with well-researched, expert-backed insights for all your informational needs.


0 thoughts on “How To Take Apart Washer”