Home>Furniture & Design>Living Room Furniture>How To Take Apart A Catnapper Recliner
Living Room Furniture
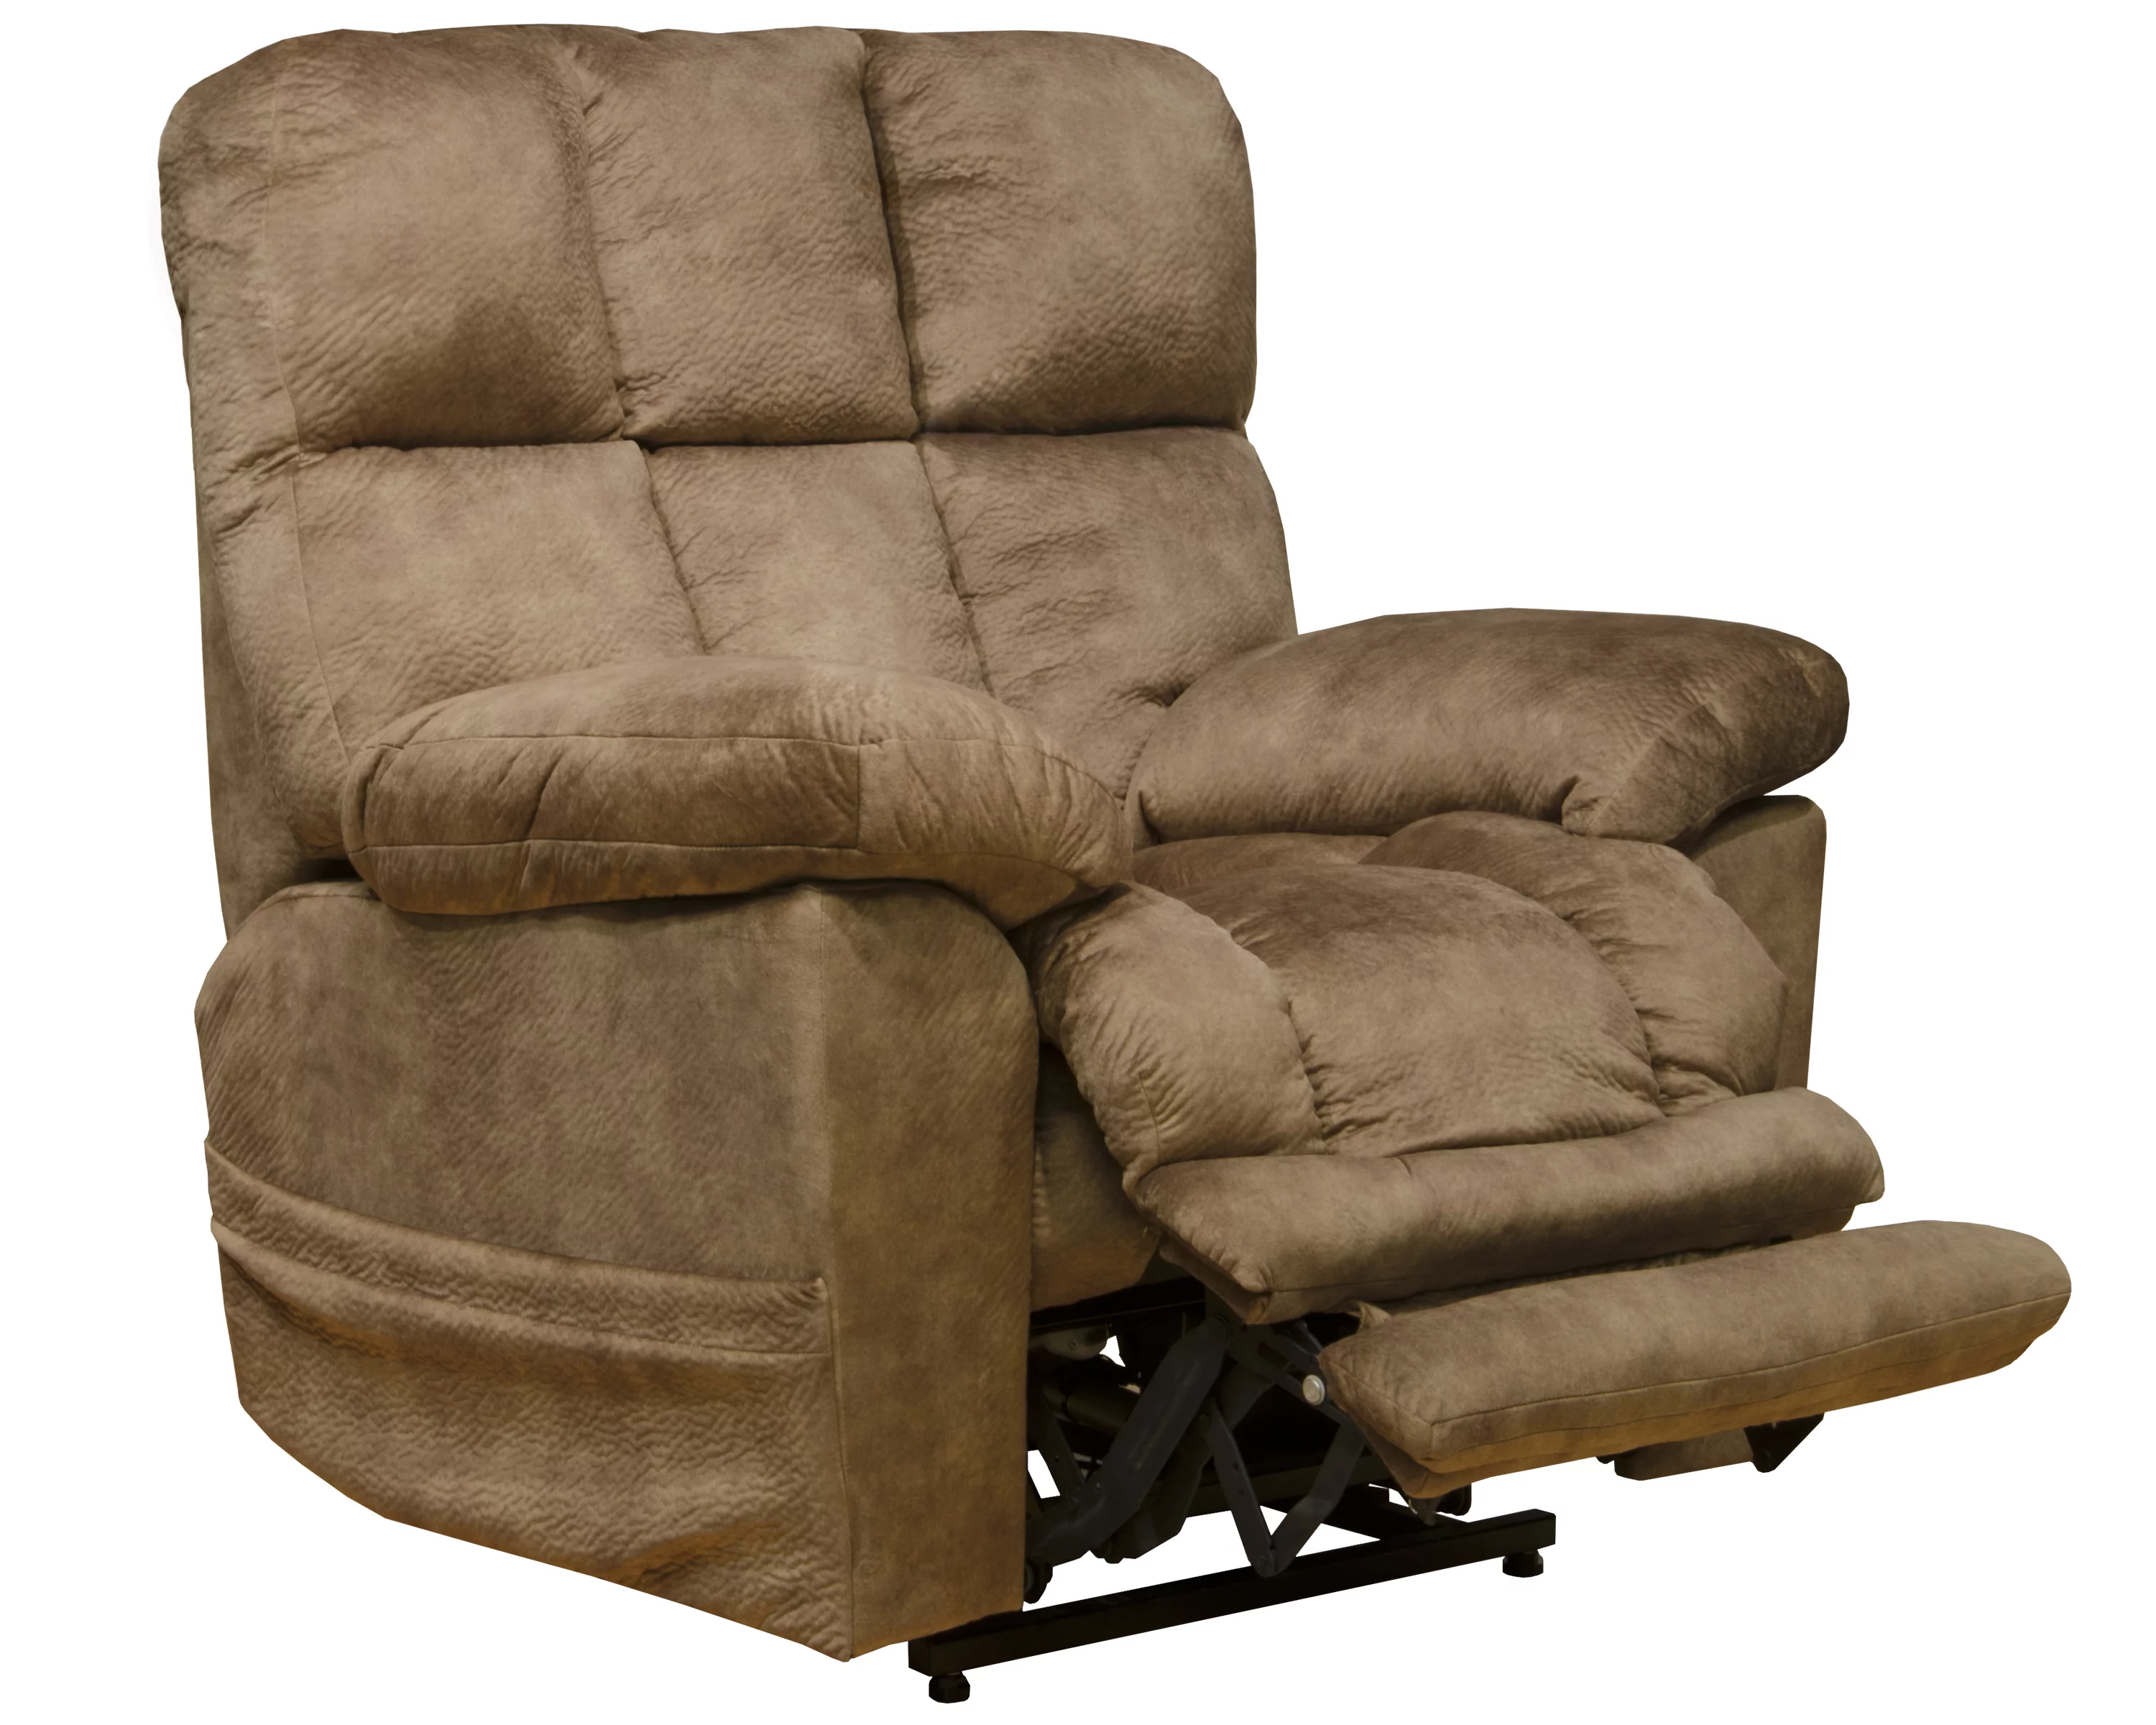
How To Take Apart A Catnapper Recliner
Modified: March 2, 2024
Learn how to disassemble a Catnapper recliner with our step-by-step guide. Get expert tips for taking apart living room furniture and design.
(Many of the links in this article redirect to a specific reviewed product. Your purchase of these products through affiliate links helps to generate commission for Storables.com, at no extra cost. Learn more)
Introduction
Welcome to the comprehensive guide on dismantling a Catnapper recliner. Whether you're moving to a new home, replacing worn-out parts, or simply exploring the inner workings of your favorite recliner, this step-by-step tutorial will equip you with the knowledge and confidence to disassemble your Catnapper recliner with ease.
Catnapper recliners are renowned for their comfort, durability, and stylish design. However, there may come a time when you need to take apart your recliner for maintenance or transportation purposes. While the task might seem daunting at first, with the right tools, a methodical approach, and a bit of patience, you can successfully disassemble your Catnapper recliner without hassle.
In the following sections, we will delve into the essential tools and materials needed for the disassembly process, along with a detailed walkthrough of each step. By following this guide, you'll gain a deeper understanding of your recliner's construction and be better equipped to handle any necessary repairs or modifications in the future.
So, grab your toolkit, set aside some time, and let's embark on this DIY adventure to uncover the inner workings of your beloved Catnapper recliner.
Key Takeaways:
- Disassembling a Catnapper recliner requires preparation, the right tools, and careful handling. By following the step-by-step guide, you can gain valuable insights into your recliner’s construction and be better prepared for future maintenance or repairs.
- When reassembling your recliner, organization, caution, and attention to detail are key. Following the reverse order of disassembly and testing functionality ensures a successful restoration of comfort and relaxation.
Read more: How To Take A Recliner Couch Apart
Tools and Materials Needed
Before you begin the disassembly process, it’s essential to gather the necessary tools and materials to ensure a smooth and efficient experience. Here’s a comprehensive list of what you’ll need:
- Socket Wrench Set: A set of socket wrenches in various sizes will be indispensable for removing bolts and screws.
- Phillips and Flat-Head Screwdrivers: These will come in handy for removing screws and fasteners of different types.
- Needle-Nose Pliers: Useful for gripping and manipulating small components during disassembly.
- Adjustable Wrench: An adjustable wrench will assist in loosening and tightening nuts and bolts.
- Protective Gloves: It’s important to safeguard your hands with a pair of durable gloves while handling the recliner’s components.
- Protective Eyewear: Safety goggles or glasses will provide eye protection during the disassembly process.
- Ziplock Bags or Small Containers: These will help you organize and store small parts and hardware to prevent loss.
- Marker and Labels: Use these to label the disassembled parts for easy identification during reassembly.
- Blanket or Drop Cloth: Lay down a blanket or drop cloth to protect the floor and the recliner’s upholstery during disassembly.
- Assistance: Enlist the help of a friend or family member to assist with lifting and maneuvering the recliner’s components.
By ensuring you have these tools and materials at your disposal, you’ll be well-prepared to tackle the disassembly of your Catnapper recliner. With everything in place, you’re ready to move on to the first step of the process: preparation.
Step 1: Preparation
Before diving into the disassembly of your Catnapper recliner, it’s crucial to prepare the workspace and the recliner itself to ensure a safe and organized process. Here’s a detailed guide to help you get started:
Clear the Surrounding Area: Begin by clearing the space around the recliner to create ample room for maneuvering and working comfortably. Remove any obstacles or furniture that may obstruct your movement.
Gather Necessary Tools: Ensure that all the tools and materials listed in the previous section are within reach. Having everything readily available will streamline the disassembly process and minimize interruptions.
Protect the Floor and Upholstery: Lay a blanket or drop cloth on the floor beneath the recliner to safeguard it from scratches and damage. Additionally, you can place protective padding on any nearby sharp edges or surfaces.
Inspect the Recliner: Take a few moments to visually inspect the recliner and identify any visible screws, bolts, or fasteners that will need to be removed. This initial assessment will give you a clearer understanding of the disassembly process ahead.
Secure Small Parts: If there are any loose cushions, headrests, or detachable components, set them aside in a safe location. Use ziplock bags or small containers to store any small screws, nuts, or bolts that will be removed during disassembly.
Enlist Assistance: If the recliner is bulky or heavy, consider enlisting the help of a friend or family member to assist with lifting and maneuvering the larger components. Safety should always be a priority when handling heavy furniture.
By meticulously preparing the workspace and the recliner itself, you’ll set the stage for a smooth and efficient disassembly process. With these preparations complete, you’re now ready to move on to the next step: removing the back of the recliner.
Step 2: Removing the Back
Removing the back of your Catnapper recliner is a crucial step in the disassembly process. This section will guide you through the necessary steps to detach the back and gain access to the internal components of the recliner.
Locate the Attachment Points: Carefully examine the back of the recliner to identify the attachment points, which are typically located at the base of the backrest. These attachment points may be secured with screws, bolts, or clips.
Use the Correct Tools: Depending on the type of attachment, use the appropriate tools to remove the fasteners. A socket wrench or screwdriver will likely be needed to loosen and extract the screws or bolts. If the back is attached with clips, gently disengage them using a flat-head screwdriver or a similar tool.
Secure the Backrest: Once the fasteners are removed, ensure that the backrest is adequately supported to prevent it from falling or tilting backward. Enlist the assistance of a second person if necessary to stabilize the backrest as it is detached.
Set the Backrest Aside: Carefully lift and set the detached backrest aside in a safe and clear area, ensuring that it is placed on a soft surface to prevent any damage. Take note of any additional components or mechanisms that may be revealed upon removing the backrest.
Organize and Store Fasteners: As you proceed, collect and store the screws, bolts, or clips in a labeled container or ziplock bag. Keeping these fasteners organized will simplify the reassembly process and minimize the risk of misplacement.
Inspect the Interior: With the backrest removed, take a moment to inspect the interior of the recliner. This vantage point will provide a clearer view of the internal mechanisms, allowing you to assess any areas that may require maintenance or repairs.
By successfully removing the back of your Catnapper recliner, you’ve taken a significant step toward gaining access to its internal components. With the backrest safely set aside, you’re now prepared to proceed to the next phase of disassembly: taking apart the seat of the recliner.
Step 3: Taking Apart the Seat
Disassembling the seat of your Catnapper recliner is a pivotal stage in the overall disassembly process. This step-by-step guide will walk you through the process of separating the seat from the recliner’s frame, allowing for further exploration and potential repairs.
Identify the Attachment Points: Begin by identifying the attachment points securing the seat to the frame of the recliner. These attachment points may be located underneath the seat, often obscured by fabric or upholstery. Look for screws, bolts, or clips that hold the seat in place.
Remove the Fasteners: Using the appropriate tools, such as a socket wrench or screwdriver, carefully remove the fasteners securing the seat to the frame. Exercise caution to avoid damaging the upholstery or any surrounding components during this process.
Support the Seat: As the fasteners are removed, ensure that the seat is adequately supported to prevent it from shifting or becoming unstable. Enlist the assistance of a second person if necessary to hold the seat steady as it is detached from the frame.
Detach the Seat: Once the fasteners are removed and the seat is properly supported, gently lift and detach the seat from the recliner’s frame. Take care to maneuver it out of the recliner’s structure without causing damage to the upholstery or any internal mechanisms.
Inspect the Underside: With the seat removed, take the opportunity to inspect the underside of the seat and the area of the frame from which it was detached. This vantage point may reveal additional components, springs, or mechanisms that contribute to the recliner’s functionality.
Organize and Store Fasteners: As with previous steps, collect and store the fasteners in a labeled container or ziplock bag. Keeping these components organized will simplify the reassembly process and mitigate the risk of misplacing essential hardware.
By successfully taking apart the seat of your Catnapper recliner, you’ve made significant progress in the disassembly process, gaining a clearer view of the recliner’s internal structure. With the seat safely detached, you’re now ready to proceed to the next phase: disassembling the footrest of the recliner.
Before taking apart a Catnapper recliner, make sure to unplug the power source if it’s electric. Then, carefully remove the back and seat cushions to access the frame and mechanism for disassembly. Keep track of the screws and parts to reassemble correctly.
Step 4: Disassembling the Footrest
Disassembling the footrest of your Catnapper recliner is a crucial phase in the overall disassembly process. This step-by-step guide will lead you through the process of separating the footrest from the recliner, providing access to its internal mechanisms and facilitating potential maintenance or repairs.
Locate the Attachment Points: Begin by identifying the attachment points that secure the footrest to the recliner’s frame. These attachment points are typically located beneath the seat or within the footrest’s structure. Look for screws, bolts, or clips that hold the footrest in place.
Use the Appropriate Tools: Depending on the type of fasteners used, utilize the necessary tools, such as a socket wrench or screwdriver, to remove the fasteners that secure the footrest. Exercise caution to avoid damaging the upholstery or any surrounding components during this process.
Support the Footrest: As you remove the fasteners, ensure that the footrest is adequately supported to prevent it from shifting or becoming unstable. Enlist the assistance of a second person if necessary to hold the footrest steady as it is detached from the recliner’s frame.
Detach the Footrest: Once the fasteners are removed and the footrest is properly supported, carefully lift and detach the footrest from the recliner’s frame. Take care to maneuver it out of the recliner’s structure without causing damage to the upholstery or any internal mechanisms.
Inspect the Mechanisms: With the footrest removed, take the opportunity to inspect its internal mechanisms and the area of the frame from which it was detached. This vantage point may reveal additional components, springs, or mechanisms that contribute to the functionality of the recliner’s footrest.
Organize and Store Fasteners: As in previous steps, collect and store the fasteners in a labeled container or ziplock bag. Keeping these components organized will simplify the reassembly process and minimize the risk of misplacing essential hardware.
By successfully disassembling the footrest of your Catnapper recliner, you have advanced further in the disassembly process, gaining insight into the intricate mechanisms that contribute to the functionality of the recliner. With the footrest safely detached, you are now prepared to proceed to the next phase: removing the arms of the recliner.
Step 5: Removing the Arms
Removing the arms of your Catnapper recliner is a pivotal step in the disassembly process, allowing for a comprehensive exploration of the recliner’s structure and mechanisms. This section will guide you through the process of detaching the arms, providing access to internal components and facilitating potential repairs or modifications.
Identify Attachment Points: Begin by identifying the attachment points that secure the arms to the recliner’s frame. These attachment points are typically located at the sides of the recliner, often concealed beneath fabric or upholstery. Look for screws, bolts, or clips that hold the arms in place.
Use the Appropriate Tools: Depending on the type of fasteners used, employ the necessary tools, such as a socket wrench or screwdriver, to remove the fasteners that secure the arms. Exercise caution to avoid damaging the upholstery or any surrounding components during this process.
Support the Arms: As you remove the fasteners, ensure that the arms are adequately supported to prevent them from shifting or becoming unstable. Enlist the assistance of a second person if necessary to hold the arms steady as they are detached from the recliner’s frame.
Detach the Arms: Once the fasteners are removed and the arms are properly supported, carefully lift and detach the arms from the recliner’s frame. Take care to maneuver them out of the recliner’s structure without causing damage to the upholstery or any internal mechanisms.
Inspect the Exposed Areas: With the arms removed, take the opportunity to inspect the areas of the frame from which they were detached. This vantage point may reveal additional components or mechanisms that contribute to the overall functionality and structural integrity of the recliner.
Organize and Store Fasteners: As in previous steps, collect and store the fasteners in a labeled container or ziplock bag. Keeping these components organized will simplify the reassembly process and minimize the risk of misplacing essential hardware.
By successfully removing the arms of your Catnapper recliner, you have made significant progress in the disassembly process, gaining a clearer view of the recliner’s internal structure and mechanisms. With the arms safely detached, you are now prepared to proceed to the final phase: reassembly tips to guide you in putting your recliner back together.
Step 6: Reassembly Tips
As you near the completion of disassembling your Catnapper recliner, it’s essential to consider reassembly to restore the recliner to its fully functional and comfortable state. Here are valuable reassembly tips to guide you as you begin the process of putting your recliner back together:
Organize and Label Components: Throughout the disassembly process, diligently organize and label each component, including fasteners and small parts, to ensure that you can easily identify and retrieve them when reassembling the recliner.
Refer to Documentation: If available, refer to the manufacturer’s documentation, assembly instructions, or diagrams that accompanied the recliner to gain insights into the proper reassembly sequence and component placement.
Inspect and Clean Components: Take the opportunity to inspect and clean each component, including the frame, upholstery, and internal mechanisms, before reassembly. Address any maintenance or repairs needed to ensure the recliner’s optimal performance.
Follow Reverse Order: When reassembling the recliner, follow the reverse order of the disassembly process. Begin with attaching the arms, then the footrest, seat, and finally, the backrest, ensuring that each component is securely fastened.
Exercise Caution: Handle components with care and attention to prevent damage to the upholstery, frame, or internal mechanisms during reassembly. Enlist assistance when maneuvering larger components to ensure safety and precision.
Test Functionality: Once reassembly is complete, test the recliner’s functionality, including the reclining mechanism, footrest operation, and overall stability. Confirm that all components are securely fastened and that the recliner operates as intended.
By adhering to these reassembly tips, you can streamline the process of putting your Catnapper recliner back together, ensuring that it is restored to its optimal condition and ready to provide comfort and relaxation once again.
With the reassembly tips in mind, you are now equipped to embark on the reassembly of your Catnapper recliner, bringing together its components to recreate the familiar comfort and functionality that it offers.
Conclusion
Congratulations on successfully navigating the disassembly process of your Catnapper recliner. By following this comprehensive guide, you’ve gained valuable insights into the intricate construction and mechanisms that contribute to the comfort and functionality of your recliner. Whether your endeavor was driven by the need for maintenance, repair, or simple curiosity, this experience has provided a deeper understanding of your beloved recliner.
As you reflect on the disassembly journey, you’ve not only uncovered the inner workings of the recliner but also honed your skills in handling furniture maintenance and repairs. The meticulous approach you’ve taken in organizing components, exercising caution, and seeking assistance when needed has not only facilitated the disassembly process but has also equipped you with valuable skills for future endeavors.
As you move forward, whether it’s reassembling your Catnapper recliner or embarking on new DIY projects, the knowledge and experience gained from this endeavor will serve as a valuable foundation. Remember to refer back to this guide and the reassembly tips as you put your recliner back together, ensuring that it is restored to its optimal condition.
Embrace the satisfaction of a job well done and the newfound familiarity with your recliner’s inner workings. You’ve unlocked the potential for future maintenance, repairs, and enhancements, allowing you to continue enjoying the comfort and relaxation that your Catnapper recliner offers for years to come.
With the disassembly process behind you and the reassembly journey ahead, take pride in the hands-on experience and the newfound expertise you’ve gained. As you restore your recliner to its former glory, may it continue to be a cherished and inviting centerpiece in your living space.
Frequently Asked Questions about How To Take Apart A Catnapper Recliner
Was this page helpful?
At Storables.com, we guarantee accurate and reliable information. Our content, validated by Expert Board Contributors, is crafted following stringent Editorial Policies. We're committed to providing you with well-researched, expert-backed insights for all your informational needs.


0 thoughts on “How To Take Apart A Catnapper Recliner”