Home>Furniture & Design>Living Room Furniture>How To Take Apart Recliner
Living Room Furniture
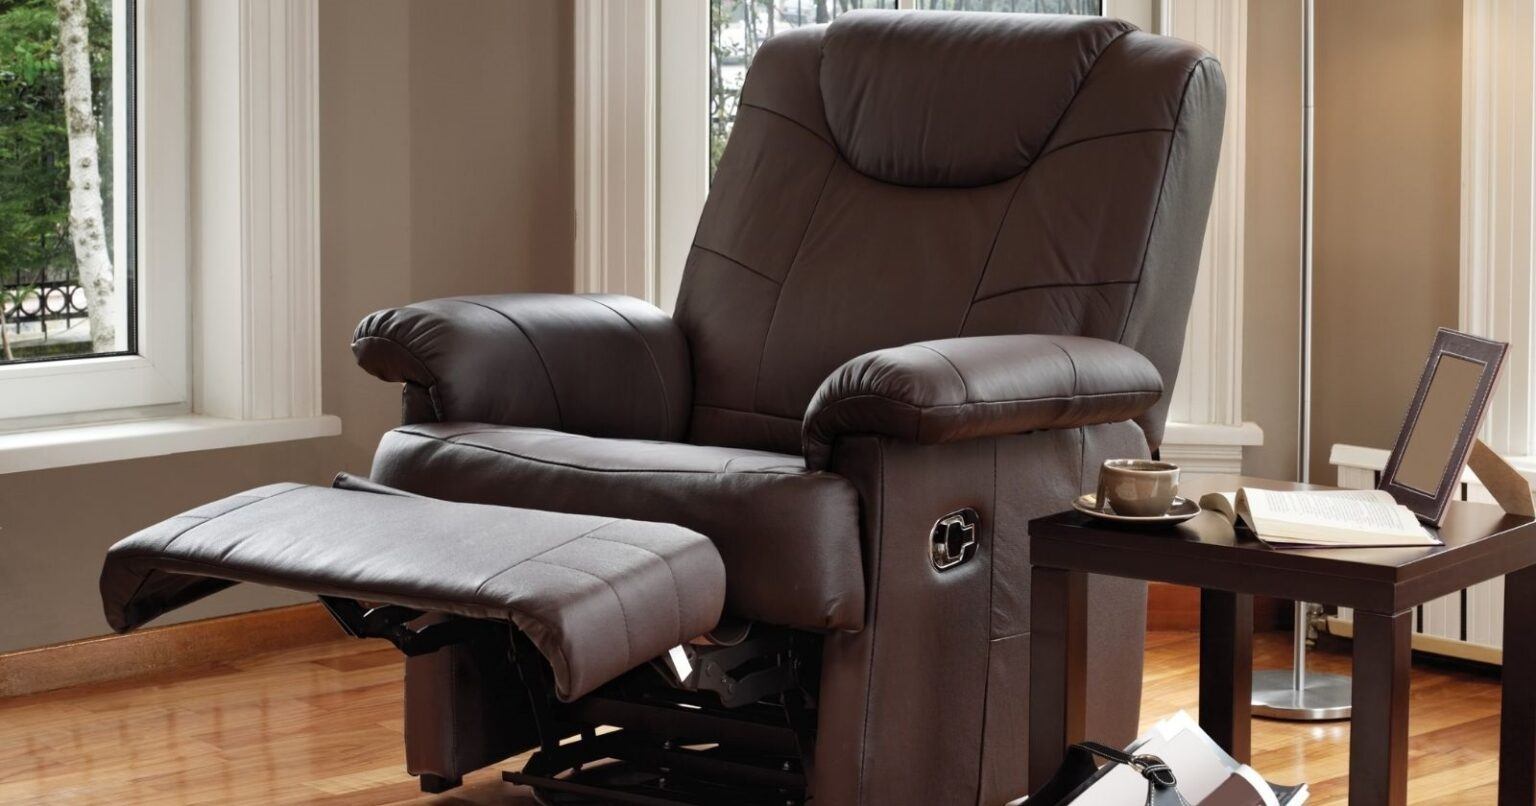
How To Take Apart Recliner
Modified: January 9, 2024
Learn how to easily take apart your recliner with the help of our step-by-step guide. Get expert tips on dismantling and reassembling your living room furniture.
(Many of the links in this article redirect to a specific reviewed product. Your purchase of these products through affiliate links helps to generate commission for Storables.com, at no extra cost. Learn more)
Introduction
Recliners are one of the most beloved pieces of furniture, providing comfort and relaxation in our living rooms. However, there may come a time when you need to take apart your recliner for various reasons, such as moving it to a new location or performing repairs. While it may appear intimidating at first, with the right tools and guidance, disassembling a recliner can be a straightforward process.
In this article, we will guide you through the step-by-step process of taking apart a recliner. We will discuss the tools you’ll need and provide detailed instructions to ensure a smooth disassembly. Whether you’re a seasoned DIY enthusiast or a first-time recliner disassembler, this guide will help you successfully dismantle your recliner without any mishaps.
Before we jump into the disassembly process, it’s important to note that the specific steps and methods may vary depending on the type and model of your recliner. Be sure to consult your recliner manufacturer’s instructions or seek professional assistance if you have any doubts or concerns.
Now, let’s gather the necessary tools and get ready to take apart your recliner!
Key Takeaways:
- Disassembling a recliner requires the right tools, careful preparation, and step-by-step dismantling to ensure a smooth and organized process, allowing for repairs, replacements, or maintenance.
- Proper cleaning and maintenance of disassembled recliner parts are essential for extending their lifespan and ensuring optimal functionality when reassembling the recliner, promoting longevity and comfort in your living room.
Read more: How To Take Apart A Catnapper Recliner
Tools Needed
Before you begin disassembling your recliner, it’s important to gather the necessary tools to make the process smoother and more efficient. Here are the tools you’ll need:
- Phillips-head screwdriver: This will be used to remove screws or bolts.
- Flat-head screwdriver: You may need this for prying or removing certain parts.
- Allen wrench set: Some recliners may have bolts that require an Allen wrench for removal.
- Pliers: These can come in handy for gripping and maneuvering parts.
- Socket set: If your recliner has bolts instead of screws, a socket set will be useful for loosening and removing them.
- Electrical tape: If your recliner has electrical components, electrical tape can help secure and protect the wiring during disassembly.
- Blanket or protective covering: To protect the recliner and surrounding area from scratches or damage.
Having these tools on hand will ensure that you have everything you need to properly disassemble your recliner. It’s always a good idea to check your recliner’s manufacturer instructions or manual to see if any additional or specialized tools are required for your specific model.
Now that you have your tools ready, let’s move on to the step-by-step process of taking apart your recliner.
Step 1: Prepare the Work Area
Before you start disassembling your recliner, it’s important to prepare the work area to ensure a safe and organized disassembly process. Follow these steps to get your work area ready:
- Clear a space: Make sure you have enough space to move around comfortably and lay out the recliner parts. Clear any obstacles or furniture that might get in your way.
- Use a blanket or protective covering: Lay down a blanket or protective covering to prevent any scratches or damage to the recliner and the floor. This will also help keep small parts from rolling away or getting lost.
- Gather a container: Have a container nearby to collect and store the screws, bolts, or other small parts as you remove them. This will prevent them from getting mixed up or lost.
- Unplug electrical components: If your recliner has electrical components, such as built-in massagers or heating elements, unplug them from the power source and secure the cords using electrical tape. This will prevent any accidental electrical shocks or damage to the components.
By preparing your work area properly, you’ll have a clean and organized space to work in, reducing the chances of losing small parts and ensuring a smoother disassembly process. Once you’ve prepared your work area, you’re ready to move on to the next step.
Step 2: Locate and Remove the Screws or Bolts
Once you’ve prepared your work area, it’s time to locate and remove the screws or bolts that hold the recliner together. Follow these steps:
- Examine the recliner: Carefully inspect the recliner to identify the screws or bolts that hold it together. These are typically located on the backrest, underneath the seat, and on the arms, if applicable.
- Use the appropriate tool: Depending on the type of screws or bolts, use a Phillips-head screwdriver, flat-head screwdriver, or Allen wrench to loosen and remove them. If the recliner has bolts, a socket set may be required.
- Keep track of the removed screws or bolts: As you remove each screw or bolt, place them in the container you prepared earlier. This will help you keep track of the parts and prevent them from getting lost.
- Pay attention to hidden screws: Some recliners may have hidden screws or bolts underneath upholstery or removable parts. Carefully check for any concealed fasteners and remove them to ensure a complete disassembly.
Remember to take your time and be gentle when removing the screws or bolts, as forcing or using excessive pressure can cause damage. Once all the screws or bolts are removed, you’re ready to move on to the next step.
Step 3: Separate the Backrest from the Seat
Now that you’ve removed the screws or bolts, it’s time to separate the backrest from the seat. Here’s how to do it:
- Locate the connection points: Look for the points where the backrest connects to the seat. These are usually located at the base of the backrest or along the sides.
- Release any locking mechanisms: Some recliners have locking mechanisms that secure the backrest to the seat. If your recliner has this feature, release the locks before trying to separate the two parts. Refer to your recliner’s manual for specific instructions on how to unlock the mechanism.
- Gently lift or pull the backrest: Once the locks are released, lift or pull the backrest away from the seat. You may need to enlist the help of someone else to hold and support the backrest while you detach it.
- Set the backrest aside: Once the backrest is disconnected from the seat, carefully set it aside on the blanket or protective covering you prepared earlier. This will ensure it remains safe and protected during the rest of the disassembly process.
Separating the backrest from the seat is an important step in disassembling your recliner. Take your time and be cautious while handling the backrest to avoid any damage. Once you’ve successfully separated the backrest, you can move on to the next step.
Read more: How To Take A Recliner Couch Apart
Step 4: Detach the Arms (If Applicable)
If your recliner has arms, this step will guide you through the process of detaching them. Follow these steps:
- Identify the arm attachment points: Take a close look at the recliner to locate the points where the arms are attached. These attachment points may be visible screws or bolts.
- Inspect for any locking mechanisms: Some recliners have locking mechanisms that hold the arms in place. Check for any release buttons or levers near the attachment points. If present, use them to unlock the arms.
- Remove the screws or bolts: Using the appropriate tool, such as a screwdriver or socket set, unscrew or unbolt the arms from the recliner. Make sure to keep track of the removed screws or bolts by placing them in the container.
- Gently lift or pull the arms: Once the screws or bolts are removed, carefully lift or pull the arms away from the recliner. If necessary, have someone assist you in supporting the arms while detaching them.
- Set the arms aside: Once the arms are detached, place them on the protective covering or blanket to keep them safe and prevent any scratches or damage.
Not all recliners have detachable arms, so if your recliner doesn’t have arms or they aren’t removable, you can skip this step and move on to the next one.
By detaching the arms, you’ll have better access to other parts of the recliner and make the disassembly process easier. Take your time and be careful when removing the arms to avoid any accidents or damage to the recliner. Once the arms are safely set aside, you can proceed to the next step.
Before taking apart a recliner, make sure to carefully read the manufacturer’s instructions or manual. Take note of the location of screws and bolts, and use the appropriate tools for disassembly. Keep track of the parts and hardware to ensure proper reassembly.
Step 5: Disconnect Any Electrical Components (If Applicable)
If your recliner has electrical components, such as built-in massagers, heating elements, or LED lights, it’s important to disconnect them before proceeding with the disassembly. Follow these steps:
- Refer to the manufacturer’s instructions: Consult your recliner’s manual or manufacturer’s instructions to identify the electrical components and understand how they are connected.
- Unplug the recliner: Ensure the recliner is unplugged from the power source to avoid any electrical shocks or accidents.
- Secure the cords: Use electrical tape to secure and bundle any exposed cords. This will prevent them from getting tangled or damaged during the disassembly process.
- Disconnect the wires: If your recliner has wires connecting the electrical components, carefully disconnect them by removing any connectors or fasteners. Take note of the connections for easy reassembly later on. If necessary, label the wires or take pictures for reference.
- Set the electrical components aside: Once the wires are disconnected, set the electrical components on the protective covering or blanket to keep them safe and prevent any damage.
It’s crucial to handle electrical components with care and follow proper safety precautions. If you’re unsure about disconnecting any electrical components or if you’re uncomfortable working with electricity, it’s best to consult a professional for assistance.
By disconnecting the electrical components, you can safely proceed with the disassembly without worrying about electrical hazards. Once the components are safely set aside, you’re ready to move on to the next step.
Step 6: Remove the Seat Cushion
Now that you’ve detached the backrest, arms, and electrical components (if applicable), it’s time to remove the seat cushion. Follow these steps:
- Locate the attachment points: Look underneath the seat for any screws or bolts that secure the cushions in place. The attachment points may be found near the front, back, or sides of the seat.
- Use the appropriate tool: Depending on the type of attachment, use a screwdriver or socket set to remove the screws or bolts holding the seat cushion in place.
- Lift the cushion: Once the screws or bolts are removed, carefully lift the seat cushion from the recliner frame. It may be attached by Velcro, clips, or hooks, so gently detach it from the frame.
- Set the cushion aside: Place the seat cushion on the protective covering or blanket to keep it clean and protected during the rest of the disassembly process.
Removing the seat cushion will give you better access to the internal components of the recliner. Be cautious when lifting the cushion, as it may be heavy and may have sharp edges. If needed, have someone assist you in safely removing it. Once the seat cushion is removed, you’re ready to move on to the next step.
Step 7: Take Apart the Footrest or Leg Rest
Next in the disassembly process is taking apart the footrest or leg rest of your recliner. Follow these steps:
- Assess the construction: Examine the footrest or leg rest to determine how it is attached to the recliner. This can vary depending on the recliner’s design and mechanism.
- Locate any attachment points: Look for screws, bolts, or other fasteners that connect the footrest or leg rest to the recliner frame. These attachment points are typically found underneath the seat or at the base of the footrest.
- Use the appropriate tool: Depending on the type of fasteners, use a screwdriver or socket set to remove the screws or bolts holding the footrest or leg rest in place.
- Disconnect any levers or mechanisms: If your recliner has a lever or release mechanism that controls the footrest or leg rest, detach it according to the manufacturer’s instructions. This may involve removing screws or pins that secure the mechanism.
- Gently remove the footrest or leg rest: Once the screws, bolts, and any connecting mechanisms are removed, carefully detach the footrest or leg rest from the recliner frame. Pay attention to any wires or cables that may be connected to the footrest.
- Set the footrest or leg rest aside: Place the disassembled footrest or leg rest on the protective covering or blanket to ensure it remains undamaged and easily accessible for later reassembly.
It’s important to handle the footrest or leg rest with care, especially if there are any electrical components attached. Take your time and be mindful of any wires or cables that may need to be disconnected before fully removing the footrest or leg rest. Once it’s safely set aside, you’re ready to move on to the next step.
Read more: How To Take Apart A Lamp
Step 8: Disassemble the Reclining Mechanism
Now that you’ve taken apart the backrest, arms, seat cushion, and footrest or leg rest, it’s time to disassemble the reclining mechanism of your recliner. Follow these steps:
- Identify the reclining mechanism: Take a close look at your recliner to identify the specific type of reclining mechanism it uses. Common types include lever-operated, push-back, or electrically powered mechanisms.
- Refer to the manufacturer’s instructions: Consult your recliner’s manual or manufacturer’s instructions to understand the specifics of how the reclining mechanism is disassembled. Different mechanisms may require different steps.
- Remove any screws or bolts: If there are any screws or bolts securing the reclining mechanism, use the appropriate tools to remove them. Keep track of the removed screws or bolts in the container.
- Detach any connecting components: Depending on the type of reclining mechanism, there may be additional components such as springs, brackets, or linkages. Carefully detach these components according to the manufacturer’s instructions.
- Separate the reclining mechanism from the recliner frame: Once all attached components are removed, gently separate the reclining mechanism from the recliner frame. Be cautious of any cables or wires, especially if you have an electrically powered reclining mechanism.
It’s crucial to follow the manufacturer’s instructions or consult a professional if you’re unsure about disassembling the reclining mechanism. Each recliner may have specific nuances or additional steps to consider. Take your time and exercise caution to avoid damaging any components during the disassembly process.
Once the reclining mechanism is separated from the recliner frame, it can be set aside on the protective covering or blanket with the rest of the disassembled parts. You’re now ready to move on to the final step of the disassembly process.
Step 9: Clean and Maintain the Recliner Parts
After successfully disassembling your recliner, it’s important to clean and maintain the recliner parts to ensure they remain in good condition. Follow these steps:
- Inspect the parts: Take a close look at each disassembled part, including the backrest, arms, seat cushion, footrest or leg rest, and reclining mechanism. Check for any dirt, stains, or signs of wear and tear.
- Clean with appropriate methods: Depending on the material of each part, use the appropriate cleaning methods. For upholstered parts, you may need to vacuum or spot clean with gentle upholstery cleaner. For mechanical parts, wipe them down with a damp cloth to remove any dust or grime.
- Repair or replace damaged parts: If you notice any damage, such as tears in the upholstery or broken mechanisms, consider repairing or replacing those parts. Consult a professional if needed, especially when dealing with complex mechanisms.
- Apply lubrication (for mechanical parts): If your recliner has mechanical components, applying lubrication to the appropriate joints or moving parts can help maintain smooth operation. Follow the manufacturer’s recommendations for the type of lubricant to use and where to apply it.
- Store the parts safely: Once cleaned and inspected, store the disassembled recliner parts in a clean and dry space, protected from dust and potential damage.
Proper cleaning and maintenance will help extend the lifespan of your recliner parts and ensure they function optimally when reassembling the recliner. Regular cleaning and inspection of the parts will also allow you to address any issues promptly and keep your recliner in top shape.
With the cleaning and maintenance complete, you are now ready to move on to reassembling your recliner or proceed with the necessary repairs or replacements.
Conclusion
Congratulations on successfully disassembling your recliner! Taking apart a recliner may seem like a daunting task, but with the right tools and guidance, it can be a manageable and rewarding process. By following the step-by-step instructions provided in this guide, you were able to dismantle your recliner piece by piece, ensuring a smooth and organized disassembly.
Throughout the process, you learned how to prepare your work area, gather the necessary tools, locate and remove screws or bolts, separate the backrest from the seat, detach the arms (if applicable), disconnect any electrical components (if applicable), remove the seat cushion, take apart the footrest or leg rest, disassemble the reclining mechanism, and finally, clean and maintain the recliner parts.
Remember to consult your recliner’s manufacturer instructions or seek professional assistance if you have any specific concerns or doubts about your recliner’s disassembly process. Each recliner may have unique features or mechanisms that require specific handling.
Once you’ve completed the disassembly, you can decide whether to proceed with repairs, replacements, or simply clean and maintain the parts before reassembling the recliner. Be sure to keep all the disassembled parts, screws, and bolts safely stored and labeled for easy locating and reassembly later on.
We hope this guide has been helpful in providing the necessary information to successfully take apart your recliner. Remember to exercise caution, take your time, and seek professional help if needed. Good luck with your recliner maintenance or reassembly project!
Frequently Asked Questions about How To Take Apart Recliner
Was this page helpful?
At Storables.com, we guarantee accurate and reliable information. Our content, validated by Expert Board Contributors, is crafted following stringent Editorial Policies. We're committed to providing you with well-researched, expert-backed insights for all your informational needs.


0 thoughts on “How To Take Apart Recliner”