Articles
How To Use Quilt Templates
Modified: October 20, 2024
Learn how to use quilt templates effectively with these informative articles. Find tips, techniques, and step-by-step guides to enhance your quilting skills.
(Many of the links in this article redirect to a specific reviewed product. Your purchase of these products through affiliate links helps to generate commission for Storables.com, at no extra cost. Learn more)
Introduction
Welcome to the world of quilting! If you’re a quilting enthusiast or a beginner looking to try your hand at this beautiful craft, you may have heard about quilt templates. Quilt templates are essential tools that can help you create stunning and precise quilt blocks. In this article, we will explore what quilt templates are, the benefits they offer, how to choose the right template, and provide step-by-step instructions on how to use them effectively.
Quilting is a centuries-old art form that involves stitching together layers of fabric to create a warm and cozy blanket. Traditionally, quilts were made by hand, with each piece of fabric carefully cut and sewn together. However, with the advent of modern tools and techniques, quilting has become more accessible, allowing both experienced and novice quilters to create intricate designs with ease.
Quilt templates, also known as quilt rulers or stencils, are pre-cut shapes made from sturdy materials like acrylic or plastic. These templates come in a variety of shapes and sizes, such as squares, rectangles, triangles, hexagons, and more. They serve as guides for cutting fabric pieces in precise shapes, ensuring accuracy and uniformity in quilt blocks.
The use of quilt templates offers numerous benefits to quilters. Firstly, they eliminate the need for manual measuring and marking, saving time and effort. The templates provide predefined shapes and sizes, taking the guesswork out of the cutting process. This is especially helpful for complex designs that require multiple pieces to fit together perfectly.
Secondly, quilt templates enable consistent results. By using the same template for every fabric piece, you ensure that all the blocks have the same shape and size. This consistency is crucial for achieving a professional and polished look in your quilt. Plus, it makes the assembly and stitching process much smoother.
Moreover, quilt templates allow for greater creativity and design options. With a wide array of shapes available, you can mix and match templates to create unique patterns and motifs. Whether you prefer traditional designs or modern abstract compositions, quilt templates provide the versatility to bring your vision to life.
When it comes to choosing the right quilt template, there are a few factors to consider. Firstly, think about the type of quilt block you want to create. Different templates are designed for specific block styles, such as Log Cabin, Dresden Plate, or Flying Geese. Select a template that matches the style you’re aiming for.
Additionally, consider the size of the template. Depending on your quilt design and preference, you may need templates in various sizes. Look for templates that offer flexibility in sizing or consider investing in a set that includes multiple size options.
Before we dive into the details of using quilt templates, let’s gather the necessary tools and materials to ensure a smooth quilting experience. You will need:
- A quilt template(s) of your choice
- Fabric – choose high-quality quilting fabric in the colors and patterns of your preference
- A rotary cutter – a handheld tool with a sharp circular blade
- A self-healing cutting mat – a mat that protects your workspace while allowing smooth cutting
- A clear quilting ruler – for accurate fabric measurements
- Pins or clips – to secure fabric layers
- Sewing machine or needle and thread for stitching
Now that we have everything we need, let’s get started with preparing our fabrics and workspace before using quilt templates.
Key Takeaways:
- Quilt templates offer precise cutting, consistency, and creativity, making quilting accessible and enjoyable for all skill levels. Choosing the right template and preparing materials are essential for successful quilt block construction.
- By using quilt templates, quilters can achieve accurate and uniform fabric pieces, leading to stunning quilt blocks. Embracing patience, precision, and creativity enhances the quilting experience and results in beautiful, personalized quilts.
Read more: How To Make A Tumbler Quilt Template
What are Quilt Templates?
Quilt templates, also known as quilt rulers or stencils, are essential tools used in quilting to achieve precise and consistent quilt block designs. These templates are typically made from sturdy materials like acrylic or plastic and come in a variety of shapes and sizes.
The primary purpose of quilt templates is to guide quilters in cutting fabric pieces in specific shapes and sizes. They act as templates that you trace or cut around to create uniform shapes for your quilt blocks.
Quilt templates are available in various shapes, including squares, rectangles, triangles, circles, hexagons, and more. They can be simple, single-piece templates or more complex, multi-piece templates that allow you to create intricate designs.
The shapes and sizes of quilt templates depend on the desired quilt block design. Different block styles, such as Log Cabin, Dresden Plate, or Flying Geese, may require specific templates designed to achieve the desired shape and pattern. By using these templates, you can ensure that your quilt blocks are accurate and fit together seamlessly.
Quilt templates offer several advantages to quilters. Firstly, they eliminate the need for measuring and marking fabric pieces manually, saving time and effort. With a quilt template, you can simply place it on your fabric and cut around the edges to achieve consistent shapes. This increases efficiency, especially when working on projects with multiple fabric pieces.
Using quilt templates also helps maintain uniformity in quilt blocks. When you use the same template for each fabric piece, you ensure that all the blocks are the same size and shape. This consistency is crucial for achieving a professional and polished look in your finished quilt.
Another benefit of quilt templates is the precision they provide. The templates are designed with precise measurements, ensuring accurate and clean cuts. This level of precision is especially important for intricate quilt patterns that require multiple pieces to fit together accurately.
In addition to standard shapes, quilt templates can also come in specialty shapes, allowing you to create unique and innovative designs. For example, there are templates available to create flowers, animals, or other decorative motifs. These specialty templates add a touch of creativity and individuality to your quilts.
When choosing quilt templates, it’s essential to consider the size and shape that best suits your project. Some templates offer flexibility in sizing, allowing you to create quilt blocks of varying sizes using the same template. Others come in sets with multiple sizes to choose from. Selecting the appropriate template for your specific project ensures the best results.
Now that we’ve explored what quilt templates are and their benefits, let’s move on to discussing how to choose the right quilt template for your project.
Benefits of Using Quilt Templates
Using quilt templates in your quilting projects offers a wide range of benefits that enhance the overall quilting experience and the quality of your finished quilt. Let’s explore some of the advantages of using quilt templates.
1. Accurate and Consistent Results: One of the primary benefits of using quilt templates is the ability to achieve precise and consistent results. The templates provide predefined shapes and sizes, eliminating the need for manual measuring and marking. By using the same template for each fabric piece, you ensure that all the blocks have the same shape and size, resulting in a uniform and professional-looking quilt.
2. Time and Effort Saving: Quilt templates make the cutting process much more efficient. Instead of measuring and marking each fabric piece individually, you can simply place the template on the fabric and cut around it. This saves time and effort, especially when working on projects with numerous fabric pieces. It also reduces the likelihood of errors and ensures a smoother quilting workflow.
3. Versatility and Design Options: Quilt templates offer a wide range of design options and versatility. They come in various shapes and sizes, allowing you to create an assortment of quilt blocks and patterns. Whether you’re aiming for traditional designs or modern abstract compositions, quilt templates provide the flexibility to bring your creative vision to life. Moreover, there are specialty templates available that allow you to create unique and decorative motifs, adding a personal touch to your quilts.
4. Precision and Accuracy: Quilt templates are designed with precise measurements, ensuring accurate and clean cuts. This is especially important for intricate quilt patterns that require multiple pieces to fit together perfectly. The templates provide a guide for cutting fabric pieces with precision, resulting in sharp edges and precise seam allowances. The attention to detail that quilt templates provide enhances the overall quality of your quilt.
5. Ease of Use and Beginner-Friendly: Quilt templates are user-friendly and suitable for quilters of all skill levels, including beginners. They eliminate the challenges of measuring and cutting fabric accurately, making the quilting process more accessible and enjoyable. Beginners can benefit from using quilt templates as they provide a clear guide and reduce the likelihood of mistakes. This allows novice quilters to focus on their creativity and quilting techniques without worrying about precise measurements.
6. Consistency Across Multiple Projects: If you’re working on multiple quilting projects or planning to make a series of quilts, using quilt templates ensures consistency across all your creations. By using the same set of templates for each project, you can maintain a cohesive aesthetic and uniformity in your quilts. This is particularly useful for quilters who like to create quilt sets or themed collections.
7. Enhances Efficiency in Assembly and Stitching: Quilt templates help streamline the quilting process. When all the fabric pieces have been cut using the same template, the assembly and stitching of the blocks become much more efficient. The uniform shapes and sizes ensure that the blocks fit together seamlessly, reducing the amount of time and effort spent on adjustments and corrections.
By taking advantage of these benefits, quilting with templates becomes a rewarding experience. The use of quilt templates not only enhances the visual appeal of your quilt but also makes the entire quilting process more enjoyable and efficient.
Now that we understand the benefits of using quilt templates, let’s move on to the next step – choosing the right template for your project.
Choosing the Right Quilt Template
Choosing the right quilt template is crucial to ensure the success of your quilting project. Here are some factors to consider when selecting a quilt template:
1. Quilt Block Style: Consider the style of quilt block you want to create. Different quilt block styles, such as Log Cabin, Dresden Plate, or Flying Geese, may require specific templates designed to achieve the desired shape and pattern. Research different block styles and choose a template that matches the style you want to create.
2. Shape and Size: Determine the shape and size of the quilt block you want to create. Quilt templates are available in various shapes, including squares, rectangles, triangles, circles, hexagons, and more. Consider the design of your quilt and the desired block shape when choosing the template. Additionally, think about the size of the template. Depending on your project, you may need templates in different sizes. Look for templates that offer flexibility in sizing or consider investing in a set that includes multiple size options.
3. Compatibility with Tools and Techniques: Ensure that the quilt template you choose is compatible with the tools and techniques you plan to use. Some templates are designed for use with rotary cutters, while others may require tracing and cutting with scissors. If you prefer working with a specific tool, make sure the template is suitable for that method. Additionally, consider whether the template provides seam allowances or if you need to add them separately.
4. Material and Durability: Look for quilt templates made from high-quality, durable materials, such as acrylic or plastic. These materials are sturdy and long-lasting, ensuring that your template will withstand repeated use. Avoid templates made from flimsy materials that may warp or break easily, as this can affect the accuracy of your cuts.
5. Markings and Measurements: Pay attention to the markings and measurements on the templates. Clear and easy-to-read markings make it simpler to align the template accurately on your fabric and measure seam allowances. Look for templates with precise measurements and markings that are easy to interpret.
6. Specialty Templates: Consider whether you need any specialty templates to create specific designs or motifs. Specialty templates allow you to add decorative elements, such as flowers, animals, or intricate patterns, to your quilts. If you have a particular design in mind, check if there are specialty templates available that can help you achieve it.
7. User Reviews and Recommendations: Read user reviews and seek recommendations from other quilters when selecting a quilt template. Real-life experiences and feedback can provide valuable insights into the usability and performance of a template. Take into account the experiences of other quilters, especially those who have worked on similar projects or have used the specific template you are considering.
By considering these factors and doing some research, you can select the right quilt template that meets your project needs and personal preferences. Once you have chosen the template, you can move on to the next step – gathering the necessary tools and materials for quilting.
Tools and Materials Needed
Before you start using quilt templates, it’s essential to gather the necessary tools and materials. Having the right equipment on hand will ensure a smooth and enjoyable quilting experience. Here are the tools and materials you will need:
1. Quilt Template(s): Select the quilt template(s) that match the design and size of your desired quilt block. Consider the shape, size, and style of the template(s) based on your project requirements. It’s helpful to have a few different templates on hand to cater to various block designs.
2. Fabrics: Choose high-quality quilting fabrics in different colors and patterns. Select fabrics that work well together and complement your quilt design. Pre-wash and press your fabrics to ensure they are clean and free of any potential shrinkage or distortions.
3. Rotary Cutter: Use a rotary cutter for precise fabric cutting. A rotary cutter is a handheld tool with a sharp circular blade that makes clean and accurate cuts through multiple layers of fabric. It’s important to handle the rotary cutter with care and always use a cutting mat to protect your work surface.
4. Clear Quilting Ruler: Invest in a clear acrylic quilting ruler that allows for accurate fabric measurements. A quilting ruler with clear markings and grid lines will help you align your fabric properly when cutting with the rotary cutter. Look for a ruler that is at least 6 inches wide and has length markings suitable for your project size.
5. Self-Healing Cutting Mat: Use a self-healing cutting mat to protect your work surface and provide a smooth cutting area. A self-healing mat can withstand the rotary cutter’s blade without leaving permanent marks or cuts. Choose a mat that is larger than your fabric pieces to ensure ample working space.
6. Marking Tool: Have a fabric-safe marking tool, such as a fabric pen or pencil, to mark your fabric accurately. Choose a marking tool that is easily visible on your fabric but can be easily removed or washed away when no longer needed. Test the marking tool on a scrap piece of fabric before using it on your actual project.
7. Pins or Clips: Use pins or clips to secure fabric layers together before cutting with the template. This will prevent the fabric from shifting or moving while you’re cutting, ensuring accurate shapes. Opt for flat-headed pins or quilting clips that won’t distort or damage the fabric.
8. Sewing Machine or Needle and Thread: Depending on your preferred quilting method, you will need a sewing machine or a needle and thread for stitching the quilt blocks together. Ensure that your sewing machine is in good working condition, or have a variety of needles and threads suitable for piecing and quilting.
9. Iron and Ironing Board: Keep an iron and ironing board nearby for pressing fabric pieces and seams. Pressing helps to create crisp and precise quilt blocks, ensuring a professional finish. Use a dry iron or steam iron, depending on your fabric requirements.
10. Scissors: Have a pair of sharp fabric scissors handy for trimming threads and making small cuts when necessary. Scissors with a comfortable grip and sharp blades will make your cutting tasks easier and more precise.
By having these tools and materials on hand, you will be well-equipped to start using quilt templates and create beautiful quilt blocks. Now that you’re prepared, let’s move on to the next step – preparing your fabrics and workspace.
Read more: How To Make A Template For Woodworking
Preparing Your Fabrics and Workspace
Before you begin using quilt templates, it’s important to properly prepare your fabrics and workspace. Taking the time to prepare your materials will ensure accurate cuts, smooth assembly, and a successful quilting experience. Here are some steps to follow when preparing your fabrics and workspace:
1. Wash and Iron Your Fabrics: Start by washing and ironing your fabrics. This step is crucial to remove any dirt, chemicals, or sizing that may be present in the fabric. Pre-washing helps prevent shrinkage and color bleeding once the quilt is finished. After washing, iron the fabrics to ensure they are smooth, wrinkle-free, and ready for cutting.
2. Consider the Grainline: When working with fabric, it’s important to pay attention to the grainline. The grainline refers to the direction of the fabric threads. Aligning your quilt template with the grainline ensures that your fabric pieces maintain their stability and proper shape. Take a moment to identify the grainline of your fabric and align the quilt template accordingly before cutting.
3. Set Up a Clean and Spacious Workspace: Clear a flat and clean surface to serve as your quilting workspace. Ensure that there is enough space to accommodate your cutting mat, rulers, and other quilting tools. Having a clutter-free workspace will help you measure, cut, and assemble your quilt blocks with ease and precision.
4. Protect Your Work Surface: Place a self-healing cutting mat on your workspace to protect the surface from cuts and scratches. The self-healing mat provides a stable and smooth cutting surface for using quilt templates and rotary cutters. It is important to have a mat large enough to comfortably accommodate your fabric pieces and template.
5. Test Your Marking Tool: Before marking your fabric, test your marking tool on a scrap piece of fabric from your project. Ensure that the markings show up clearly and that they can be easily removed or washed away. This step helps avoid any unwanted marks on your fabric that could impact the finished quilt’s appearance.
6. Position and Secure the Fabric: Lay your fabric flat on the cutting mat, ensuring that it is free from wrinkles or folds. Smooth out the fabric to ensure it lies flat, facilitating precise cutting. Use pins or clips to secure the fabric layers together before placing the quilt template on top. This prevents shifting or movement of the fabric during the cutting process.
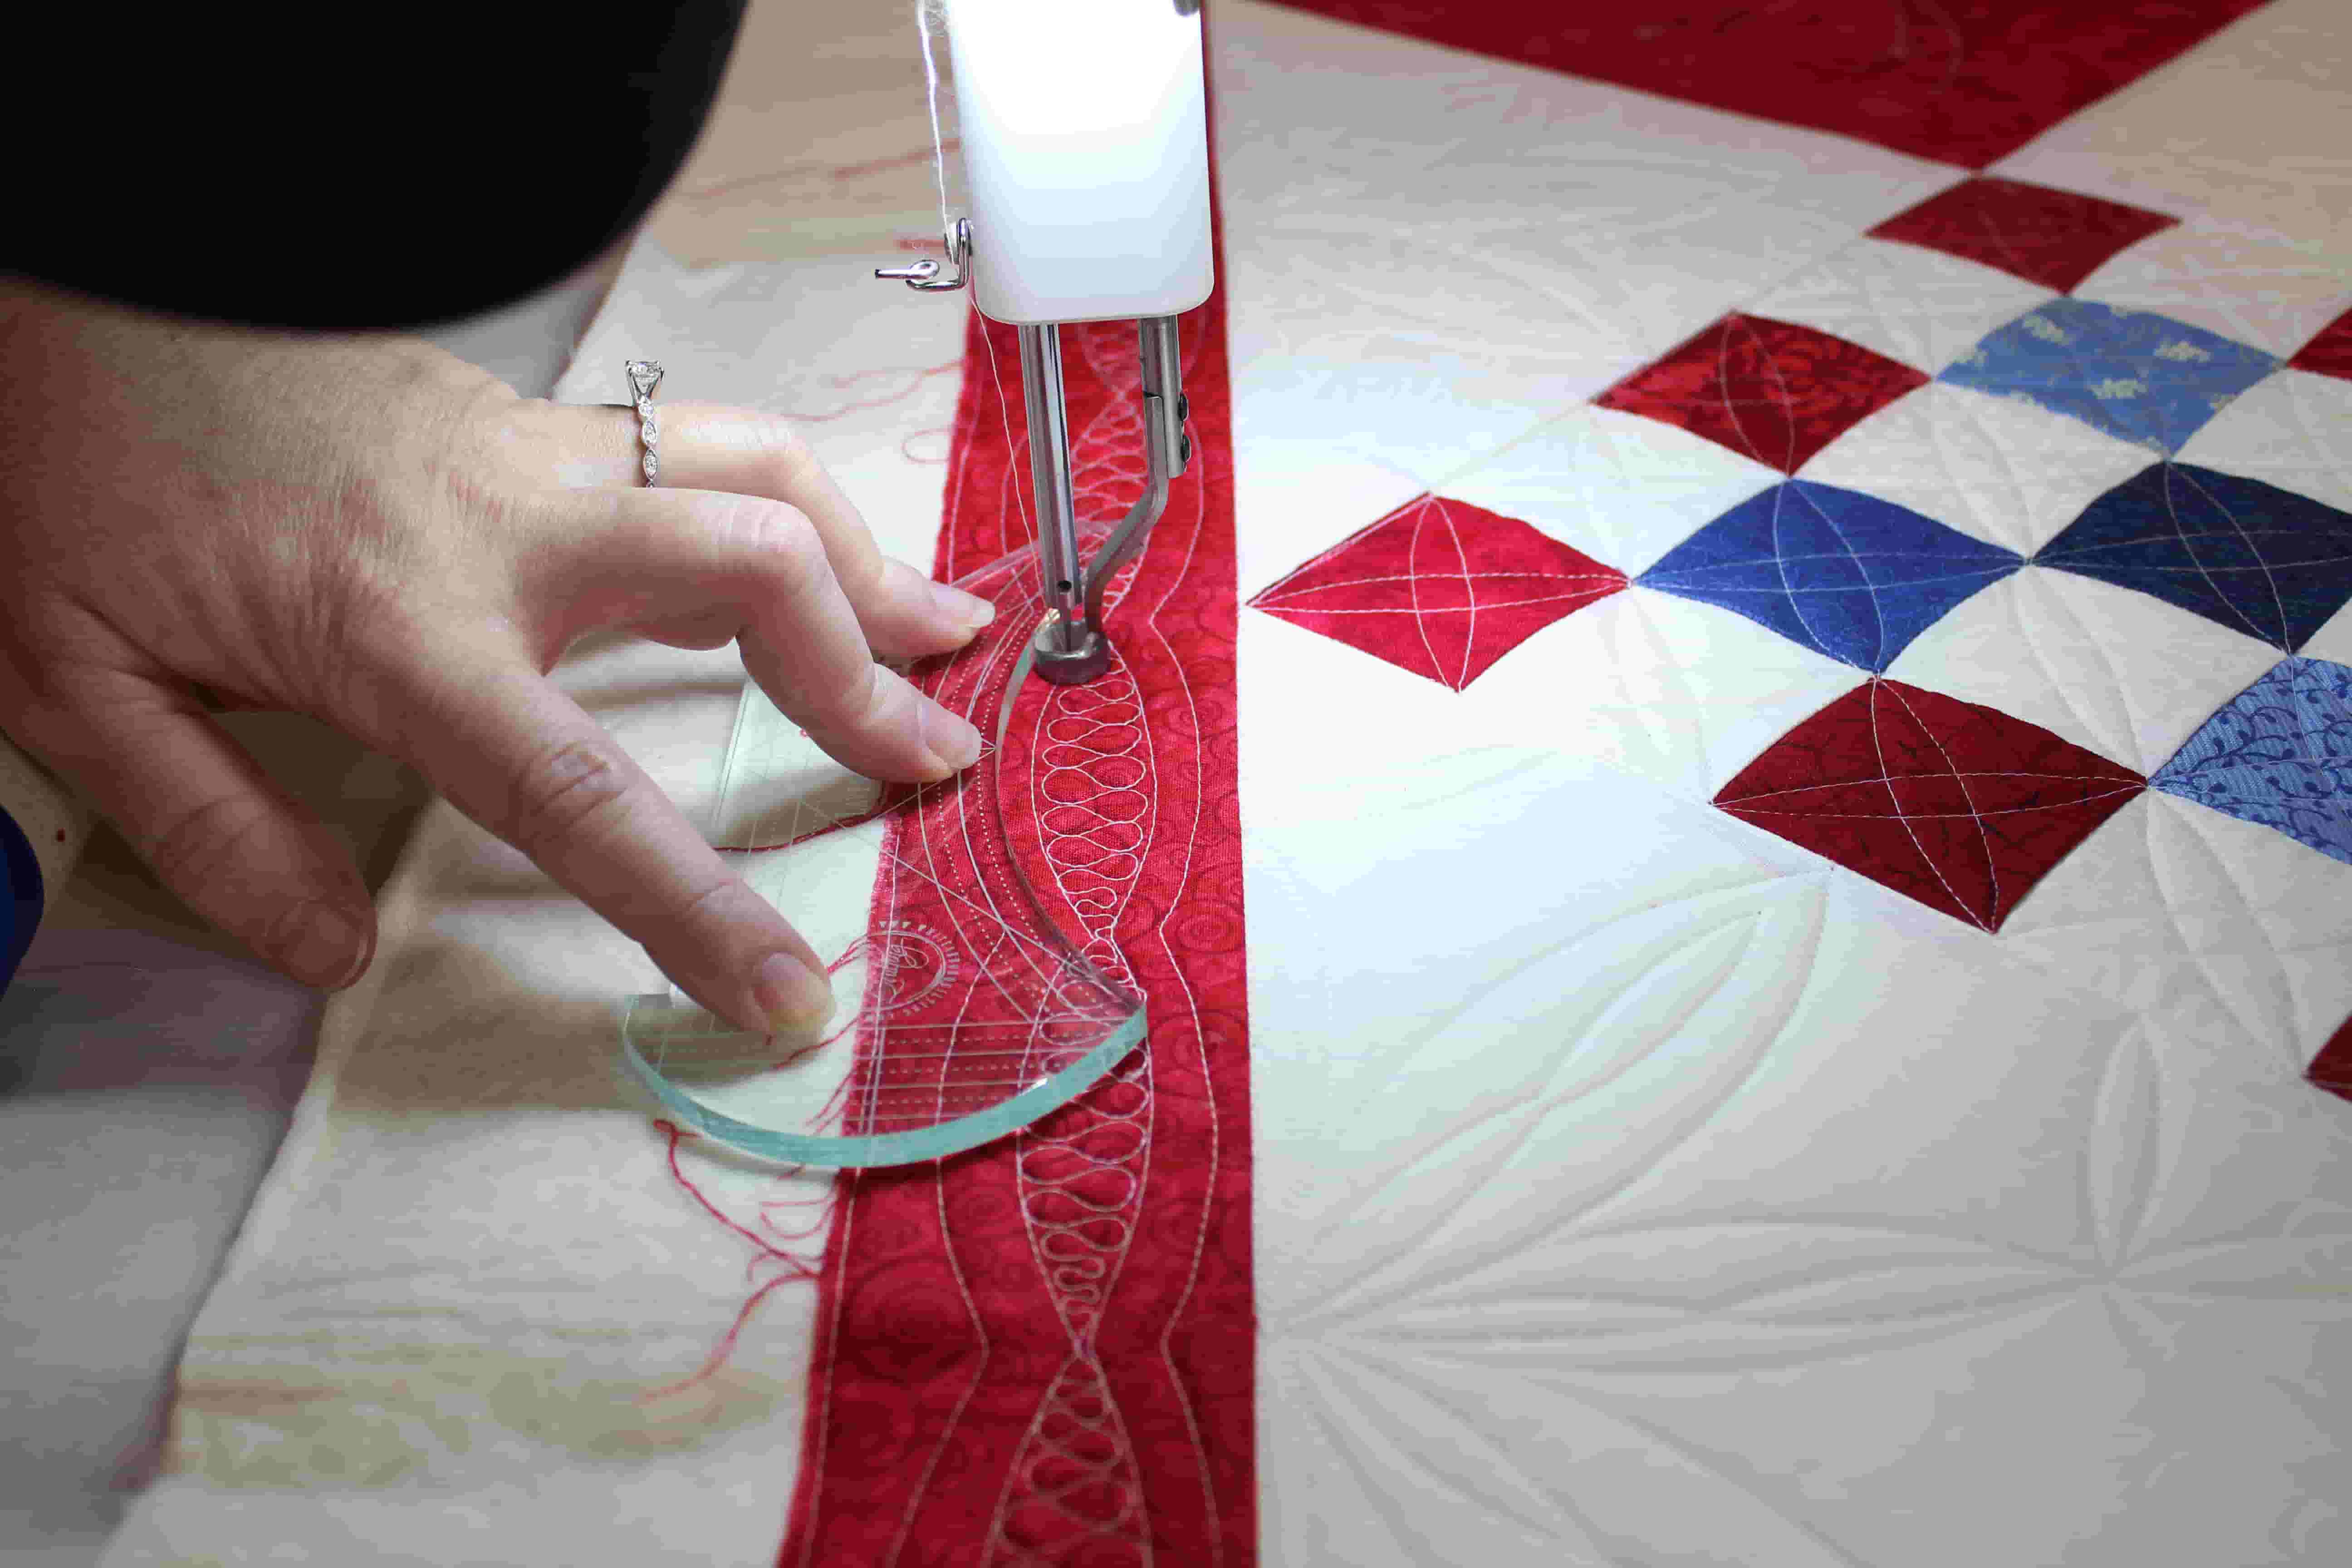
7. Align the Template and Cut: Place the quilt template on top of the fabric, aligning it with the desired grainline and pattern orientation. Ensure that the template covers the area you want to cut, and that it is positioned accurately. Holding the template firmly in place, use a rotary cutter to cut around the edges of the template carefully. Follow the curve or straight edges of the template to achieve precise and uniform fabric shapes.
8. Repeat the Process: Once you have cut your fabric piece using the quilt template, remove the template and set it aside. Repeat the process for each fabric piece required for your quilt block. Take your time and pay attention to detail to ensure accuracy and consistency in your cuts.
By following these steps and properly preparing your fabrics and workspace, you set a solid foundation for successful quilt block construction. Now that you have your fabric pieces ready, it’s time to dive into using quilt templates step-by-step.
When using quilt templates, always make sure to measure and mark accurately before cutting your fabric. This will ensure that your pieces fit together perfectly when sewing.
Using Quilt Templates Step-by-Step
Now that you have prepared your fabrics and workspace, it’s time to start using quilt templates to create your quilt blocks. Follow this step-by-step guide to effectively use quilt templates:
Step 1: Choose the Quilt Template: Select the quilt template that corresponds to the shape and size of the fabric piece needed for your quilt block. Consider the design of your quilt and the specific block pattern you want to achieve.
Step 2: Position the Fabric: Lay your fabric flat on the cutting mat, ensuring it is free from wrinkles or folds. Smooth out the fabric and secure any layers together with pins or clips, preventing shifting during cutting.
Step 3: Place the Template: Position the quilt template on top of the fabric, aligning it with the desired grainline and pattern orientation. Ensure the template covers the area you want to cut precisely. Hold the template firmly in place.
Step 4: Cut the Fabric: Use a rotary cutter to carefully cut around the edges of the template. Follow the curve or straight edges of the template to achieve precise fabric shapes. Apply steady pressure while cutting to ensure clean and accurate cuts. Take care to keep your fingers away from the rotary cutter’s path to avoid any accidents.
Step 5: Repeat for Additional Pieces: If your quilt block requires multiple fabric pieces of the same shape, repeat steps 2 to 4 to cut additional pieces. Ensure each fabric piece aligns with the template and matches the previously cut pieces.
Step 6: Remove the Template: Once you have cut all the required fabric pieces, carefully remove the template from the fabric. Be gentle to avoid disturbing the fabric layers. Set the template aside for future use or to cut additional pieces if needed.
Step 7: Arrange and Assemble: Arrange your cut fabric pieces according to your quilt block design. Experiment with different layouts to achieve the desired pattern and visual effect. Once you are satisfied with the arrangement, begin assembling the pieces by stitching them together using a sewing machine or by hand with needle and thread.
Step 8: Press the Quilt Block: After stitching, press the completed quilt block with an iron. Pressing helps set the seams and creates a crisp and polished look. Use a dry iron or steam iron, depending on the fabric requirements and your preferred pressing method.
Step 9: Repeat for All Quilt Blocks: Repeat the process outlined in steps 2 to 8 for all the quilt blocks needed for your project. Take your time and ensure each block is cut and assembled with precision.
Step 10: Join the Quilt Blocks: Once all the quilt blocks are complete, arrange and join them together to form the final quilt top. Seam allowances and stitching methods may vary depending on your design preferences and the quilt block’s shape.
By following these step-by-step instructions, you can effectively use quilt templates to create precise and uniform fabric pieces for your quilt blocks. Remember to take your time, be cautious when cutting, and enjoy the process of bringing your quilt design to life.
Next, we will explore some helpful tips and tricks for using quilt templates to enhance your quilting experience.
Tips and Tricks for Using Quilt Templates
Using quilt templates can significantly enhance your quilting experience and help you create precise and beautifully designed quilt blocks. Here are some tips and tricks to keep in mind when using quilt templates:
1. Secure the Template: Before cutting, ensure that the quilt template is securely positioned on the fabric. Use pins or clips to keep the template in place and prevent it from shifting while cutting. This will ensure accurate shapes and clean cuts.
2. Invest in High-Quality Templates: Quality quilt templates made from durable materials will provide precise measurements and withstand repeated use. Invest in templates that are sturdy and won’t warp or break easily. High-quality templates will give you consistent and reliable results.
3. Check for Seam Allowances: Some quilt templates include built-in seam allowances, while others require you to add them separately. Double-check whether your chosen template includes seam allowances or if you need to factor them in. Accurately accounting for the seam allowances will ensure that your fabric pieces fit together properly.
4. Use a Sharp Rotary Cutter: A sharp rotary cutter is essential for clean and accurate cuts. Make sure the blade of your rotary cutter is sharp and replace it when it becomes dull. Dull blades can result in jagged edges and imprecise cuts. Take breaks to sharpen your blade when necessary.
5. Test the Template: Before cutting into your precious fabric, consider using scrap fabric to test the template and ensure it is suitable for your desired design. This will help you practice cutting techniques and gain confidence before working with your main fabric.
6. Rotate the Template: To maximize fabric utilization and minimize waste, consider rotating your quilt template when cutting multiple fabric pieces. Carefully position the template to fit as many pieces as possible within the fabric area, adjusting the orientation if needed. This technique can be particularly helpful when working with limited fabric quantities.
7. Experiment with Fabric Placement: While using quilt templates, don’t be afraid to experiment with different fabric placements and orientations. Rotate the template or change the fabric design placement to explore various visual effects and create unique quilt block designs. This allows for creativity and customization in your quilting projects.
8. Keep Your Workspace Organized: Maintain a tidy workspace by organizing your tools and keeping your cutting mat clear of fabric scraps. This will ensure accurate cutting, prevent fabric pieces from sticking together, and reduce distractions while working with quilt templates.
9. Take Breaks and Assess Progress: Quilting can be an intricate and time-consuming process. Take regular breaks to rest your eyes and assess your progress. Step back and evaluate the accuracy and alignment of your cut fabric pieces. This will help identify and correct any potential issues before moving forward.
10. Practice Patience and Enjoy the Process: Using quilt templates requires patience and precision. Remember to enjoy the process and take your time. Quilting is a journey, and each step brings you closer to a beautiful finished quilt. Embrace the opportunity to create something unique, and have fun along the way!
By incorporating these tips and tricks into your quilting routine, you can make the most of your quilt templates and create stunning quilt blocks with ease and accuracy. Now that you’re equipped with these helpful suggestions, let’s explore common mistakes to avoid while using quilt templates.
Common Mistakes to Avoid
While using quilt templates can greatly improve the accuracy and consistency of your quilt blocks, it’s important to be aware of common mistakes and pitfalls. By avoiding these errors, you can ensure a smoother quilting experience and achieve the best results possible. Here are some common mistakes to avoid when using quilt templates:
1. Not Measuring Fabric Properly: Accurate measuring is essential when using quilt templates. Failing to measure your fabric accurately can result in pieces that are either too small or too large. Take the time to measure your fabric before positioning the template to ensure proper sizing and a perfect fit.
2. Cutting Too Close to the Template: When using a rotary cutter with a quilt template, be careful not to cut too close to the edge of the template. Cutting too close can result in distorted or uneven fabric shapes. Leave a small seam allowance around the template to ensure clean cuts and accurate shapes.
3. Using Dull Rotary Cutter Blades: A sharp blade is essential for clean and precise cuts. Using a dull rotary cutter blade can result in jagged edges, fabric fraying, and inaccurate shapes. Regularly change your rotary cutter blade to maintain sharpness and achieve the best cutting results.
4. Not Securing Fabric Layers: Failing to secure fabric layers before cutting can lead to fabric shifting and inaccurate cuts. Use pins or clips to hold the fabric layers together, ensuring they are flat and stable. This will help you maintain consistent shapes and sizes throughout your quilt blocks.
5. Overloading the Rotary Cutter: Avoid overloading your rotary cutter with too many fabric layers. Cutting through too many layers can result in imprecise cuts and damage to your rotary cutter blade. It’s best to cut through a manageable number of fabric layers at a time to maintain accuracy.
6. Skipping the Pressing Step: Pressing your fabric pieces before and after cutting is crucial for achieving crisp and accurate quilt blocks. Skipping the pressing step can result in distorted shapes and uneven seams. Take the time to press your fabric to ensure a professional and polished look in your finished quilt.
7. Rushing Through the Cutting Process: Quilting is a craft that requires attention to detail and patience. Rushing through the cutting process can lead to inaccurate cuts, fabric misalignment, and frustration. Take your time, double-check measurements, and cut with precision to ensure the best possible results.
8. Not Aligning the Grainline Correctly: The grainline of your fabric plays a crucial role in maintaining stability and shape. Failing to align the quilt template according to the grainline can result in distorted blocks and compromised structure. Take the time to identify and align the grainline properly before cutting your fabric.
9. Neglecting to Practice on Scrap Fabric: Before using your quilt template on your precious fabric, it is wise to practice on scrap fabric first. This will allow you to familiarize yourself with the template, rotary cutting technique, and the impact of different fabric choices. It’s better to make mistakes and learn from them on scrap fabric before moving on to your main project.
10. Not Cleaning and Maintaining Quilt Templates: Quilt templates need proper care and maintenance to ensure their longevity and accuracy. Clean your quilt templates after each use and store them properly to prevent scratches or warping. Regularly inspect your templates for any signs of wear and replace them when necessary to avoid compromising your quilting results.
By avoiding these common mistakes, you can make the most of your quilt templates and achieve precise and beautifully crafted quilt blocks. Remember to take your time, practice sound quilting techniques, and enjoy the creative process!
Now that you know how to avoid common mistakes, let’s address some frequently asked questions about using quilt templates.
Read more: How To Use A Quilt As A Slipcover
Frequently Asked Questions (FAQs)
As you embark on your quilting journey with the use of quilt templates, you may have some questions. Here are answers to frequently asked questions about using quilt templates:
Q1: Can I use any fabric with quilt templates?
A1: Yes, you can use a wide variety of fabrics with quilt templates. However, it’s important to choose fabrics that are suitable for quilting. Quilting fabrics, such as 100% cotton, are commonly used due to their durability and ease of handling. Ensure the fabric is pre-washed to avoid any shrinking or bleeding of colors.
Q2: How do I clean my quilt templates?
A2: To clean your quilt templates, use a mild soap or dishwashing liquid and warm water. Gently wash the templates, rinse off any soap residue, and pat them dry with a soft cloth. Avoid using abrasive materials or harsh cleaners, as they can scratch or damage the templates.
Q3: Can I use quilt templates for hand piecing?
A3: Yes, quilt templates can be used for both machine piecing and hand piecing. The templates provide precise cutting guidelines, regardless of the piecing method you choose. However, ensure that the chosen template is compatible with your preferred piecing technique.
Q4: Can I resize quilt templates to fit my desired block size?
A4: Some quilt templates offer flexibility in sizing, allowing you to create blocks of different dimensions using the same template. However, not all templates can be resized easily. Read the product description or packaging to determine if resizing is possible. If resizing is not an option, you may need to find an alternative template that matches your desired block size.
Q5: Can I use quilt templates for appliqué?
A5: While quilt templates are primarily designed for block piecing, they can also be used for appliqué designs. Choose templates with the desired shape and size to trace and cut fabric pieces for appliqué. Alternatively, consider using specialty appliqué templates specifically designed for this technique.
Q6: Can I use rotary cutters without a cutting mat?
A6: It is highly recommended to use a self-healing cutting mat when using a rotary cutter. The cutting mat provides a stable and safe surface for the rotary cutter’s blade, protects your working area from scratches, and ensures clean and accurate cuts without damaging your tools.
Q7: How do I know the right amount of fabric to use with quilt templates?
A7: To determine the amount of fabric needed for your quilt blocks, refer to a quilting project pattern or calculate the fabric requirements based on the size and quantity of your desired blocks. Add extra fabric for seam allowances and potential mistakes. Quilting calculators or sewing reference books can help you with the fabric estimation process.
Q8: Are there alternative methods of cutting fabric without using quilt templates?
A8: While quilt templates provide precise cutting guidelines, there are alternative methods of cutting fabric, such as using quilting rulers and marking the fabric with a fabric-safe pen or pencil. However, quilt templates offer convenience and accuracy, especially when working with complex block designs that require multiple pieces of fabric to fit together perfectly.
Q9: Can I use quilt templates for other crafts like paper piecing or scrapbooking?
A9: While quilt templates are primarily designed for quilting, they can also be used in other crafts, such as paper piecing, scrapbooking, or stenciling. The sturdy and precise shapes of quilt templates can be adapted for various creative projects, empowering your artistic endeavors beyond quilting.
Q10: Where can I find a variety of quilt templates?
A10: Quilt templates are widely available both online and at local quilting supply stores. Online platforms and marketplaces offer a vast selection of quilt templates, including specialty and unique shapes. Local quilting stores may also carry a range of templates, allowing you to see and feel the templates before making a purchase.
By addressing these frequently asked questions, we hope to provide clarity and guidance as you embark on your quilting journey using quilt templates. Remember to embrace the learning process, enjoy the creative possibilities, and have fun with your quilting projects!
Now, it’s time to wrap up our article.
Conclusion
Using quilt templates is a valuable tool in your quilting arsenal. They offer precise cutting guidelines, consistency in block sizes, and limitless design possibilities. By choosing the right quilt template and following proper techniques, you can create beautiful quilt blocks with ease.
In this article, we explored what quilt templates are and the benefits they offer. Quilt templates provide accuracy, save time, enhance creativity, and allow for consistent results. We discussed the importance of choosing the right template based on block style, shape, and size.
We also delved into the tools and materials needed for using quilt templates. From the template itself to fabric, rotary cutters, cutting mats, and marking tools, having the right supplies ensures a smooth and successful quilting process.
Preparing fabrics and the workspace is crucial before cutting with a quilt template. Properly washing, ironing, aligning the grainline, and setting up a clean and spacious workspace are essential steps for achieving accurate quilt blocks.
We then provided step-by-step instructions on using quilt templates, including positioning the fabric, cutting with precision, and assembling the blocks to create a stunning quilt top.
Additionally, we offered valuable tips and tricks to enhance your quilting experience with quilt templates. These tips included securing the template, using high-quality templates, rotating the template for efficient fabric utilization, and taking breaks to assess progress.
We addressed common mistakes to avoid when using quilt templates, such as inaccurate measuring, cutting too close to the template, using dull rotary cutter blades, and neglecting to secure fabric layers.
Lastly, we answered frequently asked questions, providing insights on fabric choices, cleaning quilt templates, resizing templates, and using templates for appliqué.
With this comprehensive guide, you’re now equipped to embark on your quilting journey using quilt templates. Remember to enjoy the process, practice patience, and embrace your creativity to create stunning quilts that reflect your personal style.
So gather your quilt templates, fabrics, and tools, and let your quilting adventure begin! Happy quilting!
Frequently Asked Questions about How To Use Quilt Templates
Was this page helpful?
At Storables.com, we guarantee accurate and reliable information. Our content, validated by Expert Board Contributors, is crafted following stringent Editorial Policies. We're committed to providing you with well-researched, expert-backed insights for all your informational needs.


0 thoughts on “How To Use Quilt Templates”