Articles
How To Make A Tumbler Quilt Template
Modified: October 18, 2024
Discover the step-by-step process of creating your own tumbler quilt template with our informative articles. Start quilting today with our expert tips and guidance.
(Many of the links in this article redirect to a specific reviewed product. Your purchase of these products through affiliate links helps to generate commission for Storables.com, at no extra cost. Learn more)
Introduction
Quilting is a timeless craft that allows you to create beautiful and functional pieces of art. One popular quilting design is the tumbler quilt. The tumbler quilt is characterized by its unique shape, resembling a tumbler or a glass. With its charming design and endless possibilities, the tumbler quilt is a favorite among quilters of all skill levels.
In this article, we will guide you through the process of making your own tumbler quilt template. We will provide detailed steps and tips to ensure a successful quilting project. Whether you are a beginner or an experienced quilter, this article will help you create a stunning tumbler quilt that you can cherish for years to come.
Before we dive into the process, let’s gather the materials needed for this project.
Key Takeaways:
- Embrace your creativity and trust your instincts when choosing fabric, arranging strips, and creating the iconic tumbler shape. Enjoy the process and let your passion for quilting shine through each step.
- The tumbler quilt-making journey is a fulfilling and rewarding experience that allows you to express yourself through a timeless art form. Cherish the moments spent creating something beautiful with your own hands.
Read more: How To Use Quilt Templates
Materials Needed
Before you begin making your tumbler quilt template, it’s important to gather all the necessary materials. Here’s a list of what you’ll need:
- Fabric: Choose a variety of fabrics in different colors and patterns to create visual interest in your tumbler quilt. Consider using cotton fabric for its durability and ease of sewing. The amount of fabric you’ll need depends on the size of your quilt, so make sure to calculate accordingly.
- Rotary Cutter and Cutting Mat: These tools are essential for cutting fabric strips accurately. Invest in a high-quality rotary cutter with a sharp blade to ensure clean cuts. A self-healing cutting mat will protect your work surface.
- Ruler: A clear, acrylic ruler with measurement markings is necessary to guide your cutting and ensure precision.
- Quilting Pins: Pins are used to hold fabric in place during sewing and assembling. Make sure to choose sharp quilting pins to avoid damaging the fabric.
- Sewing Machine and Thread: A sewing machine is crucial for creating consistent and sturdy stitches. Use a high-quality thread in a color that complements your fabric choices.
- Iron and Ironing Board: An iron is essential for pressing fabric seams, ensuring flat and neat quilt blocks. Set up a sturdy ironing board for convenience.
- Quilting Ruler or Template: Optional, but a quilting ruler or template specifically designed for tumbler shapes can be helpful for accurately cutting and aligning the pieces.
- Marking Tool: A fabric marking tool, such as a disappearing ink pen or fabric chalk, is useful for marking your fabric before cutting.
- Batting and Backing Fabric: Batting provides the warmth and dimension to your quilt, while backing fabric forms the underside. Choose batting and backing fabric that are compatible with the size of your quilt.
- Quilting Needles: When it comes time to quilt your tumbler quilt, you’ll need quilting needles. These needles have a larger eye and a sharp point, making them ideal for stitching through multiple layers of fabric.
Gather these materials and make sure you have a comfortable and organized workspace before you begin creating your tumbler quilt template. With everything in place, you’re ready to move on to the next step: choosing fabric.
Step 1: Choosing Fabric
Choosing the right fabric for your tumbler quilt is an exciting part of the quilting process. The fabric you select will determine the overall look and feel of your quilt. Here are a few tips to consider when choosing fabric:
- Color Palette: Decide on a color palette that suits your personal taste and the intended aesthetic of your quilt. Consider using a mix of solid colors, small prints, and larger-scale patterns to add depth and visual interest to your tumbler quilt.
- Contrast: Aim for contrast between fabrics to ensure that the tumbler shapes stand out. If all the fabrics have a similar shade or pattern, the quilt blocks may blend together, resulting in a less defined design.
- Fabric Type: Cotton fabric is an excellent choice for quilting due to its durability, ease of sewing, and wide variety of options. It’s recommended to wash and press your fabric before cutting to remove any sizing or wrinkles.
- Theme or Style: Consider the theme or style you want to evoke with your tumbler quilt. Do you want a traditional, modern, or eclectic look? Choose fabrics that align with your desired aesthetic.
- Fabric Quantity: Determine how much fabric you’ll need based on the size of your quilt. It’s a good idea to calculate the amount of fabric needed for each tumbler shape and include some extra for mistakes, borders, and bindings.
Remember, there are no strict rules when it comes to choosing fabric for your tumbler quilt. Trust your instincts and have fun with it! Mix and match different colors, patterns, and textures to create a unique and visually appealing quilt that reflects your personal style.
Once you have selected your fabrics, it’s time to move on to the next step: cutting the fabric strips.
Step 2: Cutting the Fabric Strips
Now that you have chosen your fabric, it’s time to cut the fabric strips for your tumbler quilt. Follow these steps to ensure accurate and precise cuts:
- Prepare Your Workstation: Clear a clean and flat workspace to lay out your fabric. Ensure that your rotary cutter, cutting mat, and ruler are easily accessible.
- Measure and Mark: Measure the desired width of your tumbler shapes on the wrong side of the fabric. Use a fabric marking tool to make a straight line along the length of the fabric strip. Repeat this process to mark as many fabric strips as you need.
- Cut the Strips: Align the ruler with the marked line and use the rotary cutter to cut along the edge of the ruler. Take care to maintain a steady and straight cut throughout the length of the fabric strip.
- Repeat for Additional Fabrics: If you are using multiple fabrics, repeat the measuring, marking, and cutting process for each fabric. This will ensure that you have enough fabric strips to create a cohesive tumbler quilt.
It’s important to note that the dimensions of your tumbler shapes will depend on your personal preferences and the size of the quilt. You can experiment with different widths to achieve the desired look. Just make sure that all your fabric strips are consistent in width to ensure uniformity in your quilt blocks.
After cutting the fabric strips, take a moment to admire your colorful collection. The vibrant strips will soon come together to form your tumbler quilt. In the next step, we will discuss arranging the fabric strips.
Step 3: Arranging the Strips
Arranging the fabric strips is an important step in creating a visually appealing tumbler quilt. This process allows you to play with colors, patterns, and fabric placements to achieve the desired aesthetic. Follow these steps to arrange your fabric strips:
- Design Idea: Consider the overall design or layout you want to achieve for your tumbler quilt. You can opt for a random arrangement or create a specific pattern, such as a gradient, a checkerboard, or a rainbow effect.
- Lay Out the Strips: Begin by laying out your fabric strips on a large flat surface, such as a design wall or a spacious table. Arrange them in a way that lets you visualize their positioning in the quilt. Play around with different combinations to find the most pleasing arrangement.
- Color Balancing: Pay attention to the balance of colors across your quilt. Distribute different colors and patterns evenly throughout the arrangement to achieve a harmonious look. You may also want to create color transitions or focal points within the design.
- Contrast and Variety: Consider the contrast between adjacent fabric strips. Vary the colors, patterns, and textures to add interest and create a dynamic visual impact.
- Take Photos: As you experiment with different arrangements, take photos of each one. This will allow you to compare them later and make a final decision on the design that appeals to you the most.
Arranging the fabric strips may take some time and experimentation, but don’t be afraid to trust your instincts and have fun with the process. Remember, this is your quilt, and you have the creative freedom to arrange the fabric strips in a way that reflects your personal style and vision.
Once you are satisfied with the arrangement, it’s time to move on to the next step: sewing the fabric strips together.
When creating a tumbler quilt template, be sure to use a sturdy material such as template plastic or cardboard to ensure durability and accuracy in cutting your fabric pieces.
Read more: How To Make A Template For Woodworking
Step 4: Sewing the Strips Together
With your fabric strips arranged in the desired order, it’s time to sew them together to create the rows for your tumbler quilt. Follow these steps to sew the fabric strips together:
- Prepare Your Sewing Machine: Ensure that your sewing machine is in good working condition and threaded with matching thread. Set your machine to a straight stitch with a medium-length stitch setting.
- Align the Strips: Take the first two fabric strips from your arrangement and place them right sides together, aligning the raw edges. Pin them together to keep them in place during sewing.
- Sew the Strips: Start sewing at the top edge of the fabric strips, using a ¼-inch seam allowance. Backstitch at the beginning and end to secure the stitches. Continue sewing the remaining strips together in the same manner until you have completed all the rows for your quilt.
- Press the Seams: After sewing each row, press the seam allowances flat. This helps to create crisp and neat rows in your tumbler quilt. You can alternately press the seam allowances to one side or open them, based on your preference.
- Continue Sewing: Repeat the sewing process for all the rows of fabric strips in your tumbler quilt. Take care to maintain the order and orientation of the strips as you sew them together.
As you sew the fabric strips together, take breaks to admire your progress. The rows will start to take shape, and you’ll get a glimpse of how your tumbler quilt will look once it’s completed.
Once all the rows have been sewn together, it’s time to move on to the next step: creating the tumbler shape.
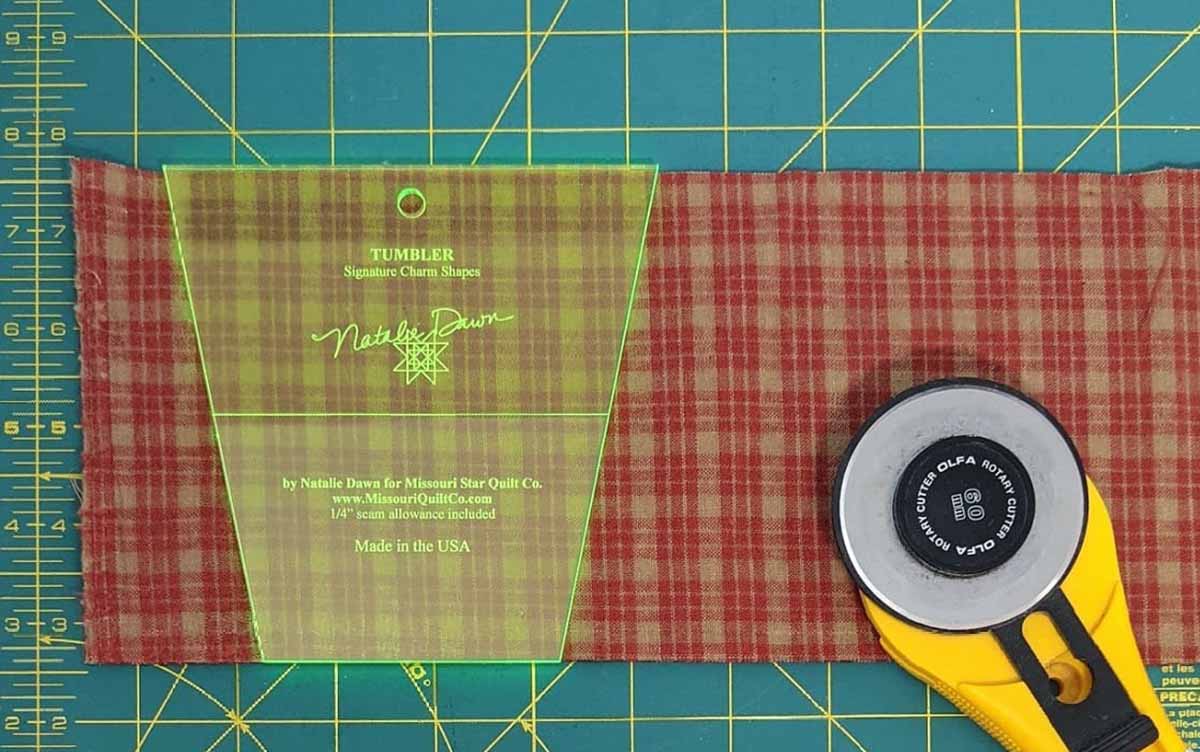
Step 5: Creating the Tumbler Shape
Now that you have your fabric strips sewn together into rows, it’s time to transform them into the iconic tumbler shape that gives the tumbler quilt its name. Follow these steps to create the tumbler shape:
- Preparation: Lay out your fabric strip rows on a flat surface, ensuring that the seams are pressed flat and facing in the desired direction.
- Cutting the Tumbler Shapes: Take your tumbler quilt template or ruler and place it on the first row of strips. Align the template or ruler with the edges and the top of the fabric strip row. Carefully trace around the template or ruler and mark the fabric.
- Cutting the Remaining Rows: Move on to the next row and align the template or ruler with the previously cut tumbler shape. Repeat the tracing and marking process for all the remaining rows.
- Cut Out the Tumbler Shapes: Using sharp scissors or a rotary cutter, carefully cut along the marked lines to create the tumbler shapes. Take your time to ensure clean and precise cuts.
- Repeat for Remaining Rows: Repeat the cutting process for all the rows of fabric strips in your tumbler quilt. As you cut out each tumbler shape, arrange them in the desired order to maintain the design.
Creating the tumbler shape is an important step that gives your quilt its signature look. Take care to align the template or ruler accurately and cut the shapes consistently to maintain uniformity in your tumbler quilt.
After cutting out all the tumbler shapes, take a moment to arrange them in the final design. You’ll start to see your tumbler quilt come together, showcasing the vibrant colors and patterns you chose.
With the tumbler shapes cut and arranged, it’s time to move on to the final step: finishing the quilt top.
Step 6: Finishing the Quilt Top
Congratulations! You’ve come a long way in creating your tumbler quilt, and now it’s time to finish the quilt top. Follow these steps to complete this final stage:
- Arrange the Tumbler Shapes: Lay out the tumbler shapes in the finalized design on a flat surface. Take a step back and assess the overall balance and visual appeal of the quilt top. Make any necessary adjustments to the arrangement.
- Sew the Tumbler Shapes: Starting from the top row, take the first two tumbler shapes and place them right sides together. Align the raw edges and pin them in place. Sew a ¼-inch seam allowance along the edge, backstitching at the beginning and end. Continue sewing the remaining tumbler shapes together in rows until you complete the quilt top.
- Press the Seams: After sewing each row, press the seam allowances flat, alternating their direction for easy nesting and improved quilt top assembly. This will help create a smooth and professional-looking finish.
- Trim the Excess: Once the rows are sewn together, trim any excess fabric to ensure that the quilt top edges are even and aligned.
- Optional Borders: If desired, you can add borders to enhance the design and size of your quilt top. Cut strips of fabric to the desired width and sew them to the edges of the quilt top, aligning the raw edges. Press the seam allowances flat and trim any excess fabric.
As you sew and press the tumbler shapes together, you’ll witness your quilt top taking shape. It’s an exciting moment as your hard work and creativity come together.
Once the quilt top is finished, take a moment to admire your completed masterpiece. The vibrant colors, the intricate tumbler shape, and the overall design make your tumbler quilt a unique and beautiful creation.
With the quilt top finished, you can now move on to the next steps of the quilt-making process, such as adding batting and backing fabric, quilting, and binding. These steps will bring your tumbler quilt to completion and ready for use or display.
Remember, the quilting journey is a personal and creative one. Don’t be afraid to experiment, customize, and let your imagination soar as you make your tumbler quilt template.
Good luck, and happy quilting!
Conclusion
Creating a tumbler quilt template is a fulfilling and rewarding experience that allows you to showcase your creativity and passion for quilting. By following the steps outlined in this article, you have learned how to choose fabric, cut fabric strips, arrange them in an appealing design, sew the strips together, create the iconic tumbler shape, and finish the quilt top.
Throughout this process, you have developed key skills in fabric selection, cutting and sewing techniques, and design arrangement. You’ve witnessed the transformation of fabric strips into a stunning tumbler quilt top that reflects your personal style and vision.
Remember, quilting is not just a craft; it’s an art form that allows you to express yourself and create something truly unique. Embrace your creativity, trust your instincts, and have fun throughout the entire quilting process.
Whether you’re making a tumbler quilt for yourself, as a gift for a loved one, or to showcase your quilting skills, take pride in your creation. Each stitch, each fabric strip, and each tumbler shape is a testament to your dedication and love for quilting.
Now that you have completed your tumbler quilt template, you can move on to the next stages of the quilt-making process, such as adding batting and backing fabric, quilt sandwiching, quilting, and binding. These steps will bring your tumbler quilt to its final form and make it ready for use or display.
Quilting is a journey, and each project offers new opportunities for growth and learning. Enjoy the process, embrace the imperfections, and cherish the moments spent creating something beautiful with your own hands.
So, gather your materials, set up your sewing machine, and let your creativity soar as you embark on the wonderful world of tumbler quilt making. Happy quilting!
Frequently Asked Questions about How To Make A Tumbler Quilt Template
Was this page helpful?
At Storables.com, we guarantee accurate and reliable information. Our content, validated by Expert Board Contributors, is crafted following stringent Editorial Policies. We're committed to providing you with well-researched, expert-backed insights for all your informational needs.


0 thoughts on “How To Make A Tumbler Quilt Template”