Articles
How To Use Rival Ice Cream Maker
Modified: August 28, 2024
Learn how to use the Rival Ice Cream Maker with our informative articles. Discover tips, techniques, and recipes to make delicious homemade ice cream at home.
(Many of the links in this article redirect to a specific reviewed product. Your purchase of these products through affiliate links helps to generate commission for Storables.com, at no extra cost. Learn more)
Introduction
Welcome to the world of homemade ice cream! If you’re a fan of frozen treats and have recently acquired a Rival ice cream maker, you’ve come to the right place. In this guide, we’ll walk you through everything you need to know to use your Rival ice cream maker and create delicious ice cream flavors right in the comfort of your own home.
Making ice cream at home allows you to have complete control over the ingredients and flavors you use. From classic vanilla and chocolate to creative concoctions like mint chocolate chip or cookies and cream, the possibilities are endless. Plus, there’s something truly satisfying about seeing your carefully crafted mixture transform into a creamy, frozen dessert.
Before we dive into the step-by-step process, let’s take a moment to familiarize ourselves with the Rival ice cream maker. Rival has been producing high-quality kitchen appliances for decades, and their ice cream makers are no exception. Known for their durability and user-friendly design, Rival ice cream makers are a popular choice among ice cream enthusiasts.
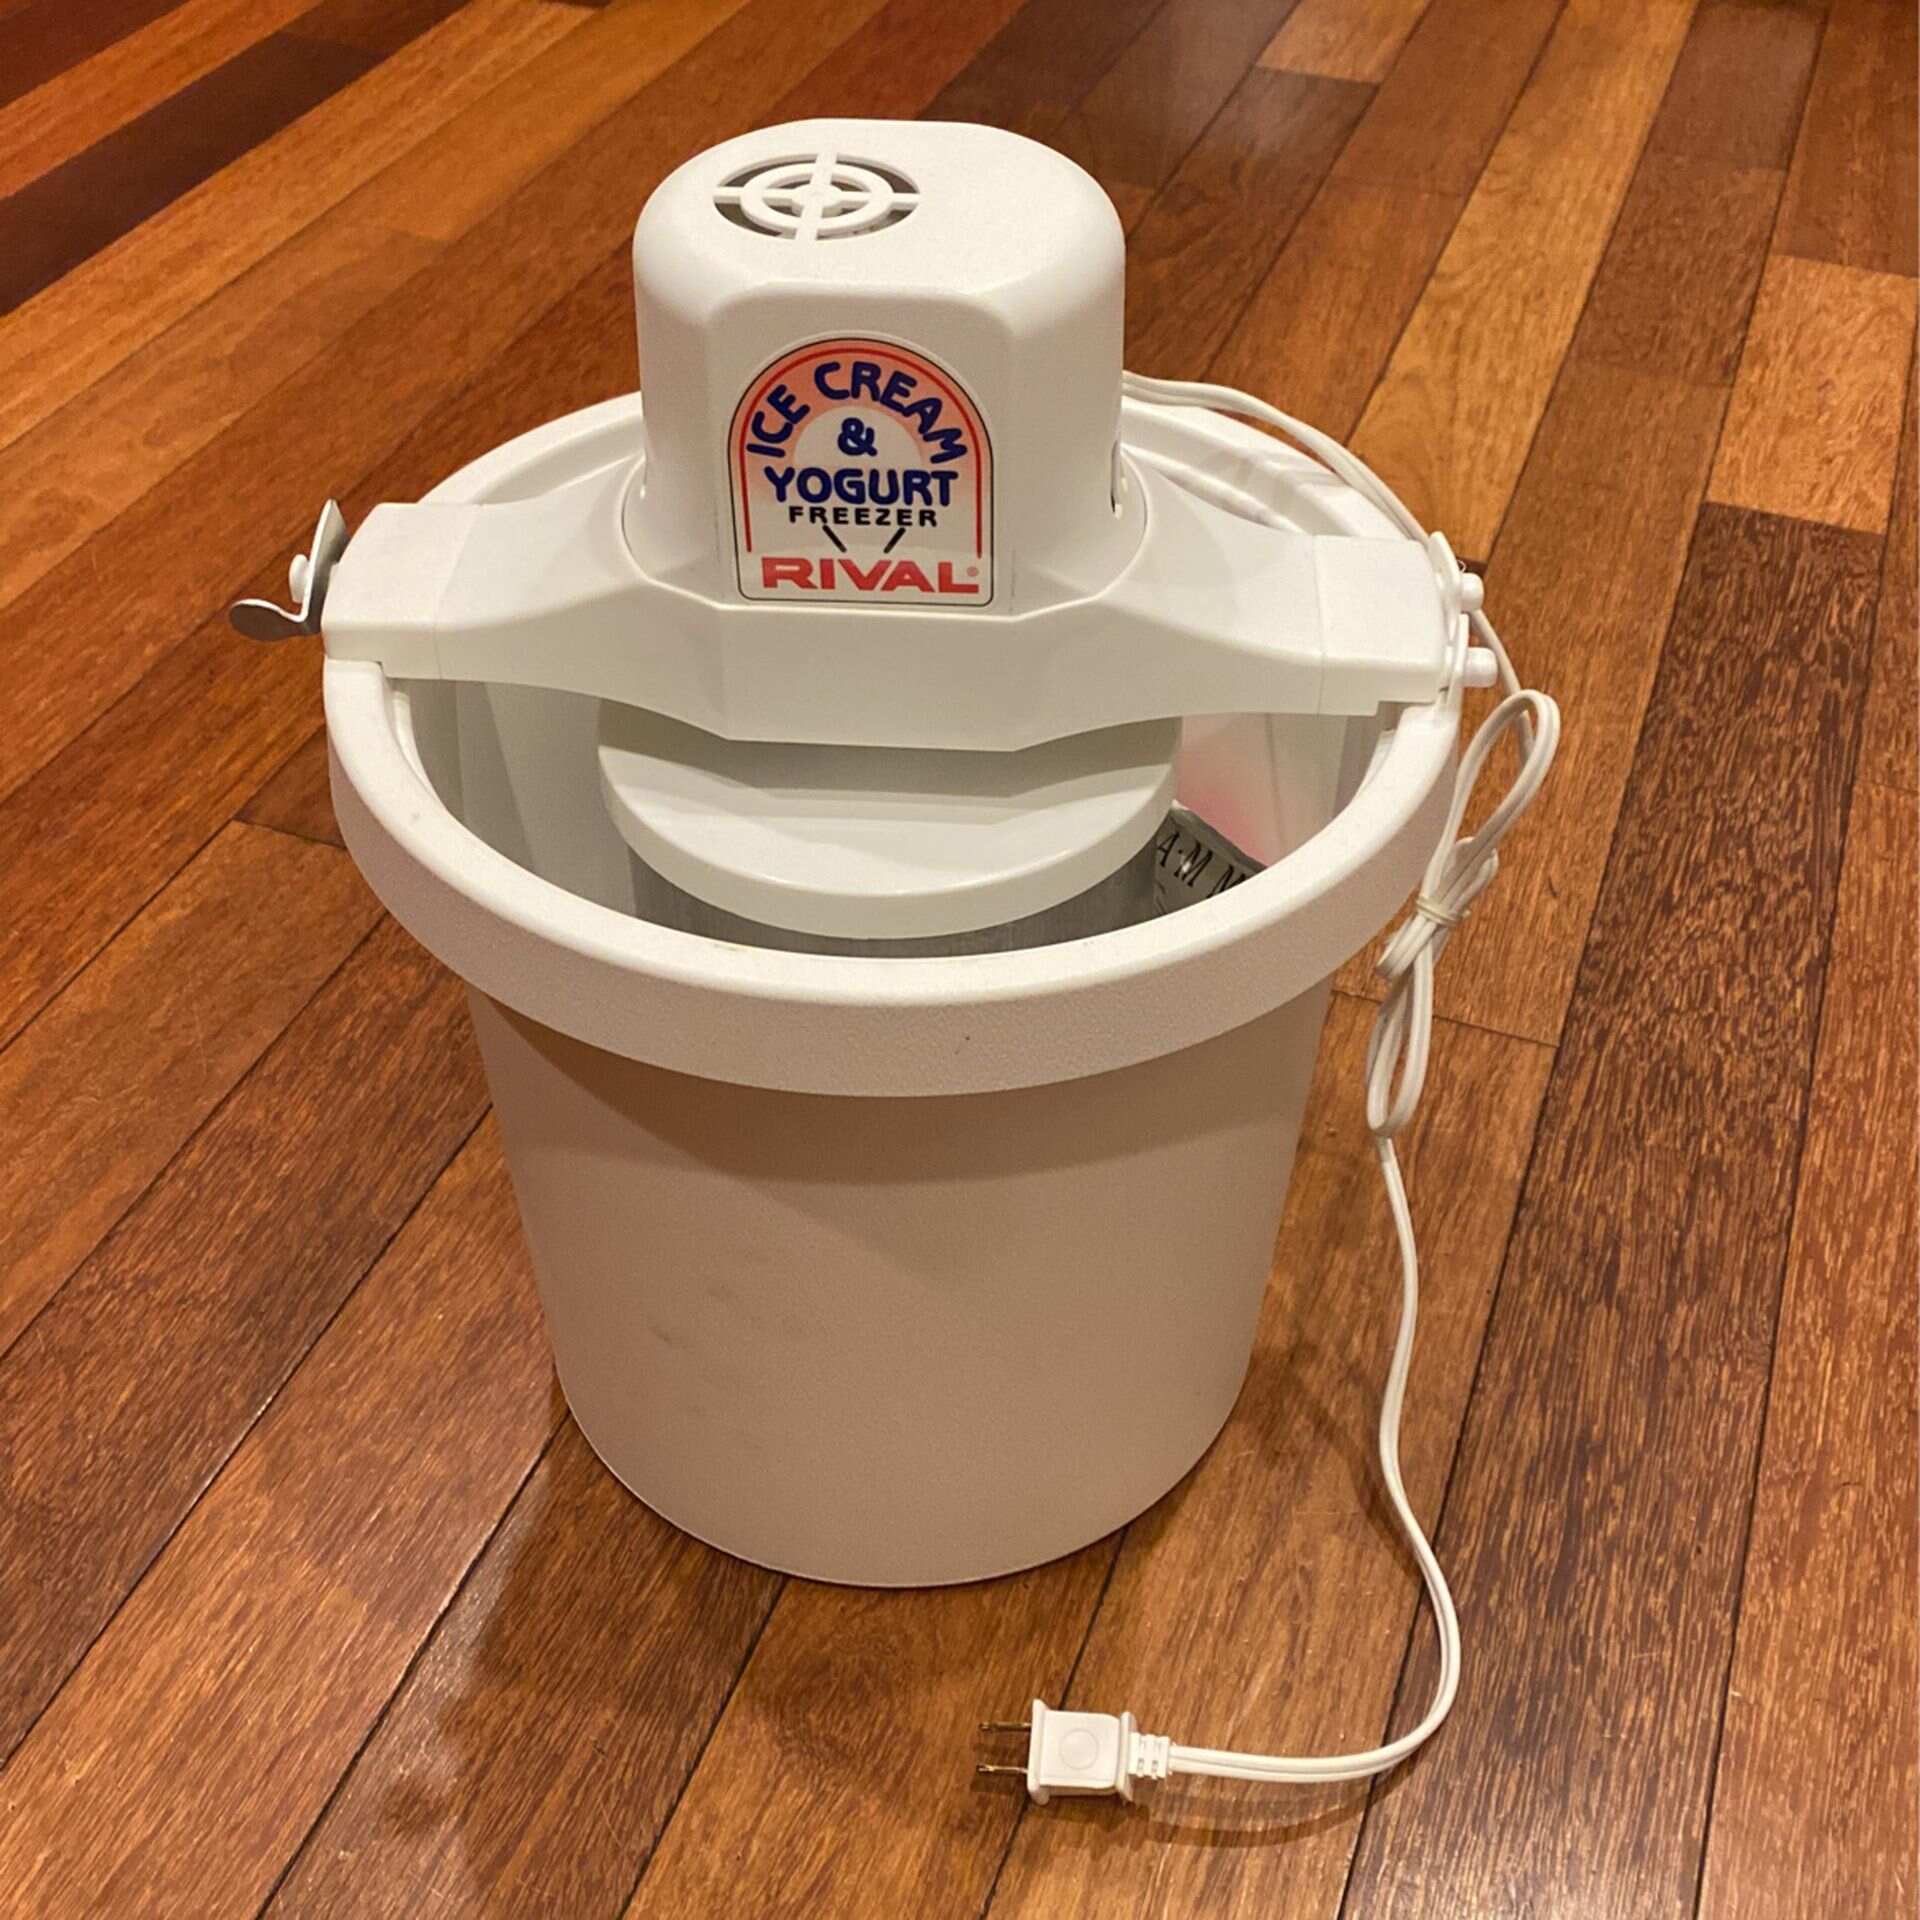
The Rival ice cream maker consists of several components, including a freezer bowl, dasher or paddle, and a motorized base. The freezer bowl is the key component that freezes the mixture and helps create the smooth and creamy texture we all love in ice cream. The dasher or paddle is responsible for churning and aerating the mixture as it freezes.
Getting started with your Rival ice cream maker is a breeze. Whether you’re a seasoned ice cream maker or a newbie to the world of homemade frozen treats, we’ll guide you through the process to ensure you have the best possible experience and end up with a delectable batch of ice cream.
So, let’s grab our aprons and get ready to embark on a delicious journey of homemade ice cream goodness with your Rival ice cream maker!
Key Takeaways:
- Create delicious homemade ice cream with your Rival ice cream maker by mastering assembly, ingredient preparation, and mix-in techniques. Experiment with flavors and enjoy the satisfaction of crafting your own frozen treats.
- Overcome common ice cream making challenges with troubleshooting tips for your Rival ice cream maker. From texture issues to motor malfunctions, equip yourself with the knowledge to tackle any obstacle and achieve creamy, flavorful results.
Read more: How To Use The Kitchenaid Ice Cream Maker
Getting Started
Before we start creating your favorite ice cream flavors, let’s make sure we have everything we need and understand the basic setup of the Rival ice cream maker.
First and foremost, ensure that you have all the necessary components of the Rival ice cream maker: the freezer bowl, dasher or paddle, and the motorized base. Check that these components are clean and in good working condition.
Next, find a flat and stable surface in your kitchen where you can set up your ice cream maker. Make sure there is enough space for the freezer bowl to fit properly and room for the motorized base to operate without obstruction.
Once you have set up your workspace, it’s time to prepare the freezer bowl. Take the freezer bowl and place it in your freezer for a minimum of 24 hours. This allows the bowl to freeze completely, ensuring optimal ice cream making conditions.
While the freezer bowl is freezing, gather your ingredients and decide on the flavor of ice cream you want to make. This is where you can let your creativity shine! Whether you want to make a classic flavor or experiment with unique combinations, the choice is yours.
Lastly, it’s a good idea to read through the instruction manual that came with your Rival ice cream maker. Although we will guide you through the process, familiarizing yourself with the specific features and operating instructions of your ice cream maker will help ensure successful results.
Now that you have all the necessary components, a frozen freezer bowl, and a thirst for homemade ice cream, you’re ready to move on to the next steps: assembly and preparing the ingredients. So, let’s dive in and start creating delicious ice cream with your Rival ice cream maker!
Assembly
Assembling your Rival ice cream maker is a straightforward process. Follow the steps below to ensure everything is properly set up and ready to go:
- Start by placing the motorized base on a flat and stable surface. Make sure it is within reach of a power outlet.
- Take the frozen freezer bowl out of the freezer and remove any packaging or protective covering.
- Locate the drive assembly on the motorized base. It is usually a circular opening with grooves or notches.
- Insert the dasher or paddle into the drive assembly. Ensure that it fits securely and rotates freely.
- Now, take the freezer bowl and place it on top of the motorized base. It should fit into the drive assembly, locking the dasher or paddle in place.
- Once the freezer bowl is securely in place, ensure that all components are aligned and properly assembled.
- Double-check that the power cord is not tangled or obstructing the movement of the ice cream maker.
With the assembly complete, you are now ready to start preparing your ice cream mixture. But before we dive into the recipe, let’s cover the necessary steps to ensure the ingredients are ready and properly mixed for a delightful ice cream experience. So, let’s move on to the next section: preparing the ingredients!
Preparing the Ingredients
An important aspect of making delicious homemade ice cream with your Rival ice cream maker is preparing the ingredients with care. Follow these steps to ensure your mixture is well-prepared and ready for freezing:
- Start by gathering all the ingredients needed for your chosen ice cream flavor. This typically includes a base like heavy cream, whole milk, or a combination of both, sugar, and any flavorings or mix-ins you desire.
- If your recipe calls for eggs, make sure they are at room temperature. This will help incorporate them into the mixture more easily.
- In a separate bowl, combine the sugar with the eggs (if using). Whisk them together until the sugar is dissolved and the mixture is smooth.
- If your recipe calls for any additional flavorings, such as vanilla extract or cocoa powder, add them to the sugar and egg mixture and whisk until well combined.
- In a separate saucepan, heat the milk and/or cream over medium heat until it reaches a simmer. Do not let it boil.
- Slowly pour the hot milk and/or cream into the sugar mixture, whisking continuously as you pour. This step is important to temper the eggs and create a smooth mixture.
- Once the mixture is well combined, transfer it back to the saucepan and heat over medium-low heat. Stir continuously until the mixture thickens slightly and coats the back of a spoon.
- Remove the mixture from the heat and let it cool completely. You can place it in the refrigerator to speed up the cooling process.
- While the mixture is cooling, take the time to prepare any mix-ins you plan to add, such as chocolate chips, nuts, or fruit. Chop or crush them to your desired size and set them aside.
By following these steps, you will have a perfectly prepared ice cream mixture that is ready to be transformed into a frozen delight. Now that you have your ingredients prepped and ready, it’s time to move on to the next step: adding the ingredients to the Rival ice cream maker and starting the freezing process. So, let’s continue our journey towards homemade ice cream perfection!
Adding the Ingredients to the Ice Cream Maker
Now that you have your ice cream mixture prepared, it’s time to add the ingredients to your Rival ice cream maker and begin the freezing process. Follow these steps to ensure a smooth and successful ice cream-making experience:
- Retrieve the assembled Rival ice cream maker and remove the freezer bowl from the motorized base.
- Place the freezer bowl on a stable surface, making sure to protect the surface from any condensation that may occur during the process.
- Attach the dasher or paddle securely to the drive assembly, ensuring it fits into the bowl’s opening.
- Give your ice cream mixture a quick stir to ensure it is well mixed and any mix-ins are evenly distributed.
- Carefully pour the prepared mixture into the freezer bowl of the ice cream maker. Be mindful not to fill it beyond the maximum fill line indicated on the bowl.
- Using a spatula or spoon, scrape any remaining mixture from the bowl into the ice cream maker to maximize the amount of ice cream you get.
- Place the motorized base with the attached freezer bowl back onto the assembled ice cream maker.
With the ingredients added, you’re now ready to start the freezing process and watch your mixture transform into luscious ice cream. Operating the Rival ice cream maker is the next step in our journey towards that delightful dessert. So, let’s dive into the process of operating the ice cream maker and bringing your frozen treat to life!
Read more: How To Use Ninja Ice Cream Maker
Operating the Rival Ice Cream Maker
Operating the Rival ice cream maker is simple and straightforward. By following these steps, you’ll be well on your way to enjoying delicious homemade ice cream:
- Ensure that the Rival ice cream maker is set up on a flat and stable surface, with the freezer bowl securely attached to the motorized base.
- Plug in the ice cream maker and turn it on, if applicable. Some models may have a power switch, while others may start automatically once plugged in.
- The dasher or paddle should begin to rotate once the ice cream maker is turned on. This rotation helps churn and freeze the mixture.
- Set a timer for the recommended freeze time specified in the recipe or according to the instructions provided with your specific Rival ice cream maker model. This typically ranges between 20 to 30 minutes.
- As the mixture freezes, you may notice the motorized base vibrating or making some noise. This is normal and indicates that the ice cream is being churned and frozen.
- Avoid opening the lid or constantly checking on the ice cream during the freezing process. This can disrupt the freezing and prevent the ice cream from reaching its desired consistency.
- Pay attention to the consistency of the ice cream as the timer nears the end. The mixture should be thick and frozen, with a smooth texture similar to soft-serve ice cream.
- If your ice cream maker has a built-in timer or automatic shut-off feature, it will signal when the ice cream is ready. Otherwise, use your judgment based on the recipe instructions and the desired consistency.
- Once the ice cream reaches the desired consistency, turn off the ice cream maker and unplug it from the power source.
Now that you’ve successfully operated the Rival ice cream maker, you’re one step closer to enjoying your homemade frozen treat. The next section will cover how to monitor the progress of your ice cream and when to add any desired mix-ins. So, let’s continue our ice cream-making journey together!
When using a Rival ice cream maker, make sure the freezer canister is completely frozen before starting. Also, chill your ice cream mixture before pouring it into the machine for smoother results.
Monitoring the Progress
Monitoring the progress of your ice cream as it freezes is an essential step in achieving the perfect texture and consistency. Here are some tips and guidelines to help you monitor the progress of your ice cream:
1. Stay observant: While the ice cream maker is in operation, keep a close eye on the mixture. Observe how it changes in texture and consistency as it freezes. You should notice it becoming thicker and more solid as time goes on.
2. Check the time: Refer to the recommended freeze time specified in the recipe or the instructions provided with your Rival ice cream maker. Set a timer and monitor the progress accordingly. This will help you gauge when the ice cream is approaching the desired consistency.
3. Look for the “soft-serve” stage: After a certain amount of time, usually around 20 to 30 minutes, the ice cream should reach the consistency of soft-serve. This means it will be thick and smooth, but still easily scoopable and slightly malleable.
4. Perform the “spoon test”: To check the progress of the ice cream, remove the motorized base and freezer bowl from the ice cream maker. Take a spoonful of the partially frozen mixture and place it on a plate. Observe its texture and consistency. If it holds its shape and doesn’t instantly melt, that’s a good indication that it’s close to being done.
5. Use your judgment: Each ice cream recipe and ice cream maker may differ slightly, so it’s important to use your judgment and experience to determine when the ice cream is ready. If it has reached a thick and creamy consistency with minimal liquid, it’s likely ready for the next step.
Remember, it’s better to slightly under-churn the ice cream than to over-churn it, as over-churning can result in a grainy texture. Once you’re satisfied with the progress and consistency of your ice cream, it’s time to move on to the next step: adding any desired mix-ins to enhance the flavor and texture of your homemade creation.
In the following section, we will explore the process of adding mix-ins to take your homemade ice cream to a whole new level. So, let’s get creative and continue our journey of ice cream decadence!
Adding Mix-ins
Adding mix-ins to your homemade ice cream is a fantastic way to enhance flavors and textures, and let your creativity shine. Whether you prefer chunks of chocolate, swirls of caramel, or a burst of fruity goodness, here’s how you can incorporate mix-ins into your Rival ice cream:
- Prepare your desired mix-ins ahead of time. Popular mix-ins include chocolate chips, crushed cookies, nuts, fruits, or candy pieces. Ensure that they are well-chilled or at room temperature, depending on the recipe.
- Once your ice cream has reached the desired consistency, it’s time to add the mix-ins. Carefully remove the freezing bowl from the ice cream maker and place it on a stable surface.
- Using a spoon or spatula, gently fold in the mix-ins into the partially frozen ice cream. Be careful not to overmix, as it may cause the ice cream to lose its creamy texture.
- For larger mix-ins, such as chunks of chocolate or whole nuts, distribute them evenly throughout the ice cream mixture. This ensures that every scoop will have a delightful surprise.
- If you want a swirled effect, like caramel or fruit sauce, layer the mix-in and ice cream in a storage container. Add a layer of ice cream, followed by drizzles or dollops of the mix-in, and repeat until all the components are used.
- Using a spoon or spatula, gently swirl the ice cream and mix-ins together, creating a marbled effect. Avoid overmixing to maintain distinct ribbons or pockets of flavor.
- Once the mix-ins are added, return the freezer bowl to the ice cream maker and continue freezing according to the recipe’s specified time or until it reaches your desired consistency.
Adding mix-ins to your homemade ice cream not only adds exciting flavor combinations but also gives your ice cream a delightful texture. Get creative and experiment with various mix-ins to find your favorite combinations.
Now that your ice cream is complete with delicious mix-ins, it’s time to transfer it to a storage container and prepare it for the final step: freezing and storing. Let’s move on to the next section to ensure your homemade ice cream stays fresh and flavorful!
Transferring and Storing the Ice Cream
After all the hard work and anticipation, your homemade ice cream is finally ready! Now, it’s time to transfer it to a storage container and ensure it stays fresh and flavorful. Follow these steps to properly transfer and store your delicious creation:
- Prepare a clean and airtight container for your ice cream. It can be a plastic or metal container with a tight-fitting lid. Make sure the container is freezer-safe to prevent any unpleasant odors or flavors from seeping into your ice cream.
- Take the freezer bowl out of the ice cream maker and detach the dasher or paddle. Use a spatula to scrape any remaining ice cream from the sides and bottom of the bowl, ensuring you collect all the deliciousness.
- Transfer the freshly churned ice cream from the freezer bowl to the storage container. Use a spatula or ice cream scoop to achieve smooth and even layers.
- Press a sheet of wax paper or plastic wrap directly onto the surface of the ice cream. This helps prevent ice crystals from forming and maintains the creamy texture.
- Seal the storage container with the lid and make sure it is tightly closed to prevent any air from entering. This will help preserve the quality of your ice cream and prevent freezer burn.
- Label the container with the flavor and date to easily identify it later. Trust us; you’ll appreciate this step when you have multiple flavors in your freezer!
- Place the container in the coldest part of your freezer, away from any strong odors that might affect the taste of the ice cream. Allow it to freeze for at least 4-6 hours or until it reaches the desired firmness.
Now that your ice cream is safely stored in the freezer, you can sit back and patiently wait for it to firm up. The longer you let it freeze, the more it will solidify and develop its flavors. However, if you can’t resist the temptation, you can enjoy a serving of soft-serve ice cream immediately!
Remember to store the ice cream container upright to avoid any possible leakage or melting. Once you’re ready to enjoy your homemade ice cream, simply remove the container from the freezer, let it sit at room temperature for a few minutes to soften slightly, and then scoop out your creamy creation.
With your homemade ice cream now successfully transferred and safely stored, there’s only one thing left to do: indulge in the frozen bliss you’ve created. So, sit back, relax, and savor every spoonful of your homemade delight!
Read more: How To Use Whynter Ice Cream Maker
Troubleshooting Tips
While making ice cream with your Rival ice cream maker is usually a smooth process, you may encounter some common issues along the way. Here are some troubleshooting tips to help you overcome any challenges and ensure successful ice cream making:
1. Ice crystals: If your ice cream comes out with noticeable ice crystals, it may be due to improper mixture ratios or over-churning. To prevent this, make sure to follow the recipe’s measurements and avoid over-churning the ice cream.
2. Grainy texture: A grainy texture can result from a few different factors, such as using low-fat ingredients or not fully dissolving the sugar during the mixing process. Ensure that all ingredients are well combined and dissolved before freezing the mixture.
3. Runny ice cream: If your ice cream turns out too soft and runny, it may be due to not freezing the freezer bowl long enough, not following the recommended freeze time, or not chilling the ingredients adequately before mixing. Ensure that the freezer bowl is frozen for at least 24 hours and follow the timing instructions provided in the recipe or ice cream maker manual.
4. Overfilling the freezer bowl: It’s crucial not to overfill the freezer bowl, as it can lead to overflow and uneven freezing. Follow the maximum fill line indicated on the bowl to ensure proper freezing and optimal results.
5. Motor issues: If your Rival ice cream maker’s motor stops or malfunctions during the process, first make sure that it is securely connected to a power source. Check if there is any obstruction or jam in the motorized base. If the issue persists, refer to the instruction manual or contact Rival customer support for further assistance.
6. Uneven freezing: Uneven freezing may occur if the freezer bowl is not frozen evenly or if the mixture is not properly distributed. Ensure that the freezer bowl is positioned securely in the ice cream maker and that the mixture is evenly poured into the bowl for consistent freezing.
7. Lack of flavor: If your ice cream lacks flavor, it may be due to not adding enough flavorings or mix-ins. Adjust the amount of flavorings or mix-ins according to your taste preferences. It’s always better to start with a slightly stronger flavor and adjust as needed.
If you encounter any other issues or have specific questions about your Rival ice cream maker, refer to the instruction manual or contact customer support. They will be able to provide you with tailored guidance and solutions.
With these troubleshooting tips in mind, you’ll be well-equipped to overcome any hiccups and create delicious ice cream with your Rival ice cream maker. Don’t be discouraged by minor setbacks; remember that practice makes perfect.
Now that you’re armed with troubleshooting knowledge, it’s time to put your newfound skills to the test and continue your ice cream-making adventures with confidence!
Conclusion
Congratulations on completing this comprehensive guide on using your Rival ice cream maker! You’ve now embarked on a journey of creating delicious homemade ice cream with endless flavor possibilities. By following the steps outlined in this guide, you have learned how to assemble and operate your Rival ice cream maker, prepare the ingredients, add mix-ins, and properly store your homemade ice cream.
Making ice cream at home with your Rival ice cream maker allows you to control the quality of ingredients, customize flavors to your liking, and enjoy the satisfaction of creating a frozen treat from scratch. The process may have seemed daunting at first, but with practice and a dash of creativity, you’ll become a master ice cream maker in no time.
Remember to experiment with different flavors, textures, and mix-ins to create unique and tantalizing ice cream creations. Let your imagination run wild and surprise your taste buds with delightful combinations.
If you encounter any challenges or have questions along the way, refer back to this guide or consult the instruction manual that came with your Rival ice cream maker. Additionally, don’t hesitate to reach out to Rival’s customer support for assistance—they are there to help you make the most of your ice cream maker.
Now that you have the knowledge and skills to make delectable homemade ice cream with your Rival ice cream maker, it’s time to gather your favorite ingredients, get creative, and start churning out batches of frozen goodness. Whether it’s a sunny summer afternoon or a cozy winter evening, your homemade ice cream will undoubtedly bring joy and satisfaction to family and friends.
So, put on your apron, plug in your Rival ice cream maker, and embark on a delightful journey of homemade ice cream magic. Enjoy the process, indulge in the flavors, and savor every creamy spoonful of your own creation. Happy ice cream making!
Frequently Asked Questions about How To Use Rival Ice Cream Maker
Was this page helpful?
At Storables.com, we guarantee accurate and reliable information. Our content, validated by Expert Board Contributors, is crafted following stringent Editorial Policies. We're committed to providing you with well-researched, expert-backed insights for all your informational needs.


0 thoughts on “How To Use Rival Ice Cream Maker”