Home>Construction & Tools>Building Materials>How To Attach Spider Web To Brick
Building Materials
How To Attach Spider Web To Brick
Published: January 22, 2024
Learn how to effectively attach spider web to brick using the right building materials. Discover expert tips and techniques for a secure and long-lasting installation.
(Many of the links in this article redirect to a specific reviewed product. Your purchase of these products through affiliate links helps to generate commission for Storables.com, at no extra cost. Learn more)
Introduction
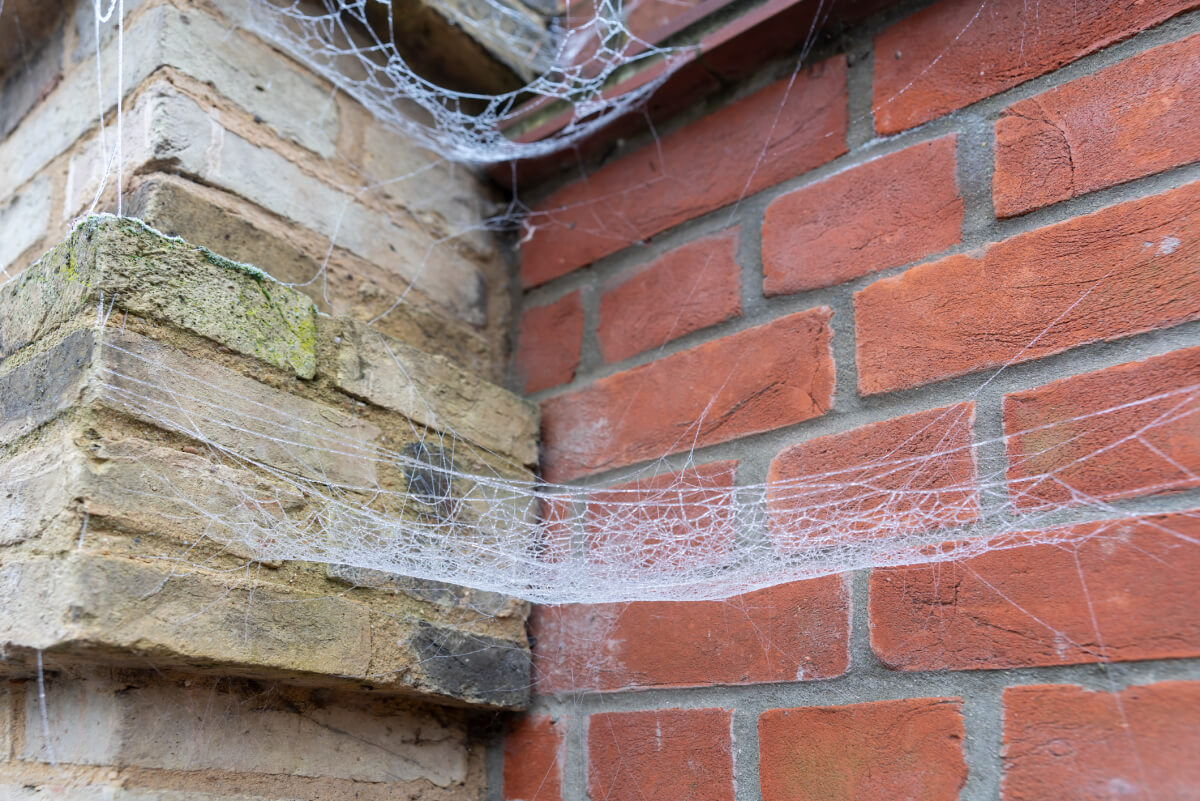
When it comes to adding a touch of spooky ambiance to your Halloween decorations or creating a chilling scene for a theatrical production, attaching spider webs to brick surfaces can be a captivating way to set the stage. The juxtaposition of the rough, earthy texture of brick against the delicate, ethereal nature of spider webs creates a striking visual contrast that can evoke a sense of mystery and intrigue.
In this comprehensive guide, we will delve into the step-by-step process of attaching spider webs to brick, ensuring a secure and visually appealing result. Whether you are transforming your home into a haunted mansion for a Halloween party or setting the scene for a spine-tingling theatrical performance, mastering the art of attaching spider webs to brick will elevate the atmosphere and captivate your audience.
By following the detailed instructions provided in this guide, you will gain the knowledge and confidence to seamlessly integrate spider webs into brick surfaces, creating a hauntingly beautiful display that is sure to leave a lasting impression. So, gather your materials and let's embark on this journey to bring a touch of eerie elegance to your brick surfaces.
Key Takeaways:
- Transform brick surfaces into haunting displays by carefully preparing and attaching synthetic spider webs. Create an eerie ambiance for Halloween or theatrical productions with meticulous attention to detail.
- Securely attach spider webs to brick using reliable adhesive and weather-resistant materials. Elevate the atmosphere with captivating displays that evoke mystery and intrigue.
Read more: What Spider Makes A Web In The Grass
Step 1: Gather the necessary materials
Before embarking on the process of attaching spider webs to brick, it is essential to gather the necessary materials to ensure a smooth and successful application. Here's a comprehensive list of items you will need:
-
Spider Webs: Acquire high-quality synthetic spider webs, readily available at party supply stores or online retailers. Opt for stretchable and realistic-looking spider webs to achieve an authentic and captivating effect.
-
Adhesive: Select a reliable adhesive suitable for outdoor use and capable of adhering to brick surfaces. A strong adhesive such as outdoor mounting tape or adhesive putty is recommended to ensure the spider webs remain securely attached.
-
Cleaning Supplies: Prepare a soft-bristled brush or a vacuum cleaner to remove any dirt, dust, or debris from the brick surface. This step is crucial to create a clean and smooth area for attaching the spider webs.
-
Protective Gloves: It's advisable to wear protective gloves, especially if the adhesive requires manual application. This will safeguard your hands and ensure a clean application process.
-
Scissors: Keep a pair of scissors handy to trim the spider webs to the desired size and shape, allowing for a customized and tailored application.
-
Step Ladder: Depending on the height of the brick surface, a step ladder may be necessary to reach and effectively attach the spider webs to elevated areas.
-
Weather Protection: If the brick surface is exposed to the elements, consider using weather-resistant spider webs and adhesive to ensure durability and longevity, especially in outdoor settings.
By assembling these essential materials, you will be well-equipped to proceed with the subsequent steps of preparing and attaching the spider webs to the brick surface. With careful preparation and the right tools at your disposal, you are poised to create a captivating and haunting display that will leave a lasting impression on all who behold it.
Step 2: Prepare the spider web
Before attaching the spider web to the brick surface, it is crucial to prepare the web to ensure a seamless and visually appealing application. Proper preparation of the spider web will contribute to a more realistic and captivating effect, enhancing the overall aesthetic of the display. Here's a detailed guide on how to prepare the spider web for attachment:
-
Inspect the Spider Web: Carefully examine the synthetic spider web to identify any irregularities or tangles. Gently unravel the web to ensure it is free from knots and entanglements, allowing it to drape naturally and elegantly once attached to the brick surface.
-
Stretch and Shape: To achieve a lifelike appearance, gently stretch the spider web to create a delicate, intricate pattern reminiscent of natural spider webs. Manipulate the web to form irregular shapes and strands, mimicking the random and asymmetrical nature of authentic spider webs.
-
Trim Excess Material: Using a pair of scissors, trim any excess material from the spider web to achieve the desired size and shape for the intended application. This step allows for customization, enabling you to tailor the spider web to fit specific areas of the brick surface seamlessly.
-
Enhance Realism: For an added touch of authenticity, consider lightly dusting the spider web with a fine layer of gray or black powder to simulate the appearance of accumulated dust and debris. This subtle enhancement contributes to the eerie and weathered look often associated with abandoned spider webs.
-
Test the Appearance: Before proceeding to attach the spider web to the brick, hold it against the surface to assess its appearance and ensure it aligns with your vision. This step allows for adjustments and refinements, guaranteeing that the prepared spider web complements the brick surface harmoniously.
By meticulously preparing the spider web, you set the stage for a captivating and seamless attachment process. Taking the time to refine the appearance and shape of the web will elevate the overall presentation, creating a hauntingly beautiful display that captures the imagination and leaves a lasting impression on all who encounter it.
Step 3: Apply adhesive to the brick
The application of adhesive to the brick surface is a critical step in ensuring the secure attachment of the spider web. Properly applying the adhesive not only facilitates a strong bond but also contributes to the longevity and stability of the display. Here's a detailed guide on how to effectively apply adhesive to the brick:
-
Surface Preparation: Before applying the adhesive, it is essential to prepare the brick surface to promote optimal adhesion. Use a soft-bristled brush or a vacuum cleaner to remove any dirt, dust, or debris from the surface. Ensuring a clean and smooth area for the adhesive application is crucial for achieving a secure and long-lasting bond.
-
Selecting the Adhesive: Choose a high-quality adhesive suitable for outdoor use and capable of adhering to rough surfaces such as brick. Outdoor mounting tape or adhesive putty are recommended options known for their strong bonding properties. It is important to select an adhesive that is weather-resistant and capable of withstanding outdoor conditions if the display will be exposed to the elements.
-
Application Technique: When applying the adhesive to the brick, follow the manufacturer's instructions for the specific product chosen. In the case of adhesive putty, knead it to soften and shape it into a thin strip or small dots. For outdoor mounting tape, carefully cut it to the desired length and shape. Apply the adhesive evenly and sparingly to the areas where the spider web will be attached, ensuring that it covers the surface adequately for a secure bond.
-
Pressing and Securing: Once the adhesive is applied, gently press the spider web against the brick surface, ensuring that it adheres firmly to the treated area. Use a smooth, consistent pressure to secure the web in place, allowing the adhesive to create a strong bond. If using adhesive putty, firmly press and mold it around the edges of the spider web to ensure a secure attachment.
-
Adjustments and Refinements: After attaching the spider web, assess the placement and appearance to make any necessary adjustments. Ensure that the web is positioned as desired and that the adhesive has created a secure bond. If needed, gently reposition the web or make minor refinements to achieve the desired presentation.
By meticulously following these steps and applying the adhesive with precision and care, you will establish a strong and reliable bond between the spider web and the brick surface. This meticulous approach ensures that the spider web remains securely attached, creating a captivating and haunting display that captures the imagination and sets the stage for a truly memorable experience.
Step 4: Attach the spider web to the brick
With the adhesive meticulously applied to the brick surface, it's time to delicately attach the prepared spider web, ensuring a seamless and visually captivating display. The process of attaching the spider web to the brick requires precision and attention to detail to achieve an authentic and haunting effect. Here's a comprehensive guide on how to effectively attach the spider web to the brick:
-
Positioning the Spider Web: Carefully hold the prepared spider web and position it against the treated area of the brick surface. Gently drape the web to create an organic and natural appearance, allowing it to flow and cascade in a visually compelling manner. Take time to assess the positioning, ensuring that the web aligns with your vision for the overall display.
-
Smooth Application: Once the spider web is positioned, gently smooth it against the brick surface to ensure a secure attachment. Use light, consistent pressure to press the web against the adhesive, allowing it to adhere firmly without distorting its delicate appearance. Smooth out any wrinkles or irregularities, ensuring a seamless integration with the brick surface.
-
Customization and Layering: For a more dynamic and realistic effect, consider customizing the placement of the spider web by layering it in strategic areas. Create depth and dimension by overlapping sections of the web, mimicking the intricate and complex nature of natural spider webs. This layering technique adds visual interest and depth to the display, enhancing its overall allure.
-
Refinements and Adjustments: As you attach the spider web, periodically step back to assess its appearance from a distance. Make any necessary refinements or adjustments to ensure that the web complements the brick surface harmoniously. Fine-tune the positioning and shape of the web, ensuring that it evokes the desired atmosphere and captivates onlookers with its eerie elegance.
-
Securing the Edges: Pay particular attention to securing the edges of the spider web to the brick surface. Ensure that all sections of the web are firmly attached, preventing any loose or dangling portions that may detract from the overall presentation. By securing the edges with precision, you guarantee a polished and professional finish.
By meticulously following these steps and delicately attaching the spider web to the brick, you will create a visually stunning and haunting display that captures the imagination and sets the stage for a truly memorable experience. The seamless integration of the spider web with the rugged texture of the brick surface evokes an air of mystery and intrigue, leaving a lasting impression on all who encounter this captivating display.
Step 5: Allow the adhesive to dry
After delicately attaching the spider web to the brick surface, it is imperative to allow the adhesive to thoroughly dry to ensure a secure and long-lasting bond. The drying process is a crucial final step that contributes to the stability and durability of the display, ensuring that the spider web remains firmly attached to the brick. Here's a detailed guide on the importance of allowing the adhesive to dry and the best practices for this essential phase:
Importance of Drying
The drying phase is essential as it allows the adhesive to form a strong and resilient bond between the spider web and the brick surface. During this time, the adhesive undergoes a curing process, gradually solidifying and creating a secure attachment. Allowing the adhesive to dry completely is crucial for ensuring that the spider web remains in place, especially in outdoor settings where it may be exposed to varying weather conditions.
Optimal Drying Time
The optimal drying time for the adhesive largely depends on the specific product used and the prevailing environmental conditions. It is advisable to refer to the manufacturer's instructions to determine the recommended drying time for the chosen adhesive. In general, outdoor adhesives may require several hours to fully cure, while some products may necessitate overnight drying for maximum effectiveness.
Avoiding Disturbance
During the drying period, it is important to avoid any disturbance to the attached spider web. Refrain from touching or manipulating the web, as this could compromise the adhesive's bonding process. Additionally, minimize exposure to external elements such as wind, rain, or excessive sunlight, which may impede the drying process or affect the integrity of the bond.
Read more: How To Attach Downspout To Brick
Visual Inspection
After the designated drying period, visually inspect the attached spider web to ensure that the adhesive has fully dried and formed a secure bond. Check for any signs of looseness or instability, and gently test the web to confirm its firm attachment to the brick surface. If the adhesive has dried adequately, the spider web should remain in place without any shifting or detachment.
Final Touches
Once the adhesive has thoroughly dried and the spider web is securely attached, take the opportunity to make any final adjustments or refinements to the display. Ensure that the web is positioned to your satisfaction and that it complements the brick surface harmoniously. With the adhesive fully cured, the spider web is now poised to captivate onlookers with its eerie elegance and haunting allure.
By allowing the adhesive to dry completely, you ensure the longevity and stability of the attached spider web, creating a captivating and visually striking display that sets the stage for a truly memorable experience. This final step solidifies the seamless integration of the spider web with the rugged texture of the brick surface, leaving a lasting impression on all who encounter this hauntingly beautiful creation.
Use a hot glue gun to attach spider web to brick. The hot glue will adhere the web securely to the rough surface of the brick without damaging it.
Conclusion
In conclusion, mastering the art of attaching spider webs to brick surfaces offers a captivating and visually striking way to evoke an air of mystery and intrigue. By following the comprehensive steps outlined in this guide, you have gained the knowledge and confidence to seamlessly integrate spider webs into brick surfaces, creating hauntingly beautiful displays that leave a lasting impression.
The process begins with gathering the necessary materials, including high-quality synthetic spider webs, reliable adhesive suitable for outdoor use, cleaning supplies, protective gloves, scissors, a step ladder (if needed), and weather-resistant options for outdoor settings. With these essential tools at your disposal, you are well-prepared to embark on the journey of transforming brick surfaces into captivating canvases for eerie elegance.
Preparing the spider web is a meticulous yet rewarding endeavor, involving careful inspection, stretching and shaping, trimming excess material, and enhancing realism with subtle touches. This preparation sets the stage for a seamless and visually appealing attachment to the brick surface, ensuring that the spider web drapes naturally and evokes an authentic and captivating effect.
The application of adhesive to the brick is a critical step that demands precision and attention to detail. By meticulously preparing the surface, selecting the appropriate adhesive, and applying it with care, you establish a strong and reliable bond that ensures the secure attachment of the spider web. This meticulous approach contributes to the longevity and stability of the display, especially in outdoor settings where exposure to the elements requires durable and weather-resistant solutions.
Delicately attaching the spider web to the brick is a transformative process that requires finesse and creativity. By positioning the web, smoothing its application, customizing and layering strategically, and securing the edges with precision, you bring the hauntingly beautiful display to life. The seamless integration of the spider web with the rugged texture of the brick surface evokes an air of mystery and leaves a lasting impression on all who encounter this captivating creation.
Finally, allowing the adhesive to dry thoroughly is the essential final step that solidifies the longevity and stability of the attached spider web. By understanding the importance of the drying process, adhering to optimal drying times, avoiding disturbance, visually inspecting the attachment, and making final refinements, you ensure that the display is poised to captivate onlookers with its eerie elegance and haunting allure.
In mastering the art of attaching spider webs to brick, you have unlocked the potential to create captivating and visually striking displays that set the stage for a truly memorable experience. Whether transforming your home into a haunted mansion for a Halloween party or setting the scene for a spine-tingling theatrical performance, the seamless integration of spider webs with brick surfaces offers a captivating way to captivate the imagination and leave a lasting impression.
Frequently Asked Questions about How To Attach Spider Web To Brick
Was this page helpful?
At Storables.com, we guarantee accurate and reliable information. Our content, validated by Expert Board Contributors, is crafted following stringent Editorial Policies. We're committed to providing you with well-researched, expert-backed insights for all your informational needs.


0 thoughts on “How To Attach Spider Web To Brick”