Home>Furniture & Design>Bathroom Accessories>How To Remove A Bathtub Spout
Bathroom Accessories
How To Remove A Bathtub Spout
Modified: March 2, 2024
Learn how to remove a bathtub spout easily with our step-by-step guide. Upgrade your bathroom accessories hassle-free.
(Many of the links in this article redirect to a specific reviewed product. Your purchase of these products through affiliate links helps to generate commission for Storables.com, at no extra cost. Learn more)
Introduction
Removing a bathtub spout may seem like a daunting task, but with the right tools and a clear understanding of the process, it can be a manageable DIY project. Whether you're looking to replace a worn-out spout or upgrade to a new style, knowing how to remove a bathtub spout is a valuable skill for any homeowner. By following a few simple steps, you can successfully remove the old spout and prepare for the installation of a new one.
In this guide, we'll walk you through the process of removing a bathtub spout, providing detailed instructions and tips to help you complete the task with confidence. From gathering the necessary tools to cleaning the pipe and installing the new spout, each step is crucial to ensuring a successful and seamless removal process. So, roll up your sleeves, gather your tools, and let's get started on this DIY adventure!
Key Takeaways:
- Removing a bathtub spout is a manageable DIY project with the right tools and precautions. From turning off the water supply to installing the new spout, each step is crucial for a successful removal process.
- By following the detailed steps and gathering the necessary tools, you can confidently remove and replace a bathtub spout. This DIY project enhances your home maintenance skills and empowers you for future tasks.
Read more: How To Remove An Old Bathtub Spout
Step 1: Gather the necessary tools
Before embarking on the task of removing a bathtub spout, it's essential to gather the necessary tools to ensure a smooth and efficient process. Here's a list of tools you'll need:
-
Adjustable Wrench: This versatile tool will be used to loosen and remove the spout, providing a secure grip for twisting and pulling.
-
Screwdriver: Depending on the type of spout, you may need a flathead or Phillips screwdriver to remove any set screws securing the spout to the pipe.
-
Pipe Brush or Emery Cloth: To clean the pipe and ensure a smooth surface for the new spout installation, a pipe brush or emery cloth will come in handy.
-
Plumber's Tape: Also known as Teflon tape, this thin white tape is used to create a watertight seal when installing the new spout.
-
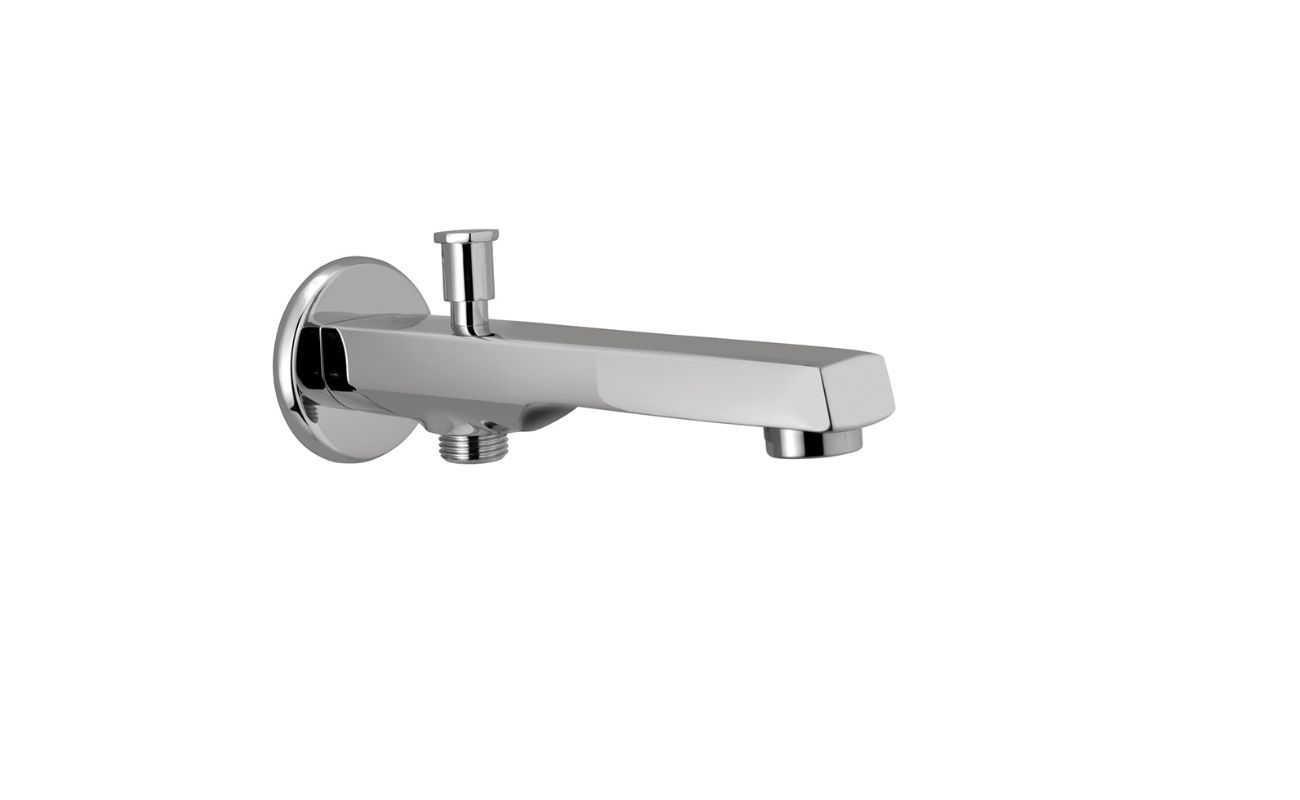
New Bathtub Spout: If you're planning to replace the old spout with a new one, make sure to have the new spout on hand before beginning the removal process.
-
Towels or Rags: Having towels or rags nearby will help to clean up any water that may drip during the removal process, keeping your work area dry and tidy.
-
Flashlight: In some cases, the area around the spout may be dimly lit, making it challenging to see the set screw or other components. A flashlight will help illuminate the area for better visibility.
-
Safety Glasses: While removing the spout, it's important to protect your eyes from any debris or water splashes. Safety glasses will provide an extra layer of protection during the removal process.
By ensuring that you have all these tools at your disposal, you'll be well-prepared to tackle the task of removing the bathtub spout. With the right tools in hand, you can proceed to the next step with confidence, knowing that you're equipped to handle the removal process effectively.
Step 2: Turn off the water supply
Before you begin the process of removing the bathtub spout, it is crucial to turn off the water supply to the bathtub. This step is essential to prevent any water leakage or unexpected spraying during the removal process. Here's how to turn off the water supply:
-
Locate the Water Shut-Off Valve: The water shut-off valve for the bathtub is typically located near the tub or in the basement or utility area of the house. It may be a lever-style valve or a knob that needs to be turned clockwise to shut off the water flow.
-
Shut Off the Water Supply: Once you've located the shut-off valve, turn it clockwise to shut off the water supply to the bathtub. It's important to verify that the water flow has stopped by turning on the bathtub faucet to ensure no water is coming out.
-
Release Any Pressure: After turning off the water supply, it's a good practice to release any remaining pressure in the water lines. You can do this by turning on the bathtub faucet and allowing any residual water to drain out.
By turning off the water supply and releasing any remaining pressure, you'll create a safe and controlled environment for the spout removal process. This precautionary measure helps to minimize the risk of water leakage and ensures a smooth and hassle-free removal experience.
With the water supply safely turned off, you can proceed to the next step with confidence, knowing that you've taken the necessary precautions to prepare for the bathtub spout removal.
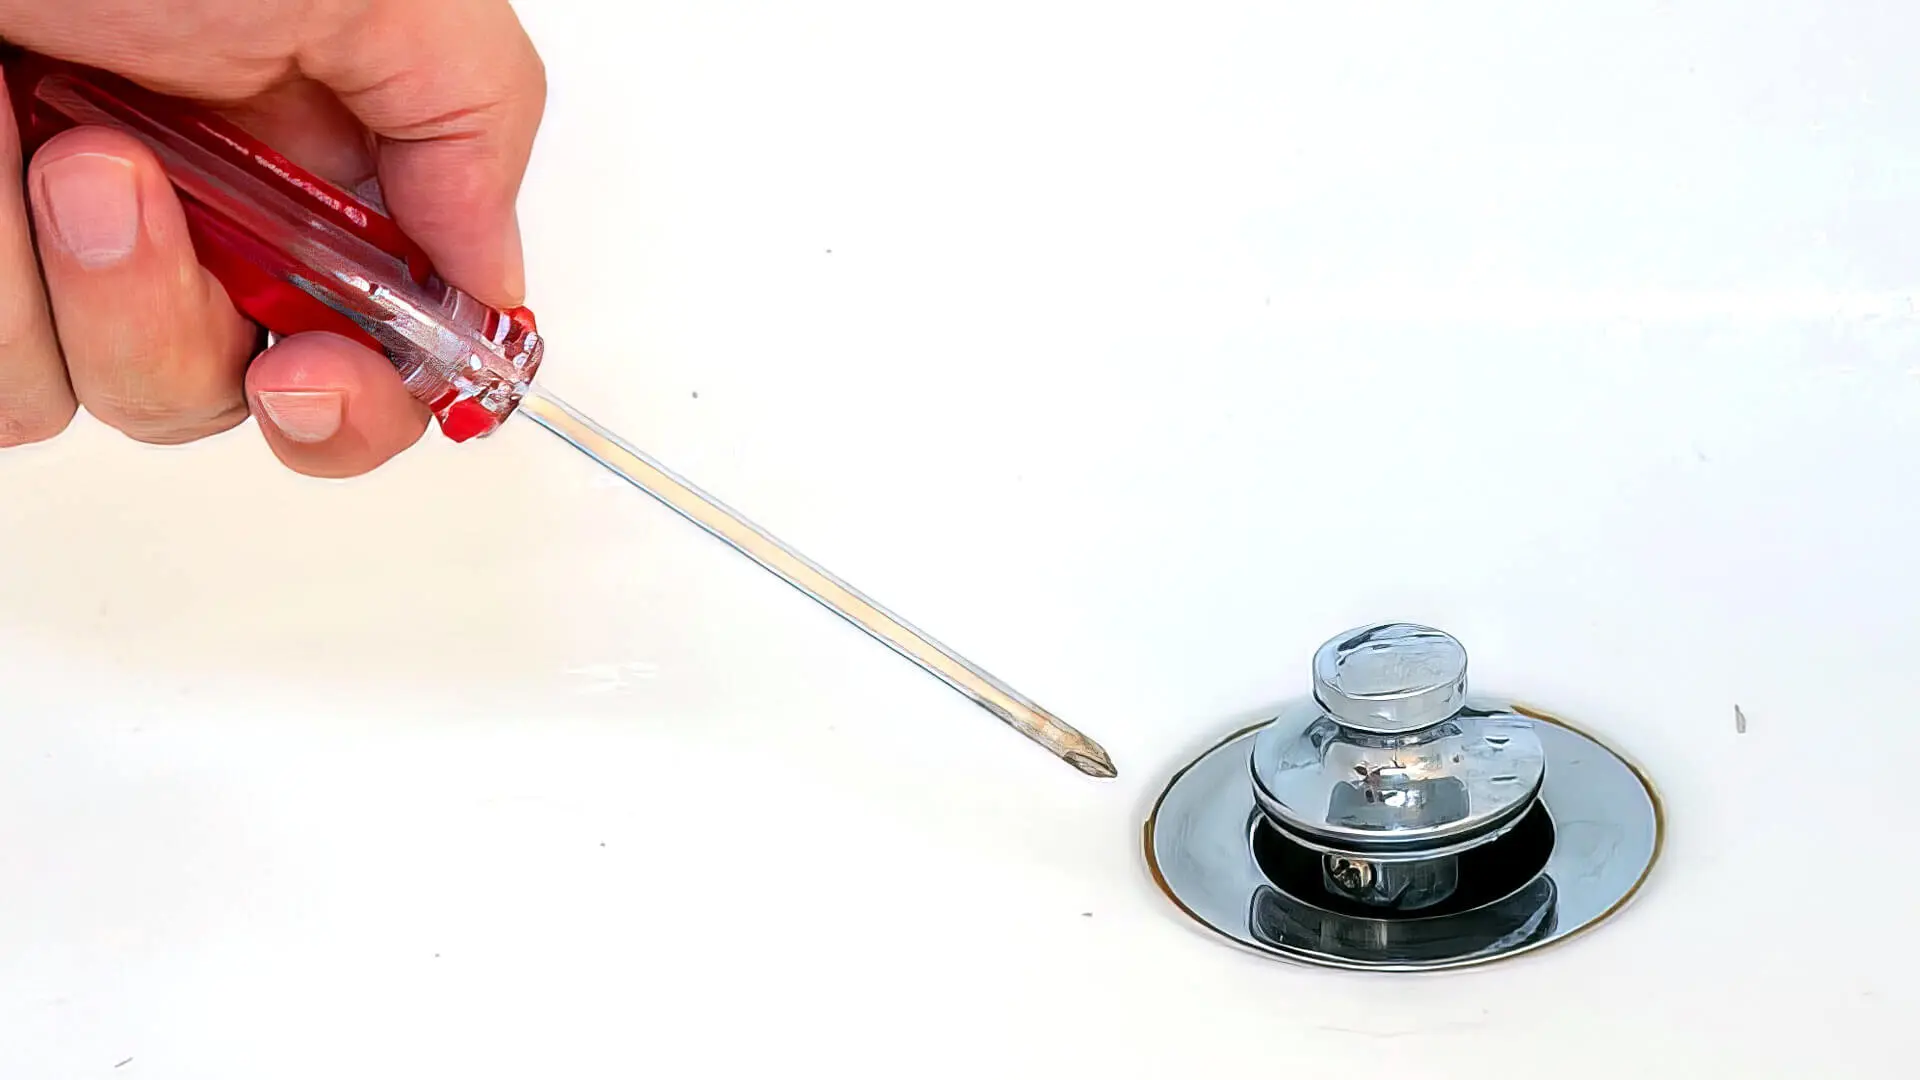
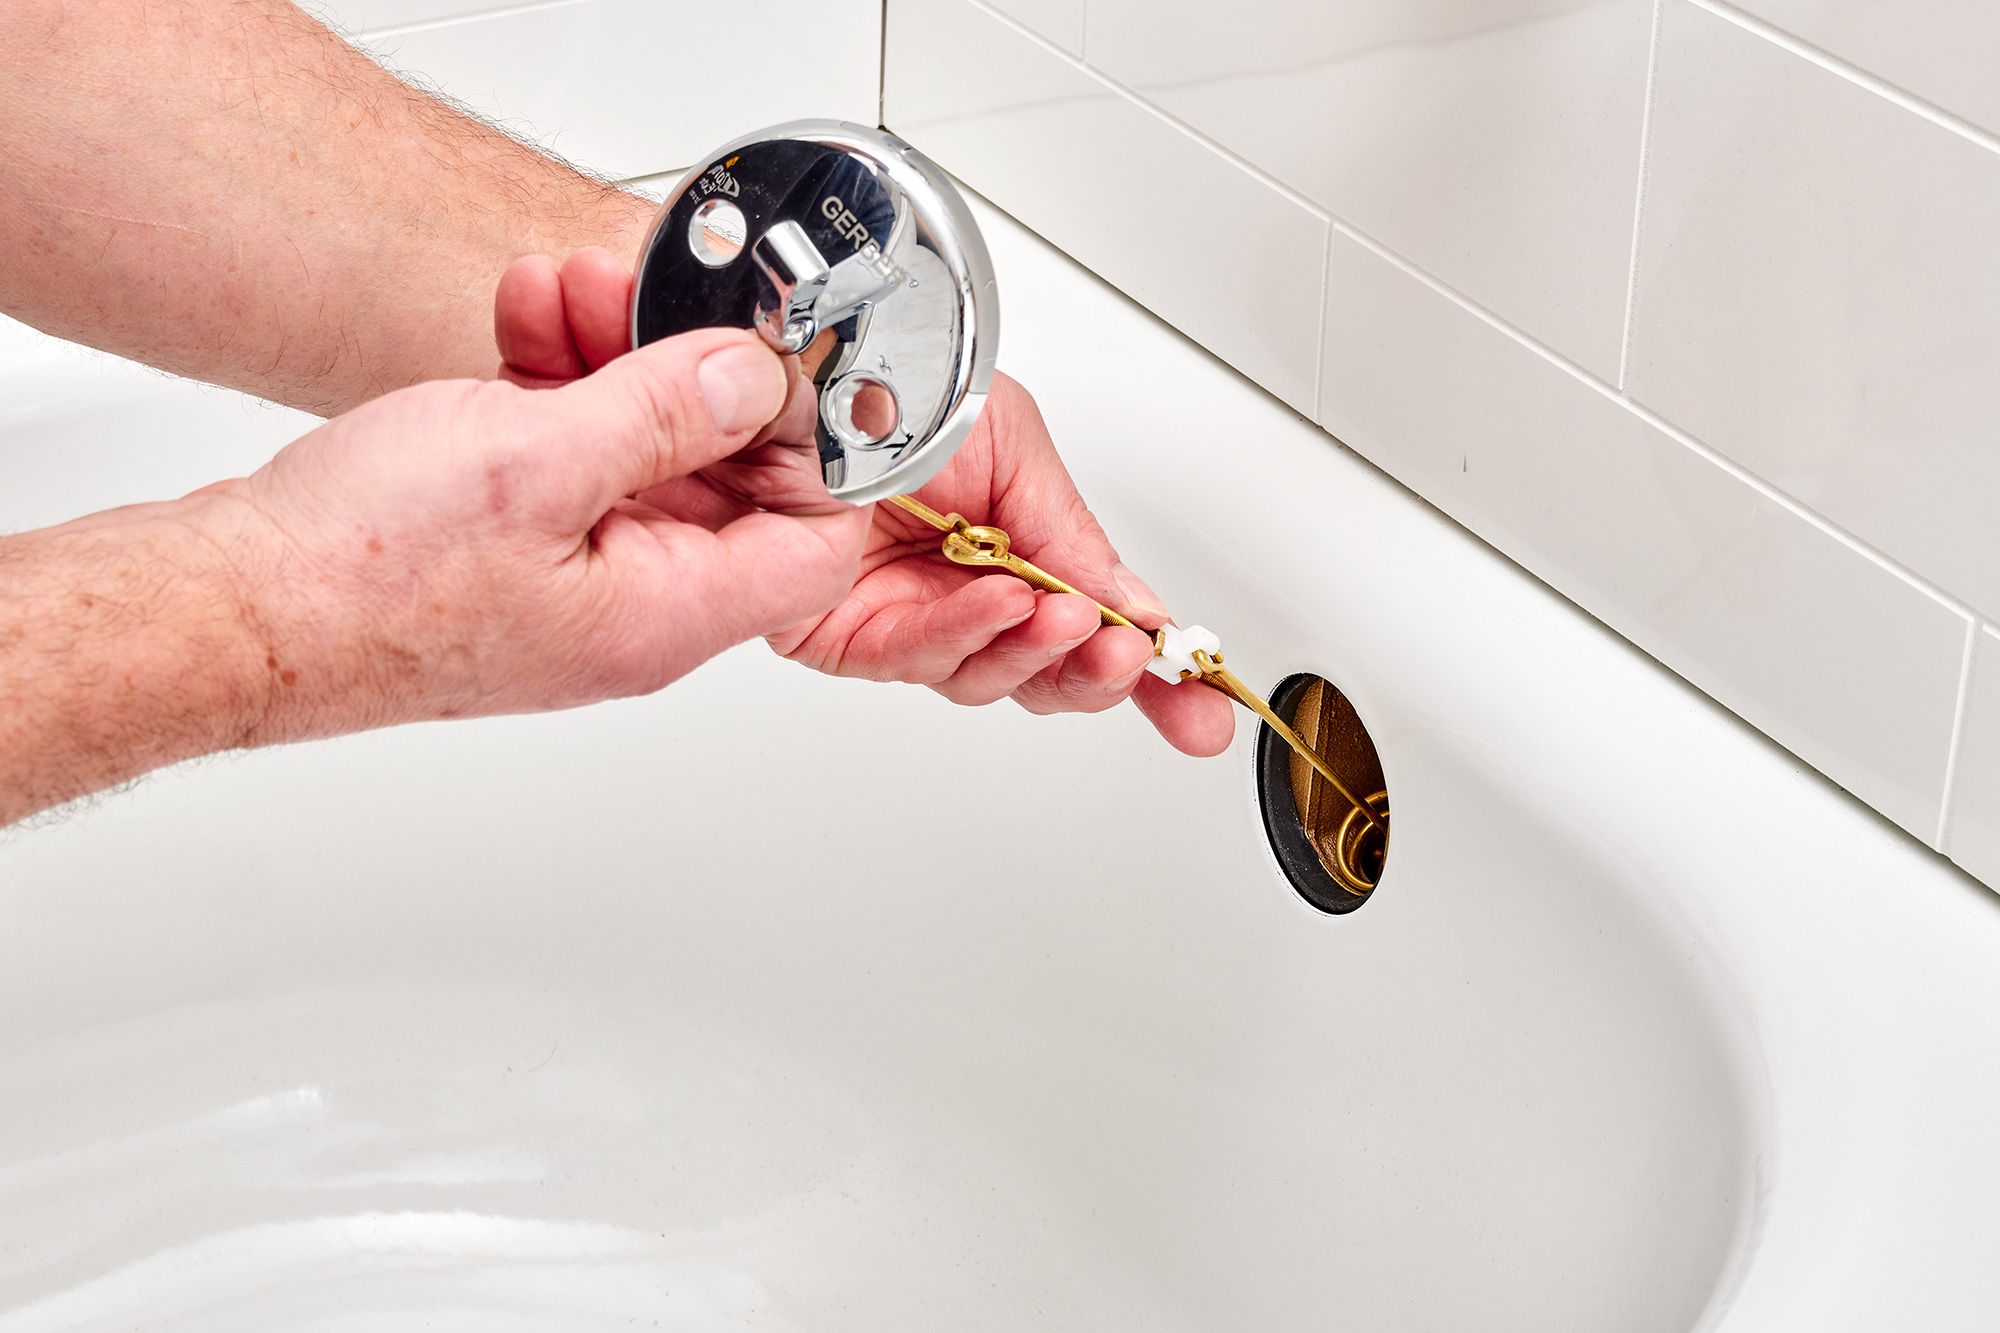
Step 3: Remove the set screw
With the water supply turned off and the necessary tools at hand, you're ready to delve into the process of removing the bathtub spout. The next crucial step involves locating and removing the set screw that secures the spout to the pipe. Here's a detailed guide on how to accomplish this task effectively.
-
Locate the Set Screw: Depending on the design of the bathtub spout, the set screw may be located near the base of the spout or underneath a cover plate. Use a flashlight to illuminate the area and carefully inspect the spout for the set screw. In some cases, the set screw may be concealed beneath a small cap that can be pried off using a flathead screwdriver.
-
Use the Screwdriver: Once you've located the set screw, use the appropriate screwdriver (flathead or Phillips) to loosen and remove it. Apply gentle but firm pressure to turn the screw counterclockwise, ensuring that you have a secure grip on the screwdriver to prevent slipping. If the set screw has accumulated dirt or debris, use a pipe brush or a small tool to clean the area around the screw before attempting to remove it.
-
Set Screw Removal: As you unscrew the set screw, be mindful of keeping it in a safe place, as it will be needed when installing the new spout. Once the set screw is fully removed, set it aside in a designated container or on a clean surface to prevent misplacement.
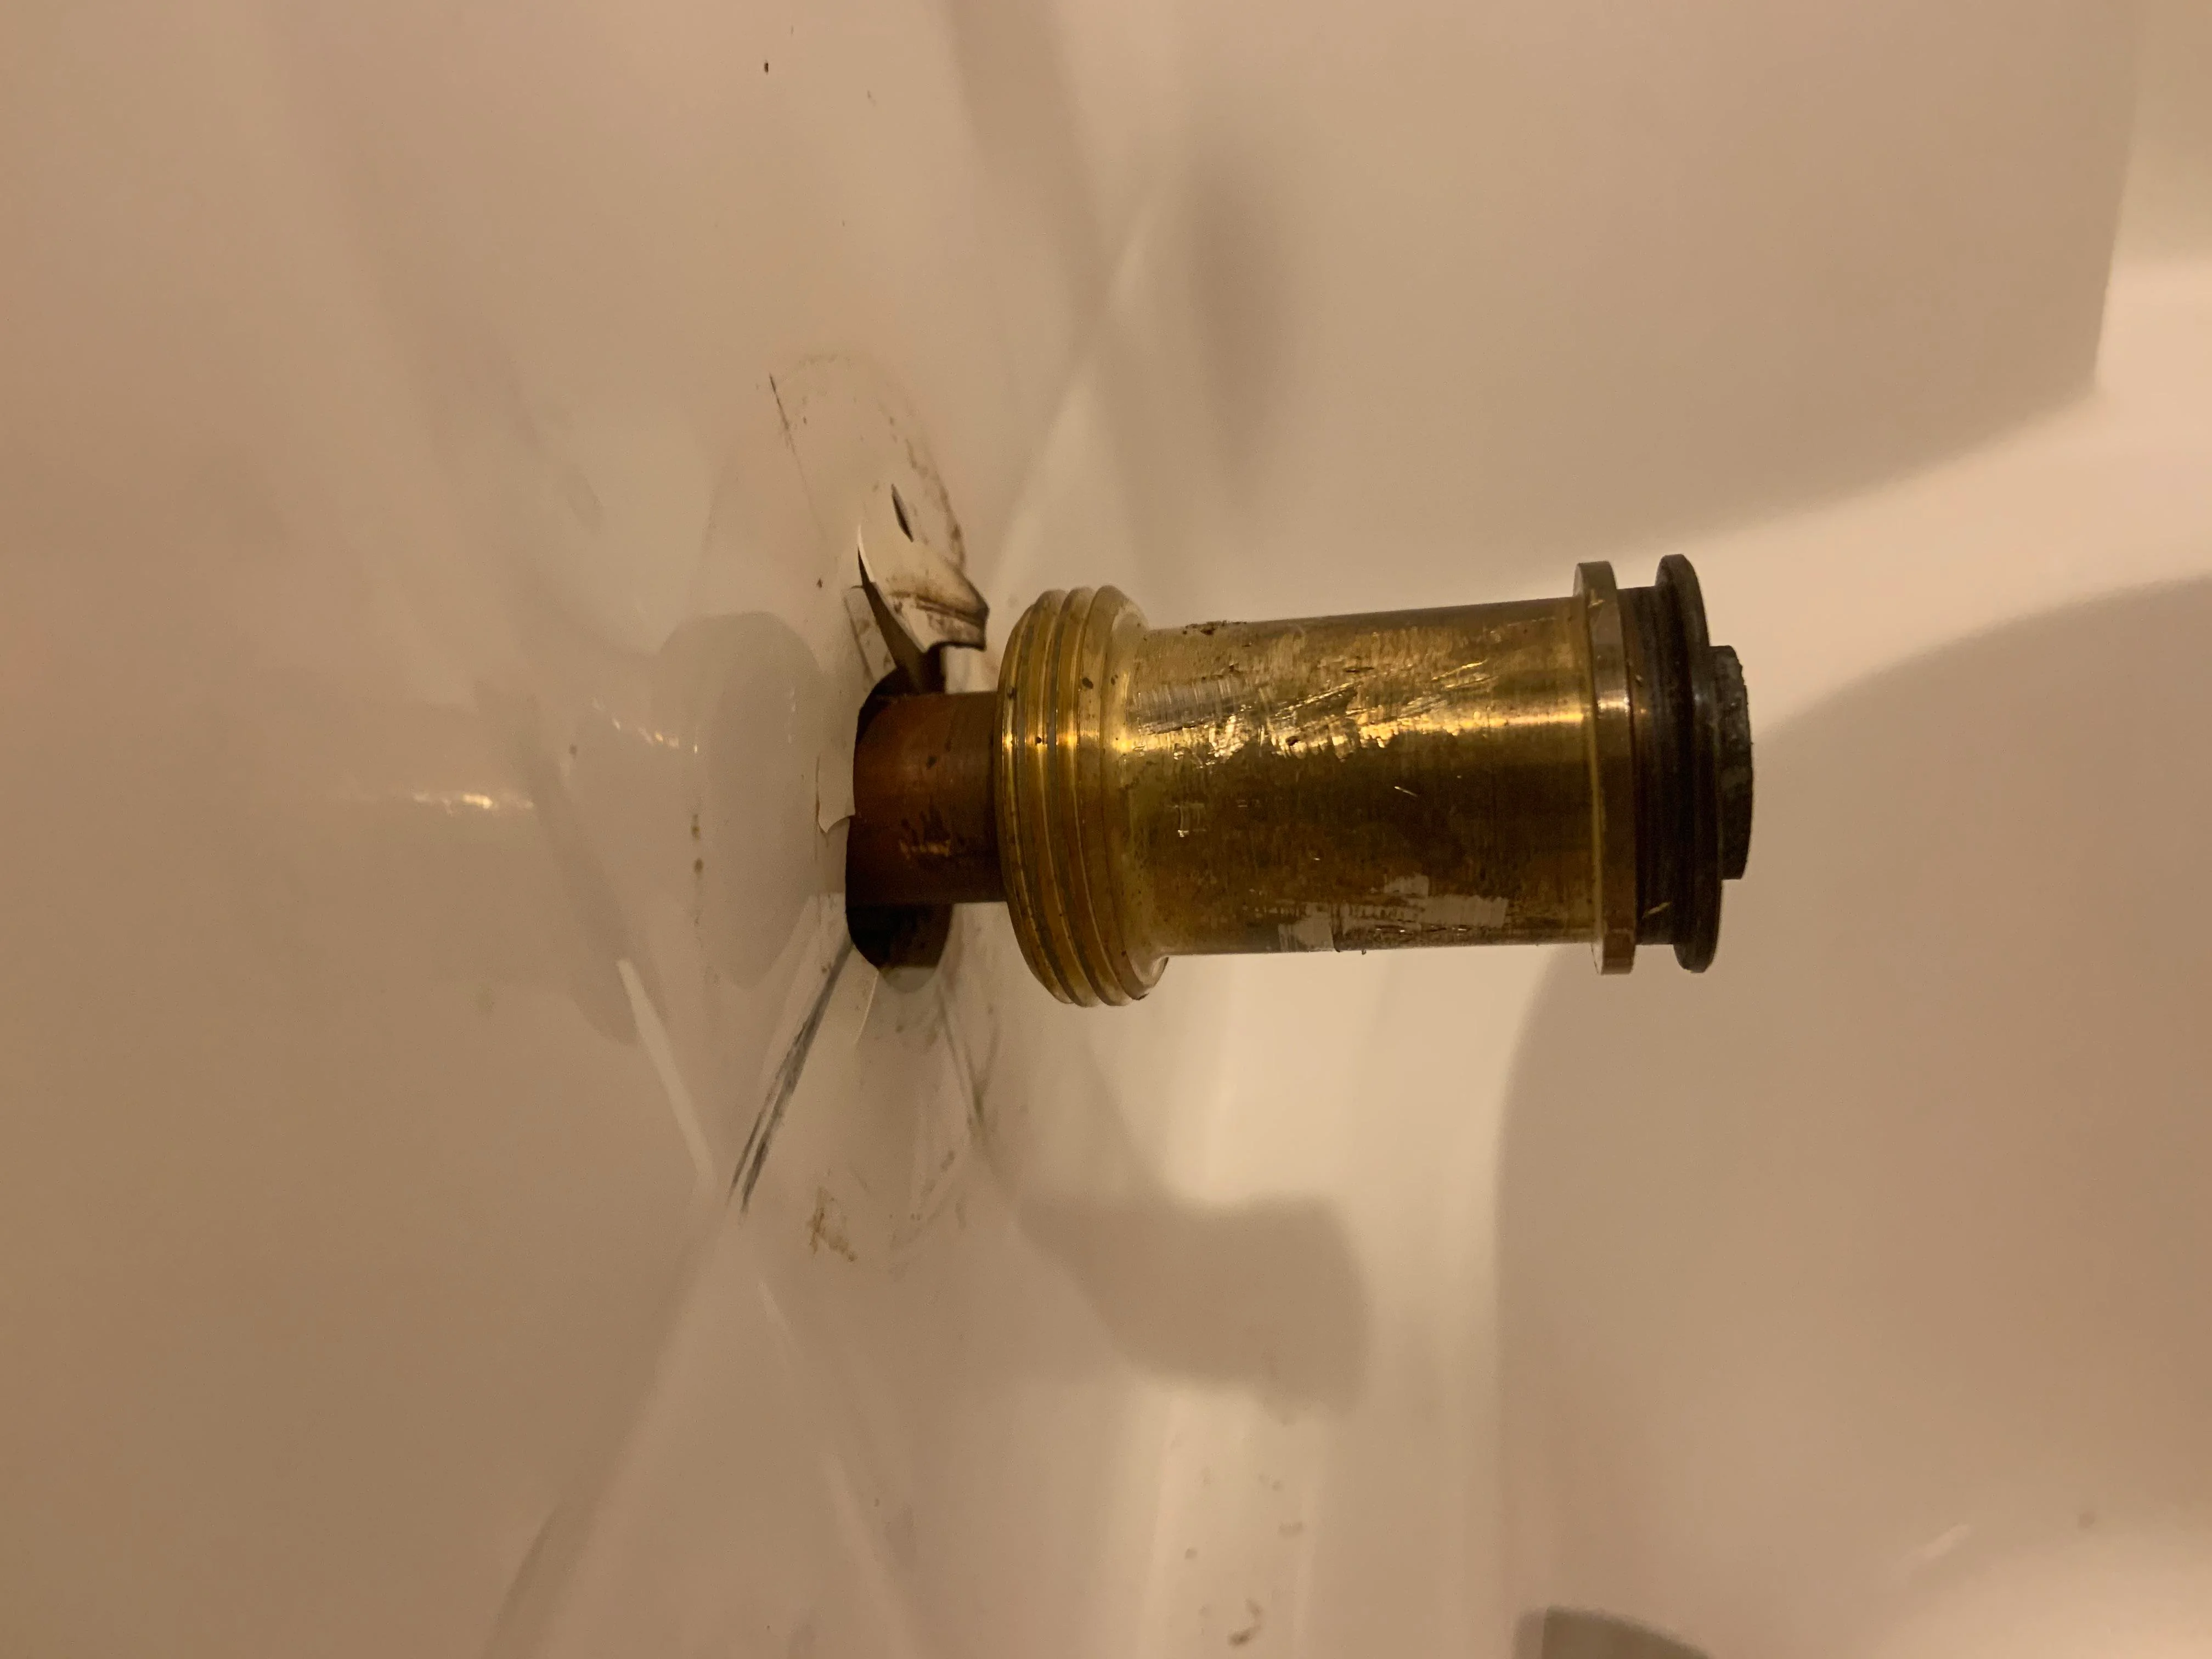
-
Inspect the Spout: With the set screw removed, carefully inspect the spout to ensure that it is now free from any securing mechanisms. Depending on the spout's design, it may simply twist off or require additional steps for removal.
By successfully removing the set screw, you've completed a critical phase of the bathtub spout removal process. This accomplishment brings you one step closer to seamlessly removing the old spout and preparing for the installation of a new one. With the set screw safely removed, you can proceed to the next step with confidence, knowing that you've navigated this essential phase of the removal process with precision and skill.
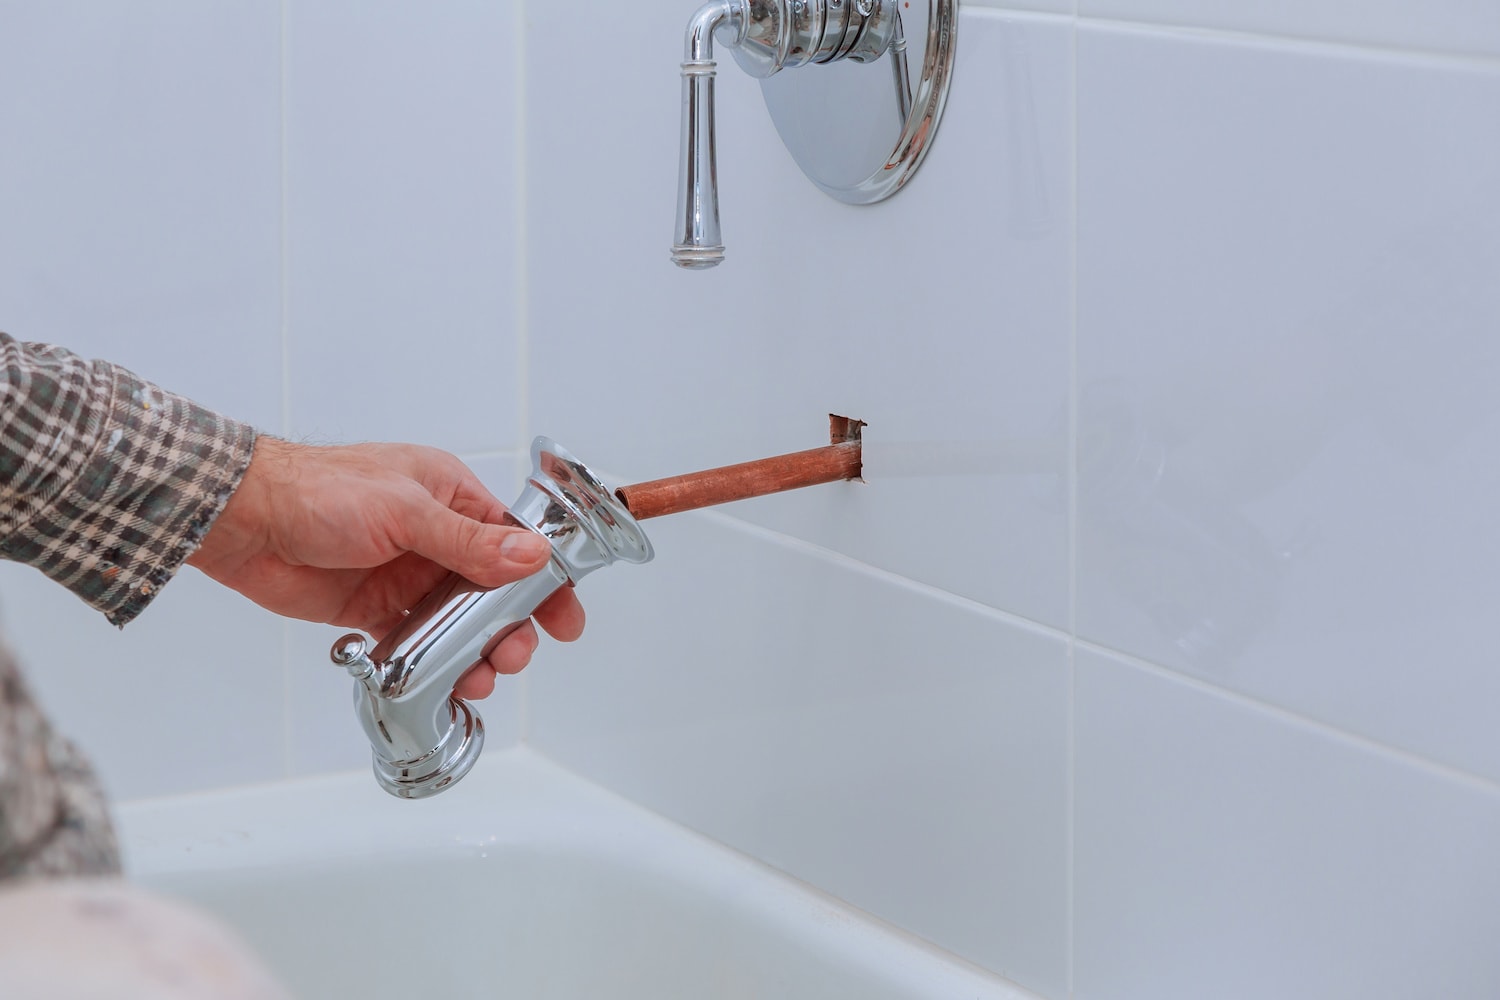
Step 4: Twist and pull the spout
With the set screw successfully removed, the next step in removing the bathtub spout involves twisting and pulling the spout to detach it from the pipe. This phase of the process requires careful maneuvering and a steady hand to ensure that the spout is separated without causing damage to the surrounding fixtures. Here's a detailed guide on how to execute this step effectively.
-
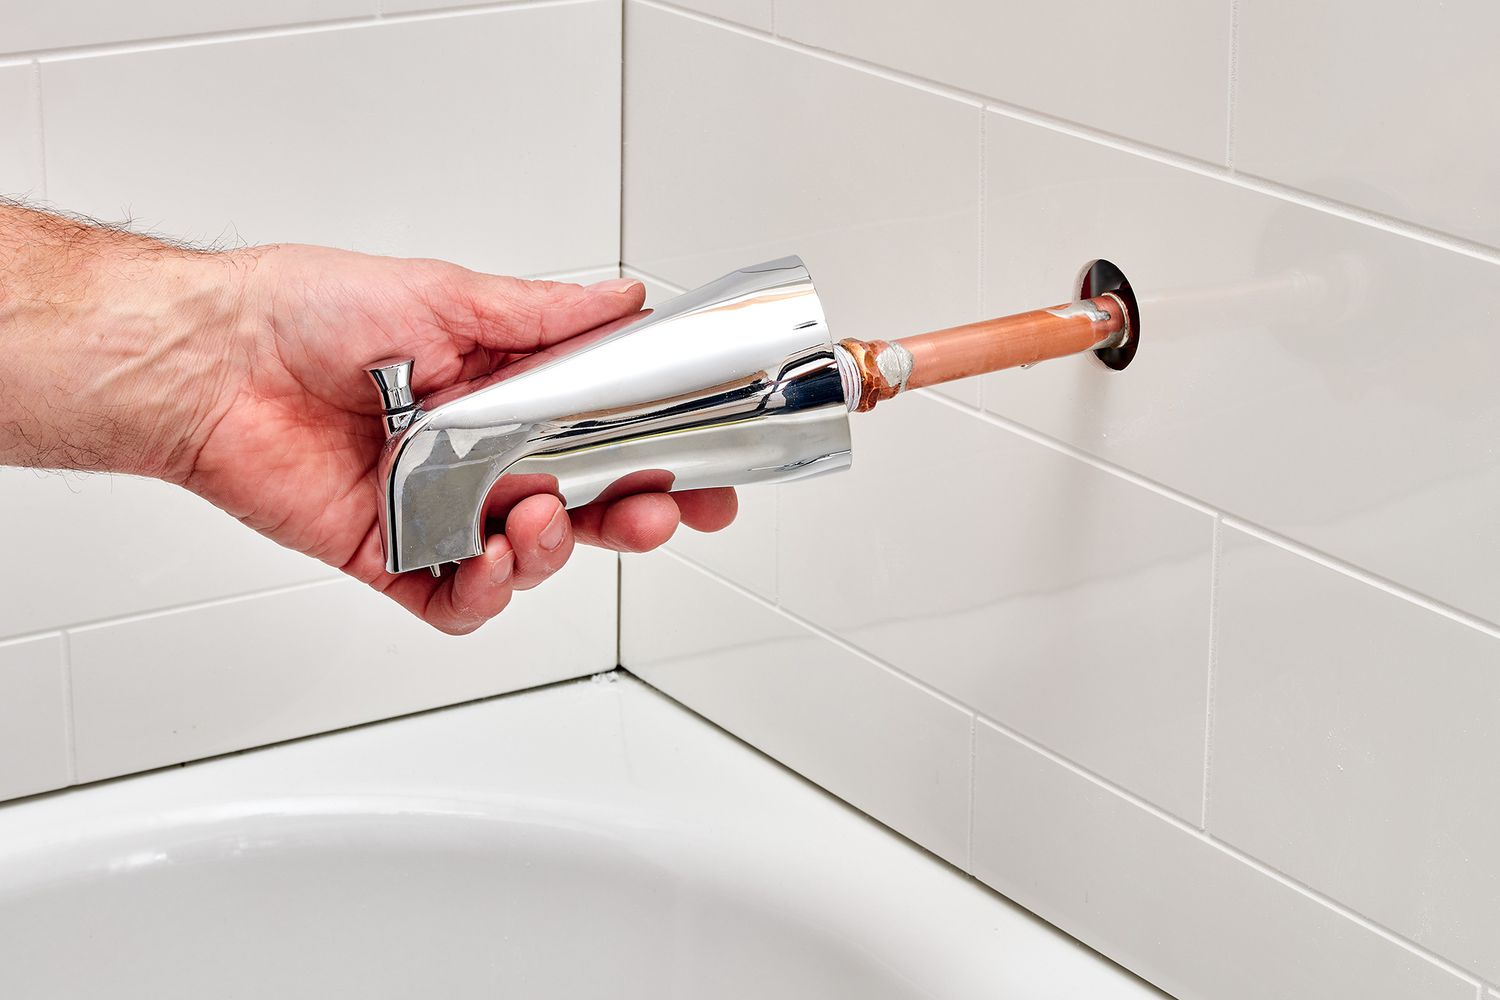
Twisting the Spout: Depending on the type of spout, it may have a threaded connection or a slip-fit design. If the spout is threaded, grip it firmly and begin twisting it counterclockwise. Apply steady but controlled force, being mindful of any resistance. In the case of a slip-fit spout, it may require a gentle wiggle or rotation to loosen it from the pipe.
-
Pulling the Spout: Once the spout has been sufficiently twisted, it's time to pull it away from the wall. Use a firm and even pulling motion, taking care not to exert excessive force that could potentially damage the pipe or surrounding tiles. If the spout seems stubborn, consider using a spout puller tool to aid in the removal process.
-
Inspecting for Debris: As the spout is removed, take a moment to inspect the interior of the spout and the exposed pipe for any accumulated debris or mineral deposits. Use a flashlight to illuminate the area and a pipe brush to gently clean the pipe's exterior, ensuring that the surface is smooth and free from any obstructions.
-
Discarding the Old Spout: Once the old spout has been successfully removed, set it aside in a designated area for disposal. If you're planning to recycle the spout, consider checking local recycling guidelines for proper disposal methods.
By effectively twisting and pulling the spout, you've completed a crucial phase of the removal process, bringing you closer to the successful installation of a new spout. With the old spout safely detached, you can proceed to the next step with confidence, knowing that you've navigated this essential phase of the removal process with precision and skill.
Use a pipe wrench to grip the base of the spout and turn it counterclockwise to unscrew it from the pipe. If it’s stuck, use penetrating oil to loosen it.
Read more: Bathtub Spout Leaking When Shower Is On
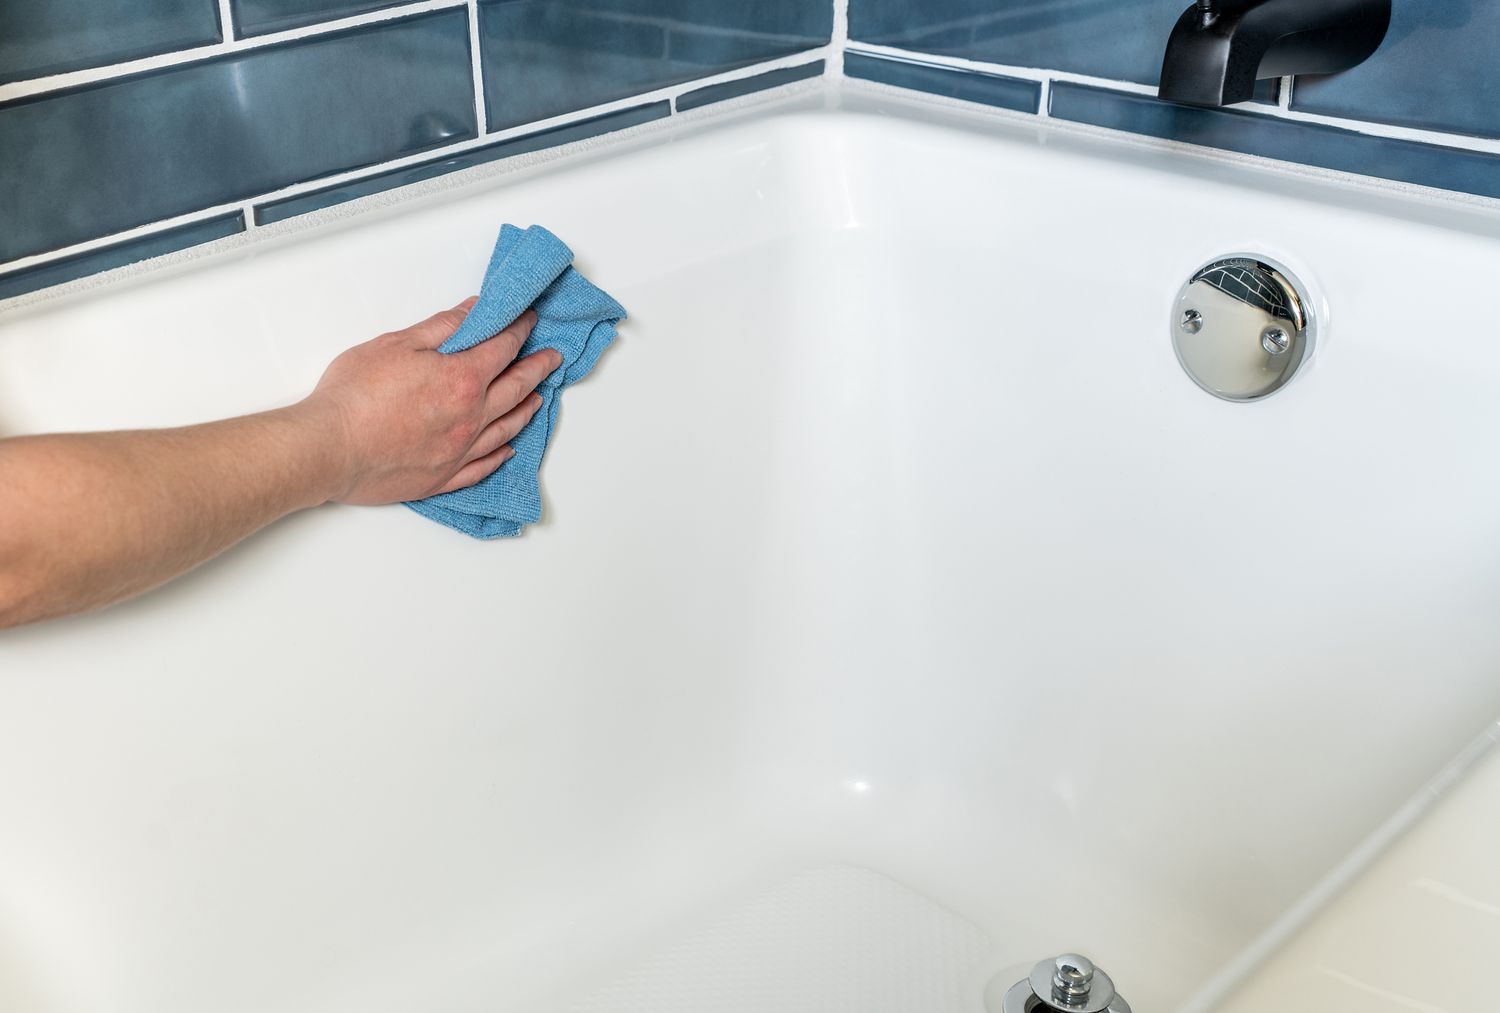
Step 5: Clean the pipe and install the new spout
With the old spout successfully removed, the next critical step involves preparing the pipe for the installation of the new bathtub spout. This phase of the process focuses on cleaning the pipe and ensuring that it is free from any debris or mineral buildup that could impede the proper installation of the new spout. Additionally, this step encompasses the careful installation of the new spout, ensuring a secure and watertight fit for optimal functionality.
Cleaning the Pipe
-
Inspecting the Pipe: Before proceeding with the cleaning process, take a moment to inspect the exposed pipe for any signs of corrosion, mineral deposits, or damage. Use a flashlight to illuminate the area and carefully examine the pipe's surface for any irregularities.
-
Using a Pipe Brush or Emery Cloth: To clean the pipe and remove any accumulated debris or mineral deposits, use a pipe brush or emery cloth. Gently scrub the exterior of the pipe, paying close attention to areas where the old spout was attached. This step is crucial to ensure a smooth and clean surface for the new spout installation.
-
Clearing the Pipe Opening: After cleaning the pipe's exterior, use a small tool or pipe brush to clear any debris or obstructions from the opening where the spout will be installed. It's essential to ensure that the opening is free from any impediments that could hinder the new spout's proper fit.
Installing the New Spout
-
Applying Plumber's Tape: Before installing the new spout, wrap the threaded end with plumber's tape (Teflon tape) to create a watertight seal. This step is crucial to prevent any potential leaks and ensure a secure connection between the spout and the pipe.
-
Aligning the Spout: Carefully align the new spout with the pipe opening, ensuring that it is positioned correctly for a snug fit. Depending on the spout's design, it may feature a threaded connection or a slip-fit installation. Follow the manufacturer's instructions to ensure proper alignment and installation.
-
Securing the Spout: Once the new spout is aligned, begin twisting it clockwise to secure it onto the pipe. Use an adjustable wrench to provide a firm grip and ensure that the spout is tightened securely. Be mindful not to overtighten, as this could potentially damage the spout or the pipe.
-
Verifying the Fit: After installing the new spout, turn on the water supply and test the spout for any signs of leakage or improper fit. Check for any water drips or irregularities around the spout, and ensure that it is functioning as intended.
By meticulously cleaning the pipe and installing the new spout, you've completed the final phase of the bathtub spout removal and replacement process. With the new spout securely in place, you can now enjoy the satisfaction of a successfully completed DIY project, bringing a fresh and functional upgrade to your bathroom.
Conclusion
Congratulations on successfully completing the process of removing a bathtub spout! By following the detailed steps outlined in this guide, you've gained valuable insights and practical skills that empower you to tackle DIY plumbing projects with confidence. As you reflect on the journey from gathering the necessary tools to installing the new spout, it's evident that your dedication and attention to detail have resulted in a job well done.
The removal of a bathtub spout is not only a practical task but also a rewarding accomplishment that enhances your home maintenance capabilities. As you navigated through each step, from turning off the water supply to carefully cleaning the pipe and installing the new spout, you've demonstrated a commendable commitment to precision and thoroughness. Your proactive approach to gathering the essential tools and taking the necessary precautions reflects a commendable dedication to ensuring a seamless and successful removal process.
Furthermore, the knowledge and experience gained from this endeavor serve as a foundation for future DIY projects, empowering you to take on new challenges with confidence. Whether it's replacing other bathroom fixtures, addressing plumbing maintenance tasks, or embarking on home improvement projects, the skills acquired through the removal of the bathtub spout position you as a capable and resourceful homeowner.
As you admire the newly installed spout, take pride in the fact that you've not only accomplished a practical goal but also enriched your understanding of household plumbing systems. The confidence and satisfaction derived from completing this project are invaluable, underscoring your ability to proactively address home maintenance needs and make meaningful enhancements to your living space.
In closing, the successful removal and replacement of the bathtub spout exemplify your commitment to maintaining a functional and aesthetically pleasing home environment. Your willingness to engage in hands-on projects and expand your skill set reflects a proactive and resourceful approach to homeownership. As you continue to explore new opportunities for home improvement and maintenance, remember that the knowledge and expertise gained from this experience will serve as a valuable asset in your journey as a capable and empowered homeowner.
Frequently Asked Questions about How To Remove A Bathtub Spout
Was this page helpful?
At Storables.com, we guarantee accurate and reliable information. Our content, validated by Expert Board Contributors, is crafted following stringent Editorial Policies. We're committed to providing you with well-researched, expert-backed insights for all your informational needs.


0 thoughts on “How To Remove A Bathtub Spout”