Home>Furniture & Design>Bathroom Accessories>How To Replace A Bathtub In A Mobile Home
Bathroom Accessories
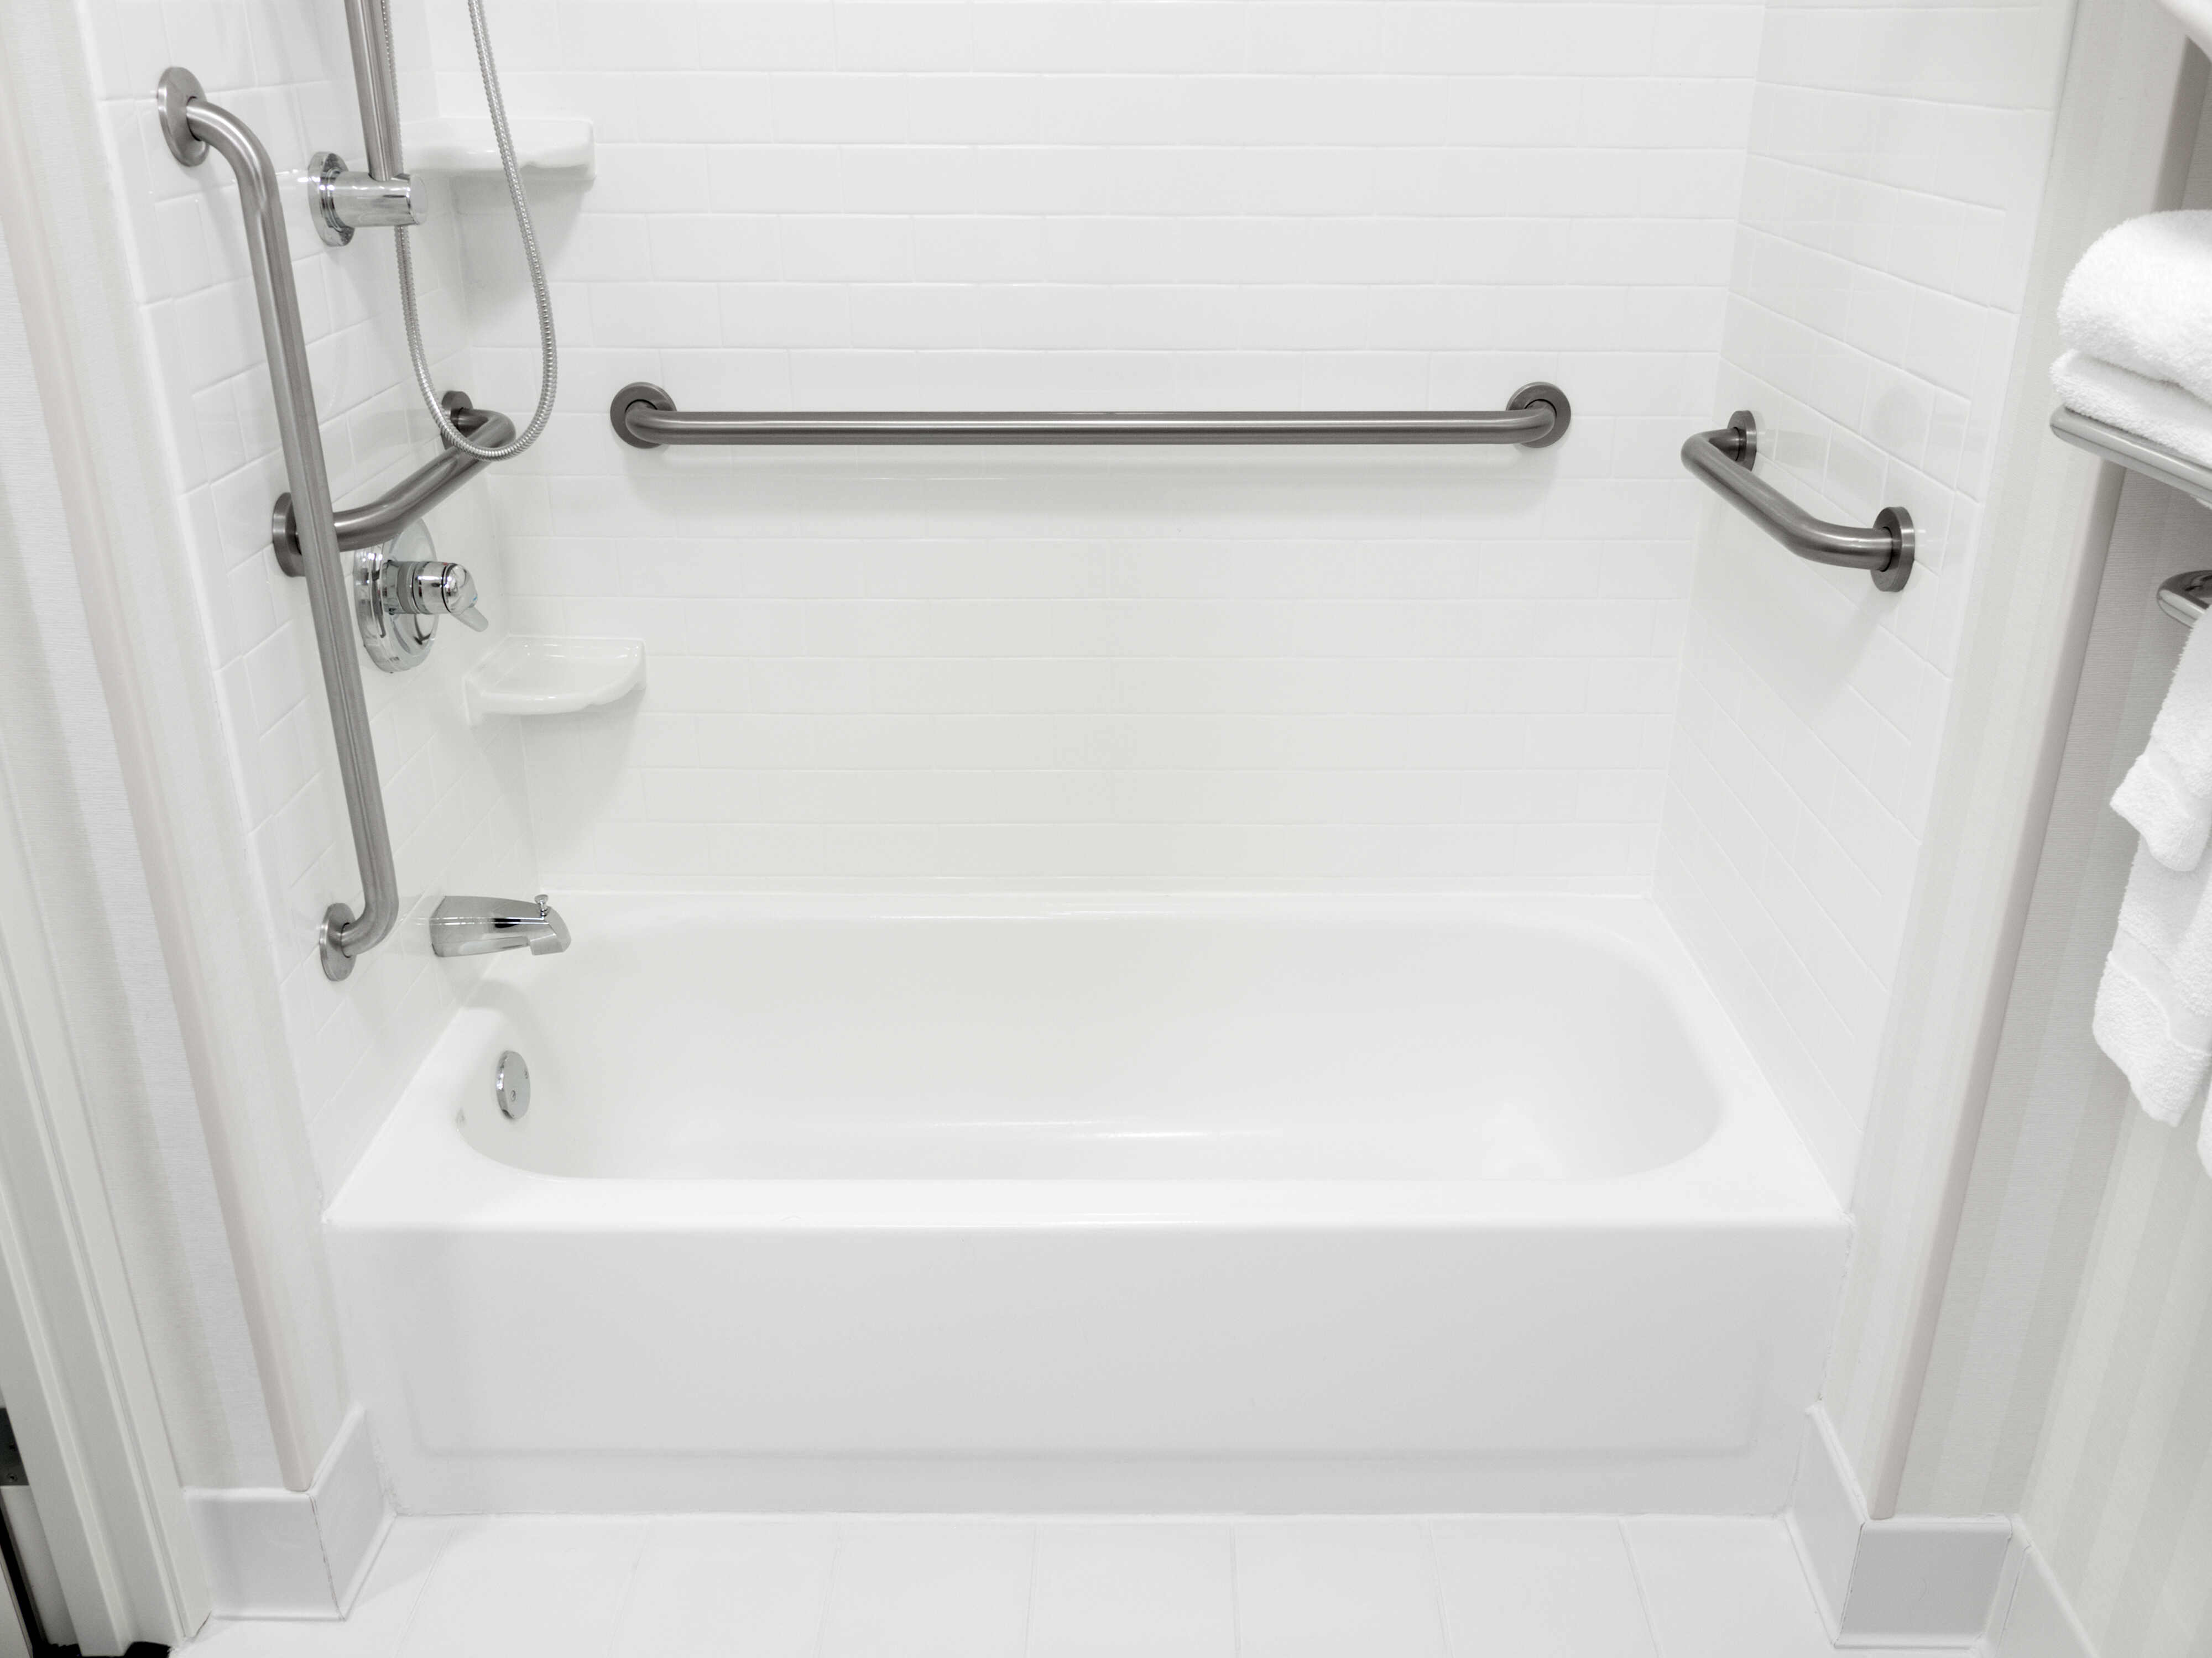
How To Replace A Bathtub In A Mobile Home
Modified: October 19, 2024
Learn how to replace a bathtub in a mobile home with our step-by-step guide. Find the best bathroom accessories for your mobile home renovation.
(Many of the links in this article redirect to a specific reviewed product. Your purchase of these products through affiliate links helps to generate commission for Storables.com, at no extra cost. Learn more)
Introduction
Replacing a bathtub in a mobile home can breathe new life into your bathroom, enhancing both its functionality and aesthetic appeal. Whether you're upgrading to a more modern tub or addressing wear and tear, this project can revitalize your bathing space. While the task may seem daunting at first, with the right guidance and tools, you can successfully complete the replacement process.
In this comprehensive guide, we'll walk you through the step-by-step process of replacing a bathtub in a mobile home. From preparing the area to connecting the plumbing and sealing the new tub, we'll cover each essential aspect to ensure a successful and satisfying outcome. By following these instructions, you can confidently tackle this home improvement project and achieve a rejuvenated bathroom space.
As you embark on this endeavor, it's important to approach the task with patience and attention to detail. Each step plays a crucial role in the overall success of the bathtub replacement, and taking the time to execute each phase meticulously will yield a professional and long-lasting result. Additionally, having the necessary tools and materials at hand will streamline the process and minimize potential setbacks.
Before diving into the specific steps, it's essential to assess the condition of your current bathtub and identify the reasons for replacement. Whether you're dealing with cracks, stains, or simply seeking an updated look, understanding your motivations for this project will guide your decisions throughout the process. Furthermore, familiarizing yourself with the dimensions and specifications of the new bathtub will ensure a seamless transition from the old to the new.
By the end of this guide, you'll have the knowledge and confidence to embark on this rewarding home improvement project. With careful planning and execution, you can transform your mobile home's bathroom into a rejuvenated and inviting space. Let's begin the journey toward a revitalized bathing experience by preparing the area for the bathtub replacement.
Key Takeaways:
- Replacing a bathtub in a mobile home can transform your bathroom, but it requires patience, attention to detail, and the right tools for a successful outcome. Prepare, remove, install, connect, and seal for a rejuvenated bathing space.
- Careful preparation, precise installation, and attention to plumbing connections are essential for replacing a bathtub in a mobile home. With patience and meticulousness, you can achieve a professional and long-lasting result, enhancing both functionality and aesthetic appeal.
Read more: How To Replace Stopper In A Bathtub
Step 1: Prepare the Area
Before diving into the physical removal and installation process, it's crucial to thoroughly prepare the area for the bathtub replacement. This initial step sets the foundation for a smooth and efficient project, ensuring that the surrounding space is ready for the upcoming tasks. Here's a detailed breakdown of the essential preparations:
-
Clear the Surrounding Space: Begin by removing any items or obstacles near the existing bathtub. This includes toiletries, bath mats, shower curtains, and any decorative elements in the vicinity. Clearing the space will provide ample room for maneuvering during the removal and installation process.
-
Turn Off Water Supply: Locate the main water shut-off valve for the bathroom and turn off the water supply. This crucial step prevents any accidental leaks or water flow during the bathtub removal, minimizing the risk of water damage and ensuring a safe working environment.
-
Ventilation and Lighting: Adequate ventilation and lighting are essential for a comfortable and well-lit work environment. Open windows or use fans to improve air circulation, and ensure that the area is well-lit to facilitate clear visibility during the project.
-
Protective Coverings: To safeguard the surrounding surfaces, consider using protective coverings such as drop cloths or plastic sheeting. Covering the floor and nearby fixtures with these materials can prevent accidental damage from tools, debris, or any potential spills during the replacement process.
-
Inspect Plumbing and Drainage: Take a moment to inspect the existing plumbing and drainage connections. Ensure that the plumbing fixtures are in good condition and that there are no signs of leaks or damage. Additionally, check the drainage system to confirm that it is functioning properly.
-
Gather Tools and Materials: Assemble the necessary tools and materials required for the bathtub replacement. This may include wrenches, screwdrivers, a utility knife, a pry bar, safety goggles, gloves, and any specific components or accessories recommended by the new bathtub's installation instructions.
By meticulously preparing the area for the bathtub replacement, you'll establish a conducive and organized workspace for the subsequent steps. This proactive approach sets the stage for a successful and efficient project, laying the groundwork for a seamless transition to the removal and installation phases.
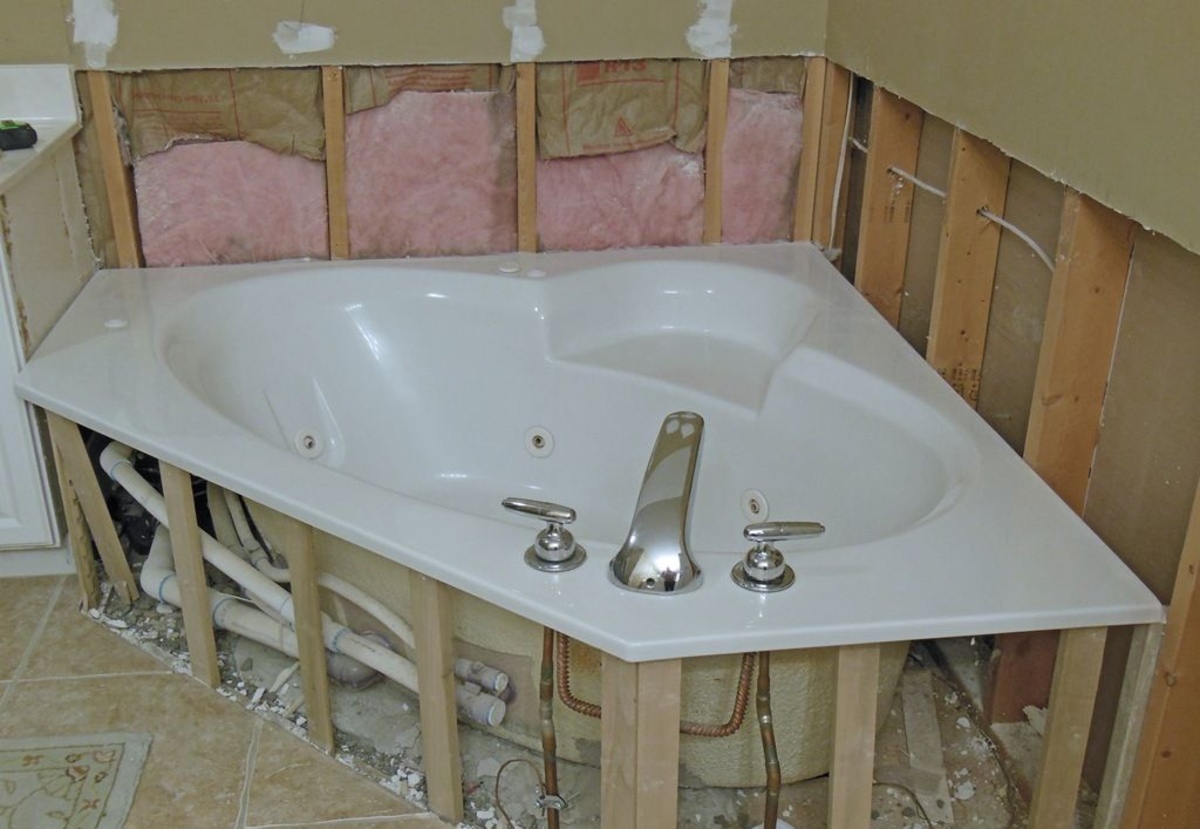
Step 2: Remove the Old Bathtub
Removing the old bathtub is a pivotal phase in the replacement process, requiring careful disassembly and extraction to pave the way for the installation of the new unit. This step demands precision and attention to detail to ensure the safe and efficient removal of the existing bathtub. Here's a comprehensive guide to executing this crucial phase:
-
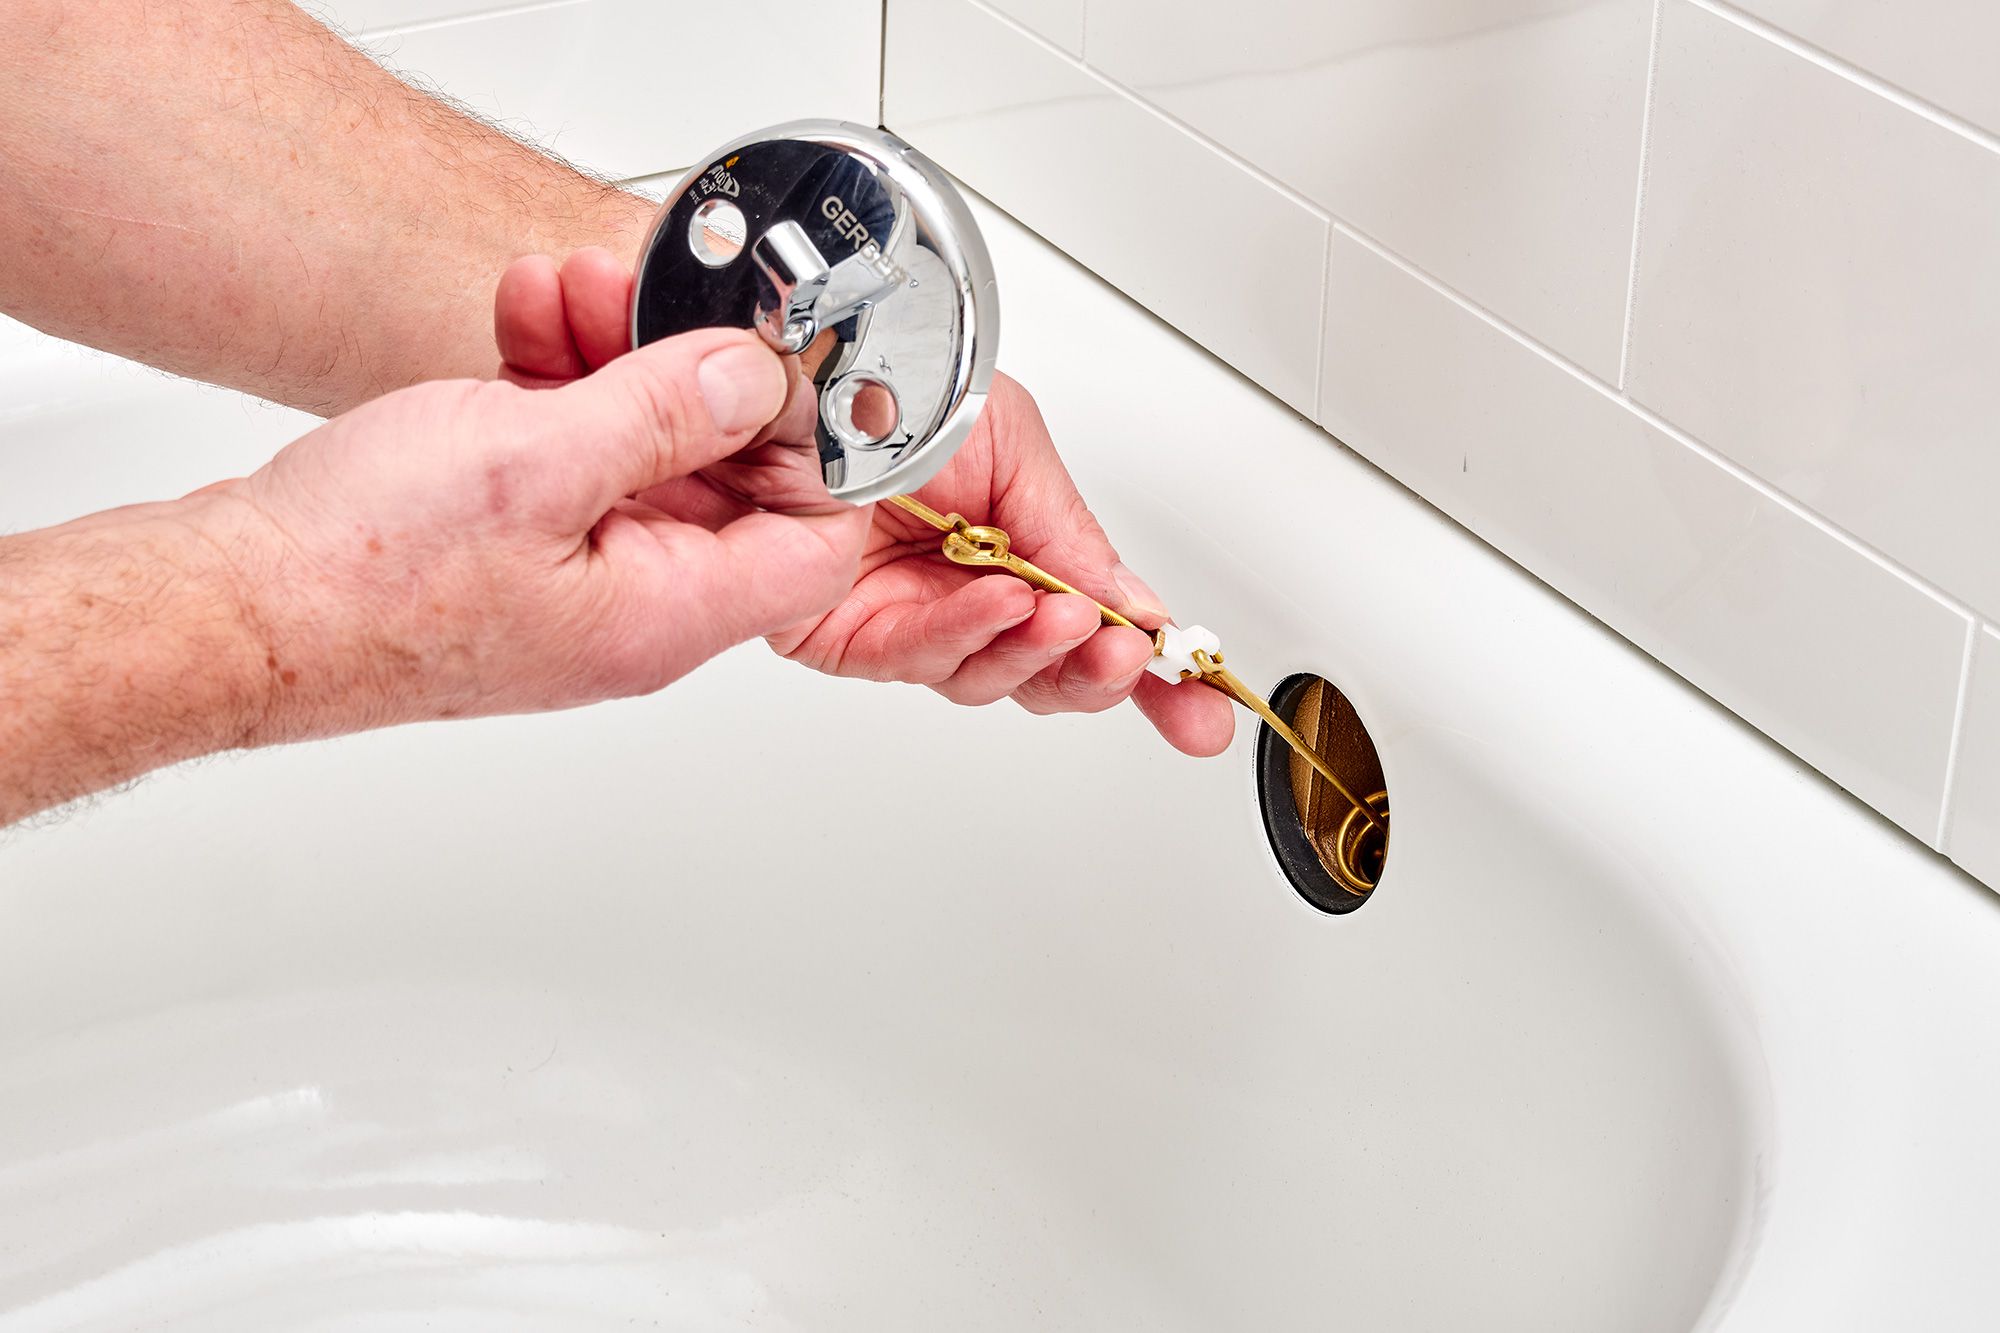
Disconnect Plumbing: Begin by turning off the water supply to the bathtub. Use a wrench to disconnect the water supply lines and the drain pipe connected to the existing bathtub. It's essential to place a bucket or container beneath the drain pipe to catch any residual water that may flow out during this disconnection process.
-
Remove Surrounding Fixtures: If the bathtub is surrounded by any fixtures such as tiles, panels, or a shower enclosure, carefully detach and remove these components. Use a utility knife and a pry bar to gently loosen and remove the fixtures, taking care to avoid damaging the surrounding walls and surfaces.
-
Detach the Tub: With the plumbing disconnected and the surrounding fixtures removed, it's time to detach the old bathtub from its position. Depending on the installation method, the bathtub may be secured to the wall studs or floor. Use a screwdriver or a drill to remove any screws or fasteners holding the bathtub in place. If the bathtub is caulked to the floor or walls, carefully cut through the caulk using a utility knife to release the tub.
-
Lift and Maneuver: Once the fasteners and caulk are removed, enlist the help of a partner to carefully lift and maneuver the old bathtub out of its alcove. Take caution to avoid damaging the surrounding walls and flooring during this extraction process. If the bathtub is heavy or cumbersome, consider using moving straps or a dolly to safely transport it out of the bathroom.
-
Clean the Area: After the old bathtub is removed, take the opportunity to clean and inspect the surrounding area. Remove any debris, old caulk, or adhesive residues to prepare the space for the installation of the new bathtub. Additionally, inspect the plumbing and drainage connections to ensure that they are in good condition and ready for the upcoming installation phase.
By meticulously following these steps, you can successfully remove the old bathtub, clearing the path for the subsequent installation of the new unit. This careful disassembly process sets the stage for a seamless transition to the next phase, where the focus shifts to installing the new bathtub in the mobile home.
Step 3: Install the New Bathtub
Installing the new bathtub marks a pivotal phase in the replacement process, where precision and attention to detail are paramount to ensure a seamless and secure fit. This step involves positioning the new bathtub in place, securing it to the designated area, and making necessary adjustments to ensure a snug and stable installation. Here's a comprehensive guide to executing this crucial phase:
-
Positioning the New Bathtub: Carefully maneuver the new bathtub into the designated alcove, ensuring that it aligns with the plumbing and drainage connections. Take precise measurements to confirm that the tub is centered and level within the space, making any necessary adjustments to achieve an optimal fit.
-
Securing the Bathtub: Once the new bathtub is positioned correctly, secure it to the surrounding walls and floor to prevent any movement or instability. Depending on the installation method and the bathtub's design, use appropriate fasteners, screws, or brackets to anchor the tub securely in place. Ensure that the fastening points align with the manufacturer's recommendations for a secure and stable installation.
-
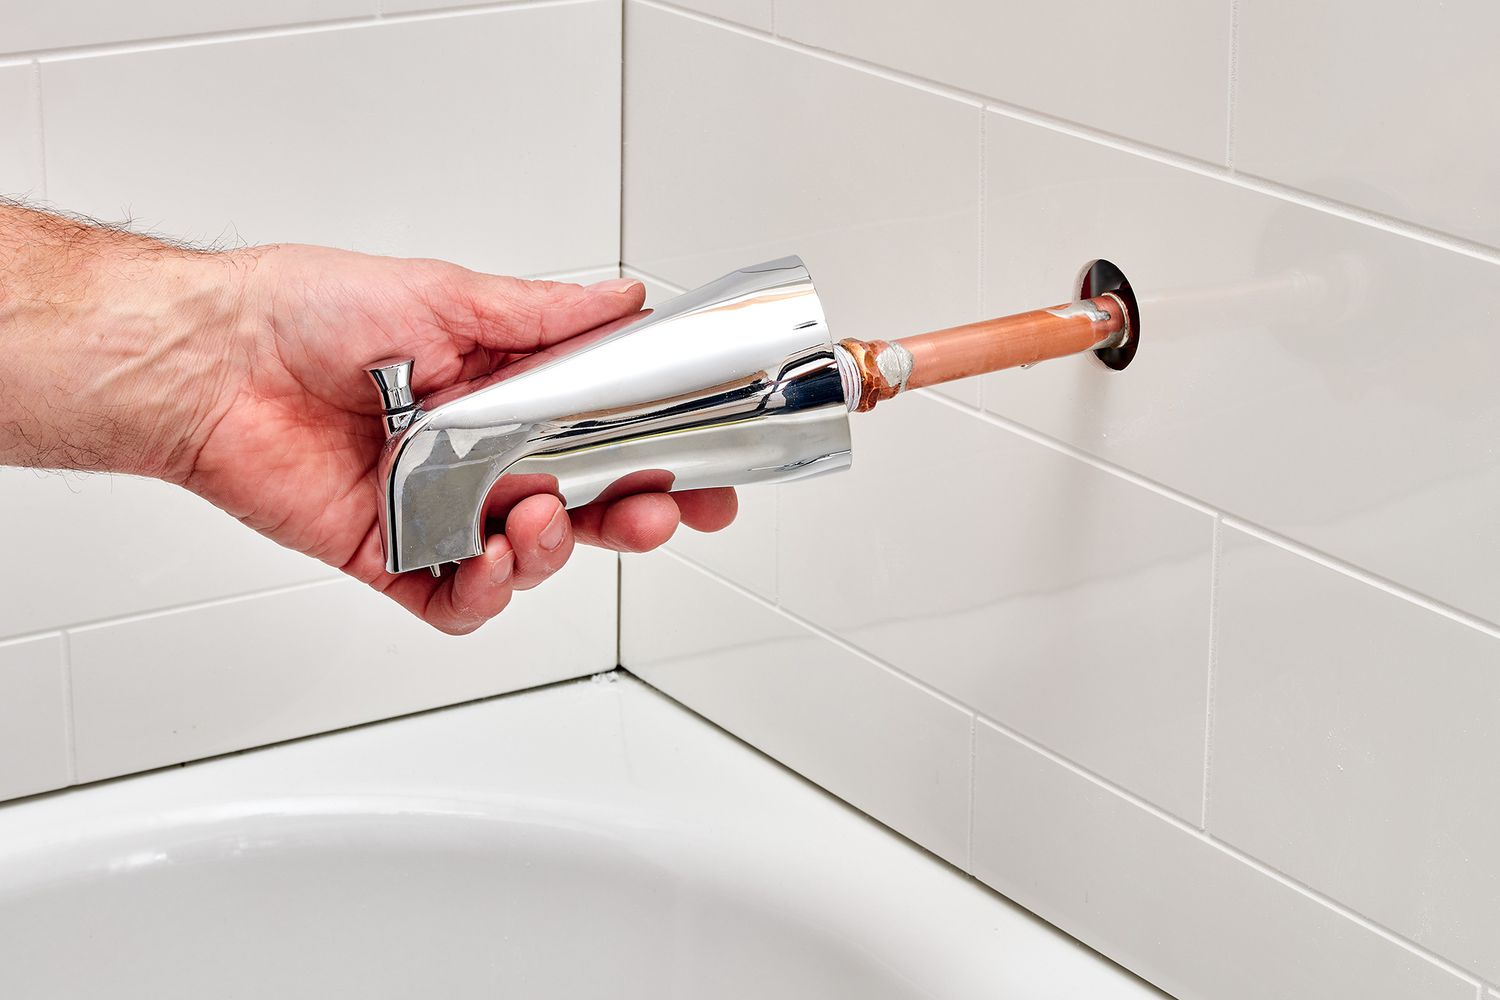
Connecting Plumbing Fixtures: Reconnect the water supply lines and the drain pipe to the new bathtub, ensuring a watertight and secure connection. Use wrenches to tighten the fittings, taking care not to overtighten and potentially damage the connections. Test the water flow and drainage to confirm that the plumbing fixtures are functioning properly with the new bathtub.
-
Sealing and Caulking: Apply a bead of waterproof caulk along the edges and seams of the new bathtub to create a watertight seal. This caulking not only enhances the aesthetic finish but also prevents water seepage and potential damage to the surrounding walls and flooring. Smooth the caulk with a damp cloth or tool to achieve a clean and uniform seal.
-
Finishing Touches: Once the new bathtub is securely installed and sealed, perform a final inspection of the surrounding area. Clean any excess caulk or debris, ensuring that the space is tidy and ready for use. Consider adding finishing touches such as decorative trim or panels to enhance the visual appeal of the newly installed bathtub.
By meticulously following these steps, you can successfully install the new bathtub in your mobile home, completing the crucial phase of the replacement process. This careful installation ensures a secure and functional addition to your bathroom space, setting the stage for the final phase of connecting the plumbing and adding the finishing touches to complete the rejuvenation of your bathing area.
Step 4: Connect the Plumbing
Connecting the plumbing fixtures is a critical aspect of the bathtub replacement process, ensuring that the new unit integrates seamlessly with the existing water supply and drainage system. This phase demands precision and attention to detail to achieve watertight connections and functional plumbing. Here's a comprehensive guide to executing this crucial step:
-
Reconnect Water Supply Lines: Begin by reconnecting the water supply lines to the new bathtub. Use appropriate wrenches to secure the fittings, ensuring a snug and leak-free connection. It's essential to verify that the hot and cold water lines are correctly attached to their respective inlets on the bathtub, preventing any potential mixing of temperatures.
-
Attach Drain Pipe: Securely attach the drain pipe to the designated outlet on the new bathtub, ensuring a proper alignment and tight seal. Utilize the appropriate fittings and connectors to establish a watertight connection, minimizing the risk of leaks and ensuring efficient drainage from the bathtub.
-
Test for Leaks: Once the water supply lines and drain pipe are connected, it's crucial to conduct a thorough leak test to validate the integrity of the plumbing connections. Turn on the water supply and allow it to flow into the bathtub, observing the connections for any signs of leakage. Similarly, fill the bathtub with water and check for any drainage issues or leaks around the drain pipe.
-
Adjustments and Tightening: If any leaks or irregularities are detected during the testing phase, promptly address them by making necessary adjustments and tightening the fittings. It's essential to rectify any potential issues before proceeding to the final stages of the bathtub replacement, ensuring that the plumbing connections are secure and reliable.
-
Insulate and Support: Consider insulating the exposed water supply lines to prevent heat loss and protect them from potential damage. Additionally, provide adequate support for the drain pipe to minimize stress on the connections and ensure long-term stability and functionality.
By meticulously following these steps, you can confidently connect the plumbing fixtures to the new bathtub, ensuring a seamless integration with the existing water supply and drainage system. This meticulous approach sets the stage for a functional and reliable plumbing setup, laying the groundwork for the final phase of sealing and finishing the newly installed bathtub.
When replacing a bathtub in a mobile home, make sure to measure the space accurately before purchasing a new tub. Mobile home bathtubs are often smaller than standard ones, so it’s important to find the right fit.
Read more: How To Replace A Bathtub Valve
Step 5: Seal and Finish
Sealing and finishing the newly installed bathtub is a crucial final step that not only enhances the visual appeal of the bathroom but also ensures the longevity and functionality of the replacement unit. This phase involves applying waterproof sealant, addressing any remaining installation details, and adding finishing touches to complete the rejuvenation of the bathing space.
Applying Waterproof Sealant
To safeguard the edges and seams of the new bathtub against water seepage and potential damage, it's essential to apply a bead of waterproof caulk along the perimeter where the tub meets the walls and floor. This silicone-based sealant creates a watertight barrier, preventing moisture from infiltrating the surrounding surfaces and compromising the integrity of the installation. Carefully apply the caulk, ensuring a uniform and continuous seal, and use a damp cloth or tool to smooth the bead for a clean and polished finish.
Addressing Installation Details
As the bathtub replacement nears completion, take a moment to inspect the surrounding area for any remaining installation details that require attention. This may include adjusting or securing any loose fixtures, ensuring that the bathtub is level and stable, and addressing any cosmetic imperfections that may have arisen during the installation process. By addressing these details, you can ensure that the new bathtub is not only functional but also visually appealing, creating a cohesive and polished look in the bathroom.
Adding Finishing Touches
To elevate the aesthetic appeal of the newly installed bathtub, consider adding finishing touches that complement the overall design of the bathroom. This may involve installing decorative trim or panels to conceal any exposed edges, enhancing the visual cohesion of the bathing space. Additionally, incorporating accessories such as a bathtub caddy, shower curtain, or bath mat can add a personal touch and further enhance the functionality and comfort of the rejuvenated bathroom.
By meticulously sealing and finishing the newly installed bathtub, you can complete the replacement process with a polished and professional touch. This attention to detail not only ensures the visual appeal of the bathroom but also contributes to the long-term durability and functionality of the new bathtub, creating a rejuvenated and inviting bathing space in your mobile home.
Read more: How To Replace A Bathtub Shower
Conclusion
In conclusion, replacing a bathtub in a mobile home is a transformative home improvement project that can breathe new life into your bathroom space. By following the comprehensive steps outlined in this guide, you can successfully navigate the process with confidence and precision, ultimately achieving a rejuvenated and inviting bathing area.
Throughout this endeavor, meticulous preparation, careful removal of the old bathtub, precise installation of the new unit, and thorough attention to plumbing connections are essential elements that contribute to the overall success of the replacement project. Each phase plays a crucial role in ensuring a seamless transition from the old to the new, culminating in a functional and visually appealing bathtub installation.
As you embark on this journey, it's important to approach the task with patience, attention to detail, and a proactive mindset. By thoroughly preparing the area, disconnecting and removing the old bathtub, installing the new unit, connecting the plumbing, and sealing and finishing the installation, you can achieve a professional and long-lasting result.
Furthermore, the completion of this project not only enhances the functionality and aesthetic appeal of your bathroom but also contributes to the overall value and comfort of your mobile home. The rejuvenated bathing space serves as a testament to your dedication to maintaining and improving your living environment, creating a welcoming and enjoyable area for relaxation and self-care.
Ultimately, the successful replacement of a bathtub in a mobile home is a testament to your ability to undertake and complete a significant home improvement project. By following the steps outlined in this guide and infusing the process with attention to detail and care, you have the opportunity to transform your bathing space into a rejuvenated and inviting area that reflects your commitment to maintaining a comfortable and aesthetically pleasing home.
In closing, the completion of this project marks a significant achievement, and the revitalized bathroom space stands as a testament to your dedication to enhancing your living environment. Embrace the satisfaction of a job well done and revel in the rejuvenated ambiance of your newly installed bathtub in your mobile home.
Frequently Asked Questions about How To Replace A Bathtub In A Mobile Home
Was this page helpful?
At Storables.com, we guarantee accurate and reliable information. Our content, validated by Expert Board Contributors, is crafted following stringent Editorial Policies. We're committed to providing you with well-researched, expert-backed insights for all your informational needs.


0 thoughts on “How To Replace A Bathtub In A Mobile Home”