Home>Furniture & Design>Bathroom Fixtures>How To Caulk A Shower Tile

Bathroom Fixtures
How To Caulk A Shower Tile
Modified: August 27, 2024
Learn how to caulk shower tiles like a pro with our step-by-step guide. Keep your bathroom fixtures in top shape with our expert tips.
(Many of the links in this article redirect to a specific reviewed product. Your purchase of these products through affiliate links helps to generate commission for Storables.com, at no extra cost. Learn more)
Introduction
Welcome to the ultimate guide on how to caulk a shower tile! Whether you're a seasoned DIY enthusiast or a novice looking to tackle your first home improvement project, this comprehensive resource will equip you with the knowledge and skills to complete this task like a pro.
Caulking is a crucial aspect of maintaining a watertight and visually appealing shower. Over time, the caulk in your shower can deteriorate, leading to unsightly cracks and water leakage. By learning the art of caulking, you can safeguard your shower from water damage and mold while enhancing its aesthetic appeal.
In this guide, we will walk you through the step-by-step process of caulking your shower tiles, from gathering the necessary materials to achieving a seamless, professional finish. You'll discover the essential tools and supplies required, as well as insider tips for preparing the shower tile, applying the caulk, and achieving a smooth, polished result.
By the end of this journey, you'll not only have a beautifully caulked shower but also a newfound confidence in your home improvement abilities. So, roll up your sleeves, grab your caulking gun, and let's dive into the art of shower tile caulking!
Key Takeaways:
- Mastering the art of caulking a shower tile ensures a watertight and visually stunning oasis, protecting against water damage and mold while enhancing the shower’s aesthetic appeal.
- Proper preparation, precise application, and meticulous finishing result in a flawlessly sealed joint that prevents moisture infiltration and elevates the overall appearance of the shower tile.
Necessary Materials
Before embarking on your caulking adventure, it’s essential to gather the right materials to ensure a successful and efficient process. Here’s a list of the necessary items you’ll need:
- Caulk: Choose a high-quality silicone or acrylic caulk specifically designed for wet environments. Opt for a color that complements your shower tiles for a seamless finish.
- Caulking Gun: A sturdy caulking gun will facilitate precise application and control of the caulk.
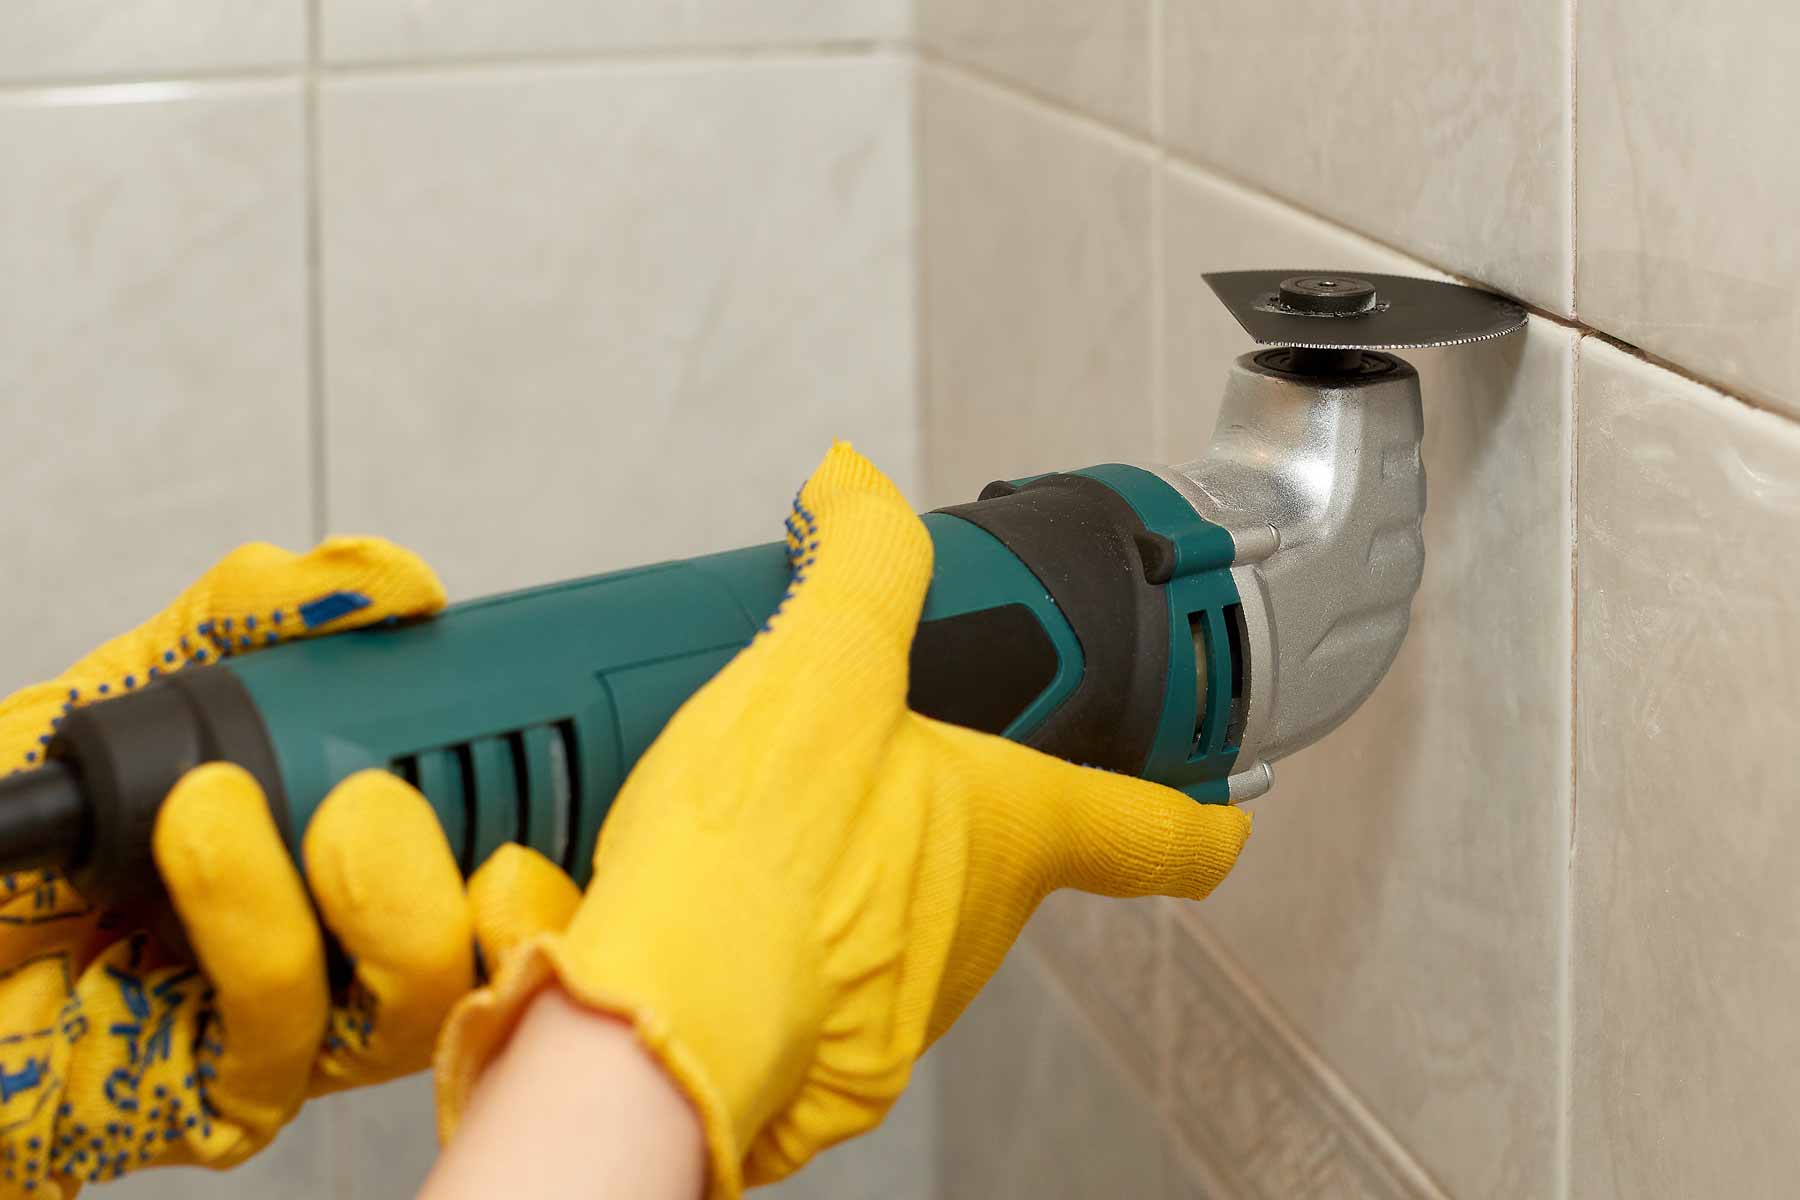
- Caulk Remover: If there’s old caulk that needs to be removed, a caulk remover or a utility knife will come in handy.
- Caulk Smoother: This tool, often with a rubber or silicone tip, is used to create a smooth, uniform bead of caulk and to remove excess caulk for a professional finish.
- Painter’s Tape: Use painter’s tape to mask off areas adjacent to the tile where you don’t want the caulk to adhere.
- Denatured Alcohol: This will help clean the surface before applying the new caulk, ensuring better adhesion.
- Clean Cloth or Paper Towels: Keep these on hand to wipe away excess caulk and clean up any spills.
- Utility Knife: If you need to remove old caulk, a utility knife will be indispensable for this task.
- Respirator Mask and Gloves: It’s important to prioritize safety. A respirator mask and gloves will protect you from caulk fumes and potential skin irritation.
By having these materials at your disposal, you’ll be well-prepared to tackle the caulking process with confidence and precision, ensuring a professional and long-lasting result.
Preparing the Shower Tile
Before diving into the caulk application, it’s crucial to prepare the shower tile to ensure optimal adhesion and a seamless finish. Follow these steps to get your shower tile ready for caulking:
- Clean the Surface: Start by thoroughly cleaning the existing caulk and the surrounding tile surface. Use a caulk remover or a utility knife to eliminate any remnants of old caulk. Then, wipe the area with denatured alcohol to remove any residual grime, soap scum, or mold. This step is vital for promoting strong adhesion and preventing future mold growth.
- Mask Off Adjacent Areas: Use painter’s tape to mask off the areas around the tile where you don’t want the caulk to adhere. This will ensure clean, straight lines and prevent accidental smudges on adjacent surfaces.
- Ensure Dryness: It’s essential that the shower tile and surrounding areas are completely dry before applying the new caulk. Moisture can compromise the caulk’s adhesion and longevity, so take the time to ensure a dry environment.
- Inspect for Damage: Before proceeding, inspect the tile and grout for any signs of damage or deterioration. Address any issues such as loose tiles or crumbling grout before applying the caulk to ensure a solid foundation for the new sealant.
By meticulously preparing the shower tile, you’ll create an ideal canvas for the caulk application, setting the stage for a professional and long-lasting result. This attention to detail will pay off in the form of a watertight and visually appealing shower.
Applying the Caulk
Now that the shower tile is prepped and ready, it’s time to delve into the art of applying the caulk. Follow these steps to ensure a precise and effective caulk application:
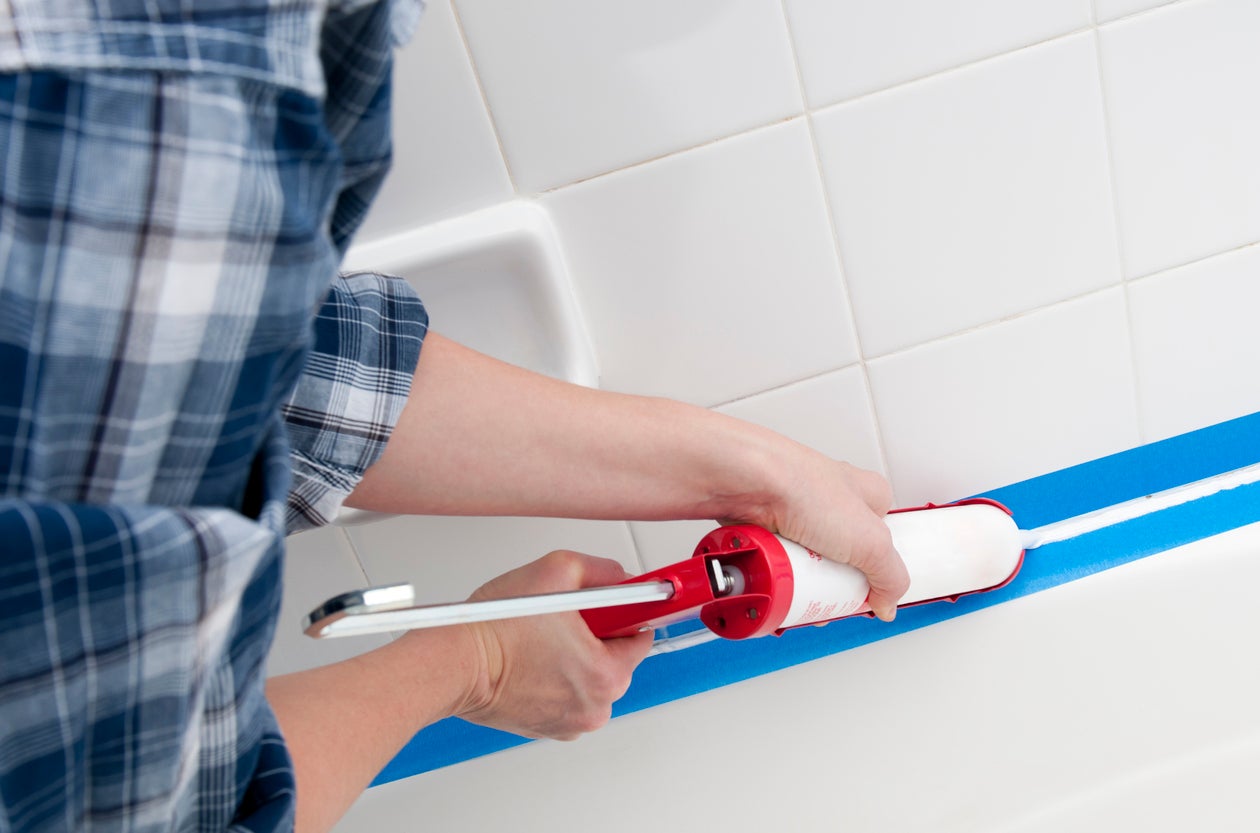
- Load the Caulking Gun: Load the caulk tube into the caulking gun, then cut the tip of the caulk tube at a 45-degree angle to create an opening that matches the width of the joint you’ll be caulking.
- Apply the Caulk: Hold the caulking gun at a 45-degree angle and steadily apply even pressure to dispense the caulk along the joint. Aim for a consistent and smooth bead of caulk, ensuring that it completely fills the joint without excess buildup.
- Work in Sections: It’s best to work in small sections to maintain control over the caulk application. Be mindful of the pace at which the caulk dries to avoid any inconsistencies in the finish.
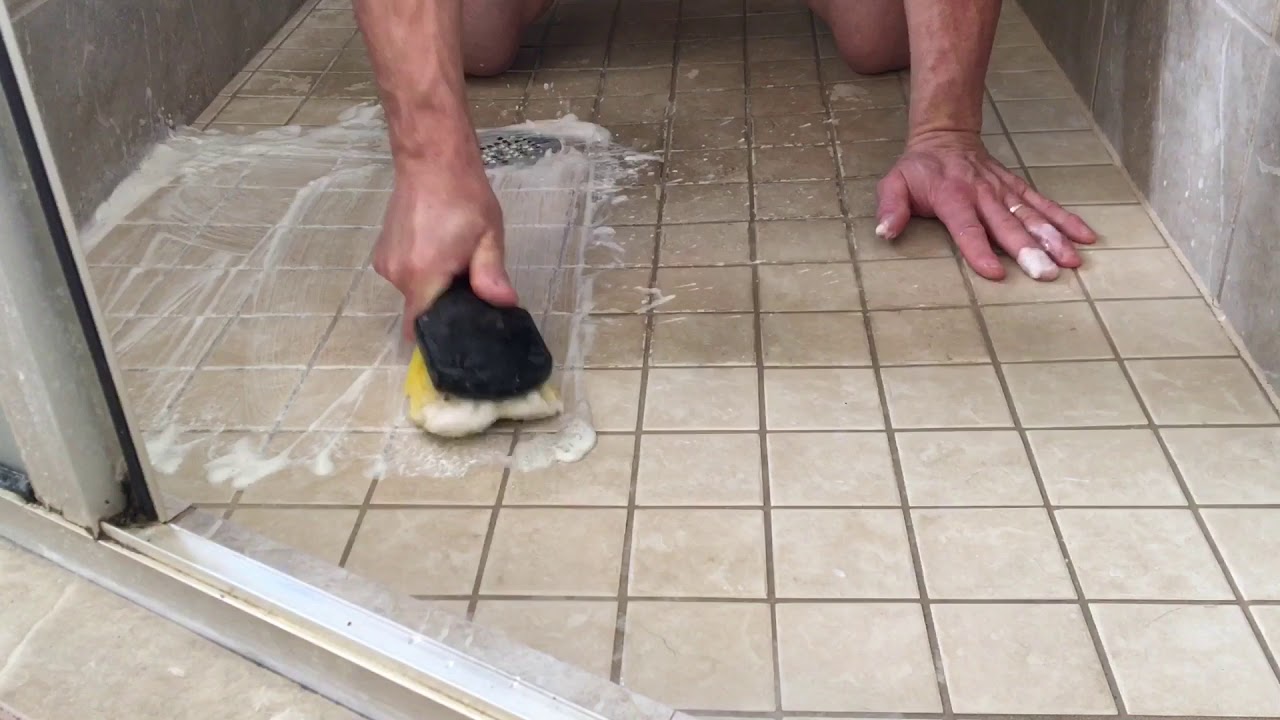
- Smooth the Caulk: Once the caulk is applied, use a caulk smoother or a damp finger to gently smooth and shape the bead of caulk. This step helps ensure a neat and professional finish while pressing the caulk into the joint for optimal adhesion.
- Remove Excess Caulk: Immediately after smoothing the caulk, use a damp cloth or paper towel to carefully remove any excess caulk or smudges. This will contribute to a clean and polished appearance.
By following these steps and exercising patience and precision, you’ll achieve a flawlessly caulked joint that not only seals out moisture but also enhances the aesthetic appeal of your shower tile.
Make sure to clean and dry the area before applying the caulk. Use a caulk gun for even application and smooth the caulk with a wet finger for a clean finish.
Smoothing and Finishing
After applying the caulk, the next crucial step is to focus on smoothing and finishing the caulk to achieve a professional and polished look. Here’s how to ensure a seamless finish:
- Use a Caulk Smoother: Employ a caulk smoother or a damp finger to gently run along the caulk line, smoothing out any imperfections and creating a uniform appearance. The goal is to achieve a sleek and consistent finish that seamlessly blends with the surrounding tile.
- Check for Gaps: Inspect the caulked joint carefully to ensure that there are no gaps or missed spots. Address any deficiencies by applying additional caulk as needed to achieve a complete seal.
- Remove Painter’s Tape: If you used painter’s tape to mask off adjacent areas, carefully remove it while the caulk is still fresh. This will prevent the tape from pulling on the caulk and disrupting the finish.
- Allow for Drying Time: Allow the caulk to dry and cure according to the manufacturer’s instructions before exposing it to moisture. This step is crucial for ensuring the longevity and effectiveness of the caulk seal.
- Inspect the Finished Result: Once the caulk is dry, inspect the finished result to ensure that it meets your expectations. Take pride in the seamless and professional finish you’ve achieved, knowing that your shower is now equipped with a durable and visually appealing caulk seal.
By paying attention to the smoothing and finishing process, you’ll elevate the overall appearance of the caulked joint, creating a seamless and watertight seal that enhances the aesthetic appeal of your shower tile.
Read more: How To Replace A Shower Tile
Cleaning Up
As you near the completion of the caulking process, it’s important to focus on cleaning up to ensure a pristine and tidy result. Follow these steps to complete the cleaning process effectively:
- Remove Excess Caulk: Use a clean, damp cloth or paper towel to carefully wipe away any excess caulk that may have accumulated during the application and smoothing process. Pay special attention to the surrounding tile and adjacent surfaces to ensure a clean and polished appearance.
- Clean Caulking Tools: If you used a caulk smoother or any other tools during the process, clean them thoroughly with soap and water to remove any residual caulk. Properly maintaining your tools will ensure their longevity and effectiveness for future caulking projects.
- Dispose of Materials: Dispose of any used caulk tubes, paper towels, and other disposable materials in accordance with local waste disposal guidelines. Proper disposal is essential for environmental responsibility.
- Inspect the Area: Take a moment to inspect the entire caulking area, ensuring that all tools and materials have been properly cleaned and put away. Admire the clean and refreshed appearance of your shower, knowing that you’ve successfully completed the caulking process.
By diligently cleaning up after the caulking process, you’ll not only achieve a professional and polished result but also maintain a clean and organized work environment. This final touch ensures that your shower will exude a sense of cleanliness and sophistication, reflecting your attention to detail and craftsmanship.
Conclusion
Congratulations on mastering the art of caulking a shower tile! By following the steps outlined in this guide and infusing your project with care and precision, you’ve successfully transformed your shower into a watertight and visually stunning oasis. As you reflect on your journey, consider the following key takeaways:
First and foremost, the proper preparation of the shower tile sets the stage for a successful caulking endeavor. By meticulously cleaning the surface, masking off adjacent areas, and ensuring dryness, you’ve laid the groundwork for a professional finish that will stand the test of time.
Next, the application of the caulk itself demands patience and attention to detail. By loading the caulking gun, applying the caulk evenly, and smoothing out imperfections, you’ve achieved a flawlessly sealed joint that not only prevents moisture infiltration but also enhances the aesthetic appeal of your shower.
Furthermore, the smoothing and finishing process elevates the caulked joint to a new level of sophistication, ensuring a seamless and uniform appearance that seamlessly integrates with the surrounding tile.
As you complete the project with a thorough cleaning process, you’ve not only achieved a professional result but also maintained a clean and organized work environment, reflecting your commitment to excellence.
With your newly caulked shower tile, you can revel in the peace of mind that comes with knowing your shower is fortified against water damage and mold, while also exuding a polished and refined aesthetic.
Remember, the skills and knowledge you’ve gained in this process extend beyond this project. Your newfound expertise in caulking can be applied to future home improvement endeavors, empowering you to tackle a wide range of projects with confidence and finesse.
So, take a moment to admire your handiwork, revel in the satisfaction of a job well done, and embrace the confidence that comes with mastering the art of shower tile caulking. Your shower has been revitalized, and you’ve proven that with the right tools and guidance, you can conquer any DIY challenge that comes your way.
Frequently Asked Questions about How To Caulk A Shower Tile
Was this page helpful?
At Storables.com, we guarantee accurate and reliable information. Our content, validated by Expert Board Contributors, is crafted following stringent Editorial Policies. We're committed to providing you with well-researched, expert-backed insights for all your informational needs.


0 thoughts on “How To Caulk A Shower Tile”