Home>Furniture & Design>Bathroom Fixtures>How To Regrout A Shower Tile
Bathroom Fixtures
How To Regrout A Shower Tile
Modified: August 27, 2024
Learn how to regrout your shower tiles with our step-by-step guide. Keep your bathroom fixtures looking fresh and clean with this easy DIY solution.
(Many of the links in this article redirect to a specific reviewed product. Your purchase of these products through affiliate links helps to generate commission for Storables.com, at no extra cost. Learn more)
**
Introduction
**
Welcome to the ultimate guide on how to regrout a shower tile! Over time, the grout between your shower tiles can become discolored, cracked, or even begin to crumble. This not only affects the appearance of your shower but can also lead to water seepage and damage to the underlying structure. However, fear not! Regrouting your shower tiles is a manageable DIY project that can breathe new life into your bathroom and protect it from potential water damage.
In this comprehensive guide, we will walk you through the step-by-step process of regrouting your shower tiles, providing you with valuable tips and insights along the way. From preparing the surface to applying new grout and adding the finishing touches, we've got you covered. By the end of this guide, you'll have the knowledge and confidence to tackle this project with ease, achieving professional-looking results without breaking a sweat.
So, roll up your sleeves, gather your tools, and let's dive into the wonderful world of regrouting to revitalize your shower and elevate the overall aesthetic and functionality of your bathroom. Let's get started!
**
Key Takeaways:
- Refresh your shower tiles by regrouting to prevent water damage and enhance your bathroom’s appearance. Follow the steps to remove old grout, apply new grout, and maintain the tiles for long-lasting results.
- Maintain your regrouted shower tiles by cleaning regularly, reapplying grout sealer, addressing repairs promptly, ensuring ventilation, and using gentle cleaners. Enjoy a fresh and inviting bathroom space with these simple maintenance tips.
Read more: How To Regrout Tile Floor
Tools and Materials Needed
**
Before embarking on your regrouting journey, it’s essential to gather the necessary tools and materials. Having the right equipment at your disposal will streamline the process and ensure a successful outcome. Here’s what you’ll need:
Tools:
- Grout saw or rotary tool: To remove old grout from between the tiles.
- Grout float: For applying new grout to the tile surfaces.
- Sponge and bucket of water: For cleaning the tiles and smoothing the grout lines.
- Utility knife: To scrape and clean the grout lines.
- Dust mask and safety goggles: For personal protection while working with grout and grout removal tools.
- Grout sealer: To protect the new grout from moisture and stains.
- Caulk and caulk gun: For sealing corners and edges where tiles meet.
- Old towels or rags: For wiping excess grout and cleaning the tiles.
- Small brush: For applying grout sealer.
Materials:
- New grout: Choose a color that complements your tiles and meets the specific requirements of your shower environment.
- Cleaner: A tile and grout cleaner to prepare the surface before regrouting.
- Grout additive: Optional, but recommended for enhanced flexibility and resistance to mold and mildew.
- Painter’s tape: For protecting adjacent surfaces from grout and sealer.
- Replacement tiles: In case any tiles are damaged during the regrouting process.
By ensuring you have these tools and materials on hand, you’ll be well-prepared to tackle the regrouting process efficiently and effectively. Now that you’re equipped with everything you need, let’s move on to the next step: removing the old grout.
**
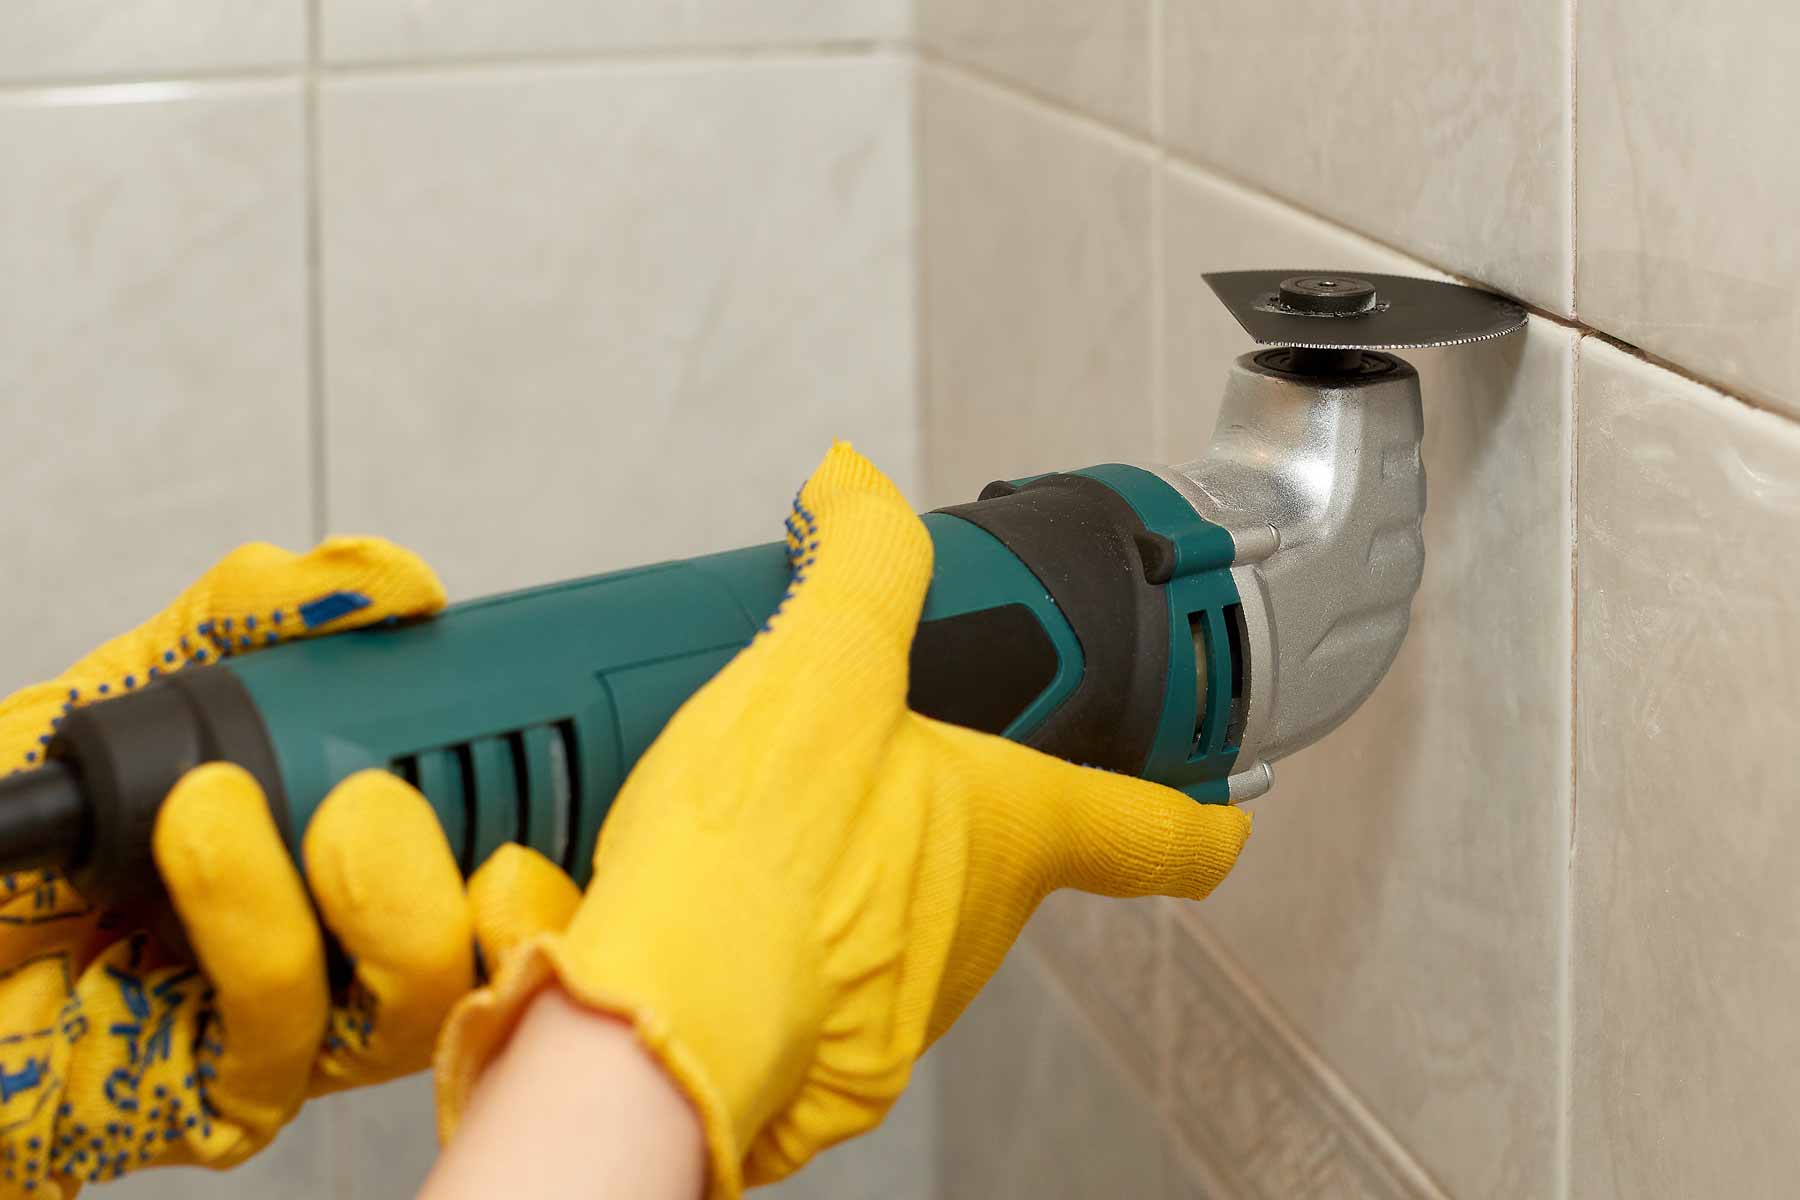
Removing Old Grout
**
Before you can apply new grout, it’s crucial to remove the old grout from between the tiles. This ensures a clean and stable base for the fresh grout, promoting better adhesion and a professional finish. Here’s how to remove the old grout:
Step 1: Prepare the Area
Start by thoroughly cleaning the tiles and grout lines to remove any surface dirt and debris. This will allow for better visibility and access to the grout during the removal process.
Step 2: Choose Your Tool
You can use a grout saw or a rotary tool equipped with a grout removal bit. Both tools are effective at cutting through the old grout, allowing you to carefully extract it from between the tiles. Be sure to wear a dust mask and safety goggles to protect yourself from airborne particles.
Step 3: Begin Removing the Grout
Hold the grout saw or rotary tool at a slight angle and carefully work it along the grout lines, taking care not to damage the surrounding tiles. Work methodically and patiently, focusing on small sections at a time. As you progress, use a vacuum or brush to clear away the loosened grout and maintain a clear view of your work area.
Step 4: Clean the Joints
Once the majority of the old grout has been removed, use a utility knife to scrape and clean the joints between the tiles. This will help ensure that the new grout adheres well and fills the spaces evenly.
Step 5: Inspect and Clean
After removing the old grout, thoroughly inspect the tile joints to ensure they are free of any remaining debris or residue. Use a damp sponge and clean water to wipe down the tiles and remove any leftover grout particles.
By following these steps, you’ll successfully remove the old grout, setting the stage for the next phase of the regrouting process: preparing the surface for the new grout. With the old grout out of the way, you’re one step closer to achieving a refreshed and revitalized shower space.
**
Preparing the Surface
**
With the old grout removed, it’s time to prepare the surface for the application of new grout. This crucial step ensures that the tiles and grout lines are clean, dry, and ready to receive the fresh grout, setting the foundation for a durable and visually appealing finish. Here’s how to prepare the surface for regrouting:
Step 1: Clean the Tiles and Joints
Using a tile and grout cleaner, thoroughly clean the tiles and grout lines to remove any residual grout dust, dirt, or cleaning residue. A clean surface will promote better adhesion and prevent any contaminants from interfering with the new grout.
Step 2: Allow Sufficient Drying Time
After cleaning, ensure that the tiles and grout lines are completely dry before proceeding with the regrouting process. Moisture can hinder the performance of the new grout, so it’s essential to allow ample drying time to achieve optimal results.
Step 3: Apply Grout Additive (Optional)
If desired, consider applying a grout additive to the new grout mixture. This additive can enhance the flexibility and resistance of the grout, making it more durable and less prone to mold and mildew growth. Follow the manufacturer’s instructions for the proper application of the grout additive.
Step 4: Protect Adjacent Surfaces
Use painter’s tape to protect adjacent surfaces, such as the edges of the shower pan and fixtures, from accidental grout and sealer application. This precaution will help maintain a clean and polished look upon completion of the regrouting process.
By diligently preparing the surface, you’ll create an optimal environment for the new grout, ensuring a strong bond and a professional finish. With the surface primed and ready, it’s time to move on to the exciting phase of applying new grout to rejuvenate your shower tiles.
**
Use a grout saw to remove old grout, clean the area thoroughly, and apply new grout with a rubber float. Wipe off excess grout with a damp sponge and let it dry before using the shower.
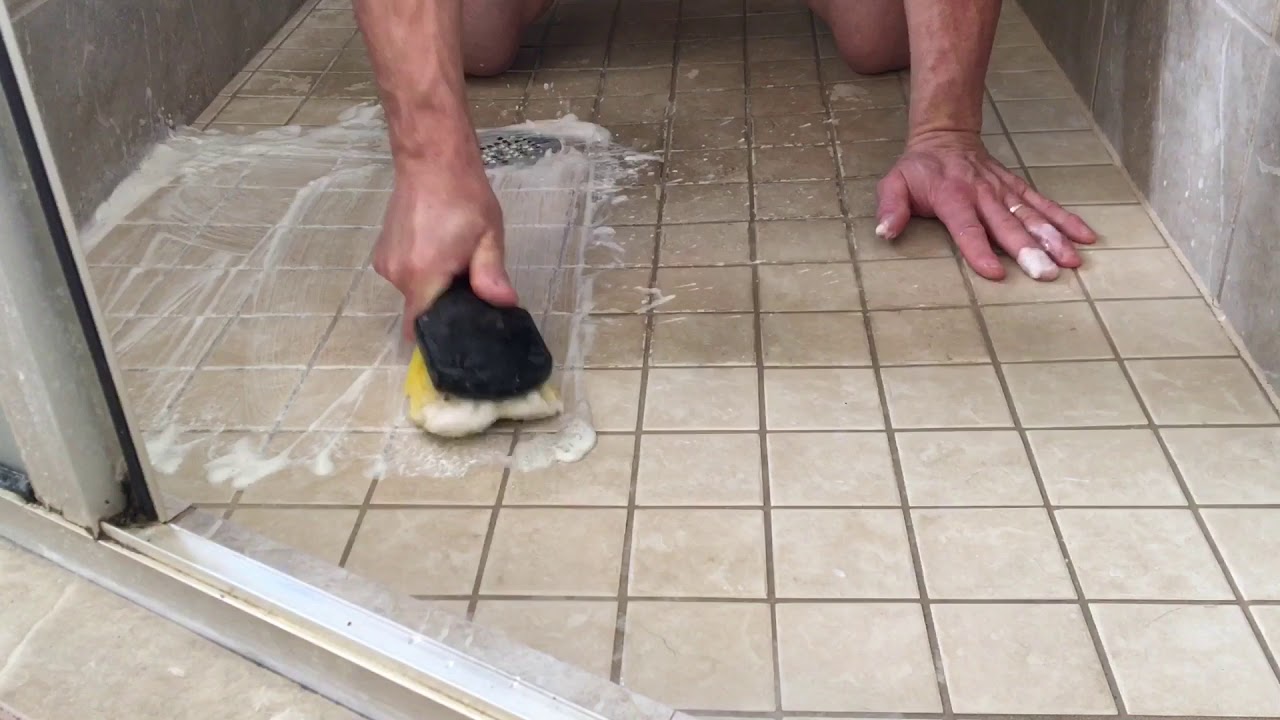
Applying New Grout
**
Now that the surface is meticulously prepared, it’s time to breathe new life into your shower tiles by applying fresh grout. This transformative step will not only enhance the aesthetics of your shower but also fortify the integrity of the tiled surfaces. Let’s delve into the process of applying new grout:
Step 1: Mix the Grout
Follow the manufacturer’s instructions to prepare the grout mixture to the desired consistency. Use a clean bucket and a grout float to achieve a smooth and lump-free grout mixture. Ensure that the color of the grout complements your tiles and aligns with your aesthetic vision for the shower.
Step 2: Apply the Grout
Using the grout float, apply the mixed grout to the tile surfaces, working it into the grout lines at a 45-degree angle. Work in small sections to ensure that the grout is evenly distributed and fully fills the joints between the tiles. Avoid leaving any gaps or air pockets within the grout lines.
Step 3: Clean Excess Grout
Once the grout is applied, use a damp sponge to gently clean the tiles and smooth the grout lines. Be mindful not to remove too much grout from the joints while ensuring that the tile surfaces are free from excess grout residue. Rinse the sponge frequently to maintain a clean and effective cleaning process.
Step 4: Allow the Grout to Set
After cleaning, allow the grout to set for the time recommended by the manufacturer. This will give the grout ample time to cure and achieve its full strength and stability. Avoid disturbing the grout during this setting period to ensure a flawless finish.
Step 5: Apply Grout Sealer
Once the grout has set, use a small brush to apply a layer of grout sealer over the newly grouted areas. The sealer will protect the grout from moisture and stains, extending its lifespan and preserving its appearance over time.
By following these steps, you’ll successfully apply new grout to your shower tiles, revitalizing the entire space and creating a fresh and polished look. With the grout in place, it’s time to add the finishing touches to complete the regrouting process.
**
Finishing Touches
**
As you near the completion of the regrouting process, it’s time to add the finishing touches that will elevate the overall appearance of your shower and ensure a polished and professional outcome. These final steps will not only enhance the visual appeal of the regrouted tiles but also contribute to the longevity and durability of the newly refreshed surfaces. Let’s explore the essential finishing touches:
Step 1: Inspect and Touch-Up
Thoroughly inspect the regrouted areas to ensure that the grout lines are uniform and free from any imperfections. If necessary, use a small brush or grout float to touch up any areas where the grout may be uneven or require additional filling. Pay attention to detail to achieve a seamless and consistent finish.
Step 2: Seal Corners and Edges
Using a caulk gun, apply a bead of caulk along the corners and edges where the tiles meet. This will seal these vulnerable areas, preventing water infiltration and maintaining a clean and tidy appearance. Choose a caulk color that complements the grout for a cohesive look.
Step 3: Clean and Polish
Wipe down the tiles and grout lines with a clean, dry cloth to remove any residual grout haze or sealer. This final cleaning step will reveal the full beauty of the regrouted tiles and ensure that the surfaces are immaculate and ready to shine.
Step 4: Allow for Curing Time
After completing the finishing touches, allow the grout sealer and caulk to cure fully according to the manufacturer’s recommendations. This will ensure that these protective elements achieve their maximum effectiveness and durability, providing long-term support for your regrouted shower tiles.
With these finishing touches in place, your regrouting project is nearly complete. The revitalized shower tiles now exude a fresh and rejuvenated allure, transforming the entire bathroom space. As you admire the stunning results, it’s important to consider maintenance tips to preserve the beauty and functionality of your newly regrouted shower.
**
Maintenance Tips
**
After investing time and effort into regrouting your shower tiles, it’s essential to implement proper maintenance practices to preserve the beauty and integrity of the newly refreshed surfaces. These maintenance tips will help safeguard your regrouted tiles and ensure that they remain in impeccable condition for years to come. Let’s explore the key maintenance guidelines:
1. Regular Cleaning
Consistent cleaning is vital to prevent grime and soap scum from accumulating on the regrouted tiles. Use a mild, non-abrasive cleaner and a soft brush or sponge to gently clean the tiles and grout lines. Regular cleaning will maintain the fresh appearance of the grout and tiles, preventing the buildup of stubborn stains.
2. Periodic Sealing
Reapply grout sealer periodically to reinforce the protective barrier on the grout. This will help repel moisture and stains, preserving the grout’s color and integrity. Follow the manufacturer’s recommendations for the frequency of resealing to ensure optimal performance.
3. Addressing Grout Repairs Promptly
Monitor the grout for any signs of damage or deterioration, such as cracks or crumbling. Address any issues promptly by removing and replacing the affected grout. Timely repairs will prevent water infiltration and maintain the structural stability of the tiled surfaces.
4. Ventilation
Ensure adequate ventilation in the shower area to minimize excess moisture, which can contribute to mold and mildew growth. Use exhaust fans or open windows to promote air circulation and facilitate the drying of the shower tiles after use.
5. Avoid Harsh Cleaners
Avoid using harsh or acidic cleaners on the regrouted tiles, as these can compromise the integrity of the grout and damage the tile surfaces. Opt for gentle, pH-neutral cleaners that are safe for both the grout and tiles.
By incorporating these maintenance tips into your regular cleaning and upkeep routine, you’ll prolong the life and beauty of your regrouted shower tiles, ensuring that they continue to exude a fresh and inviting ambiance. With these guidelines in mind, you can confidently enjoy the enduring benefits of your regrouting project.
**
Conclusion
**
Congratulations on successfully completing the regrouting process for your shower tiles! By embarking on this transformative journey, you’ve not only revitalized the appearance of your shower but also fortified its structural integrity, creating a space that exudes freshness and durability. As you bask in the rejuvenated ambiance of your bathroom, it’s important to reflect on the journey and the remarkable results achieved.
Regrouting your shower tiles is a testament to your dedication to maintaining a welcoming and functional home environment. Through careful preparation, meticulous application, and diligent maintenance, you’ve elevated the aesthetic appeal and longevity of your shower, fostering a space that embodies both beauty and resilience.
As you revel in the allure of your regrouted shower, take pride in the craftsmanship and attention to detail that have brought about this remarkable transformation. The revitalized tiles and impeccably grouted lines stand as a testament to your commitment to excellence and your ability to undertake impactful home improvement projects.
With the knowledge and skills gained from this comprehensive guide, you now possess the expertise to tackle future regrouting endeavors with confidence and finesse. Whether it’s rejuvenating other tiled surfaces in your home or assisting friends and family with their regrouting projects, your newfound proficiency will continue to make a lasting impact.
As you move forward, remember to implement the maintenance tips provided to safeguard the beauty and functionality of your regrouted shower tiles. By adhering to these guidelines, you’ll ensure that your efforts endure, maintaining the allure of your revitalized shower for years to come.
Embrace the joy of a refreshed and resilient shower space, knowing that your dedication to excellence has yielded a truly remarkable outcome. Your regrouted shower tiles now stand as a testament to your unwavering commitment to creating a home that exudes beauty, functionality, and enduring quality.
With the completion of this regrouting journey, you’ve not only transformed your shower but also enriched your home with a touch of revitalized elegance. As you revel in the results of your labor, may the renewed allure of your shower tiles serve as a daily reminder of the transformative power of dedication and craftsmanship.
Frequently Asked Questions about How To Regrout A Shower Tile
Was this page helpful?
At Storables.com, we guarantee accurate and reliable information. Our content, validated by Expert Board Contributors, is crafted following stringent Editorial Policies. We're committed to providing you with well-researched, expert-backed insights for all your informational needs.


0 thoughts on “How To Regrout A Shower Tile”