Home>Furniture>Kitchen Furniture>How To Take Apart A GE Dryer
Kitchen Furniture
How To Take Apart A GE Dryer
Modified: August 31, 2024
Learn how to take apart a GE dryer with step-by-step instructions in this informative article. Explore the inner workings and troubleshoot common issues.
(Many of the links in this article redirect to a specific reviewed product. Your purchase of these products through affiliate links helps to generate commission for Storables.com, at no extra cost. Learn more)
Introduction
Welcome to this comprehensive guide on how to take apart a GE dryer. Whether you need to repair a specific component or want to perform routine maintenance, understanding the process of disassembling your dryer is essential. By following these step-by-step instructions, you’ll be able to confidently take apart your GE dryer and address any issues that may arise.
Before we begin, it’s important to note that safety should always be your top priority. Make sure to unplug the dryer from the power source and take appropriate precautions to avoid any injuries. Additionally, refer to your dryer’s manual for specific instructions that may differ from the ones provided here.
Now, let’s gather the necessary tools and materials to get started.
Key Takeaways:
- Prioritize safety by unplugging the dryer and preparing the work area before disassembly. Label components and gather necessary tools to ensure a smooth and efficient process.
- Regular cleaning and maintenance of the lint trap, blower housing, and other components are essential for optimal dryer performance and fire hazard prevention. Reassemble components carefully and test for proper functionality.
Read more: How To Take A Dryer Apart
Tools and Materials Needed
Before beginning the disassembly process, you’ll need to gather the following tools and materials:
- Flathead screwdriver: This versatile tool will come in handy for removing screws and prying open panels.
- Phillips head screwdriver: You’ll likely encounter both flathead and Phillips head screws during the disassembly process, so having both types of screwdrivers is essential.
- Needle-nose pliers: These slim pliers are useful for removing and manipulating small components.
- Adjustable wrench: Depending on your dryer model, you may need an adjustable wrench to loosen or tighten certain bolts or nuts.
- Ratchet and socket set: Some dryer models may require the use of a ratchet and socket set for removing certain components.
- Vacuum cleaner: It’s a good idea to have a vacuum cleaner or a handheld vacuum nearby to clean up any accumulated lint or debris.
- Lint brush or dryer lint cleaning kit: To thoroughly clean the dryer’s interior and lint trap, a lint brush or a specialized dryer lint cleaning kit will be useful.
It’s important to have all these tools and materials available before you begin disassembling your GE dryer. This will ensure a smooth and efficient process, allowing you to address any issues or perform necessary maintenance with ease.
Prep Work
Before diving into the disassembly process, it’s essential to prepare your work area and take some preliminary steps to ensure a smooth and safe experience. Here are some key prep work steps to follow:
- Unplug the dryer: Ensure that the dryer is completely disconnected from the power source to avoid any electrical accidents during the disassembly process.
- Clear the area: Make sure the area around the dryer is clear of any obstacles or obstructions. This will provide you with enough space to move around and work comfortably.
- Remove any connected accessories: If your dryer is equipped with any accessories such as a drying rack or auxiliary door latch, remove them before starting the disassembly.
- Empty the dryer: Take out any clothes or items that may be inside the dryer drum. Additionally, remove and empty the lint trap to prevent any lint from scattering during the disassembly process.
- Prepare a workspace: Find a sturdy and flat surface to place the removed components. Having a designated workspace will help you stay organized and prevent any damage or misplacement of parts.
- Label or take photos: If you anticipate difficulty remembering the proper arrangement or order of components, consider labeling them or taking clear photos as reference points.
These prep work steps will set the stage for a successful disassembly. By following these precautions, you’ll create a safe environment and be better prepared to handle the various components of your GE dryer during the disassembly process.
Removing the Control Panel
The control panel is the interface that allows you to select the drying settings and operate your GE dryer. To access the inner components of the dryer, you’ll first need to remove the control panel. Follow these steps:
- Unplug the dryer: Before proceeding, make sure the dryer is disconnected from the power source to prevent any electrical accidents.
- Locate the screws: Look for screws holding the control panel in place. These screws are usually located on the back or front of the control panel.
- Remove the screws: Use a screwdriver, usually a Phillips head, to remove the screws securing the control panel. Keep them in a safe place as you will need them for reassembly.
- Disconnect wires or ribbon cables: With the screws removed, gently pull the control panel forward. You may need to disconnect any wires or ribbon cables connected to the control panel. Take note of their placement or labels for reconnection.
- Set aside the control panel: Once all the necessary connections have been safely disconnected, set aside the control panel in a secure location.
With the control panel removed, you’ll have better access to the internal components of your GE dryer. Keep the screws and any disconnected wires or cables organized, as you’ll need them for reassembly. Now you’re ready to move on to the next step of the disassembly process.
Disconnecting the Dryer Door
Next in the disassembly process is disconnecting the dryer door. This step is necessary to remove the front panel and gain access to the inner components of the GE dryer. Follow these steps:
- Unplug the dryer: Ensure that the dryer is completely disconnected from the power source to avoid any electrical accidents during the disassembly process.
- Locate the hinge screws: Look for the hinge screws that hold the dryer door in place. These screws are typically positioned on the inside of the door.
- Remove the hinge screws: Using a screwdriver or adjustable wrench, carefully unscrew the hinge screws. Keep them in a safe place for reassembly later.
- Disconnect the door switch: Locate the electrical plug near the hinge side of the door. Gently detach the plug by pulling it apart.
- Set aside the dryer door: Once the screws and electrical plug are detached, carefully lift the dryer door off the hinges and set it aside. Be mindful of the weight and make sure to place it in a safe spot to prevent any damage.
By disconnecting the dryer door, you’ll now have unhindered access to the front panel, which is the next component to remove. Remember to keep the hinge screws and electrical plug in a secure location for reassembly. With the door out of the way, you’re ready to proceed to the next step in the disassembly process.
Read more: How To Take Apart Stackable Washer/Dryer
Removing the Top Cover
The next step in disassembling your GE dryer is removing the top cover. This will allow you to access the internal components of the dryer more easily. Follow these steps:
- Unplug the dryer: Before starting, ensure that the dryer is completely disconnected from the power source to avoid any electrical accidents.
- Locate the release clips or screws: Look for the release clips or screws at the rear of the dryer. These are typically positioned just under the back lip of the dryer’s top cover.
- Depress the release clips or remove the screws: If your dryer has release clips, use a flathead screwdriver to depress them. If there are screws, use a screwdriver to remove them. This will allow you to lift the back of the top cover.
- Lift the back of the top cover: With the release clips depressed or the screws removed, lift the back of the top cover slightly, then slide it back to disengage the front clips. Be cautious, as the top cover may still be connected to the console or control panel.
- Disconnect any remaining connections: If there are any wires or cables connecting the top cover to the console or control panel, carefully disconnect them according to the dryer’s manual or manufacturer’s instructions.
- Set aside the top cover: Once all connections are safely disconnected, set the top cover aside in a secure location.
By removing the top cover, you’ll have clear access to the inner components of the GE dryer. Make sure to keep the release clips, screws, and any disconnected wires or cables organized, as you’ll need them during reassembly. With the top cover out of the way, you can now move on to removing the front panel and further disassembling the dryer.
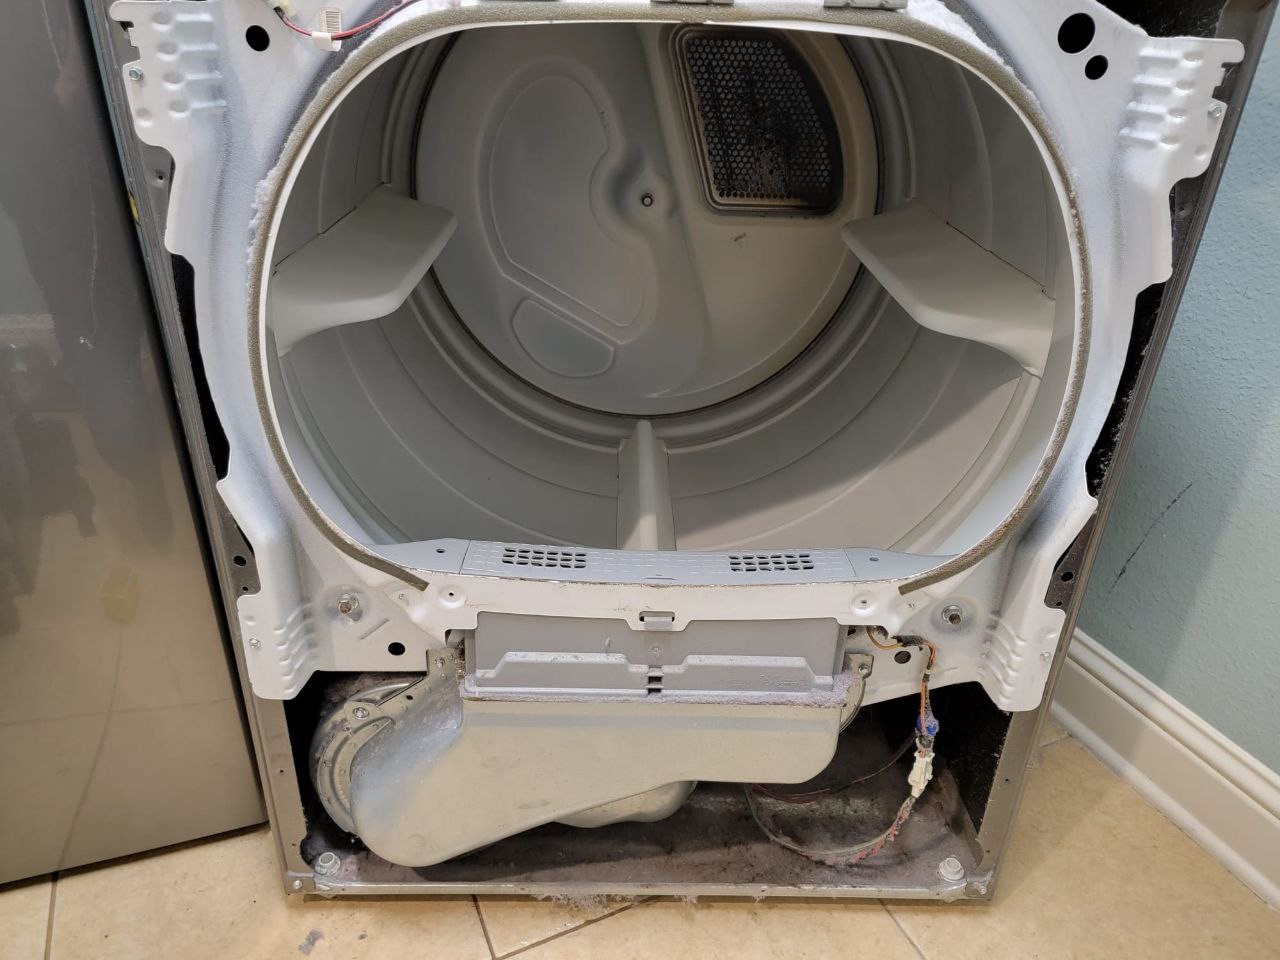
Removing the Front Panel
Now that you have successfully removed the top cover of your GE dryer, it’s time to move on to removing the front panel. Follow these steps:
- Unplug the dryer: Ensure that the dryer is completely disconnected from the power source to avoid any electrical accidents during the disassembly process.
- Locate the screws or clips: Look for screws or clips that secure the front panel to the dryer’s cabinet. The screws are typically located at the top and bottom corners of the front panel, while the clips may be positioned along the sides.
- Remove the screws or release the clips: If your dryer has screws, use a screwdriver to carefully remove them. If there are clips, gently pry them open using a flathead screwdriver.
- Disconnect any wire connections: Check if there are any wire connections or harnesses between the front panel and the rest of the dryer. If so, carefully detach them by pulling them apart or using a flathead screwdriver to release any locking tabs.
- Lift and remove the front panel: Once all screws, clips, and wire connections are released, lift the front panel slightly from the bottom and then pull it forward to completely remove it from the dryer’s cabinet. Take care not to damage any components or wiring during this step.
With the front panel removed, you now have a clear view of the dryer’s drum and other internal components. Keep the screws, clips, and wire connections in a safe place for reassembly later. With the front panel out of the way, you’re ready to move on to the next step in the disassembly process.
Before taking apart a GE dryer, always unplug the appliance to avoid any electrical hazards. Additionally, refer to the user manual or online resources for specific instructions on disassembly.
Taking Apart the Drum Assembly
Now that you have removed the front panel of your GE dryer, you can proceed to take apart the drum assembly. This step will allow you to access and inspect the drum, belt, and other components. Follow these steps:
- Unplug the dryer: Ensure that the dryer is completely disconnected from the power source to avoid any electrical accidents during the disassembly process.
- Locate and remove the screws: Look for the screws that secure the drum assembly in place. These are usually located around the perimeter of the drum or along the side walls of the dryer cabinet.
- Remove the screws: Use a screwdriver or socket wrench to carefully remove the screws. Keep them organized and easily accessible for reassembly.
- Inspect and remove the drum: Once the screws are removed, carefully lift and remove the drum from the dryer cabinet. Pay attention to any wires or connectors that may still be attached to the drum and disconnect them as needed.
- Inspect and remove the belt: Take note of the belt’s position and how it connects to the motor and idler pulley. Release the tension on the belt and remove it from the drum assembly.
- Check for any additional components: Depending on your dryer model, there may be additional components attached to the drum assembly, such as support rollers, glides, or seals. Identify and remove these components carefully, noting their locations and orientations.
By taking apart the drum assembly, you have gained access to the drum, belt, and other parts that may require inspection or replacement. Ensure that you keep the screws, belt, and any other removed components organized and safely stored for reassembly later. With the drum assembly disassembled, you can now proceed to disconnecting the belt and motor.
Disconnecting the Belt and Motor
In order to fully disassemble your GE dryer, the next step is to disconnect the belt and motor. This will allow you to remove the drum and access the motor for inspection or replacement. Follow these steps:
- Unplug the dryer: Ensure that the dryer is completely disconnected from the power source to avoid any electrical accidents during the disassembly process.
- Locate the drive belt: The drive belt is responsible for rotating the dryer drum. It is typically wrapped around the drum and connected to the motor pulley and idler pulley.
- Release tension on the belt: Locate the idler pulley and use a flathead screwdriver to release tension on the belt. This will loosen the belt’s grip on the drum and allow for easier removal.
- Remove the belt from the drum: Once tension is released, carefully slide the belt off the drum and set it aside for later reassembly.
- Locate the motor assembly: Look for the motor assembly, which is usually positioned at the back of the dryer. It will be connected to various wires and terminals.
- Disconnect the necessary wires: Identify the wires connected to the motor and use caution to disconnect them. You may need to use needle-nose pliers to release any locking tabs or connectors.
- Remove the motor assembly: Once all the necessary wires are disconnected, remove the screws or clips holding the motor assembly in place. Carefully lift and remove the motor from the dryer cabinet.
By disconnecting the belt and motor, you have now gained complete access to the drum and motor assembly. Remember to keep the belt and any removed screws or clips organized for reassembly. You can now proceed to the next step of removing the blower housing.
Read more: How To Take Apart A Conair 1875 Hair Dryer
Removing the Blower Housing
The blower housing in your GE dryer is responsible for circulating air through the drum and expelling moisture. To access the blower wheel and housing for cleaning or inspection, follow these steps:
- Unplug the dryer: Ensure that the dryer is completely disconnected from the power source to avoid any electrical accidents during the disassembly process.
- Locate the blower housing: The blower housing is typically located at the front or rear of the dryer, depending on the model. It is connected to the motor and positioned near the lint trap area.
- Remove the housing screws or clips: Using a screwdriver or appropriate tool, remove the screws or release the clips that secure the blower housing in place. Keep these screws or clips organized for reassembly.
- Disconnect the motor wiring: If necessary, carefully disconnect any motor wiring connected to the blower housing. Take note of the wire connections to ensure proper reconnection.
- Remove the blower housing: Once the screws are removed and any wiring is disconnected, lift and remove the blower housing from the dryer. Be cautious of any sharp edges or delicate components while doing so.
By removing the blower housing, you can now access the blower wheel and housing for cleaning or inspection. Take this opportunity to remove any accumulated lint or debris from the blower components. Remember to keep the screws or clips and any disconnected wiring in a safe place for reassembly later. With the blower housing removed, you’re ready to proceed to the next step of removing the lint trap.
Removing the Lint Trap
The lint trap in your GE dryer plays a crucial role in preventing lint buildup and improving airflow. To remove and clean the lint trap, follow these steps:
- Unplug the dryer: Before proceeding, make sure the dryer is completely disconnected from the power source to avoid any electrical accidents.
- Locate the lint trap: The lint trap is typically located on the top panel of the dryer, near the door opening. It may be marked with a lint trap symbol or label.
- Remove the lint trap cover: Depending on your dryer model, the lint trap cover may be removable or hinged. Carefully open or lift the cover to access the lint trap. If hinged, support the cover to prevent damage.
- Remove accumulated lint: Using your hand or a lint brush, remove any lint or debris that has collected in the lint trap. Make sure to clear the entire trap to ensure proper airflow.
- Clean the lint trap cover: Take this opportunity to clean the lint trap cover. Use a soft brush or cloth to remove any lint or dust buildup. Rinse the cover if necessary and ensure it is completely dry before reassembling.
- Reinstall the lint trap: Once the lint trap and cover are clean, carefully place the lint trap back into its designated slot. Ensure it is properly aligned and secure.
Removing and cleaning the lint trap is an essential part of dryer maintenance, as it helps prevent lint buildup and ensures optimal drying performance. By following these steps, you can keep your GE dryer running efficiently and reduce the risk of fire hazards caused by lint blockage. With the lint trap clean and reinstalled, you can now proceed to the cleaning and reassembly of the other dryer components.
Cleaning and Reassembling the Dryer Components
Now that you have disassembled and cleaned the various components of your GE dryer, it’s time to focus on reassembling them and ensuring everything is in proper working order. Follow these steps to clean and reassemble the dryer components:
- Clean the interior: Take a vacuum cleaner or a handheld vacuum and thoroughly clean the interior of the dryer. Pay special attention to areas where lint or debris may have accumulated, such as the drum, motor, and blower housing. Wipe down any visible dirt or grime with a damp cloth.
- Clean the lint trap area: Use a lint brush or a specialized dryer lint cleaning kit to remove any remaining lint or debris from the lint trap area. This will ensure proper airflow and prevent clogs in the future.
- Reassemble the components: Starting with the blower housing, carefully position it back into place and secure it with the screws or clips. Reconnect any motor wiring if required. Next, reattach the drum assembly, ensuring it is properly aligned and seated. Remember to reconnect the belt to the motor and idler pulley according to the correct configuration.
- Reinstall the front panel: Line up the front panel with the dryer cabinet and carefully slide it into place. Ensure that any screws or clips removed earlier are reinstalled to secure the front panel in place. Reconnect any wire connections as necessary.
- Replace the top cover: Position the top cover back onto the dryer cabinet, making sure it is properly aligned. Engage any front clips, then secure the back of the cover with the screws or clips that were removed earlier.
- Reconnect the dryer door: Place the dryer door back onto the hinges and secure it with the hinge screws. Reconnect any wires or electrical plugs associated with the door switch.
- Plug in the dryer: Once all the components are reassembled, plug the dryer back into the power source.
After cleaning and reassembling the dryer components, it’s a good idea to run a test cycle to ensure everything is functioning properly. Listen for any unusual sounds or vibrations and check for proper heat distribution. If any issues arise, consult the dryer’s manual or consider seeking professional assistance.
By following these steps, you can have confidence in the cleanliness and functionality of your GE dryer. Regular maintenance and cleaning will help prolong the lifespan of your appliance and ensure efficient drying performance for years to come.
Conclusion
Congratulations! You’ve successfully learned how to take apart a GE dryer and clean its various components. By following the step-by-step instructions in this guide, you can confidently disassemble, clean, and reassemble your dryer, addressing any issues or performing routine maintenance along the way.
Remember to prioritize safety throughout the entire process. Always disconnect the dryer from the power source before starting any disassembly work, and exercise caution when handling sharp edges or delicate components.
Regular maintenance and cleaning of your dryer not only ensure optimal performance but also help prevent lint buildup and reduce the risk of fire hazards. By cleaning the lint trap, blower housing, and other components, you can maintain proper airflow and prolong the lifespan of your appliance.
As you reassemble the dryer components, take care to follow the correct order and alignment. Double-check all connections and ensure screws and clips are securely fastened. If you encounter any difficulties or are unsure about certain steps, refer to your dryer’s manual or consult a professional for assistance.
By following these guidelines, you can keep your GE dryer running smoothly, efficiently, and safely. Keep up with regular maintenance and cleaning to extend the life of your appliance and enjoy hassle-free drying for years to come.
Now that you've mastered disassembling your GE dryer, why not dive deeper into keeping your home in tip-top shape? Our guide on essential home upkeep offers practical advice and simple strategies to help you maintain your living space efficiently. From seasonal checks to routine cleaning, we cover all bases to ensure your home remains a comfortable sanctuary for you and your family. Don't miss out on these invaluable insights!
Frequently Asked Questions about How To Take Apart A GE Dryer
Was this page helpful?
At Storables.com, we guarantee accurate and reliable information. Our content, validated by Expert Board Contributors, is crafted following stringent Editorial Policies. We're committed to providing you with well-researched, expert-backed insights for all your informational needs.


0 thoughts on “How To Take Apart A GE Dryer”