Home>Furniture>Outdoor Furniture>How To Stain Your Concrete Patio
Outdoor Furniture
How To Stain Your Concrete Patio
Modified: March 7, 2024
Learn how to stain your concrete patio to enhance your outdoor furniture's aesthetics and durability. Follow our step-by-step guide for stunning results.
(Many of the links in this article redirect to a specific reviewed product. Your purchase of these products through affiliate links helps to generate commission for Storables.com, at no extra cost. Learn more)
Introduction
Welcome to our comprehensive guide on how to stain your concrete patio! If you’re looking to give your outdoor space a fresh, new look, staining your concrete patio is a fantastic option. Not only does it add aesthetic appeal and personality to your patio, but it also helps protect the concrete from damage caused by weather and daily wear and tear. In this article, we’ll outline the step-by-step process to help you achieve beautiful, long-lasting results.
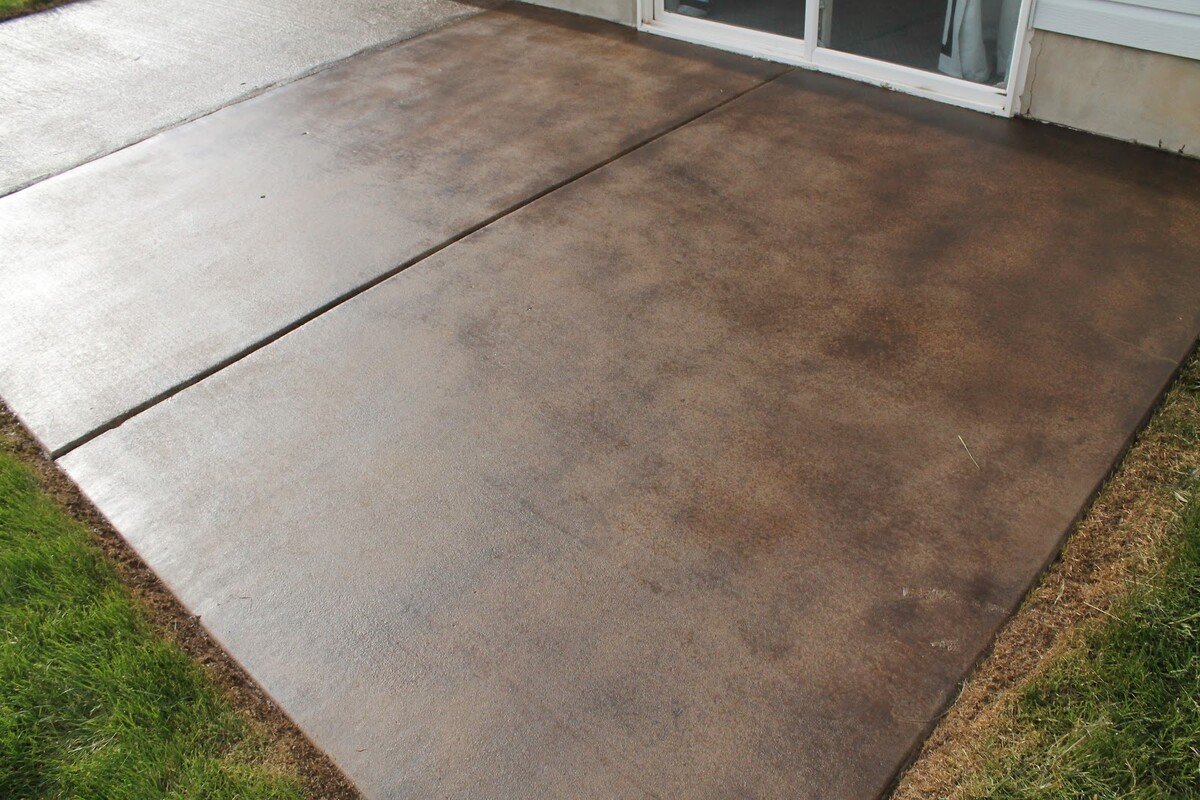
Staining your concrete patio is a relatively simple project that can be completed by homeowners with basic DIY skills. In just a few days, you can transform your dull and plain patio into a stunning centerpiece of your outdoor space. Whether you prefer a subtle, natural look or a bold and vibrant statement, there are various stain options available to suit your personal style.
Before we dive into the staining process, it’s important to note that proper preparation is crucial to ensure optimal results. Cleaning the concrete, patching any cracks or holes, and etching the surface are the essential initial steps. Once the patio is clean and ready, it’s time to choose the right stain for your project.
There are two main types of stains commonly used for concrete: water-based stains and acid-based stains. Water-based stains are highly versatile and offer a wide range of color options. They are also more environmentally friendly and easier to work with. On the other hand, acid-based stains create a unique, marbled effect and provide a more natural, earthy appearance.
Depending on the specific stain and the condition of your patio, you might need to apply a primer before proceeding with the actual stain application. The primer helps the stain adhere better and ensures a more uniform finish. It’s important to choose a primer that is compatible with both the stain and the concrete surface.
Once the patio is prepped and the primer is applied (if necessary), it’s time to apply the concrete stain. Before diving into the staining process, it’s a good idea to prepare the stain mixture according to the manufacturer’s instructions. This may involve diluting the stain or mixing different colors to achieve the desired shade. It’s always best to test the stain on a small, inconspicuous area of the patio to ensure you’re happy with the color.
To apply the stain, start by evenly coating the entire patio with the first layer. Use a brush, roller, or sprayer, depending on your preference and the size of the patio. Allow the first coat to dry completely before deciding if additional coats are needed. Applying additional coats can deepen the color and create a more vibrant, rich finish.
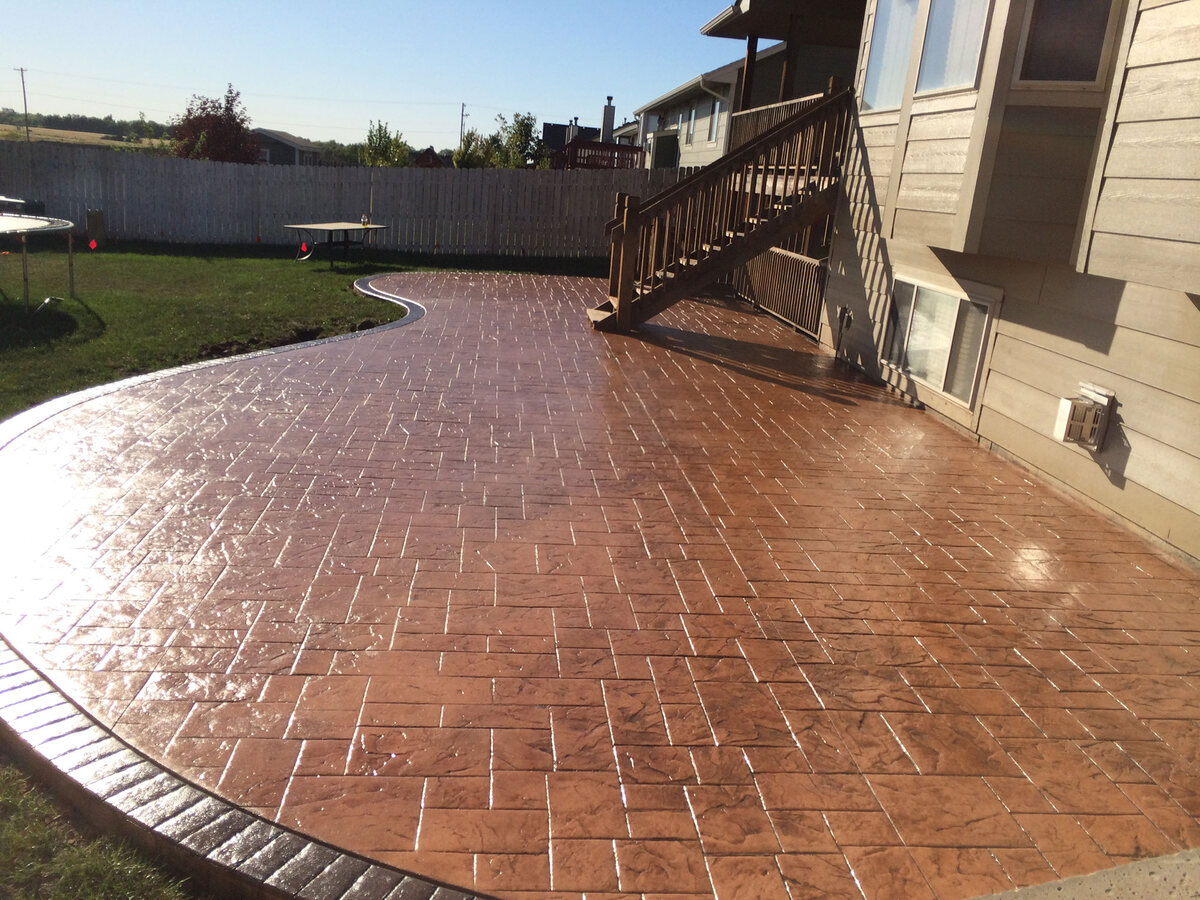
If you want to get creative and add more visual interest to your patio, you can use different colored stains or even incorporate a stencil design. This allows you to customize the look of your patio and make it truly unique to your style and taste.
Once the stain is applied and dried, it’s essential to seal and protect it to ensure its longevity. Sealing the stained concrete patio helps protect it from fading, staining, and moisture damage. It also enhances the color and adds a beautiful sheen. Select a sealer that is suitable for your specific stain type and apply it according to the manufacturer’s instructions.
Lastly, maintaining and caring for your stained concrete patio is relatively easy. Regular cleaning with a mild detergent or soap and water will help keep the surface looking its best. Additionally, it’s recommended to periodically reapply a fresh coat of sealer to maintain its protective properties.
Now that you have a comprehensive overview of the staining process, you’re ready to embark on your journey to transform your concrete patio into a beautiful and inviting outdoor space. Get your supplies ready, follow our step-by-step instructions, and enjoy the rewarding experience of creating a stunning, personalized patio that you can enjoy for years to come.
Key Takeaways:
- Transform your concrete patio into a vibrant outdoor oasis by staining it with water-based or acid-based stains. Follow the step-by-step guide to achieve a personalized and long-lasting finish that reflects your unique style.
- Ensure the longevity of your stained patio by sealing it to enhance color, resist stains, and protect against wear and tear. Regular cleaning and periodic resealing will maintain its beauty for years to come.
Read more: How To Stamp And Stain A Concrete Patio
Step 1: Clean and Prepare the Concrete Patio
Before starting the staining process, it’s crucial to thoroughly clean and prepare the concrete patio. This ensures that the stain adheres properly and provides a long-lasting finish. Here are the key steps to follow:
Sweeping and Pressure Washing
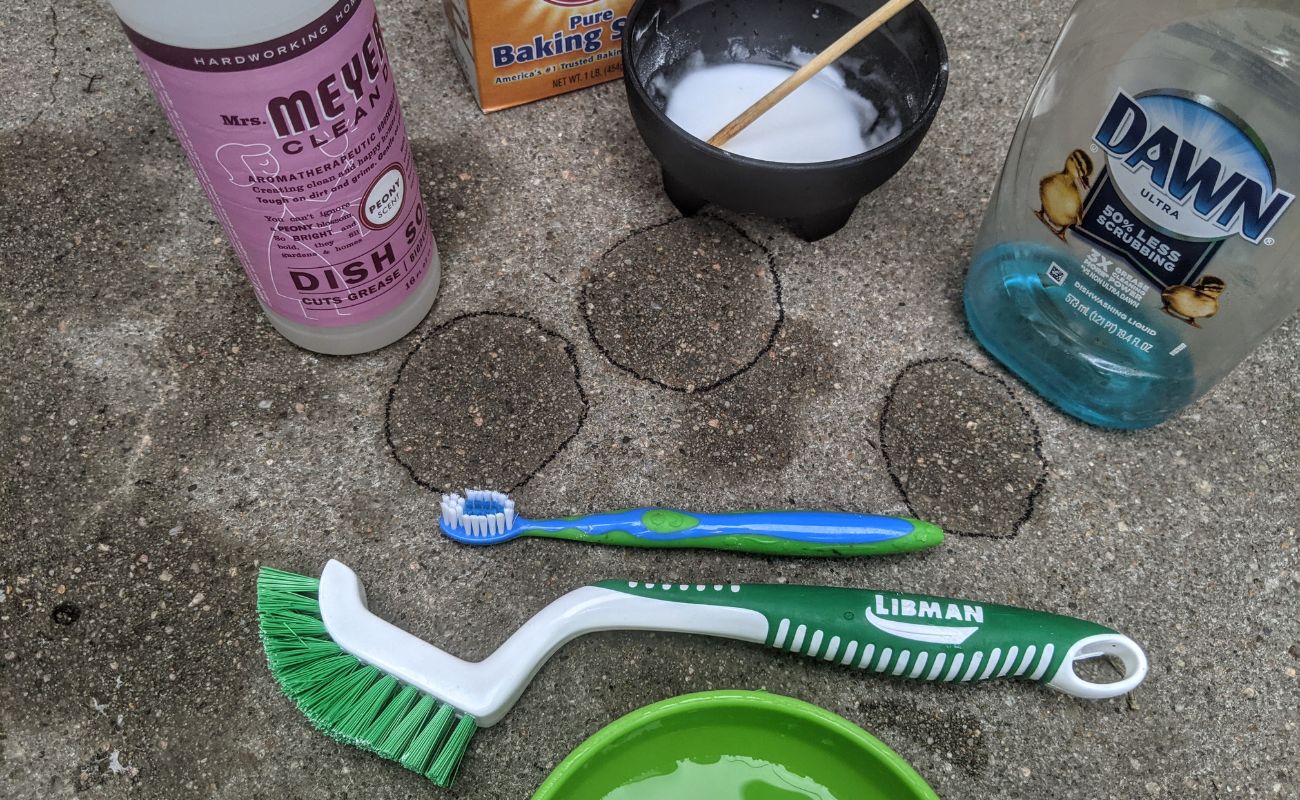
The first step is to sweep the entire patio to remove any loose dirt, leaves, or debris. Use a stiff broom or a leaf blower to clear the surface. Once the loose debris is removed, it’s time to give your patio a deep cleaning with a pressure washer. The high-pressure water stream helps cleanse the concrete by removing embedded dirt, grime, and stains. Start from one end and work your way across the entire surface, ensuring that you cover every area evenly.
Patching Cracks and Holes
If you notice any cracks or holes in the concrete during the cleaning process, it’s essential to patch them before staining. Use a concrete patching compound or filler to repair these imperfections. Follow the manufacturer’s instructions to prepare the compound and apply it to the cracks and holes. Smooth the surface with a trowel and allow it to dry thoroughly before moving on to the next step. This step is critical for ensuring a smooth and even finish when applying the stain.
Etching the Surface
Etching the concrete surface helps open up the pores and allows the stain to penetrate better. It also helps remove any existing sealer or paint residue, ensuring proper adhesion of the stain. To etch the surface, use a concrete etching solution or a mixture of water and muriatic acid. Always wear protective gloves, goggles, and a mask when working with acid. Follow the manufacturer’s instructions to mix and apply the solution. Use a stiff-bristle brush or a mechanical etcher to scrub the solution into the concrete, working small sections at a time. Rinse thoroughly with clean water once the etching process is complete. Allow the patio to dry completely before proceeding to the next step.
By following these steps to clean and prepare your concrete patio, you are setting the foundation for a successful staining project. The clean and repaired surface will ensure a more uniform and vibrant appearance of the stain. Now that your patio is clean and ready, it’s time to move on to choosing the right stain for your project.
Read more: How To Stain An Outdoor Concrete Patio
Step 2: Choose the Right Stain
Choosing the right stain for your concrete patio is an important decision that will greatly impact the overall look and feel of your outdoor space. There are two main types of stains commonly used for concrete: water-based stains and acid-based stains. Let’s explore each option:
Water-Based Stain
Water-based stains are a popular choice for staining concrete due to their versatility and ease of use. These stains are available in a wide range of colors, allowing you to achieve various effects and match your desired aesthetic. Some key advantages of water-based stains are:
- Versatility: Water-based stains can be easily customized by mixing different colors to create unique shades or by diluting them for a more subtle look.
- Quick Drying Time: Water-based stains typically have a faster drying time compared to acid-based stains, making them a convenient choice for projects with limited time constraints.
- Environmentally Friendly: Water-based stains have fewer harmful chemicals and odors, making them a more eco-friendly option.
- Easy Cleanup: Since water-based stains are not as harsh as acid-based stains, they are easier to clean up with soap and water.
- Compatibility: Water-based stains can be applied to both interior and exterior concrete surfaces, offering flexibility in usage.
Acid-Based Stain
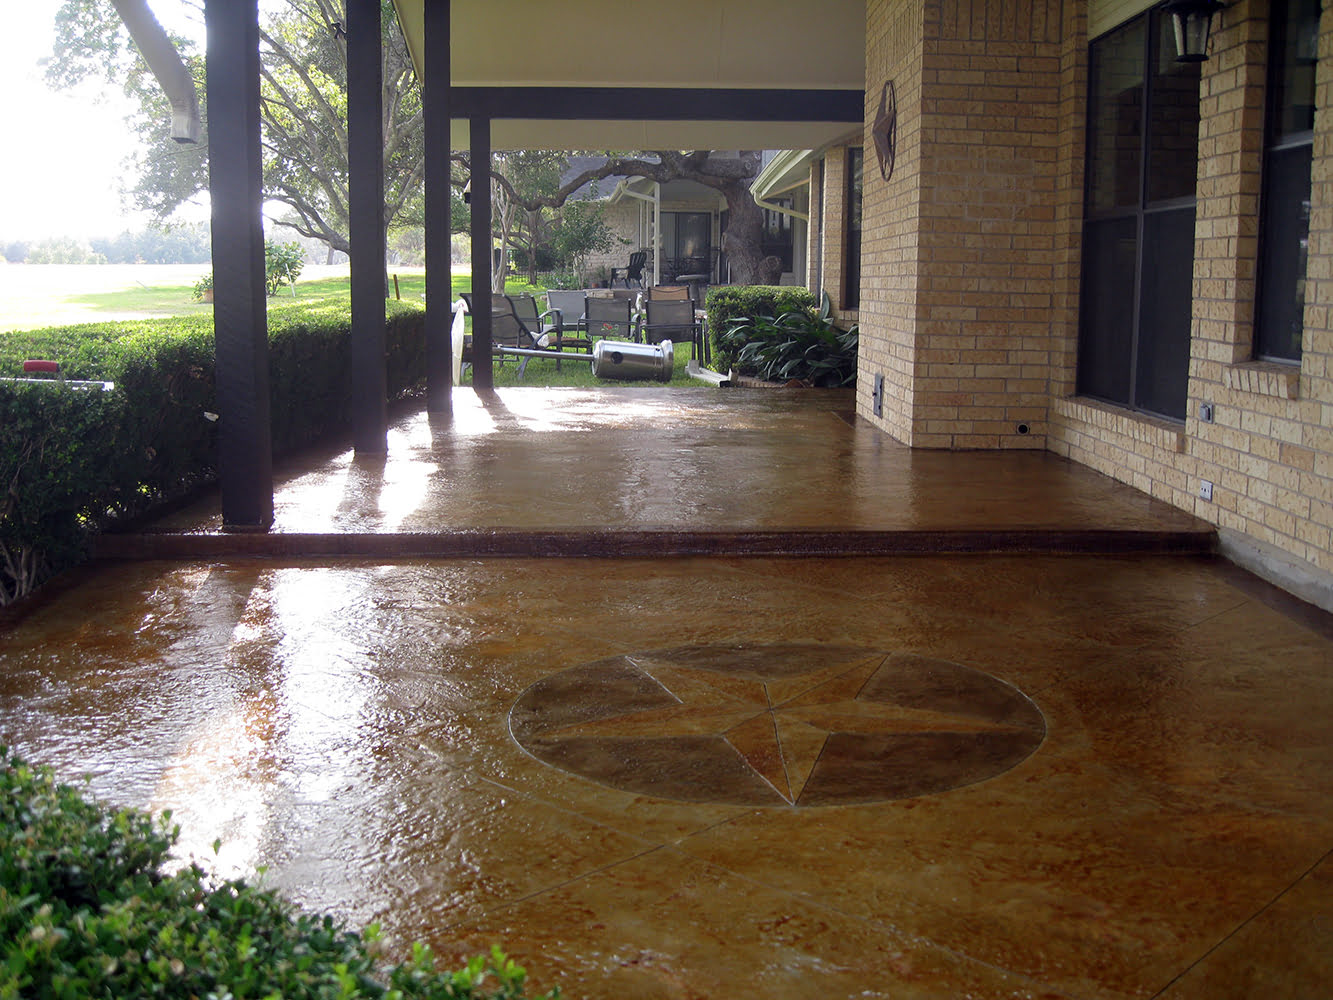
Acid-based stains are known for their ability to create beautifully marbled, mottled, or earthy finishes on concrete surfaces. These stains chemically react with the minerals in the concrete to produce unique and unpredictable color variations. Here are some key advantages of acid-based stains:
- Natural and Variegated Look: Acid stains create a more natural, organic look by penetrating the concrete and reacting with its components. The result is a stunning, variegated appearance with depth and character.
- Unique Coloration: Acid stains produce colors that are permanent and resist fading, giving your patio a long-lasting visual impact.
- Durable and Low Maintenance: Once the acid stain has properly reacted with the concrete and is sealed, it becomes a durable and low-maintenance surface that can withstand outdoor elements.
When choosing between water-based and acid-based stains, consider the desired appearance you want to achieve, the durability required for your specific outdoor conditions, and your personal preference in terms of color and pattern. It’s always a good idea to test the stain on a small inconspicuous area of the patio or on a concrete sample to see how it will interact with your specific concrete surface.
Now that you have a better understanding of the differences between water-based and acid-based stains, you can make an informed decision and select the stain that best suits your needs and aesthetic preferences. Once you’ve chosen your stain, you’re ready to move on to the next step: applying a primer (if necessary) before staining.
Step 3: Apply Primer (If Required)
Before applying the concrete stain, it’s important to determine if a primer is necessary for your specific staining project. While not always required, using a primer can offer several benefits and enhance the overall finish of your stained concrete patio. Let’s explore the benefits of using a primer and how to apply it:
Read more: How To Acid Stain Outdoor Concrete Patio
Benefits of Using a Primer
A primer acts as a bonding agent between the concrete surface and the stain, ensuring better adhesion and a more uniform color distribution. Here are some key benefits of using a primer:
- Enhanced Adhesion: The primer creates a strong bond between the concrete and the stain, reducing the chances of peeling or flaking over time.
- Uniform Appearance: Applying a primer can help create a more even and consistent color distribution, especially if you have porous or uneven concrete.
- Increased Stain Longevity: The primer acts as a protective layer, helping the stain resist fading, chipping, and other forms of wear and tear.
- Efficiency in Stain Usage: By using a primer, you can often achieve the desired color with fewer coats of stain, saving you time and money.
Applying the Primer
If you’ve determined that a primer is necessary for your staining project, here’s how to apply it:
- Clean the concrete patio thoroughly to remove any remaining debris or contaminants.
- Ensure the surface is completely dry before applying the primer.
- Choose a primer that is compatible with both the stain type and the concrete surface. Read the manufacturer’s instructions carefully.
- Using a paint roller or a brush, apply a thin and even coat of the primer to the entire patio surface. Work in small sections to ensure proper coverage.
- Allow the primer to dry completely according to the manufacturer’s instructions. This typically takes several hours.
- After the primer is dry, carefully inspect the surface for any missed spots or areas that may require additional coats. If needed, apply a second coat following the same process.
- Allow the primer to fully cure before proceeding with the staining process.
By applying a primer, you’re creating an optimal base for the stain, ensuring better adhesion and a more professional-looking finish. It’s worth noting that not all staining projects require a primer, so be sure to follow the recommendations provided by the stain manufacturer or seek professional advice if you’re unsure.
Now that you’ve learned about the benefits of using a primer and how to apply it, you’re ready to move on to the exciting part: applying the concrete stain to transform your patio into a beautiful and personalized outdoor space.
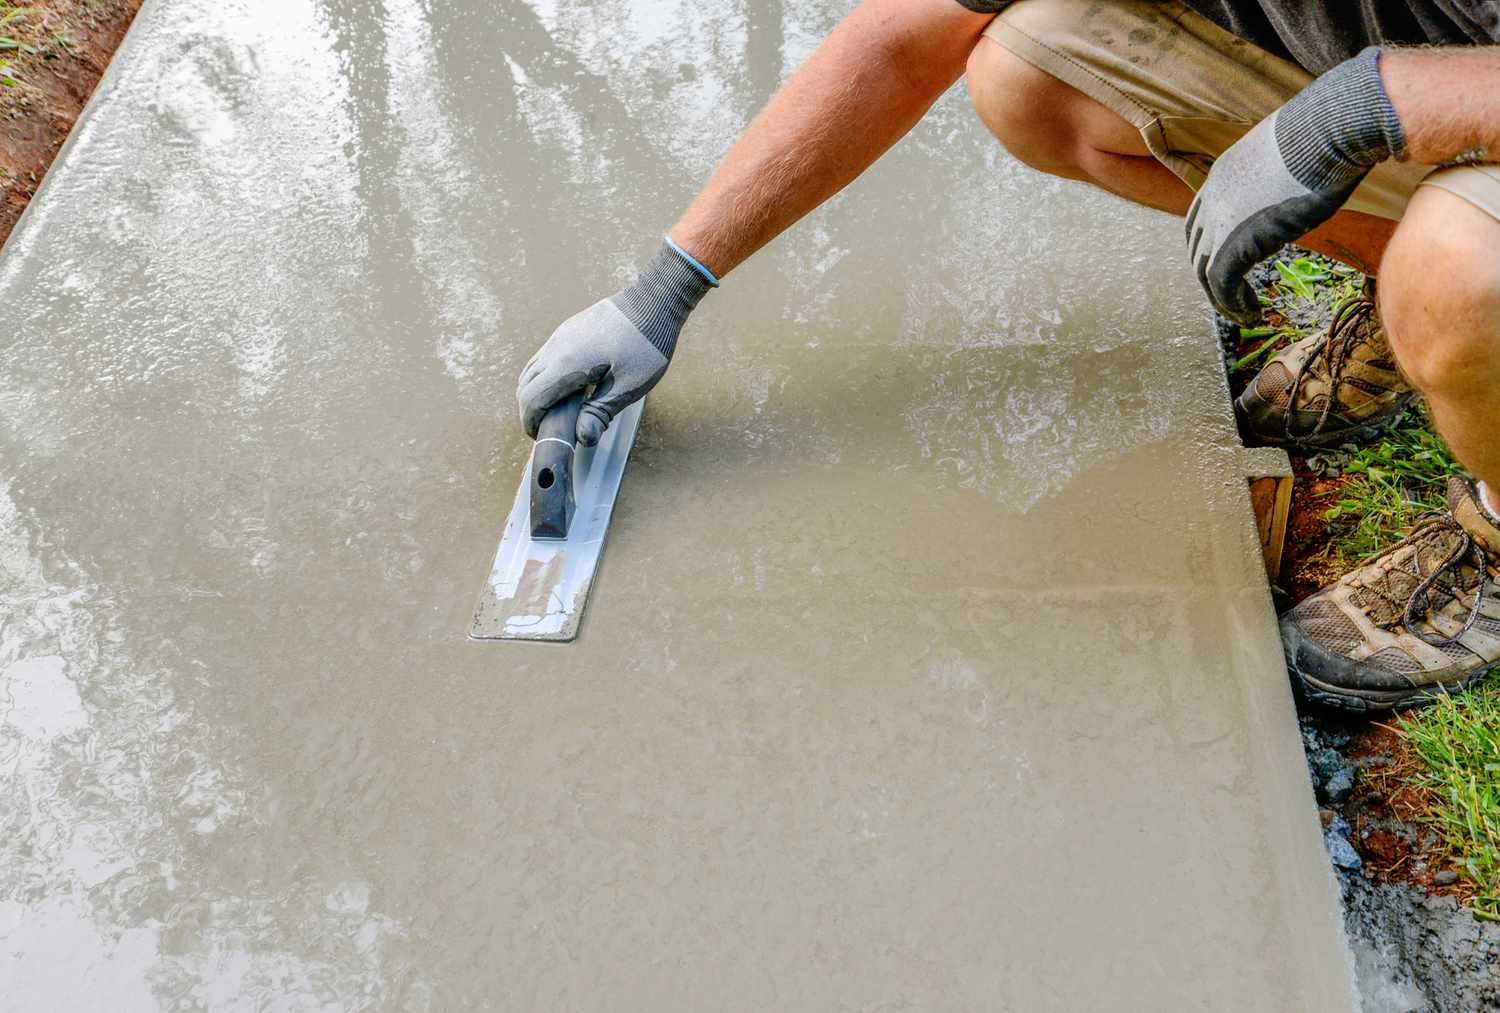
Step 4: Apply the Concrete Stain
Now that you have prepared your concrete patio and, if necessary, applied a primer, it’s time to apply the concrete stain. This step will bring color and vibrancy to your patio, transforming it into a visually appealing outdoor space. Let’s walk through the process of applying the concrete stain:
Preparing the Stain
Before you begin, it’s important to read and follow the manufacturer’s instructions for preparing the stain. This may involve diluting the stain with water or mixing different colors to achieve your desired shade. Take the time to test the stain on a small, inconspicuous area of the patio to ensure it matches your desired color and effect.
Read more: How To Paint Your Concrete Patio
Applying the First Coat
Start by preparing the patio for staining. Protect any nearby plants, furniture, or other surfaces by covering them with plastic or drop cloths. Use painter’s tape to protect the edges of walls or other areas you don’t want to stain.
Next, apply the first coat of stain. There are several methods you can use, such as using a brush, roller, or sprayer. Choose the method that works best for you and the size of your patio. Start at one end and work your way across the patio, applying the stain evenly and following the manufacturer’s recommended coverage rate.
As you apply the first coat, keep in mind that the color may appear lighter than the final result. Allow the first coat to dry completely according to the manufacturer’s instructions. This typically takes several hours or overnight.
Applying Additional Coats (if desired)
Once the first coat is dry, assess the color and decide if you want to deepen the shade or add more dimension. Applying additional coats can help achieve a richer and more vibrant appearance. Repeat the same application process as before, ensuring even coverage and allowing each coat to dry completely before proceeding to the next one.
Keep in mind that the drying time between coats can vary depending on the stain and environmental conditions. It’s essential to follow the manufacturer’s instructions for the recommended dry time.
Using Different Colored Stains or a Stencil (optional)
If you want to add more visual interest and personalization to your patio, consider using different colored stains or incorporating a stencil design. Using multiple colors can create unique patterns or borders, while stencils allow you to add intricate designs. Apply the additional colors or stencil patterns once the base coat is completely dry.
When working with different colors or stencils, it’s important to carefully plan your design and follow the instructions provided by the manufacturer. Take your time and ensure each layer is dry before moving on to the next one to avoid smudging or bleeding of colors.
By following these steps to apply the concrete stain, you’ll bring life and character to your patio. Whether you prefer a subtle, earthy look or a bold, vibrant statement, staining your concrete patio allows for endless creative possibilities. Once you’re satisfied with the level of color and dimension, it’s time to seal and protect the stained concrete to ensure its longevity.
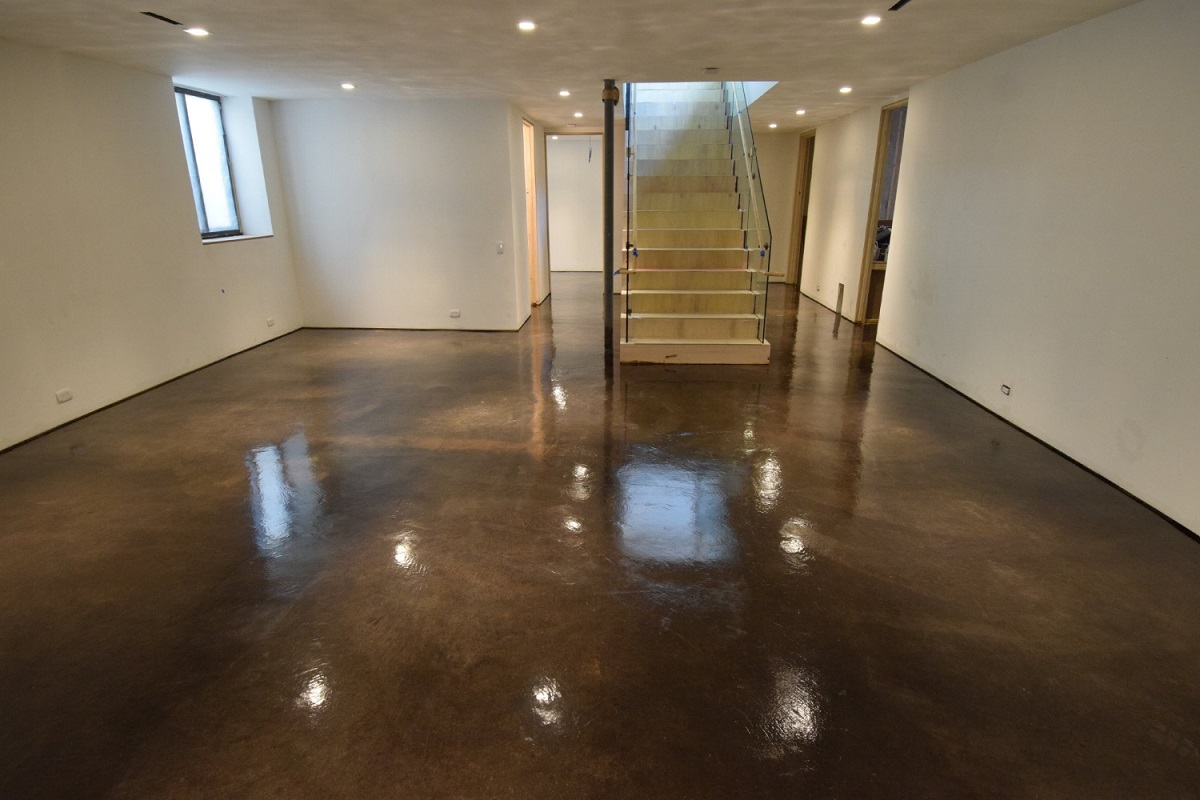
Step 5: Seal and Protect the Stained Concrete
After applying the concrete stain, it’s crucial to seal and protect the stained surface. Sealing the stained concrete not only enhances the color and aesthetic appeal but also provides crucial protection against fading, staining, and moisture damage. Here’s what you need to know about sealing and protecting your newly stained concrete patio:
Importance of Sealing the Stain
Sealing the stain is a vital step in maintaining the beauty and longevity of your stained concrete patio. Here are some key reasons why sealing is necessary:
- Color Enhancement: Sealing the stain enhances its color, giving it a richer and more vibrant appearance.
- Stain Protection: A sealer creates a protective layer on the concrete surface, making it more resistant to stains from spills, oil, dirt, and UV fading.
- Moisture Resistance: Sealing the stain helps prevent moisture penetration and damage, such as cracking, flaking, and efflorescence.
- Easy Maintenance: A sealed surface is easier to clean and maintain, as it repels dirt and makes regular maintenance routines simpler.
- Longevity: By sealing your stained concrete patio, you can extend its lifespan and enjoy its beauty for years to come.
Selecting the Right Sealer
Choosing the right sealer for your stained concrete patio is crucial for achieving optimal results. There are two main types of sealers commonly used for stained concrete: topical sealers and penetrating sealers.
Topical sealers, such as acrylic-based or epoxy-based sealers, create a protective film on the surface of the concrete. These sealers offer excellent stain resistance and enhance the color and sheen of the stained concrete. They are available in various finishes, including matte, satin, and glossy.
Penetrating sealers, also known as penetrating concrete sealers or silane/siloxane sealers, penetrate into the concrete pores to create a barrier against moisture and stains. These sealers provide excellent protection without significantly altering the appearance of the concrete. They are ideal for maintaining a natural, unenhanced look.
When selecting a sealer, consider factors such as the level of gloss or sheen you desire, the level of protection required for your specific climate and usage, and the compatibility with your stain type. It’s essential to carefully read the manufacturer’s instructions and choose a sealer that is designed for use on stained concrete surfaces.
Applying the Sealer
Before applying the sealer, ensure that the stained concrete is completely dry. Follow these general steps to apply the sealer:
- Read and follow the manufacturer’s instructions for the specific sealer you have chosen.
- Protect any nearby surfaces or plants by covering them with plastic or drop cloths.
- Using a brush or roller, apply an even and thin coat of sealer to the entire stained concrete surface. Work in small sections to ensure proper coverage and avoid pooling or streaking.
- Allow the sealer to dry according to the manufacturer’s instructions. This typically takes a few hours.
- After the first coat has dried, assess the surface and determine if additional coats are necessary. Apply subsequent coats, if needed, following the same process of applying a thin and even layer.
- Allow the final coat to dry fully before subjecting the sealed surface to foot traffic or placing furniture or other objects on it. This may take anywhere from 24 to 72 hours, depending on the sealer and environmental conditions.
It’s important to note that each sealer may have specific instructions and curing times, so always refer to the manufacturer’s guidelines for the best results.
By sealing your stained concrete patio, you’re taking an important step in preserving its beauty and protecting it against wear and tear. Once the sealer has fully cured, you can enjoy your revitalized outdoor space to its fullest. Lastly, don’t forget to maintain and care for your stained patio to ensure its longevity.
Step 6: Maintain and Care for the Stained Patio
Once you have successfully stained and sealed your concrete patio, it’s important to establish a regular maintenance routine to keep it looking its best and prolong its lifespan. Here are two key steps to maintaining and caring for your stained patio:
Regular Cleaning
Regular cleaning is essential to remove dirt, debris, and stains from the surface of your stained patio. Follow these steps to keep your patio looking pristine:
- Sweep or Brush: Use a broom or brush to remove loose dirt, leaves, and debris from the surface. Regular sweeping helps prevent the accumulation of dirt that can scratch the surface over time.
- Mild Detergent or Soap: Mix a mild detergent or soap with warm water to create a cleaning solution. Use a soft-bristle brush or a mop to scrub the surface gently. Avoid using abrasive materials or harsh chemicals that may damage the stain or sealer.
- Rinse Thoroughly: After scrubbing, thoroughly rinse the patio with clean water to remove any remaining detergent and dirt. Use a garden hose or a pressure washer on a low setting for more thorough cleaning if necessary.
- Remove Stains Promptly: If any stains occur, such as food or beverage spills, clean them up as soon as possible to prevent them from seeping into the stain and causing permanent discoloration.
Periodic Sealer Reapplication
Over time, the protective sealer on your stained patio may wear down due to foot traffic, weather exposure, and other factors. It’s important to periodically reapply the sealer to maintain its protective properties. Here’s how to determine when it’s time to reseal your patio:
- Water Absorption Test: Sprinkle water onto the surface of your patio. If the water beads up and doesn’t absorb into the concrete, the sealer is still effective. However, if the water starts to soak into the concrete, it indicates that the sealer has worn off, and it’s time for reapplication.
- Visual Inspection: Look for signs of wear and tear on the surface of the patio. If you notice areas where the color appears faded or where the stain seems more vulnerable to stains or damage, it’s a good indication that the sealer needs to be reapplied.
- Manufacturer’s Recommendations: Check the manufacturer’s instructions for the recommended timeframe for resealing. This can vary depending on the type of sealer used, so it’s important to follow their guidelines.
When it’s time to reseal your patio, follow the same steps as the initial sealer application process outlined in Step 5. Make sure to thoroughly clean the surface beforehand to ensure proper adhesion of the new sealer.
By maintaining a regular cleaning routine and periodically reapplying the sealer, you can protect the integrity and appearance of your stained patio for years to come. These simple steps will help preserve its beauty and make it a long-lasting focal point of your outdoor space.
With Step 6 completed, you have successfully learned how to maintain and care for your stained patio. Now you can enjoy the beauty and benefits of your stained concrete creation while relishing in the joy of your outdoor sanctuary!
Conclusion
Congratulations on completing the journey of staining and caring for your concrete patio! By following the step-by-step guide outlined in this article, you have transformed your outdoor space into a stunning and inviting area that reflects your style and personality.
Staining your concrete patio not only enhances its visual appeal but also provides protection against the elements and everyday wear and tear. With the right stain and proper preparation, you were able to achieve a beautiful and long-lasting finish.
Remember, cleaning and preparing the concrete surface is crucial before applying the stain. Sweeping, pressure washing, patching cracks, and etching the surface ensure optimal adhesion and a smooth canvas for the stain.
Choosing the right stain is key to achieving the desired look for your patio. Whether it’s a water-based stain offering versatility and ease of use, or an acid-based stain providing a unique marbled effect, you were able to select the stain that best suited your preferences.
If a primer was necessary for your project, applying it helped enhance the adhesion and color distribution of the stain, resulting in a more professional finish.
With the stain applied, your concrete patio came to life with colors and character. Whether you opted for a single color or experimented with different shades and stencils, you created a personalized outdoor oasis.
To protect your stained concrete, sealing it is essential. The sealer enhances the color, provides resistance against staining and fading, and increases the overall longevity of your patio. Regular cleaning and periodic reapplication of the sealer will ensure that your patio remains vibrant and protected over time.
By completing these steps and incorporating regular maintenance, you have set the stage for a patio that can be enjoyed for years to come. Whether relaxing with family and friends, hosting gatherings, or simply immersing yourself in nature, your stained patio has become a focal point of your outdoor living space.
We hope this comprehensive guide has provided you with the knowledge and confidence to embark on your staining journey. Remember to unleash your creativity and enjoy the process of transforming your concrete patio into a beautiful oasis that reflects your unique style.
Now that you are equipped with the necessary skills, go ahead and make the most of your outdoor living experience. Bask in the beauty of your stained concrete patio and create lasting memories in your serene and personalized outdoor retreat!
Frequently Asked Questions about How To Stain Your Concrete Patio
Was this page helpful?
At Storables.com, we guarantee accurate and reliable information. Our content, validated by Expert Board Contributors, is crafted following stringent Editorial Policies. We're committed to providing you with well-researched, expert-backed insights for all your informational needs.


0 thoughts on “How To Stain Your Concrete Patio”