Home>Furniture>Outdoor Furniture>How To Weave A Mayan Hammock
Outdoor Furniture
How To Weave A Mayan Hammock
Modified: August 17, 2024
Learn how to weave a Mayan hammock and create your own outdoor furniture masterpiece. Explore step-by-step instructions and tips for a comfortable and stylish hammock experience.
(Many of the links in this article redirect to a specific reviewed product. Your purchase of these products through affiliate links helps to generate commission for Storables.com, at no extra cost. Learn more)
Introduction
Welcome to the wonderful world of Mayan hammocks! These handmade marvels have a rich history and continue to be a popular choice for outdoor relaxation. Whether you are lounging in your backyard, camping, or simply enjoying a sunny day at the beach, a Mayan hammock is the perfect companion to unwind and reconnect with nature.
The art of weaving Mayan hammocks can be traced back thousands of years to the indigenous Mayan culture of Central America. These hammocks were originally created for sleeping, making them an integral part of daily life for the Mayan people. Today, they have evolved into a symbol of comfort and style, favored by outdoor enthusiasts all around the world.
What sets a Mayan hammock apart from other types of hammocks is its unique weaving technique. Unlike traditional hammocks, which are made from a solid piece of fabric, Mayan hammocks are hand-woven using a process called the “double weave.” This intricate weaving style results in a hammock that is durable, flexible, and incredibly comfortable.
To create your own Mayan hammock, you will need a few essential materials and tools. The main component is the hammock cord, usually made from nylon or cotton, which will serve as the foundation of your hammock. You will also need a sturdy frame or support system, such as trees or hammock stands, to hang your hammock.
In addition to the materials, you will also need a few tools to assist you in the weaving process. These include a weaving loom, which can be purchased or constructed using basic materials like dowels or PVC pipes, as well as a shuttle or stick to pass the cord through the warp threads.
In the following sections, we will guide you through the step-by-step process of weaving your very own Mayan hammock. By the end of this article, you will have all the knowledge and skills necessary to create a comfortable and beautiful hammock that you can enjoy for years to come.
Key Takeaways:
- Weaving a Mayan hammock involves setting up a loom, preparing warp threads, weaving the body, adding decorative patterns, and finishing touches. It’s a creative and rewarding process that results in a unique and comfortable outdoor relaxation spot.
- To care for your Mayan hammock, protect it from sun and rain, clean it regularly, inspect for damage, avoid sharp objects, rotate hanging points, store it properly, and follow weight limits. With proper maintenance, your hammock will provide years of comfort and enjoyment.
Read more: How To Weave Baskets
History of Mayan Hammocks
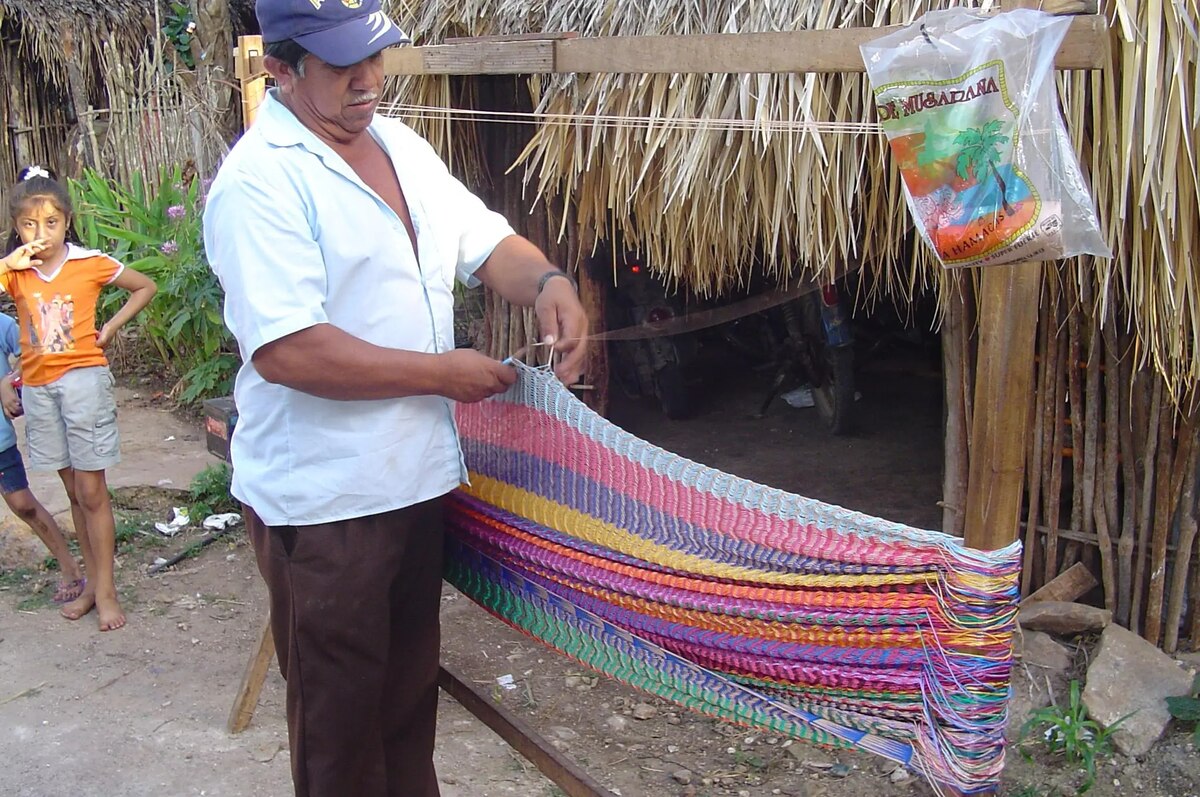
The history of Mayan hammocks dates back centuries, originating in the indigenous Mayan culture of Central America. Hammocks have been an integral part of the Mayan way of life, serving as a place to sleep, rest, and socialize. The Mayans perfected the art of hammock weaving, creating a unique and intricate technique that has been passed down through generations.
The Mayans were known for their exceptional weaving skills, using natural fibers like sisal, henequen, or cotton to create their hammocks. These fibers were abundant in the region and provided durability and comfort. The weaving process involved skilled artisans who meticulously crafted each hammock by hand, taking pride in their craftsmanship and attention to detail.
Mayan hammocks were initially woven for practical purposes, primarily as a sleeping surface. The design and weaving techniques used in the creation of these hammocks allowed for maximum comfort and breathability in the hot and humid climate of Central America. The open-weave design allowed air to flow freely, keeping the sleeper cool and well-ventilated.
Over time, Mayan hammocks became more than just a functional piece of furniture. They evolved into a symbol of Mayan culture and tradition. Hammocks were often passed down as family heirlooms, signifying status and wealth. As the popularity of Mayan hammocks spread beyond the Mayan culture, they became sought-after commodities in international markets.
Today, Mayan hammocks are cherished for their superior comfort and exquisite craftsmanship. They are admired for their unique weaving pattern, which offers unparalleled support and relaxation. These hammocks are hand-woven by skilled artisans who have perfected the technique passed down through generations.
The intricate weaving process involves creating a series of knots and loops, carefully interlacing each strand of cord to form a strong and flexible fabric. Each hammock is a work of art, reflecting the expertise and creativity of the weaver. The vibrant colors and patterns used in the weaving process add a touch of beauty and personality to the final product.
Mayan hammocks have transcended their origins and are now enjoyed worldwide. They have become a staple in outdoor spaces, providing a cozy and inviting place to relax and unwind. Whether you are lounging in a tropical paradise or transforming your backyard into a tranquil oasis, a Mayan hammock is the perfect addition to enhance your outdoor experience.
In the following sections, we will explore the materials and tools needed to create your own Mayan hammock, as well as the step-by-step process of weaving one yourself. Get ready to embark on a journey of creativity and craftsmanship!
Materials and Tools Needed
Before you begin weaving your own Mayan hammock, it’s essential to gather all the necessary materials and tools. Having everything prepared and easily accessible will ensure a smooth and enjoyable weaving experience. Here’s a list of what you’ll need:
- Hammock Cord: The main component of your hammock, the cord comes in various materials, such as nylon or cotton. Choose a cord that is strong, durable, and comfortable to the touch.
- Weaving Loom: A weaving loom will serve as the framework for your hammock. You can purchase a loom specifically designed for Mayan hammock weaving, or you can create your own using dowels, PVC pipes, or even tree branches.
- Support System: You will need a sturdy support system to hang your completed hammock. This can be a hammock stand, two sturdy trees, or any other stable structure that can bear the weight of the hammock and its occupants.
- Scissors: A pair of sharp scissors will be indispensable for cutting the hammock cord to the desired length and trimming excess threads.
- Measuring Tape: To ensure accuracy in your measurements, a measuring tape will come in handy. This will help you determine the length and width of your hammock, as well as any decorative patterns you wish to incorporate.
- Shuttle or Stick: A shuttle or stick is used to pass the cord through the warp threads during the weaving process, making it easier to create the intricate patterns. You can use a dedicated shuttle or a simple wooden dowel or stick.
These are the basic materials and tools needed to weave a Mayan hammock. Depending on your preferences and creativity, you may also choose to incorporate additional decorative elements like beads, tassels, or fringe.
It’s important to select high-quality materials that will withstand the elements and provide long-lasting durability. When choosing the cord, consider the climate and intended use of the hammock. Nylon cords are known for their strength and resistance to moisture, making them ideal for outdoor use. Alternatively, cotton cords offer a soft and comfortable feel.
Now that you have gathered all the necessary materials and tools, you are ready to embark on the weaving journey. In the next section, we will guide you through the step-by-step process of setting up the loom and preparing the warp threads for your Mayan hammock.
Step-by-Step Instructions
Now that you have all the materials and tools ready, let’s dive into the step-by-step process of weaving your own Mayan hammock. Follow these instructions carefully, and soon enough, you’ll be relaxing in your handmade hammock:
1. Setting up the Loom
Start by setting up your weaving loom. If you have a pre-made loom, follow the manufacturer’s instructions for assembly. If you’re creating your own loom, secure the dowels or PVC pipes to form a rectangular frame. The size of the loom will determine the final dimensions of your hammock, so adjust it accordingly.
Read more: How To Weave A Placemat
2. Preparing the Warp Threads
Measure and cut the warp threads to the desired length, taking into account the size of your loom and the length of the hammock you want to create. The warp threads should be double the length of the desired hammock length, as they will be folded and attached to the loom.
Secure one end of each warp thread to one side of the loom, ensuring they are evenly spaced across the width. You can tie them or use clamps to hold them in place. Start with an odd number of warp threads to create a balanced pattern.
3. Weaving the Hammock Body
With the warp threads in place, it’s time to start weaving the hammock body. Begin by securing the first weft thread to one end of the loom, creating a loop around the first warp thread. Pass the shuttle or stick through the loop, pulling the weft thread snugly against the warp thread.
Continue the weaving process, passing the shuttle or stick over and under each warp thread, alternating with each row. This weaving technique is known as the “double weave,” and it is what gives Mayan hammocks their unique strength and flexibility.
Make sure to maintain an even tension throughout the weaving process, adjusting the warp threads if necessary. As you progress, gently push down the previous rows to create a tight and secure weave.
4. Adding the Decorative Patterns
If you wish to incorporate decorative patterns into your hammock, now is the time to do so. You can create intricate patterns by selectively skipping warp threads or using different colored cords. Let your creativity shine as you experiment with various designs.
Remember to maintain an even tension and keep the weave tight as you add the decorative patterns. This will ensure consistency and balance in the final hammock design.
5. Finishing Touches
Once you have reached the desired length of your hammock, it’s time to finish the weaving process. Secure the last weft thread to the last warp thread and trim any excess cord, leaving a small tail.
Remove the warp threads from the loom, carefully sliding them out of the loops or untying the clamps. Tie the tails of the warp threads together, creating sturdy end knots to prevent the hammock from unraveling.
Finally, attach your hammock to the support system of your choice. Whether you use hammock stands, trees, or other structures, make sure it is securely fastened to ensure your safety and comfort.
Congratulations! You have successfully woven your very own Mayan hammock. Now you can sit back, relax, and enjoy the fruits of your labor.
Remember that practice makes perfect, so don’t worry if your first hammock isn’t flawless. With each creation, you will gain confidence and refine your weaving skills.
In the next section, we will provide you with some tips for maintaining and caring for your Mayan hammock, ensuring its longevity and continued enjoyment.
Read more: How To Weave Rugs
Setting up the Loom
The first step in weaving your Mayan hammock is setting up the loom. The loom serves as the framework for your weaving project and provides the structure for creating a sturdy and comfortable hammock. Follow these instructions to set up your loom:
Gather the Materials:
Before you begin, ensure that you have all the necessary materials for setting up your loom. These include two long and sturdy dowels or PVC pipes, measuring tape, rope or cord for tying, and any additional hardware or accessories specific to your chosen loom design.
Select the Size:
Determine the desired size of your hammock and adjust the length of the dowels or PVC pipes accordingly. The width of the loom should be slightly narrower than the width of the hammock you wish to weave. The length of the dowels or pipes will determine the overall length of your hammock.
Assemble the Frame:
Start by positioning the dowels or PVC pipes parallel to each other, with the desired width apart. Place them on a flat surface, ensuring they are tightly secured and level. If using PVC pipes, you may need to attach connectors or elbows to create a stable frame.
Read more: How To Fix Weave Patio Furniture
Secure the Joints:
Using rope or cord, securely tie the joints of the dowels or PVC pipes together. Make tight knots around the ends of the frame to ensure stability. Double-check that the frame is well-held and can withstand the tension of the weaving process.
Check for Stability:
Once the frame is assembled and secured, check for any wobbling or instability. The loom should be sturdy and rigid so that it can support the weight of the hammock and the tension of the weaving process. Make any necessary adjustments or reinforcements to ensure the frame is stable.
Prepare the Work Area:
Clean and clear the area around your loom to provide ample space for weaving. Make sure there are no obstacles or clutter that could interfere with the weaving process. Having a clean and organized work area will make weaving easier and more enjoyable.
Position the Loom:
Place the assembled loom in a location that is convenient for you to work comfortably. Ensure that there is enough space to move around the loom and that you have easy access to the sides and top. Consider using clamps or hooks to secure the loom in place if necessary.
With the loom properly set up, you are now ready to move on to the next step of preparing the warp threads for your Mayan hammock. This crucial step creates the foundation upon which the weaving will take place, ensuring the stability and strength of the hammock.
In the next section, we will provide detailed instructions on preparing the warp threads so you can proceed with weaving your very own Mayan hammock.
Read more: How To Weave Wildflower Crowns
Preparing the Warp Threads
Once you have your loom set up, it’s time to prepare the warp threads that will form the foundation for your Mayan hammock. The warp threads are the vertical threads that run parallel to each other and will be woven through to create the hammock body. Follow these step-by-step instructions to prepare the warp threads:
Measure and Cut:
Start by measuring and cutting the warp threads to the desired length. The length will depend on the size of the hammock you wish to create and the dimensions of your loom. Keep in mind that the warp threads should be twice the length of the final hammock, as they will be folded in half during the weaving process.
Attach to the Loom:
Secure one end of each warp thread to one side of the loom. You can tie the threads directly to the dowels or PVC pipes or use clamps or clips to hold them in place. Ensure that the warp threads are evenly spaced across the width of the loom, maintaining consistent tension.
Straighten and Align:
Once the warp threads are attached, straighten and align them to ensure they are evenly spaced and parallel. Run your hands along the threads, gently pulling and adjusting them as needed. This step is important for maintaining an even weaving pattern and ensuring a balanced hammock.
Read more: How To Weave A Grass Mat For Your Bunny
Tension Adjustment:
Check the tension of the warp threads and make any necessary adjustments. The tension should be firm but not too tight, allowing for flexibility during the weaving process. Proper tension is crucial for a well-formed and comfortable hammock.
Even Number of Warp Threads:
For a balanced weaving pattern, it is recommended to have an odd number of warp threads. However, if you prefer a specific design or want to experiment with different patterns, you can use an even number of warp threads. Just keep in mind that the weaving process and pattern may be slightly different.
Secure the Opposite Ends:
Once the warp threads are in place and properly tensioned, secure the opposite ends of the threads to the other side of the loom. This will ensure that the warp threads remain in position and do not shift during the weaving process.
With the warp threads prepared and secured on the loom, you are now ready to start weaving the body of your Mayan hammock. The weaving process is where the magic happens, transforming the warp threads into a comfortable and beautiful hammock to enjoy.
In the next section, we will provide step-by-step instructions on weaving the hammock body, so you can master this intricate technique and create a hammock to be proud of.
Weaving the Hammock Body
Now that you have prepared the warp threads, it’s time to embark on the weaving process and create the body of your Mayan hammock. This step-by-step guide will help you master the intricate weaving technique and transform the warp threads into a comfortable and durable hammock:
Read more: How To Choose A Hammock
Step 1: Start the Weaving
Begin the weaving process by securing the first weft thread to one end of the loom. The weft thread should be slightly longer than the width of the loom. Make a loop around the first warp thread and pass the shuttle or stick through the loop.
Step 2: Pass the Shuttle or Stick
Pass the shuttle or stick over and under each warp thread, alternating with each row. This weaving technique is known as the “double weave” and is what gives Mayan hammocks their strength and flexibility. Apply moderate tension to ensure a snug and secure weave.
Step 3: Maintain Consistent Tension
As you progress with each row, make sure to maintain consistent tension throughout the weaving process. Avoid pulling too tightly, as it may cause distortion, but also avoid leaving the weave too loose, as it may compromise the hammock’s stability and comfort.
Step 4: Check for Evenness
Regularly inspect the woven fabric to ensure evenness and symmetry. Gently push the previous rows down to create a tight and uniform weave. Adjust the tension of the warp threads if necessary to maintain consistency.
Read more: What Is A Hammock
Step 5: Repeat the Weaving Process
Continue weaving until you reach the desired length of your hammock. Take breaks if needed, but try to maintain a steady rhythm to establish a harmonious weaving pattern. Remember to enjoy the process and embrace the artistry of this age-old technique.
Step 6: Tie Off the Last Weft Thread
When you have reached the desired length, tie off the last weft thread to the last warp thread, making a secure knot. This will prevent the weaving from unraveling during the next steps of finishing and attaching the hammock.
Congratulations! You have successfully woven the body of your Mayan hammock. The fabric should now be strong, flexible, and ready to provide hours of relaxation and comfort.
It’s important to remember that weaving is a skill that improves with practice. Don’t be disheartened if your first attempts are not perfect. As you gain experience, you’ll develop a personal weaving style and refine your craft.
In the next section, we will discuss how to add decorative patterns to your hammock, taking it to the next level of beauty and personalization.
Adding the Decorative Patterns
Now that you have successfully woven the body of your Mayan hammock, it’s time to take it to the next level by adding decorative patterns. Adding these patterns will not only enhance the visual appeal of your hammock but also showcase your creativity and personal style. Follow these steps to incorporate decorative patterns into your hammock:
Step 1: Plan your Design
Before diving into the decorative patterns, take some time to plan out your design. Consider the colors, shapes, and motifs you want to incorporate. You can draw inspiration from traditional Mayan patterns or create your own unique design. A sketch or visual reference can be helpful during the weaving process.
Read more: How To Sit In A Hammock
Step 2: Select your Additional Cord
To add decorative patterns, you’ll need additional cord in different colors or materials. Choose cords that complement the main color of your hammock and that will contrast nicely against the existing weave. This will make the patterns stand out and add visual interest.
Step 3: Start Weaving the Patterns
Secure the end of the decorative cord to one side of the loom, close to the body of the hammock. Pass the decorative cord over or under specific warp threads, following your design plan. You can weave the patterns in straight lines, diagonally, or in any other arrangement you desire.
Step 4: Maintain Consistency
As you weave the decorative patterns, make sure to maintain consistent tension and a tight weave. This will keep the patterns crisp and well-defined. Adjust the tension of both the main cord and the decorative cord as necessary to achieve uniformity.
Step 5: Experiment with Different Techniques
Don’t be afraid to experiment with different weaving techniques to create diverse patterns. You can try skipping warp threads, creating loops, or even incorporating knotting techniques. Let your creativity guide you and enjoy the process of exploring different possibilities.
Read more: How To Get On A Hammock
Step 6: Evaluate the Results
Regularly step back and evaluate the overall appearance of the decorative patterns. Check for consistency, symmetry, and balance. Make any necessary adjustments to ensure that the patterns are visually appealing and harmonious with the rest of the hammock.
Step 7: Finish the Weaving
Once you are satisfied with the decorative patterns, continue weaving the main cord to the desired length of your hammock. Weave a few additional rows without incorporating any patterns to create a clean and consistent finish. Tie off the last weft thread to secure the weaving.
Adding decorative patterns to your Mayan hammock allows you to infuse it with your own unique style. It adds a touch of personality and makes it truly one-of-a-kind.
In the next section, we will cover the final steps of finishing your hammock and provide tips for its maintenance and care.
Finishing Touches
Congratulations on weaving and adding decorative patterns to your Mayan hammock! Now, it’s time for the final touches. These steps will ensure that your hammock is ready for use and will provide you with years of comfort and relaxation. Follow these instructions to complete the finishing touches on your hammock:
Step 1: Trim Excess Cord
Using a sharp pair of scissors, carefully trim any excess cord from the woven body of your hammock. Be sure to cut close to the knots or secure points to give your hammock a neat and clean appearance. Take care not to cut any of the woven threads or alter the structure of the hammock.
Read more: How To Lie In A Hammock
Step 2: Remove from the Loom
Untie or unclamp your hammock from the loom, ensuring that the warp threads remain securely tied. Gently slide the warp threads out of the loops or untie them from the clamps, taking care not to disturb the woven body of the hammock. This step will free up the hammock and make it ready for the next stages of finishing and attachment.
Step 3: Tie the Warp Threads
Gather the warp threads together, ensuring they are organized and aligned. Tie them securely at both ends using strong knots or secure ties. These knots will prevent the threads from unraveling and maintain the structure of the hammock as you use it.
Step 4: Attach Support System
Choose your preferred support system for your hammock—such as sturdy trees, hammock stands, or wall hooks—and attach the hammock securely. Ensure that the support system is strong enough to bear the weight of the hammock and its occupants. Take measurements and adjust the distance between the attachment points to achieve the desired sag and comfort level.
Step 5: Test the Hammock
Before fully committing to using your hammock, it’s a good idea to do a test run. Gently sit or lie in the hammock to check the tension, stability, and overall feel. Make any necessary adjustments or reinforce attachment points as needed to ensure comfort and safety.
Read more: How To Relax In A Hammock
Step 6: Enjoy Your Hammock
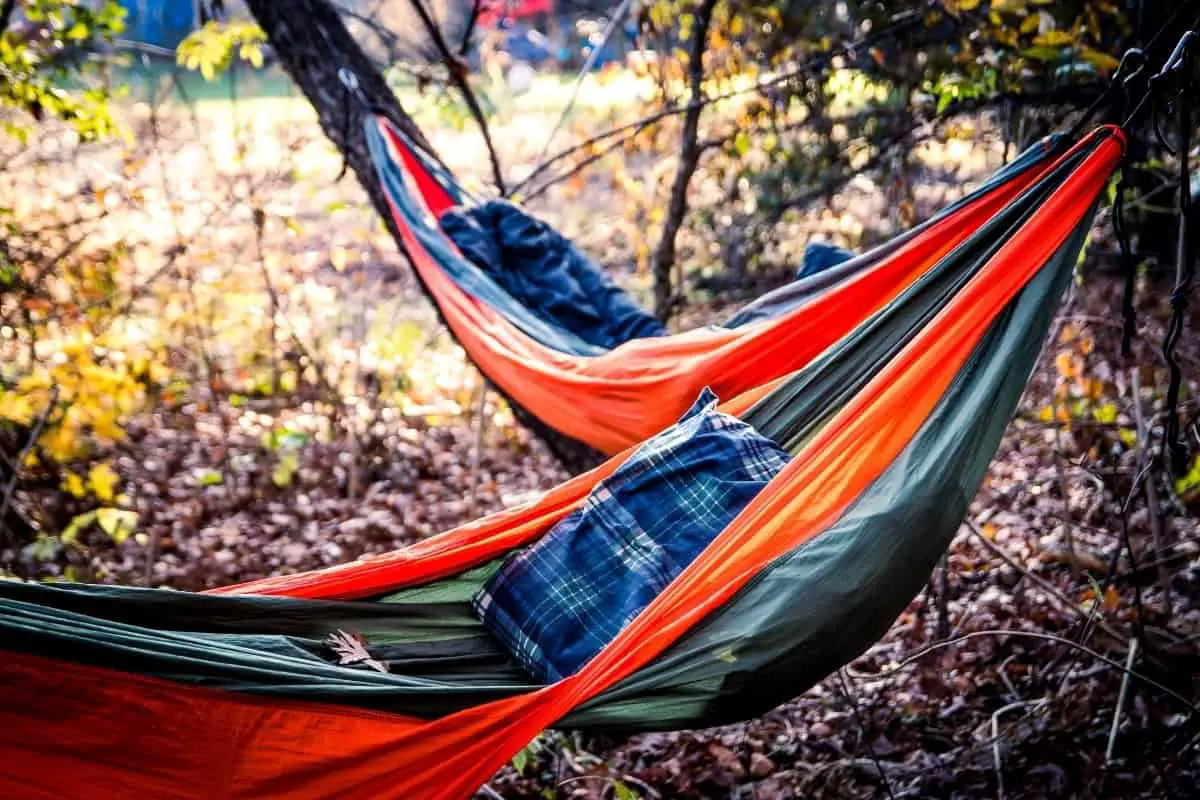
With the finishing touches complete, your Mayan hammock is ready for you to enjoy! Find a cozy spot, relax, and let the gentle swaying motion lull you into a state of bliss. Whether it’s in your backyard, on a camping trip, or by the beach, your handmade Mayan hammock will provide a comfortable and serene place to unwind.
Remember to follow proper safety measures and guidelines when using your hammock. Always ensure that it is securely attached, and do not exceed the weight limit specified by the manufacturer or determined by the strength of your support system.
With proper care and maintenance, your Mayan hammock will continue to bring you joy for years to come. In the next section, we will provide some tips for maintaining and caring for your hammock to ensure its longevity and optimal performance.
Tips for Maintenance and Care
Proper maintenance and care are essential for keeping your Mayan hammock in tip-top shape and ensuring its longevity. Follow these tips to maintain and care for your hammock:
Protect from Sun and Rain:
Avoid leaving your hammock exposed to prolonged periods of direct sunlight, as this can cause fading and weakening of the fibers. Similarly, it’s important to protect your hammock from heavy rain or moisture, as it may lead to mold or mildew growth. When not in use, store your hammock in a dry and covered area.
Regular Cleaning:
To keep your hammock clean, periodically remove any dirt, debris, or stains. Gently hand wash the hammock fabric using a mild detergent and lukewarm water. Avoid using harsh chemicals or bleach, as they can damage the fibers. After washing, thoroughly rinse the hammock and allow it to air dry completely before storing or reusing.
Read more: How To Camp In A Hammock
Inspect for Damage:
Regularly inspect your hammock for any signs of damage, such as frayed cords, loose knots, or weakened spots. Repair any minor damage promptly to prevent it from worsening. If significant damage occurs, consider consulting a professional or contacting the manufacturer for repair options.
Avoid Sharp Objects:
Keep your hammock away from sharp objects or rough surfaces that can snag or tear the fabric. Be cautious with jewelry, buttons, or any accessories that may cause damage when sitting or lying in the hammock. Taking preventive measures will help extend the lifespan of your hammock.
Rotate Hanging Points:
To avoid excessive wear on specific areas, occasionally rotate the hanging points of your hammock. This will redistribute the weight and ensure even usage throughout the fabric. Switching the attachment points will help prevent sagging or weakening of the hammock in one particular area.
Store Properly:
When your hammock is not in use, store it properly to protect it from dust, dirt, and potential damage. Fold the hammock neatly, making sure there are no knots or tangles, and store it in a clean and dry storage bag or container. This will help preserve the integrity and quality of your hammock over time.
Read more: How To Fix A Hammock
Follow Weight Limits:
Respect the weight limits set by the manufacturer or determined by the strength of your support system. Overloading the hammock can strain the cords and compromise its structural integrity. Always check the weight capacity before using and avoid exceeding the recommended limit.
By following these maintenance tips and properly caring for your Mayan hammock, you can enjoy its comfort and beauty for years to come. Remember to take the necessary precautions, and your hammock will be a reliable companion for all your outdoor relaxation moments.
With your Mayan hammock now complete and your knowledge of maintenance and care, you are well-equipped to fully enjoy the benefits and serenity it offers. So kick back, relax, and let your Mayan hammock be your sanctuary in the great outdoors.
Happy hammock weaving and happy relaxing!
Conclusion
Congratulations on completing your journey into the world of Mayan hammocks! By following the step-by-step instructions and incorporating your own creativity, you have successfully woven a unique and beautiful hammock that reflects your personal style and craftsmanship.
The history and tradition of Mayan hammocks have been passed down through generations, and now you have become a part of that rich legacy. Your hand-woven hammock showcases the intricate weaving techniques perfected by the Mayan people and brings the comfort and relaxation of the outdoors right to your home.
Remember to take proper care of your Mayan hammock by following the maintenance tips provided. Protect it from harsh weather, regularly clean it, and inspect for any damage. These steps will ensure that your hammock remains in excellent condition and can be enjoyed for many years to come.
As you immerse yourself in your Mayan hammock, take time to appreciate the craftsmanship and artistry behind it. Feel the gentle sway as you unwind, reconnect with nature, and create lasting memories. Whether you’re camping, lounging by the pool, or simply spending quiet afternoons in your backyard, your Mayan hammock will be a sanctuary of relaxation and tranquility.
Continue to explore the world of outdoor furniture and discover new ways to enhance your outdoor space. Whether it’s adding colorful cushions, incorporating stylish accessories, or creating a cozy ambiance, your Mayan hammock will serve as the centerpiece of outdoor comfort and leisure.
Now, it’s time to gather your loved ones, invite friends over, and share the joy of your hand-woven Mayan hammock. Allow it to become a gathering place for laughter, conversations, and moments of serenity. Let it be a symbol of your appreciation for the beauty of nature and the craftsmanship of the Mayan culture.
Thank you for embarking on this weaving adventure with us. We hope it has ignited your passion for outdoor furniture and inspired you to explore more creative projects. Happy weaving, happy relaxing, and may your Mayan hammock bring you countless hours of blissful enjoyment!
Frequently Asked Questions about How To Weave A Mayan Hammock
Was this page helpful?
At Storables.com, we guarantee accurate and reliable information. Our content, validated by Expert Board Contributors, is crafted following stringent Editorial Policies. We're committed to providing you with well-researched, expert-backed insights for all your informational needs.
0 thoughts on “How To Weave A Mayan Hammock”