Home>Garden Essentials>How To Build Landscaping Steps
Garden Essentials
How To Build Landscaping Steps
Modified: March 7, 2024
Learn how to build beautiful garden landscaping steps with our step-by-step guide. Create a functional and visually appealing garden with these expert tips and techniques.
(Many of the links in this article redirect to a specific reviewed product. Your purchase of these products through affiliate links helps to generate commission for Storables.com, at no extra cost. Learn more)
Introduction
Building landscaping steps is a great way to add functionality and aesthetic appeal to your outdoor space. Whether you have a sloping terrain or simply want to create a pathway with different levels, steps can make navigating your garden or yard easier and more enjoyable. In this article, we will guide you through the process of planning, designing, and building landscaping steps that will not only serve their purpose but also enhance the overall charm of your outdoor area.
Key Takeaways:
- Planning and Designing
Before building landscaping steps, carefully plan and design the layout, dimensions, and materials. Assess the site, determine the number of steps, and choose durable, weather-resistant materials for a functional and visually appealing staircase. - Construction and Finishing
When building landscaping steps, ensure proper excavation, foundation preparation, and secure installation of risers and treads. Consider adding railings, filling the surrounding area, and sealing or painting the steps for added safety and aesthetic appeal.
Planning and Designing Steps
Before embarking on any construction project, careful planning and designing are essential. Here are the key steps to consider:
- Assessing the Site: Start by studying the existing landscape and determining where the steps will fit best. Take into account the natural flow of the terrain and any existing pathways or structures.
- Determining the Number of Steps: Evaluate the height difference between the starting and ending points of the steps to determine how many steps will be required. This will depend on your comfort and accessibility needs.
- Calculating the Dimensions of Each Step: Each step should be of a comfortable height and width. The riser, which is the vertical part of the step, should ideally be between 6 and 8 inches high, while the tread, which is the horizontal part of the step, should be around 12 inches deep.
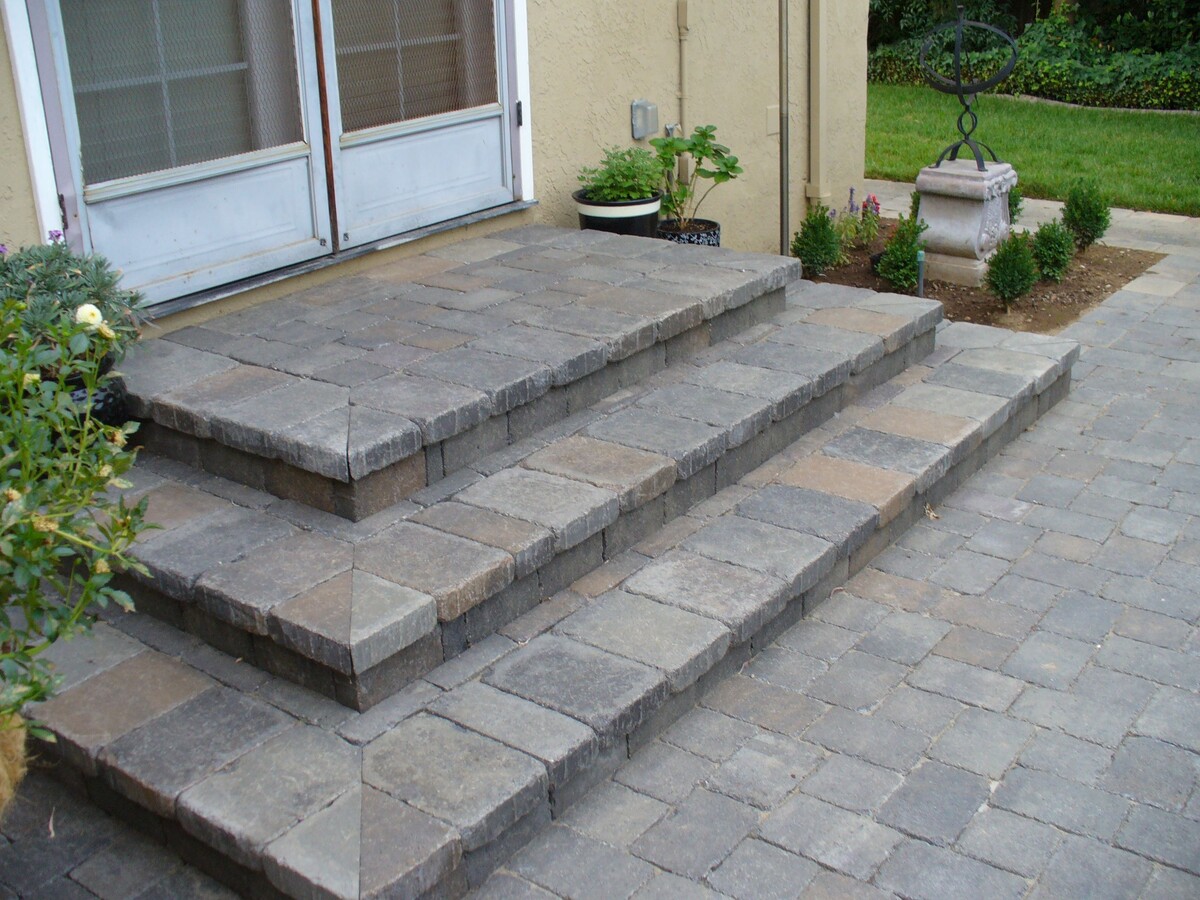
- Choosing the Materials: Select materials that are durable, weather-resistant, and complement the overall design of your outdoor space. Common options include natural stone, brick, concrete, or wood.
Taking the time to plan and design your landscaping steps will ensure that they are functional, visually appealing, and harmonize with the surrounding environment.
Assessing the Site
Before you start building landscaping steps, it’s important to assess the site where the steps will be installed. This step will help you identify any potential challenges or opportunities that may arise during the construction process. Here are a few crucial factors to consider:
- Natural Terrain: Take a close look at the slope and contours of the area where you plan to build the steps. Understanding the natural terrain will help you determine the placement and alignment of the steps.
- Drainage: Consider how water flows through the site, especially during heavy rain or snow. Proper drainage is crucial to prevent water accumulation on the steps, which can lead to slipping and other safety hazards.
- Existing Obstacles: Identify any existing features such as trees, rocks, or structures that might impact the placement or design of the steps. It’s important to work around these obstacles to create a harmonious and functional pathway.
- Safety: Evaluate the safety aspects of the site, such as the presence of uneven surfaces, loose soil, or potential tripping hazards. Make sure to address any safety concerns before proceeding with the construction of the steps.
Assessing the site is an important first step as it sets the foundation for the rest of the construction process. By understanding the natural features and potential challenges of the area, you can make informed decisions and create steps that are both functional and visually appealing.
Determining the Number of Steps
Once you have assessed the site and have a clear understanding of the natural terrain, it’s time to determine the number of steps required to create a smooth and comfortable pathway. Here are some considerations to keep in mind:
- Height Difference: Measure the vertical distance between the starting and ending points of the steps. This will help you determine the number of steps needed to cover the height difference. Optimal step height ranges from 6 to 8 inches, as this provides a comfortable stride for most people.
- Accessibility: Consider the needs and abilities of the users of your outdoor space. If you have elderly individuals or individuals with mobility challenges, it may be necessary to have fewer steps with a lower rise to ensure easier and safer navigation.
- Safety: Besides considering the height difference, also take into account the maximum number of steps that is safe for the area. Having too many steps in a confined space can create a tripping hazard, especially in low-light conditions or areas with limited visibility.
It’s important to strike a balance between functionality and aesthetics when determining the number of steps. While you want to create a pathway that is efficient and easy to navigate, it should also blend harmoniously with the surrounding landscape. Consider the overall proportions of the area and aim for a design that feels balanced and visually pleasing.
Once you have determined the number of steps required, you can move on to calculating the dimensions of each step, which will ensure that they are of the appropriate size and provide a comfortable walking experience.
Calculating the Dimensions of Each Step
When it comes to building landscaping steps, it’s crucial to ensure that each step is of the right dimensions to provide comfort and safety for users. Here’s how you can calculate the dimensions of each step:
- Riser Height: The riser refers to the vertical portion of the step. The height of each riser should ideally be between 6 and 8 inches for optimal comfort. To calculate the riser height, divide the total height by the number of steps. For example, if the total height is 24 inches and you have 4 steps, each riser should be 6 inches high.
- Tread Depth: The tread refers to the horizontal portion of the step that you walk on. The depth of each tread should be around 12 inches to provide ample space for walking. To calculate the tread depth, measure the width of the path where the steps will be installed. Ideally, the tread width should be wider than the average walking stride to ensure stability and comfort.
It’s important to note that the riser height and tread depth should be consistent for each step to create a smooth and even staircase. Inconsistent dimensions can make it difficult to navigate the steps and increase the risk of trips and falls.
In addition to calculating the dimensions, it’s also advisable to make sure that the steps have a uniform rise between each tread. Aim for a rise height that is consistent and comfortable for users, as this will ensure a safe and enjoyable experience when using the steps.
By carefully measuring and calculating the dimensions of each step, you can create a staircase that is ergonomically designed and provides a comfortable and safe walking experience for all users.
Read more: How To Build Brick Steps
Choosing the Materials
When it comes to building landscaping steps, choosing the right materials is essential for both durability and aesthetic appeal. Here are some factors to consider when selecting materials for your steps:
- Durability: Look for materials that are durable and able to withstand outdoor elements. Consider factors such as weather resistance, resistance to wear and tear, and longevity.
- Style and Design: Choose materials that complement the overall style and design of your outdoor space. Whether you prefer a rustic look with natural stone or a more modern appearance with concrete, select materials that align with your desired aesthetic.
- Maintenance: Consider the level of maintenance required for the materials you choose. Some materials may require regular sealing or painting, while others may be more low-maintenance.
- Budget: Take your budget into account when selecting materials. While natural stone may be visually appealing, it can be more expensive than other options such as concrete or wood.
Ultimately, the choice of materials will depend on your personal preferences, the overall style of your outdoor space, and your budget constraints. Take your time to explore different options and consider the pros and cons of each material before making a decision.
Preparing the Area
Once you have chosen the materials for your landscaping steps, it’s time to prepare the area where the steps will be installed. Proper preparation ensures a stable and long-lasting foundation for your steps. Here are the steps involved in preparing the area:
- Clearing the Pathway: Remove any vegetation, debris, or obstacles from the area where the steps will be constructed. Clearing the pathway ensures a clean and level surface for the steps.
- Leveling the Ground: Use a shovel or a rake to level the ground where the steps will be placed. Remove any excess soil or debris and ensure that the surface is even.
- Marking the Location of Steps: Use stakes and a string to mark the location and alignment of the steps. This will help you visualize the final position of the steps and ensure an accurate installation.
Properly preparing the area sets the stage for a successful installation of your landscaping steps. It creates a solid foundation and ensures that the steps will be level and stable.
Clearing the Pathway
Clearing the pathway is an important step in preparing the area for building landscaping steps. It involves removing any vegetation, debris, or other obstacles that may obstruct the pathway or affect the stability of the steps. Here’s how to clear the pathway effectively:
- Remove Vegetation: Begin by clearing out any plants, shrubs, or grass that may be growing in the area. Trim back any overhanging branches to ensure they don’t obstruct the path of the steps.
- Clear Debris: Remove any rocks, stones, or debris that may be present on the pathway. These can pose a safety hazard and interfere with the smooth installation of the steps.
- Address Weed Growth: If there are weeds growing in the pathway, take the time to uproot them or apply a weed killer to prevent regrowth. Weeds can compromise the stability of the steps and create an unsightly appearance.
Clearing the pathway not only creates a clean slate for the installation of the steps but also ensures a safe and unobstructed path. It allows for proper leveling and alignment of the steps, resulting in a more stable and visually pleasing end result.
During the clearing process, it’s important to exercise caution and wear appropriate protective gear, such as gloves and sturdy footwear. This will help protect you from any potential hazards and ensure your safety.
Once the pathway is cleared, you can proceed with the next step of leveling the ground, which is crucial for creating a solid foundation for the steps.
Leveling the Ground
Leveling the ground is a crucial step in preparing the area for building landscaping steps. It involves ensuring that the surface where the steps will be installed is even and free from any bumps or depressions. Here’s how to level the ground effectively:
- Clear the Area: Before leveling, make sure the pathway is cleared of any vegetation, debris, or obstructions. This will give you a clear view of the ground and allow for an accurate leveling process.
- Use a Leveling Tool: One effective tool for leveling the ground is a long, straight board or a leveling tool. Place the board or leveling tool on the ground and check for any unevenness or dips. If you notice any low spots, remove or add soil as necessary to achieve a level surface.
- Compact the Soil: Once the ground is leveled, use a tamper or a hand compactor to compact the soil. This helps to create a firm and stable foundation for the steps. Compact the soil evenly across the entire pathway to ensure consistent support.
- Check for Levelness: After compacting the soil, use the leveling tool again to check for levelness. Make any necessary adjustments to ensure the ground is uniformly leveled throughout the pathway.
Leveling the ground is essential for the proper installation and stability of the steps. It helps to prevent any potential tripping hazards and ensures a visually appealing and structurally sound end result. Taking the time to level the ground thoroughly will also make it easier to lay the foundation and construct the steps.
Keep in mind that the exact leveling process may vary depending on the specific characteristics of your outdoor space. If you are unsure or dealing with a complex terrain, it may be beneficial to consult with a professional to ensure the ground is properly leveled for the steps.
Once the ground is leveled, it’s time to move on to the next step, which involves marking the location of the steps to finalize the design and layout of the pathway.
Read more: How To Build An Angled Deck Step-by-Step
Marking the Location of Steps
After clearing the pathway and leveling the ground, the next step in building landscaping steps is marking the precise location of each step. This is a crucial step in the construction process as it helps you visualize the design and layout of the steps. Here’s how to mark the location effectively:
- Use Stakes and String: Place stakes on either side of the pathway to mark the starting and ending points of the steps. Then, stretch a string between the stakes to create a straight guideline for the steps to follow. This will help ensure that the steps are aligned and evenly spaced.
- Measure and Mark: Using a measuring tape, measure the desired width and depth of each step, and mark these measurements along the string. Make sure to take into account the riser height and tread depth when marking each step’s location.
- Double-Check Alignment: Double-check the alignment of the string and the marked locations to ensure that the steps are evenly spaced and maintain a consistent rise and run. Adjust the string and marks as needed.
By marking the location of each step, you can visualize the layout and design of the pathway before proceeding with the construction. This step helps ensure accuracy and allows for any necessary adjustments to be made before building the steps. Once you are satisfied with the markings, it’s time to begin building the steps themselves.
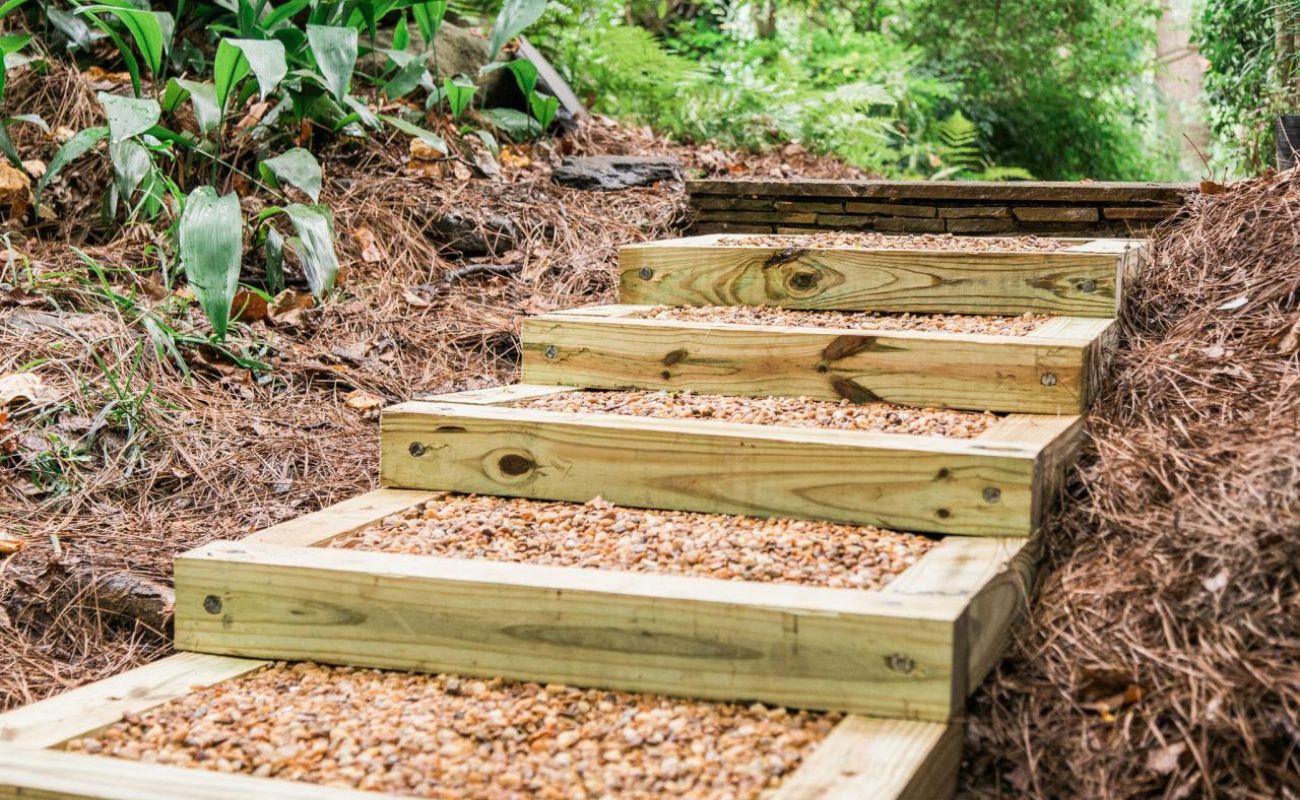
Building the Steps
Building the steps is the most satisfying and rewarding part of the process. Here’s an overview of the steps involved:
- Excavating the Tread: Start by digging out the tread area for each step. The depth of the excavation will depend on the desired tread depth you calculated earlier.
- Preparing the Foundation: Create a solid foundation by compacting the soil in each tread area. This will provide stability and support for the steps.
- Constructing the Riser: Use bricks, stones, or other materials to build the riser, which is the vertical part of each step. Ensure that the risers are level and evenly spaced.
- Installing the Tread: Place the tread material, such as pavers or stones, on top of the risers. Ensure that each tread is securely placed and level.
- Securing the Steps: Use landscaping adhesive or mortar to secure the tread material to the risers and create a solid and stable structure. Allow sufficient time for the adhesive or mortar to set before using the steps.
Following these steps will help ensure that your landscaping steps are built with precision and durability. Take your time during the construction process to ensure each step is securely installed and level. Once the steps are built, you can move on to adding finishing touches to enhance the functionality and aesthetics of your landscaped area.
When building landscaping steps, make sure to use sturdy materials such as stone or concrete for durability and safety. Properly compact the base and use a level to ensure each step is even.
Excavating the Tread
Excavating the tread area is a crucial step in building landscaping steps as it creates the space where the horizontal part of each step, known as the tread, will be placed. Here’s a step-by-step guide on how to excavate the tread effectively:
- Mark the Tread Area: Referencing the previously marked locations and string guidelines, use a measuring tape and stakes to mark the width and depth of each tread. This will ensure accuracy and consistency throughout the construction process.
- Remove Vegetation and Obstacles: Clear the marked tread area of any vegetation, rocks, or debris. This will provide a clean and even surface for excavation.
- Start Digging: Use a shovel or a digging tool to excavate the tread area. Begin by removing the top layer of soil or grass, ensuring that the depth of the excavation matches the desired tread depth. Be sure to dig evenly and maintain the width of the tread as marked.
- Level the Tread Area: Use a hand tamper or a compactor to level and compact the soil in the excavated tread area. This will provide a solid and stable foundation for the steps.
- Check for Levelness: Use a level or a straight board placed across the tread area to check for any uneven spots. Make adjustments as needed to ensure a level surface across the entire tread.
Excavating the tread area is an important step to create a level and stable foundation for the steps. Pay attention to maintaining the marked dimensions, ensuring uniform depth and width for each tread. This will result in a visually pleasing and safe staircase.
While excavating, be mindful of any underground utilities or pipes that may be present. If you are unsure of the location of such utilities, it’s best to consult with a professional or contact your local utility companies to avoid any potential damage or accidents.
Once the tread area is excavated and leveled, you can proceed to the next step of preparing the foundation, which involves creating a stable base for the steps to be constructed upon.
Preparing the Foundation
Preparing a solid foundation is an essential step in building landscaping steps. A well-prepared foundation ensures stability and longevity for the steps. Here’s a step-by-step guide on how to prepare the foundation effectively:
- Clear the Tread Area: Remove any loose soil, rocks, or debris from the excavated tread area. This will create a clean surface for the foundation preparation.
- Add a Layer of Gravel: Lay a layer of gravel or crushed stone inside the tread area. This layer will help with drainage and prevent the soil from shifting over time. Spread the gravel evenly, ensuring a consistent thickness of around 2 to 3 inches.
- Compact the Gravel: Use a hand tamper or a compactor to compact the gravel layer. This step is important for stabilizing the foundation and creating a firm surface for the steps to sit on.
- Install Landscape Fabric (Optional): To further enhance the stability and longevity of the steps, you may choose to install landscape fabric over the compacted gravel. This fabric prevents weed growth and also acts as a barrier, helping to prevent the migration of soil particles.
- Apply a Bedding Layer: For additional support and stability, apply a bedding layer of sand or a sand-based leveling compound on top of the compacted gravel. This layer should be level and provide a smooth surface for the installation of the step treads.
- Level the Bedding Layer: Use a straight board or a level to evenly distribute the bedding layer and ensure that it is level. This will help create a level and secure base for the steps.
Preparing a solid foundation is crucial for the stability and durability of the steps. The combination of compacted gravel and a bedding layer provides support, prevents shifting, and helps distribute the weight of the steps evenly.
It’s important to follow the proper sequence of preparing the foundation after excavating the tread area. Taking the time to properly prepare the foundation will result in a solid and long-lasting staircase.
Once the foundation is prepared, you can proceed to the construction of the risers and treads, which will bring your landscaping steps to life.
Read more: How To Build An Outdoor Step
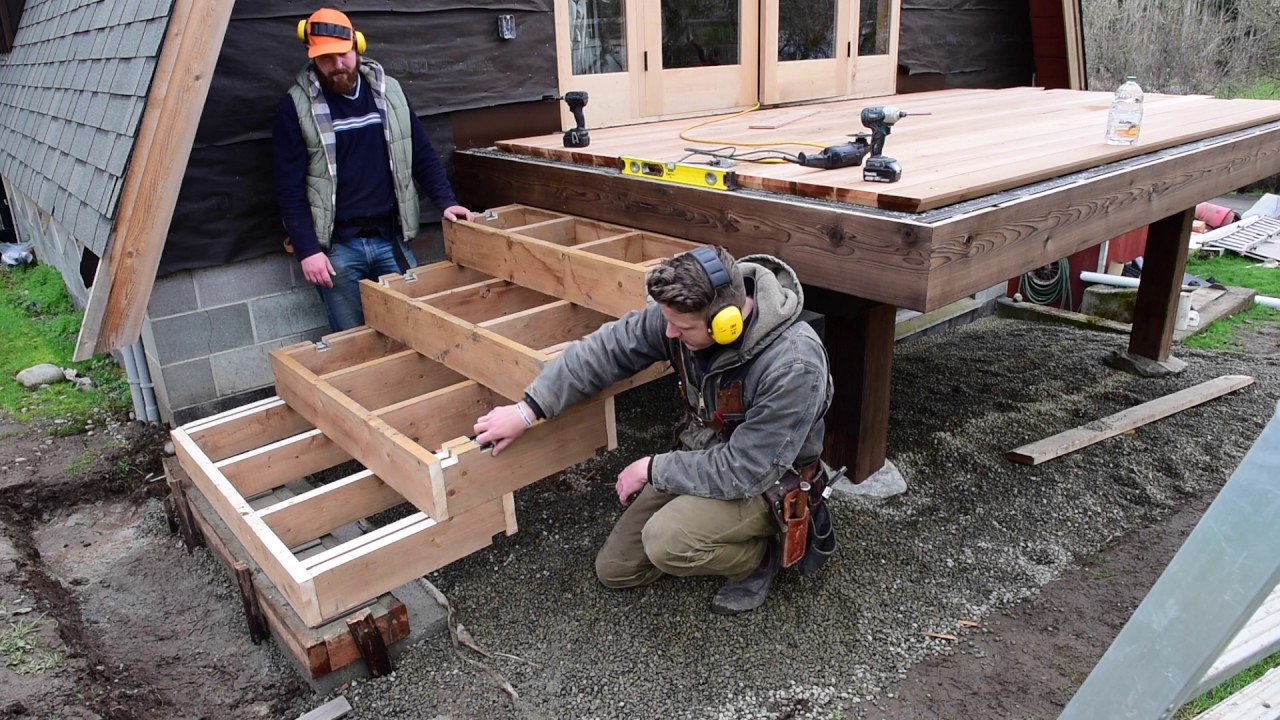
Constructing the Riser
The construction of the risers is a crucial step in building landscaping steps. The risers are the vertical components of each step that provide support and help create a visually appealing staircase. Here’s a step-by-step guide on how to construct the risers effectively:
- Gather the Materials: Depending on your chosen design and materials, gather the necessary bricks, stones, or other building materials for the risers. Ensure that the materials are of consistent size and compatible with the overall aesthetic of your outdoor space.
- Apply the Mortar Base: Prepare a batch of mortar according to the manufacturer’s instructions. Apply a layer of mortar to the tread area, using a trowel. This mortar will serve as the base for attaching the riser stones or bricks.
- Place the Stones or Bricks: Start placing the stones or bricks vertically, one by one, on the mortar base. Press them firmly into place, ensuring they are level and aligned with the markings made during the planning stage.
- Check for Levelness: Use a level to check the vertical alignment of each riser. Adjust the position of the stones or bricks as necessary to ensure they are straight and even.
- Apply Mortar Between the Riser Joints: Fill the gaps between the riser stones or bricks with mortar using a pointing trowel. This mortar not only enhances the stability of the risers but also provides a finished appearance.
- Clean the Excess Mortar: As you work, periodically clean off any excess mortar on the front surface of the risers using a damp cloth or sponge. This will ensure a neat and professional-looking finish.
When constructing the risers, precision and attention to detail are paramount. The risers should be properly aligned, level, and securely attached to the foundation. Taking the time to construct the risers correctly will result in a sturdy and visually appealing set of steps.
Always refer to the manufacturer’s instructions for specific guidelines and recommendations on working with the chosen materials, as proper mortar application and stone/brick alignment may vary. Additionally, if you are unsure about the construction process, consider consulting with a professional to ensure the best results.
With the risers constructed, you can now move on to installing the treads, the horizontal portion of each step, to complete the building of your landscaping steps.
Installing the Tread
Installing the tread is the next step in building landscaping steps. The tread refers to the horizontal portion of each step that provides a stable surface for walking. Here’s a guide on how to install the tread effectively:
- Gather the Tread Materials: Depending on your chosen design and materials, gather the necessary pavers, stones, or other tread materials. Ensure that the materials are of consistent size and thickness.
- Prepare the Tread Area: Clean the top surface of the risers, removing any debris or excess mortar. Ensure that the risers are level and secure to provide a stable base for the treads.
- Apply a Bed of Mortar: Use a trowel to apply a bed of mortar onto the top surface of the risers. The mortar should be evenly spread and approximately 1 inch thick.
- Place the Treads: Carefully place each tread material onto the mortar bed, aligning them with the marked tread locations. Press them firmly into place, ensuring they are level and properly aligned.
- Check for Levelness and Alignment: Use a level to check the horizontal placement and alignment of each tread. Tap the treads gently with a rubber mallet if needed to adjust their position and ensure they are even.
- Fill the Gaps: Once the treads are in place, fill the gaps between them with mortar or a polymeric sand mixture. This will help stabilize the treads and prevent their movement.
- Clean Excess Mortar: As you work, periodically clean off any excess mortar on the surface of the treads using a damp cloth or sponge. This will ensure a clean and finished appearance.
Installing the tread requires precision to ensure a secure and level walking surface. Proper alignment and adherence to the mortar bed are essential for stable and durable steps.
Keep in mind that the installation process may vary depending on the chosen tread materials and the specific instructions provided by the manufacturer. Always refer to the manufacturer’s guidelines to ensure you follow the recommended installation methods for your particular materials.
Once the treads are installed and all adjustments have been made, it’s time to move on to securing the steps and adding finishing touches to complete your landscaping steps.
Securing the Steps
Securing the steps is a crucial step in building landscaping steps to ensure their long-term stability and safety. Here’s a guide on how to secure the steps effectively:
- Allow the Mortar to Cure: After installing the treads, allow the mortar to cure according to the manufacturer’s instructions. This typically takes several days to achieve full strength.
- Add Landscape Adhesive: Once the mortar has cured, apply landscape adhesive to the joints between the risers and treads. This adhesive helps bond the components together, providing added stability.
- Use Construction Adhesive (Optional): For an extra layer of security, you may choose to apply construction adhesive to the underside of each tread before placing it on the mortar bed. This will help ensure a strong bond between the tread and the mortar.
- Check for Stability: After applying the adhesive, gently rock each step to check for any movement. If any steps feel loose, remove and reapply adhesive as needed to secure them.
Ensuring that the steps are securely attached and stable is vital for the long-term functionality and safety of your landscaping steps. Take the time to properly secure each step to minimize the risk of accidents or structural damage.
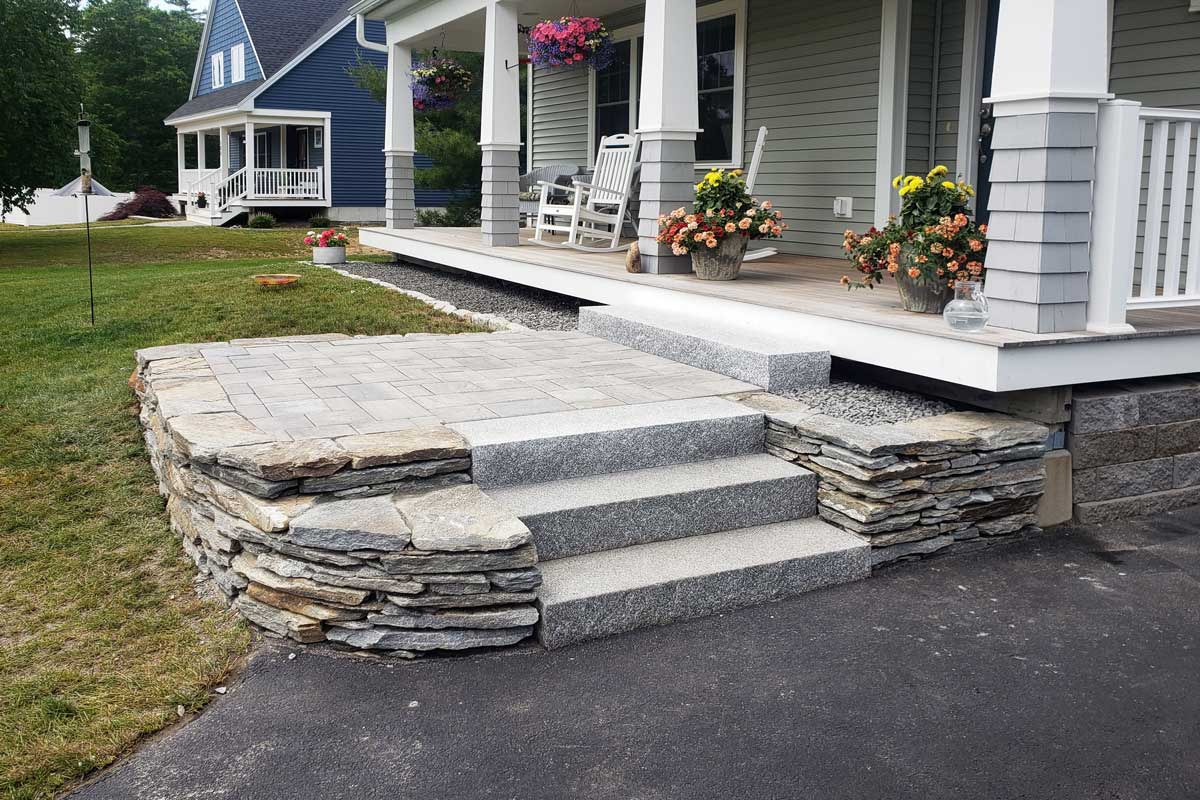
Finishing Touches
To complete the construction of your landscaping steps, you can add finishing touches that enhance their functionality and overall appearance. Here are some optional finishing touches you may consider:
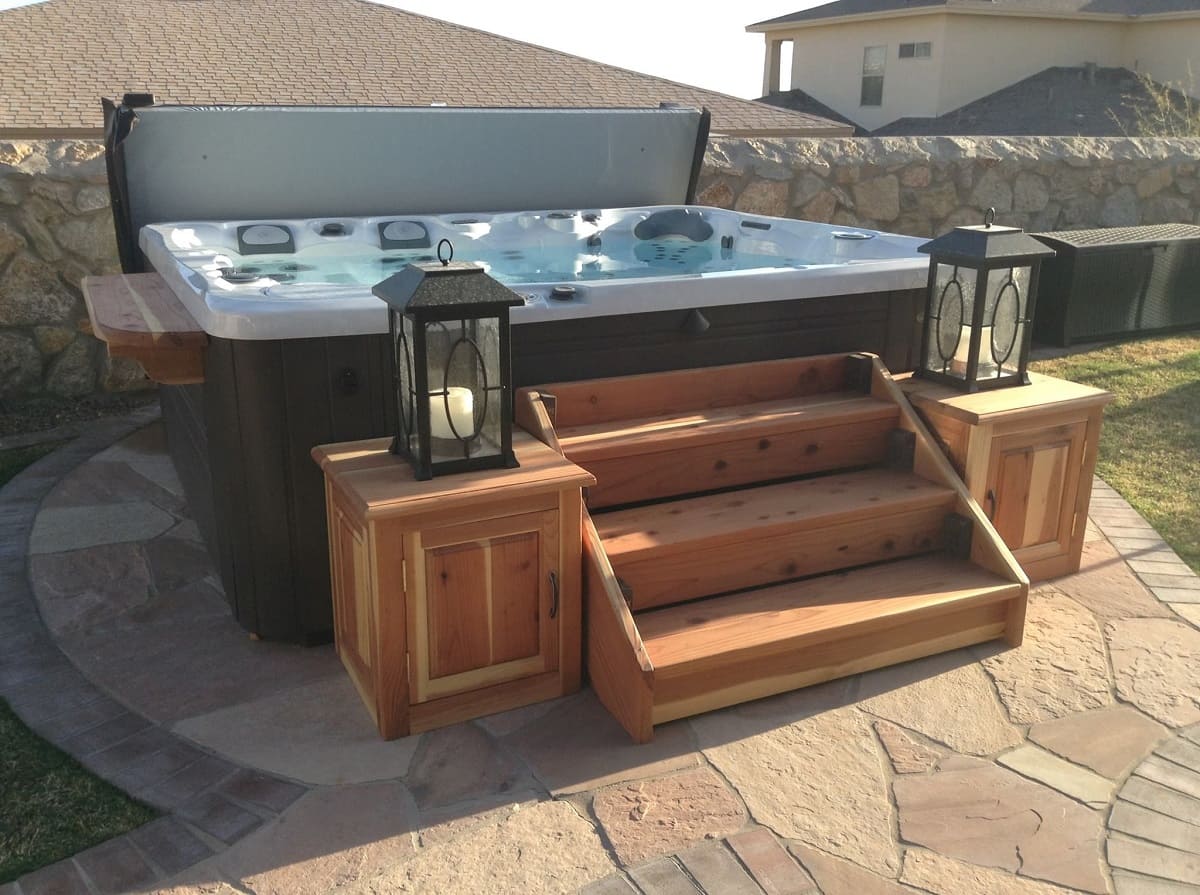
- Add Railings (Optional): Depending on the height and purpose of your steps, you may choose to install railings for additional safety and support. Railings can be made from various materials such as wood, metal, or composite materials.
- Filling the Surrounding Area: Fill the gaps and spaces around the steps with gravel, decorative stones, or mulch. This will help create a visually appealing transition between the steps and the surrounding landscape.
- Sealing or Painting the Steps: Consider sealing or painting the steps to protect them from the elements and enhance their durability and aesthetics. Choose a sealant or paint that is suitable for the materials you used.
- Adding Lighting: Install outdoor lighting fixtures to illuminate the steps, enhancing their visibility and safety during nighttime use. LED lights or solar-powered lighting options are energy-efficient choices.
These finishing touches add the final polish to your landscaping steps, making them functional and visually appealing. Choose the options that align with your personal style and the overall design of your outdoor space.
With the steps secured and the finishing touches in place, your landscaping steps are now complete. Take a step back and admire your work, knowing that you have created an attractive and functional feature in your garden or yard.
Read more: How To Build A Step On A Patio
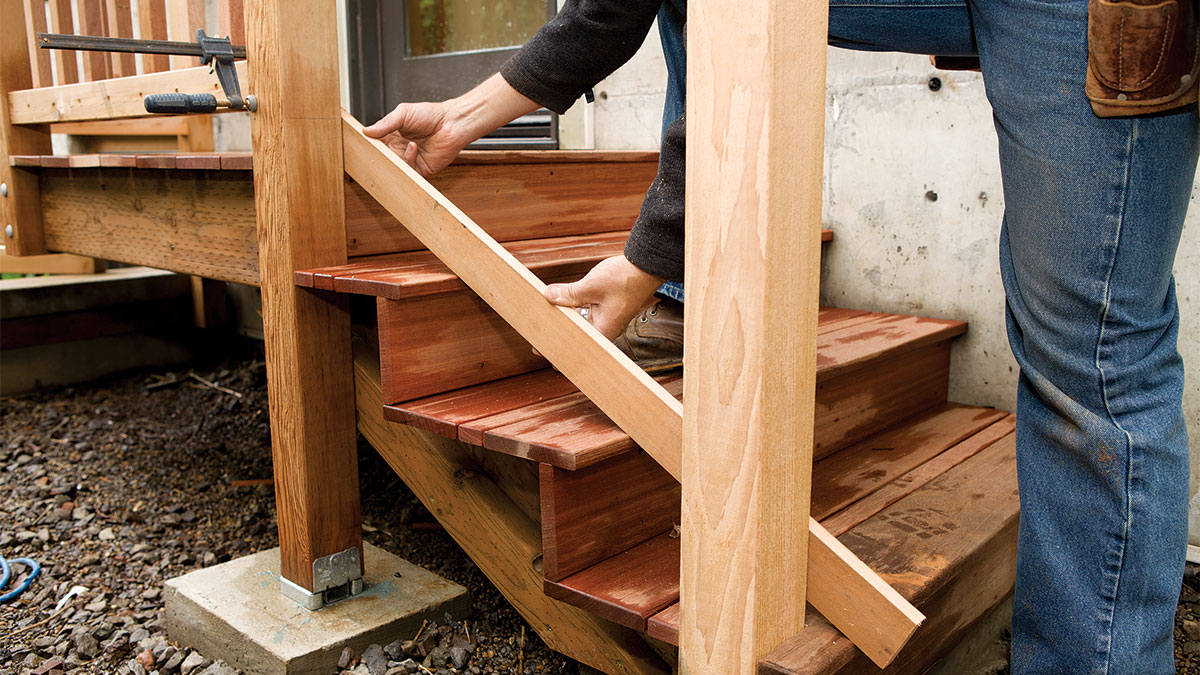
Adding Railings (Optional)
Adding railings to your landscaping steps can provide additional safety and support, especially if the steps are located in an elevated area or if you have elderly individuals or young children using the steps. Railings also offer aesthetic appeal and can complement the overall design of your outdoor space. Here’s a guide on how to add railings to your steps effectively:
- Choose the Right Material: Select a railing material that suits your style and complements the overall theme of your outdoor space. Common options include wood, metal, composite, or vinyl. Consider the durability, maintenance requirements, and weather resistance of each material.
- Measure and Mark: Measure the distance between the top and bottom of the steps where you intend to install the railings. Mark the desired height of the railings to ensure consistency.
- Install Posts: Install sturdy posts at appropriate intervals along the length of the steps. The number of posts will depend on the length of the steps and the desired spacing between each post. Secure the posts into the ground or attach them to the existing structure using appropriate hardware and techniques.
- Attach Rails: Once the posts are securely in place, attach the rails horizontally between the posts. Use screws or brackets to fasten the rails to the posts, ensuring they are level and secure.
- Add Balusters or Spindles: Depending on the railing style, you may need to attach balusters or spindles between the rails and the tread. This helps prevent any large gaps that could pose a safety risk. Space the balusters or spindles evenly and secure them firmly in place.
- Finishing Touches: Sand and smooth any rough edges and surfaces of the railings. Apply a protective sealant or paint to the railings to enhance their durability and appearance. Consider coordinating the color of the railings with the surrounding environment.
Adding railings to your landscaping steps is a personal choice that depends on your specific needs and preferences. Keep in mind any local building codes or regulations that may govern the installation of railings in your area.
By taking the time to carefully install railings, you can significantly enhance the safety and aesthetics of your landscaping steps. The railings provide added peace of mind and can be a beautiful addition to your outdoor space.
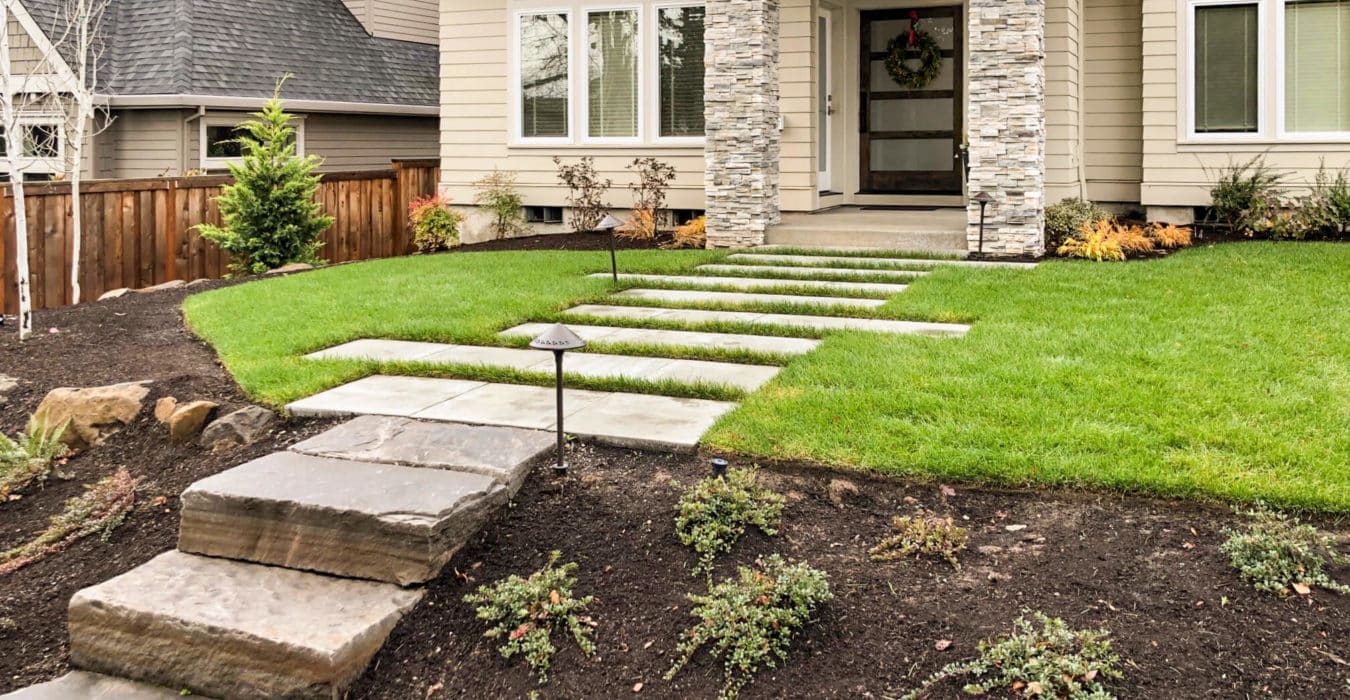
Filling the Surrounding Area
Filling the surrounding area of your landscaping steps is an important step to enhance the overall appearance and functionality of the steps. It helps create a cohesive transition between the steps and the surrounding landscape. Here’s a guide on how to effectively fill the area surrounding your steps:
- Choose the Right Material: Consider using materials that are visually appealing, harmonize with the overall design, and are suitable for the outdoor environment. Options include gravel, decorative stones, mulch, or ground cover plants.
- Prepare the Area: Clear any debris or excess soil from the area surrounding the steps. Level the ground and remove any plants or obstructions that may interfere with the filling process.
- Lay a Weed Barrier (Optional): To prevent weed growth and maintain a tidy appearance, consider laying a weed barrier fabric before adding the filling material. This helps suppress weed growth and makes maintenance easier.
- Spread the Filling Material: Evenly spread your chosen filling material around the steps. Use a rake or shovel to distribute the material and create a uniform layer. Pay attention to any slopes or uneven areas to ensure a level and consistent fill.
- Add Depth and Texture: Consider layering different materials to add depth and texture. For example, you can use gravel as the base layer and top it off with decorative stones or mulch to create visual interest.
- Compact and Tidy: Once the filling material is in place, use a tamper or your feet to lightly compact it. This helps ensure stability and prevents the material from shifting excessively over time. Use a rake or broom to tidy up any loose particles or debris.
Filling the surrounding area of your steps can provide a polished and finished look to your landscaping project. It creates a seamless blend between the steps and the surrounding landscape, enhancing the overall visual appeal of your outdoor space.
Consider the maintenance requirements of the filling material you choose. Some materials may need periodic replenishment or adjustments over time to maintain their appearance and functionality.
With the surrounding area filled, your landscaping steps are now complete. Take a moment to enjoy and appreciate the beauty and functionality they add to your outdoor space.
Sealing or Painting the Steps
Sealing or painting your landscaping steps is an optional but beneficial step that can enhance their durability and appearance. Here’s a guide on how to effectively seal or paint your steps:
- Clean the Steps: Before applying any sealant or paint, make sure the steps are clean and free from dirt, dust, or debris. Use a brush or a pressure washer to thoroughly clean the surface.
- Select the Right Product: Choose a sealant or paint that is specifically designed for the material of your steps, such as concrete, wood, or stone. Consider factors such as UV protection, water resistance, and durability.
- Prepare the Surface: If you’re sealing the steps, apply a primer if recommended by the sealant manufacturer. If you’re painting the steps, apply a suitable primer or undercoat to ensure proper adhesion and long-lasting results.
- Apply the Sealant or Paint: Using a brush, roller, or sprayer, apply the sealant or paint evenly to the surface of the steps. Follow the manufacturer’s instructions regarding application techniques and drying times. Apply multiple coats if necessary, allowing each coat to dry completely before applying the next.
- Consider Adding Texture: If desired, you can add texture to the steps by using textured paint or by adding a non-slip additive to the sealant. This can help improve traction and safety, especially in wet or slippery conditions.
- Maintain the Finish: Regularly inspect the sealant or paint finish and touch up as needed. This helps protect the steps from damage caused by weather exposure or foot traffic. Follow the manufacturer’s recommendations for maintenance and reapplication.
Sealing or painting your steps not only improves their longevity but also allows you to express your personal style and enhance the overall aesthetics of your outdoor space. It provides an opportunity to add color, coordinate with other design elements, or create a cohesive theme.
Remember to consider the environmental impact of the products you choose. Look for low-VOC (volatile organic compound) or environmentally friendly options to minimize harmful emissions and promote sustainability.
Conclusion
Building landscaping steps is a rewarding project that adds functionality and beauty to your outdoor space. From careful planning and designing to carefully constructing each element, every step of the process contributes to the creation of a durable and visually appealing staircase.
By assessing the site, determining the number of steps, calculating their dimensions, and choosing suitable materials, you can lay the groundwork for a successful project. Preparation, including clearing the pathway, leveling the ground, and marking the locations of each step, ensures a solid foundation.
As you build the steps, constructing the risers and installing the treads, remember the importance of securing each component and checking for stability. Adding optional features such as railings and filling the surrounding area further enhances the safety and aesthetics of the steps.
Finish your landscaping steps by sealing or painting them to protect against the elements and add a personalized touch. Consider adding railings, filling the surrounding area, and adding lighting for additional functionality and charm.
With proper care and maintenance, your landscaping steps will serve you and your outdoor space for many years to come. Enjoy the beauty and convenience that they bring as you navigate your garden or yard with ease.
Frequently Asked Questions about How To Build Landscaping Steps
Was this page helpful?
At Storables.com, we guarantee accurate and reliable information. Our content, validated by Expert Board Contributors, is crafted following stringent Editorial Policies. We're committed to providing you with well-researched, expert-backed insights for all your informational needs.


0 thoughts on “How To Build Landscaping Steps”