Home>Garden Essentials>How To Grow Hibiscus From Seed

Garden Essentials
How To Grow Hibiscus From Seed
Modified: March 16, 2024
Learn how to grow hibiscus from seed in your garden and enjoy a beautiful addition to your outdoor space. Step-by-step instructions for successful cultivation.
(Many of the links in this article redirect to a specific reviewed product. Your purchase of these products through affiliate links helps to generate commission for Storables.com, at no extra cost. Learn more)
Introduction
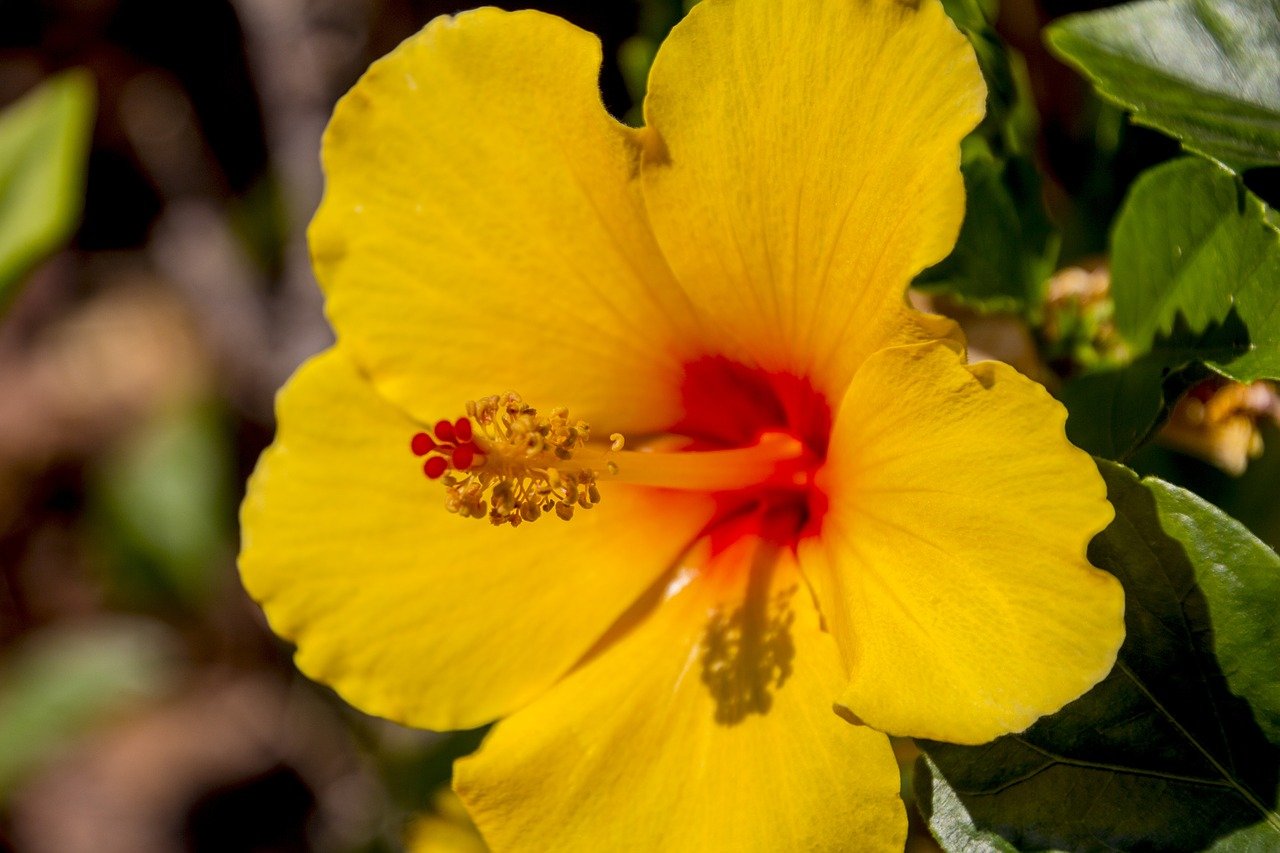
Welcome to the wonderful world of growing hibiscus from seeds! If you have a passion for gardening and want to add a touch of tropical beauty to your landscape, growing hibiscus plants from seed is an exciting and rewarding endeavor. Hibiscus plants are known for their vibrant flowers in a wide array of colors, making them a standout addition to any garden.
In this article, we will guide you through the process of growing hibiscus from seed, providing you with the necessary information and tips to ensure successful germination and growth. From choosing the right seeds to harvesting and saving them for future planting, we’ll cover everything you need to know to cultivate these stunning plants.
Before we dive into the specifics, it’s important to mention that growing hibiscus from seed requires time, patience, and a bit of experimentation. Not every seed will germinate, and not every plant will thrive, but with the right conditions and care, you can greatly increase your chances of success.
So, let’s roll up our sleeves, put on our gardening gloves, and embark on this exciting journey to grow hibiscus from seed!
Key Takeaways:
- Growing hibiscus from seed requires patience, experimentation, and the right conditions. Choose fresh, high-quality seeds, prepare nutrient-rich soil, and provide proper care to increase your chances of success.
- To grow healthy hibiscus plants, ensure adequate sunlight, proper watering, regular fertilization, and protection from pests and diseases. With patience and care, you can create a vibrant hibiscus garden.
Choosing Hibiscus Seeds
The first step in growing hibiscus from seed is to choose the right seeds. There are various factors to consider when selecting your hibiscus seeds to ensure the best chance of success.
1. Variety: Hibiscus plants come in many different varieties, each with its own unique characteristics and flower colors. Consider the specific type of hibiscus you want to grow, such as tropical or hardy varieties, and select seeds accordingly.
2. Freshness: It’s important to choose fresh hibiscus seeds for optimal germination rates. Look for seeds that are plump, firm, and have a healthy appearance. Avoid seeds that are wrinkled, discolored, or damaged.
3. Source: Purchase your hibiscus seeds from a reputable source to ensure quality and authenticity. Local nurseries, garden centers, or online seed suppliers are good options. Take the time to read reviews or ask for recommendations to ensure you are getting reliable seeds.
4. Open-Pollinated or Hybrid: Consider whether you want to grow open-pollinated or hybrid hibiscus plants. Open-pollinated seeds are collected from naturally pollinated flowers and will produce plants similar to the parent plant. Hybrid seeds, on the other hand, result from controlled cross-pollination and can produce plants with unique characteristics.
5. Quantity: Depending on the size of your garden or the number of plants you want to grow, choose the quantity of seeds accordingly. Keep in mind that not all seeds will germinate, so it’s good to have a few extra seeds on hand.
Once you have chosen your hibiscus seeds, it’s time to prepare the soil and create the ideal conditions for germination and growth. Deliciously rich and well-draining soil is essential for hibiscus plants, so continue reading to learn how to prepare the soil for successful seed planting.
Preparing the Soil
Creating the ideal growing environment for hibiscus seeds starts with preparing the soil. Hibiscus plants thrive in rich, well-draining soil that is slightly acidic. Follow these steps to ensure your soil is in prime condition:
1. Choose the Right Location: Select a location in your garden that receives at least 6 hours of direct sunlight per day. Hibiscus plants love warmth and sunlight, so a sunny spot is crucial for their growth.
2. Clear the Area: Remove any weeds, rocks, or debris from the planting area. Clearing the area of obstacles will allow the hibiscus seeds to germinate and grow without competition.
3. Amend the Soil: Hibiscus plants prefer a soil pH level between 6.0 and 6.8. Test the soil pH using a kit available at your local garden center. If the pH is too high or too low, you can adjust it by adding amendments such as sulfur or lime. Follow the instructions on the package for the correct amount to use based on your soil test results.
4. Add Organic Matter: Hibiscus plants benefit from the addition of organic matter to the soil. Mix in compost, well-rotted manure, or peat moss to improve the soil’s fertility, structure, and moisture-retaining capabilities.
5. Improve Drainage: Ensure that the soil has good drainage to prevent waterlogging, which can lead to root rot. If the soil in your planting area retains too much water, you can improve drainage by adding coarse sand or perlite to the soil mixture.
6. Loosen the Soil: Use a garden fork or a tiller to loosen the soil to a depth of at least 12 inches. This will create a loose and aerated environment for the hibiscus roots to penetrate and grow deep.
By following these steps, you will provide your hibiscus seeds with a nutrient-rich and well-drained environment that sets the stage for successful germination and healthy plant growth. Now that the soil is ready, let’s move on to the exciting process of planting hibiscus seeds.
Planting Hibiscus Seeds
Now that you have prepared the soil, it’s time to plant your hibiscus seeds. Follow these steps to ensure successful germination and get your hibiscus plants off to a healthy start:
1. Timing: Hibiscus seeds are best planted in the spring, after the risk of frost has passed and the soil has warmed up. This will provide the ideal conditions for germination and growth. It’s important to note that hibiscus seeds can take some time to germinate, so be patient and provide consistent care throughout the process.
2. Seed Depth: Hibiscus seeds should be planted at a depth of approximately 1/4 inch to 1/2 inch. Make small furrows in the soil or use a dibber to create individual holes for each seed. Space the seeds about 12 to 18 inches apart to allow for adequate growth and airflow between plants.
3. Seed Placement: Place the hibiscus seeds in the prepared holes, one seed per hole. Gently cover the seeds with soil and lightly pat it down to ensure good seed-to-soil contact.
4. Watering: After planting, give the seeds a thorough watering to settle the soil and provide the moisture needed for germination. Keep the soil consistently moist, but not drenched, throughout the germination process. Avoid overwatering, as this can lead to rotting of the seeds or seedlings.
5. Temperature and Humidity: Hibiscus seeds require warm temperatures between 70°F and 80°F (21°C to 27°C) for successful germination. If needed, use a heating mat or place the seed tray in a warm and sunny location to provide the optimal temperature. Additionally, covering the tray with a clear plastic dome or plastic wrap can help create a greenhouse-like environment and maintain humidity levels.
6. Germination: Hibiscus seeds typically germinate within 1 to 3 weeks, although it may take longer for some varieties. Be patient and monitor the moisture levels and temperature during this period. Once the seeds have germinated and small seedlings emerge, remove the covering and provide adequate light for their growth.
As the hibiscus seedlings grow, continue to care for them by providing consistent watering, monitoring for pests or diseases, and gradually acclimating them to outdoor conditions if you plan to transplant them into the garden. With proper nurturing, your hibiscus seeds will transform into beautiful and flourishing plants that will bring joy to your garden.
Providing Proper Watering
Watering is a crucial aspect of growing hibiscus plants from seed. While it’s essential to keep the soil consistently moist, it’s equally important to avoid overwatering, as it can lead to root rot and other issues. Here are some guidelines for providing proper watering to your hibiscus seedlings:
1. Establish a Watering Schedule: Create a regular watering schedule and stick to it. It’s better to water deeply and less frequently than to water lightly and frequently. Aim to water your hibiscus plants every 2-3 days, depending on the weather conditions and moisture levels of the soil.
2. Observe the Soil Moisture: Before watering, check the moisture level of the soil by inserting your finger into it. If the top inch of the soil feels dry, it’s time to water. However, if the soil is still moist, hold off on watering until it dries out a bit.
3. Water at the Base: When watering hibiscus seedlings, make sure to direct the water at the base of the plants, near the roots. This helps the water reach the roots directly, promoting healthy growth and preventing water splashing on the leaves, which can lead to leaf diseases.
4. Mulch to Retain Moisture: Apply a layer of organic mulch, such as wood chips or straw, around the base of your hibiscus seedlings. Mulching helps conserve moisture in the soil, reduces weed growth, and insulates the roots, creating a more favorable environment for the plants.
5. Adjust Watering in Different Weather Conditions: During hot and dry weather, hibiscus plants may require more frequent watering to compensate for the increased evaporation. Conversely, in cool and rainy weather, you may need to reduce the frequency of watering to prevent waterlogging and root rot.
6. Don’t Overwater: Overwatering is a common mistake that gardeners make, and hibiscus plants are no exception. Avoid keeping the soil excessively wet, as it can suffocate the roots and lead to fungal diseases. Allow the soil to dry out slightly between waterings to promote healthy root growth.
By following these watering guidelines, you will strike the right balance to keep your hibiscus seedlings properly hydrated without risking overwatering. Remember to adjust your watering routine as needed based on the specific needs of your plants and the prevailing weather conditions.
Read more: How To Get Seeds From Hibiscus
Ensuring Adequate Sunlight
Adequate sunlight is essential for the healthy growth and blooming of hibiscus plants. These sun-loving beauties thrive in full sun conditions, and providing them with the right amount of sunlight is crucial for their overall development. Here are some tips to ensure your hibiscus seedlings receive adequate sunlight:
1. Choose the Right Location: Select a planting location that receives at least 6 hours of direct sunlight per day. Hibiscus plants need ample sunlight to produce beautiful blooms, so it’s important to find a sunny spot in your garden or outdoor space.
2. Avoid Shady Areas: Avoid planting hibiscus seedlings in areas with heavy shade or where they may be shaded by tall trees, buildings, or other structures. Lack of sunlight can result in weak growth and limited flowering.
3. Morning Sun with Afternoon Shade: If you live in a hot climate, providing some shade during the hot afternoon hours can protect the hibiscus plants from scorching heat. Consider planting them where they will receive morning sun and afternoon shade to strike the right balance.
4. Monitor Sun Exposure: Observe your hibiscus seedlings during different times of the day to ensure they are receiving adequate sunlight. If you notice that they are struggling or not flowering as expected, it may be a sign that they need more sunlight. Consider transplanting them to a sunnier location if necessary.
5. Use Reflective Surfaces: Utilize reflective surfaces such as light-colored walls or fences to maximize sunlight exposure for your hibiscus plants. These surfaces can help bounce light back onto the plants, providing them with additional sunlight and promoting better growth.
6. Indoor Care: If you’re growing hibiscus seedlings indoors, place them near a sunny window that receives several hours of direct sunlight each day. Alternatively, you can use grow lights to provide them with the necessary light intensity for healthy growth.
Remember that while hibiscus plants love sunlight, it’s crucial to strike a balance. In extremely hot climates, prolonged exposure to intense sunlight can cause leaf burn and stress the plants. Regular monitoring and providing the right amount of sunlight will ensure the optimal growth and blossoming of your hibiscus seedlings.
To grow hibiscus from seed, soak the seeds in warm water for 24 hours, then plant them in a well-draining soil mix. Keep the soil consistently moist and provide plenty of sunlight for the seeds to germinate and grow.
Fertilizing Hibiscus Plants
Fertilizing is an important aspect of caring for hibiscus plants. A well-balanced and nutrient-rich soil provides the necessary elements for robust growth and abundant blooming. Here are some guidelines to help you properly fertilize your hibiscus plants:
1. Know Your Soil: Before fertilizing, it’s essential to understand the composition of your soil. Conduct a soil test to determine its nutrient levels and pH. This will help you choose the right fertilizer and make appropriate adjustments, if needed.
2. Choose the Right Fertilizer: Hibiscus plants benefit from a fertilizer with a balanced ratio of nutrients, such as a slow-release granular fertilizer labeled for flowering plants. Look for a fertilizer with an N-P-K (nitrogen, phosphorus, potassium) ratio of around 10-10-10 or 20-20-20. Additionally, select a fertilizer that contains micronutrients like iron, magnesium, and manganese, as they are crucial for healthy hibiscus growth.
3. Follow the Fertilizer Schedule: Hibiscus plants require regular feeding throughout the growing season. It’s best to start fertilizing in early spring when new growth begins, and continue every 4-6 weeks until early fall. Follow the instructions on the fertilizer package for the recommended application rates.
4. Apply Fertilizer Properly: Spread the granular fertilizer evenly around the base of your hibiscus plants, avoiding direct contact with the stems. Gently work the fertilizer into the top layer of soil using a garden fork or rake. Water the plants thoroughly after fertilizing to help the nutrients penetrate the soil and reach the roots.
5. Supplement with Organic Matter: In addition to commercial fertilizers, hibiscus plants can benefit from organic matter. Apply a layer of compost, well-rotted manure, or organic mulch around the plants. These organic materials not only provide nutrients but also improve soil structure, increase moisture retention, and encourage beneficial microbial activity.
6. Watch for Signs of Overfertilization: While fertilizing is important, it’s crucial not to overdo it. Excessive fertilizer can cause salt buildup in the soil and damage the roots of hibiscus plants. Watch for signs of overfertilization, such as yellowing or burning of leaves, stunted growth, or wilting. If you notice these symptoms, flush the soil with water to leach out excess salts.
By following these fertilization guidelines, you will provide your hibiscus plants with the nutrients they need for vigorous growth, plentiful blooms, and overall health. Remember to adjust the fertilizer application rates based on the specific needs of your plants and the soil conditions in your garden.
Pruning and Training Hibiscus
Pruning and training are important maintenance practices for hibiscus plants. Proper pruning helps shape the plants, promotes healthy growth, and enhances blooming. Training, on the other hand, allows you to control the plant’s form and size. Here are some tips to help you effectively prune and train your hibiscus:
1. Timing: Pruning hibiscus plants is typically done in late winter or early spring before new growth begins. This timing allows the plants to redirect their energy toward producing new branches and flowers.
2. Remove Dead or Diseased Wood: Start by inspecting your hibiscus for any dead, damaged, or diseased wood. Use sharp and clean pruning shears to carefully remove these branches, cutting them back to healthy tissue. This helps prevent the spread of diseases and improves the overall appearance of the plant.
3. Shaping and Reducing Size: To shape your hibiscus or reduce its size, selectively prune the stems to encourage branching and a more compact form. Make cuts just above a leaf node, ideally at a 45-degree angle. This method promotes new growth and keeps the plant bushy and well-proportioned.
4. Promote Flowering: Hibiscus plants typically produce flowers on new growth. To stimulate abundant blooming, prune the tips of the branches, removing around a third of their length. This encourages the growth of lateral branches, resulting in more flower buds.
5. Training Techniques: Depending on the desired form, hibiscus can be trained to grow as a single-trunk tree, a multi-stemmed shrub, or even as an espalier against a wall or fence. Use stakes or trellises to guide the growth in the desired direction and gently tie the branches as needed. Regular trimming and training will keep the plant in shape and prevent it from becoming leggy or unkempt.
6. Maintenance Pruning: Throughout the growing season, perform maintenance pruning as needed to remove any diseased or crossed branches, promote airflow, and maintain the desired shape. Avoid excessive pruning, as this can reduce the plant’s ability to photosynthesize and weaken its overall health.
Remember to always use clean and sharp pruning tools to minimize the risk of disease transmission. After pruning, dispose of the trimmings properly to prevent the spread of pests or diseases.
By incorporating proper pruning and training techniques, you can maintain the health and aesthetics of your hibiscus plants. Enjoy the process of shaping and guiding their growth to create stunning and well-maintained specimens in your garden.
Protecting Hibiscus from Pests and Diseases
Like any other plants, hibiscus can be susceptible to pests and diseases. However, with proper care and preventive measures, you can protect your hibiscus plants and keep them healthy and thriving. Here are some tips to help you safeguard your hibiscus from common pests and diseases:
1. Regular Inspections: Regularly inspect your hibiscus plants for any signs of pest infestations or disease symptoms. Look for chewed leaves, yellowing or wilting foliage, distorted growth, or presence of pests such as aphids, mealybugs, scales, or spider mites. Early detection allows for prompt action and prevents the issue from spreading.
2. Maintain Plant Hygiene: Keep your hibiscus plants clean and free from dead leaves, fallen flowers, or plant debris. These can attract pests and provide a breeding ground for diseases. Remove any affected plant parts immediately and dispose of them properly. Prune overcrowded branches to promote airflow and reduce moisture buildup.
3. Watering Practices: Avoid overwatering your hibiscus plants, as moist conditions can create a favorable environment for fungal diseases. Water the plants at the base and try to keep the foliage dry. Water in the morning, allowing ample time for the leaves to dry before evening, which reduces the risk of fungal infection.
4. Mulching: Apply a layer of organic mulch around the base of your hibiscus plants. Mulch helps to suppress weeds, retain soil moisture, and moderate soil temperature. However, be careful not to pile the mulch directly against the stem, as this can create a moist environment conducive to fungal diseases.
5. Natural Predators: Encourage the presence of beneficial insects and animals that naturally prey on garden pests. Ladybugs, lacewings, and birds like sparrows and wrens can help keep pest populations in check. Avoid using broad-spectrum insecticides that can harm these beneficial organisms.
6. Use Organic Pest Control: If necessary, utilize organic and environmentally friendly pest control methods. Neem oil, insecticidal soaps, or horticultural oils can effectively control common pests without causing harm to the plants or beneficial insects. Follow the product instructions carefully when using any pest control product.
7. Disease-Resistant Varieties: Consider planting disease-resistant varieties of hibiscus. These cultivars are bred to be less susceptible to certain diseases and can provide an added layer of protection for your plants.
If you notice persistent or severe pest or disease issues on your hibiscus plants, consult with a local horticulturist or extension service for further guidance and appropriate treatment options. By implementing preventive measures and taking prompt action when needed, you can keep your hibiscus plants healthy and pest-free.
Read more: How To Collect Hibiscus Seeds
Harvesting and Saving Hibiscus Seeds
As your hibiscus plants mature and produce beautiful blooms, you may want to harvest and save the seeds for future planting. Harvesting hibiscus seeds is a simple and rewarding process that allows you to propagate your favorite varieties. Here’s a step-by-step guide on how to harvest and save hibiscus seeds:
1. Timing: Hibiscus flowers typically produce seed pods after the blooms fade and drop their petals. Wait until the seed pods have matured and turned brown or dry on the plant before harvesting. This ensures that the seeds inside are fully developed and ready for planting.
2. Gather the Seed Pods: Using sharp pruning shears or scissors, carefully cut the seed pods from the hibiscus plant. Place the seed pods in a clean container or paper bag to collect them. Avoid handling the seed pods excessively, as they can be fragile and may burst, scattering the seeds.
3. Dry the Seed Pods: Allow the seed pods to dry further by placing them in a well-ventilated and dry area for a couple of weeks. This allows the pods to fully dry out and ensures that the seeds are fully matured. Check the pods periodically to ensure they are fully dry before proceeding.
4. Extract the Seeds: Once the seed pods are dry, gently break them open to release the seeds. The seeds are small and can vary in color and shape, depending on the hibiscus variety. Separate the seeds from the pod debris and discard any damaged or discolored seeds.
5. Clean the Seeds: To remove any remaining debris or chaff from the seeds, pour them onto a fine-mesh sieve or screen. Gently rub the seeds against the mesh to separate them from unwanted materials. Alternatively, you can use your fingers to pick out any debris carefully.
6. Store the Seeds: Store the cleaned hibiscus seeds in a cool, dry, and dark place to maintain their viability. Place the seeds in a labeled envelope or a small airtight container. Consider adding a desiccant packet to help absorb any excess moisture and prolong the shelf life of the seeds.
7. Record Information: It’s a good practice to keep a record of the variety, date of harvest, and any additional notes about the seeds. This information will come in handy when you’re ready to plant the seeds and want to remember the specific details about each variety.
Hibiscus seeds can remain viable for several years if stored properly. However, it’s best to use fresh seeds for optimal germination rates. When you’re ready to plant the saved seeds, follow the appropriate germination guidelines for that particular hibiscus variety.
Harvesting and saving hibiscus seeds not only allows you to propagate your favorite varieties but also gives you the exciting opportunity to experiment and create unique hybrids. Enjoy the process of seed-saving and watch your hibiscus garden flourish with the next generation of beautiful blooms.
Conclusion
Growing hibiscus from seed is a rewarding and enjoyable endeavor for any gardening enthusiast. With the right knowledge and techniques, you can successfully cultivate these stunning plants and add a touch of tropical beauty to your garden. Throughout this article, we have explored the essential steps to growing hibiscus from seed, from choosing the right seeds to harvesting and saving them for future planting.
By carefully selecting fresh, high-quality seeds and preparing the soil with the necessary nutrients, you provide the ideal environment for germination and growth. Proper watering, adequate sunlight, and regular fertilization ensure that your hibiscus plants develop into healthy and blooming specimens. Pruning and training techniques help shape the plants and maintain their vigor, while protecting them from pests and diseases is crucial to their overall health and longevity.
Remember, growing hibiscus from seed requires patience and experimentation. Not every seed will germinate, and not every plant will thrive. But with persistence and care, you can increase your chances of success and create a vibrant hibiscus garden that will bring joy and beauty for years to come.
So, why not embark on the exciting journey of growing hibiscus from seed? Prepare your soil, choose your seeds, and get your hands dirty. Watch as the tiny seeds transform into magnificent plants, bursting with colorful blooms. With each gentle pruning and careful training, you shape the future of your hibiscus garden.
Whether you’re dreaming of creating a tropical oasis or adding a splash of vibrant color to your landscape, growing hibiscus from seed allows you to turn that dream into a reality. So, grab those gardening gloves, dig deep into the soil, and let the beauty of hibiscus unfold before your eyes!
Frequently Asked Questions about How To Grow Hibiscus From Seed
Was this page helpful?
At Storables.com, we guarantee accurate and reliable information. Our content, validated by Expert Board Contributors, is crafted following stringent Editorial Policies. We're committed to providing you with well-researched, expert-backed insights for all your informational needs.


0 thoughts on “How To Grow Hibiscus From Seed”