Home>Garden Essentials>How To Plant Helicopter Seeds

Garden Essentials
How To Plant Helicopter Seeds
Modified: March 16, 2024
Learn how to plant helicopter seeds and create a beautiful garden with our step-by-step guide. Transform your outdoor space into a vibrant oasis!
(Many of the links in this article redirect to a specific reviewed product. Your purchase of these products through affiliate links helps to generate commission for Storables.com, at no extra cost. Learn more)
Introduction
Welcome to the world of gardening! If you’ve ever come across those fascinating spirally-winged seeds falling from trees, you may have wondered how to plant them and watch them grow. These unique seeds are known as helicopter seeds, so named because of their spinning motion as they fall to the ground. Planting helicopter seeds can be a fun and rewarding experience, allowing you to witness the magic of nature firsthand.
In this guide, we will walk you through the step-by-step process of successfully planting and growing helicopter seeds. Whether you have a spacious garden or a cozy balcony, these seeds can thrive in various environments, making them a perfect choice for aspiring gardeners of all kinds.
Before we delve into the planting process, let’s take a moment to understand these remarkable seeds. Helicopter seeds are typically found in trees belonging to the maple family, such as the maple tree. The technical term for these seeds is samaras. Each seed consists of a thin outer wing or pod and a tiny seed in the center.
The unique design of the helicopter seeds allows them to be carried by the wind and spread their offspring far and wide. As they fall from the tree, the pods spin, helping them travel greater distances and find suitable places to take root. Planting helicopter seeds in your garden or containers allows you to play a part in nature’s cycle, creating new life and contributing to the biodiversity of your surroundings.
So, if you’re ready to embark on this botanical adventure, let’s get started! Grab your gardening gloves and let us guide you through the process of planting and nurturing your very own helicopter seeds. Before you know it, you’ll be witnessing the growth of these unique trees and enjoying the beauty they bring to your outdoor space.
Key Takeaways:
- Planting helicopter seeds is a fun and rewarding experience that allows you to witness the magic of nature firsthand. By following the step-by-step process, you can nurture these unique seeds into thriving plants.
- From gathering the seeds to providing proper care and maintenance, the journey of growing helicopter seeds is filled with wonder and joy. Embrace the beauty of nature and enjoy the growth of your garden!
Read more: What Kind Of Tree Has The Helicopter Seeds
Step 1: Gather Helicopter Seeds
The first step in planting helicopter seeds is to gather them from a mature tree. Look for maple trees in your area, as they are the most common trees that produce helicopter seeds. These trees are often found in parks, forests, or even in residential areas.
Timing is crucial when collecting helicopter seeds. It’s best to gather them in late spring to early summer when the seeds are fully developed and ready to fall. Keep an eye out for the trees when their seeds start to turn brown and develop wings. This is a signal that they are ripe and can be harvested.
To gather the seeds, gently pluck them from the tree branches. Hold the wings of the seed and twist them in a gentle motion to detach them from the stem. Collect as many seeds as you need, keeping in mind how many plants you want to grow and the available space in your garden.
It’s important to handle the seeds with care to avoid damaging them. Try not to squeeze or crush them as you gather them. Place the gathered helicopter seeds in a small container or envelope, keeping them dry and safe until you’re ready to plant them.
Remember to only collect seeds from your own property, public areas, or with permission from the landowner. It’s essential to respect nature and not harm any trees or plants in the process.
Once you have gathered your helicopter seeds, you’re ready to move on to the next step: preparing the planting area.
Step 2: Prepare the Planting Area
Now that you have your helicopter seeds in hand, it’s time to prepare the planting area. Whether you’re planning to grow the seeds in a garden bed or in containers, proper preparation is key to providing a suitable environment for the seeds to thrive.
Start by selecting a sunny location for planting the helicopter seeds. These seeds require ample sunlight to germinate and grow into healthy seedlings. Choose a spot that receives at least 6-8 hours of direct sunlight each day.
Next, prepare the soil. Helicopter seeds prefer well-draining soil with a pH level of around 6.0 to 8.0. If your soil is heavy or compacted, it’s beneficial to loosen it and improve its drainage. You can add organic matter such as compost or well-rotted manure to enrich the soil and improve its texture.
If you’re planting the helicopter seeds in a garden bed, remove any weeds or rocks from the area. Use a garden fork or shovel to loosen the soil to a depth of about 6 inches. Break up any clumps of soil and level the surface for even planting.
If you’re choosing to plant the seeds in containers, select pots or planters that have drainage holes to prevent waterlogging. Fill the containers with a high-quality potting mix that is well-draining and nutrient-rich. Ensure that the containers are large enough to accommodate the growing seedlings.
Before moving on to the next step, water the soil or potting mix well, providing the right moisture level for the seeds to settle in.
Now that the planting area is prepared, it’s time to move on to the next step: soaking the helicopter seeds.
Step 3: Soak the Helicopter Seeds
Soaking helicopter seeds before planting can help improve their germination rate and speed up the process. By providing moisture to the seeds, you give them a head start in the germination process, enabling them to sprout faster and more successfully.
To soak the helicopter seeds, start by filling a small container with room-temperature water. Place the seeds into the container, ensuring that they are fully submerged. You can use a bowl, a glass, or a plastic container for this purpose.
Allow the seeds to soak for approximately 24 to 48 hours. During this time, the water will penetrate the outer hull of the seeds, triggering the germination process. It’s important not to exceed the soaking time, as prolonged soaking can lead to seed damage or rotting.
After the soaking period, carefully remove the seeds from the water, taking care not to damage them. Place them on a clean paper towel or a plate to allow any excess moisture to drain off.
Now that the helicopter seeds are soaked and ready for planting, let’s move on to the exciting part: actually planting the seeds!
Step 4: Plant the Helicopter Seeds
Now that you have soaked your helicopter seeds and prepared the planting area, it’s time to plant them. Whether you’re planting them directly in the garden bed or in containers, the process is relatively straightforward.
If you’re planting in a garden bed:
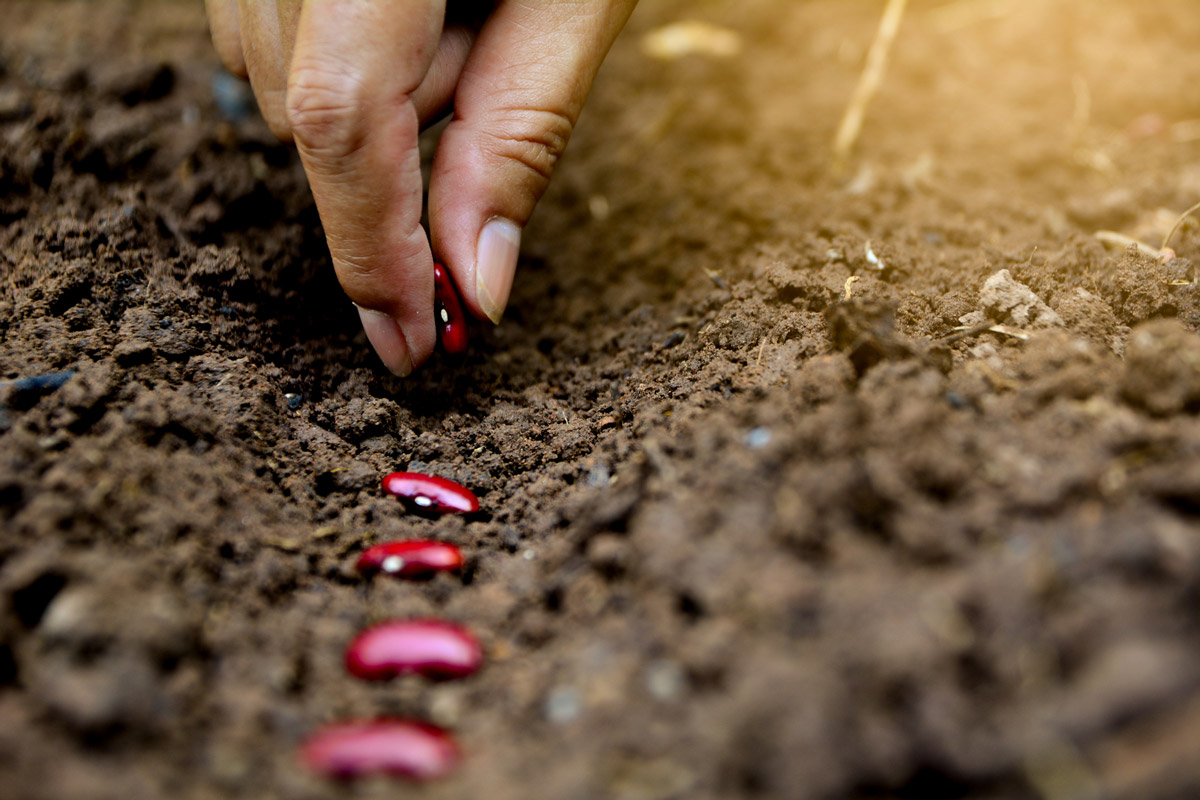
- Make small holes in the soil, about 1-2 inches deep, using your finger or a small garden tool. Space the holes at least 6 inches apart to allow room for the growing seedlings.
- Place a soaked helicopter seed in each hole, with the winged side facing upwards. Gently cover the seed with soil, ensuring it is securely planted but not buried too deeply.
- Repeat the process for each seed you wish to plant, spacing them evenly in the garden bed.
- After planting, lightly water the area to settle the soil and provide initial moisture to the seeds.
If you’re planting in containers:
- Fill the containers with the pre-moistened potting mix, leaving about an inch of space below the rim.
- Make small holes in the potting mix, about 1-2 inches deep, using your finger or a small tool.
- Place a soaked helicopter seed in each hole, with the winged side facing upwards. Gently cover the seed with potting mix, ensuring it is securely planted but not buried too deeply.
- Repeat the process for each seed you wish to plant, spacing them adequately in the container, leaving enough space for the seedlings to grow.
- Water the containers gently, making sure not to oversaturate the soil.
After planting the helicopter seeds, it’s important to provide proper care and maintenance to ensure their successful growth. Let’s move on to the next step: providing proper care and maintenance for the growing seeds.
When planting helicopter seeds, make sure to choose a sunny location with well-drained soil. Plant the seeds about 1 inch deep and water regularly to keep the soil moist. Watch for new growth in the spring!
Read more: What Trees Do Helicopter Seeds Come From
Step 5: Provide Proper Care and Maintenance
Once you have planted your helicopter seeds, it’s essential to provide them with the right care and maintenance to help them thrive. By following these guidelines, you can ensure that your seeds have the best chance of growing into healthy and vibrant plants.
Watering is a crucial aspect of caring for your helicopter seeds. After planting, water the soil or potting mix lightly to provide initial moisture. Going forward, it’s important to keep the soil consistently moist, but not waterlogged. Check the soil regularly and water as needed, ensuring that it doesn’t dry out completely. As the seedlings grow, adjust the watering frequency accordingly, considering factors such as weather conditions and soil moisture levels.
Fertilizing the soil can also provide essential nutrients for the growing helicopter seeds. Use a balanced and organic fertilizer, following the manufacturer’s instructions. Apply the fertilizer sparingly, taking care not to overfertilize, as it can harm the young plants. Generally, it’s best to wait until the seedlings have developed a few sets of true leaves before applying fertilizer.
Weeds can compete with your helicopter seeds for nutrients and sunlight, so it’s important to keep the planting area free of weeds. Regularly check the area and remove any weeds that may sprout. You can do this by hand-pulling them or by using a small gardening tool to ease their removal. Be gentle around the seedlings to avoid damaging their delicate roots.
Protecting your helicopter seeds from pests and diseases is another crucial aspect of care. Monitor the seedlings regularly for any signs of damage or infestation. Common pests that may target young plants include aphids, caterpillars, and slugs. If you notice any pest activity, you can take appropriate measures such as using organic pest control methods or introducing beneficial insects to your garden. Additionally, practice good hygiene by keeping the planting area clean and free from debris that can harbor pests or diseases.
Finally, it’s important to provide adequate support for the growing helicopter plants. As they develop, some species may require staking or support to prevent them from bending or breaking due to wind or heavy foliage. Evaluate the growth pattern of your specific plant species and provide necessary support as needed.
With proper care and maintenance, your helicopter seeds will begin to grow and develop. In the next step, we will discuss the exciting stage of germination and what to expect as your seeds sprout.
Step 6: Watch for Germination
After planting your helicopter seeds and providing them with proper care, it’s time to patiently observe and wait for germination to occur. Germination is the process in which the seeds sprout and the first signs of growth emerge. It’s an exciting stage in the lifecycle of your helicopter seeds.
Depending on various factors such as seed quality, environmental conditions, and species, germination can take anywhere from a few days to a few weeks. During this time, it’s important to be patient and not disturb the seeds or the soil unnecessarily.
Keep an eye on the planted area or containers, looking for any signs of activity. The first indication of germination is the emergence of tiny seedlings from the soil. These seedlings may look delicate, with small leaves unfolding from the stem.
As the seedlings grow, they will begin to develop their true leaves, which look different from the initial seed leaves. The appearance of the true leaves is a positive sign that your helicopter seeds are thriving and on their way to becoming healthy plants.
It’s important to continue providing adequate water and care during the germination process. Regularly check the soil moisture levels to ensure they remain consistent, as dry soil can hinder germination. Be cautious not to overwater, as excessive moisture can lead to damping-off disease or root rot.
While awaiting germination, it’s also essential to protect the seedlings from extreme weather conditions, such as strong winds or frost. If necessary, provide temporary shelter or bring the containers indoors during adverse weather to keep the seedlings safe.
Remember that germination rates can vary, and not all seeds may sprout. Be prepared for a range of outcomes and appreciate the wonder of nature’s process. Even if only a few seeds germinate, you can still enjoy the beauty and growth of your helicopter plants.
Once your helicopter seeds have successfully germinated, you can move on to the optional step of transplanting the seedlings, which we will discuss next.
Step 7: Transplant Seedlings (Optional)
Transplanting seedlings is an optional step that you can take if you initially planted your helicopter seeds in containers or if you want to rearrange them in your garden. Transplanting allows you to provide more space and optimal growing conditions for the seedlings as they continue to develop.
Before transplanting, it’s important to wait until the seedlings have grown a bit and have developed a few sets of true leaves. This ensures that they are strong enough to withstand the transplanting process.
Here’s how to transplant your helicopter seedlings:
- Choose an appropriate location in your garden to transplant the seedlings. Ensure that the soil is well-prepared and the location meets the sunlight and soil requirements for the specific plant species.
- If transplanting from containers, gently remove the seedlings from their pots by supporting the base of the seedlings and loosening the roots from the potting mix. Be careful not to damage the fragile roots.
- Prepare the planting holes in the new location, spacing them adequately to allow room for the growing seedlings.
- Place each seedling into a planting hole, ensuring that the stem is at the same depth as it was in the original container. Firmly press the soil around the seedling to secure it in place.
- Water the transplanted seedlings gently to settle the soil and provide hydration.
- Continue to care for the transplanted seedlings by providing regular watering, proper sunlight, and ongoing maintenance as discussed in Step 5.
Transplanting seedlings can be a delicate operation, so it’s important to handle the seedlings with care and avoid disturbing the roots more than necessary. While transplanting is optional, it can help your helicopter plants thrive and reach their full potential in the desired location.
Now that your seedlings are transplanted, it’s time for the final step in this process: watching the growth of your helicopter seeds.
Step 8: Enjoy the Growth of Your Helicopter Seeds
Congratulations! You have successfully planted and cared for your helicopter seeds, and now it’s time to sit back, relax, and enjoy the growth and beauty of your plants. Watching your helicopter seeds develop into vibrant trees is a rewarding experience that reconnects you with the wonders of nature.
As your helicopter seeds continue to grow, keep providing them with proper care and maintenance. Monitor their water and nutrient needs, ensuring they receive adequate sunlight and protection from pests and diseases. Regularly inspect the plants for any signs of stress or issues and take appropriate action to address them.
Over time, you will witness the transformation of your seedlings into strong, healthy trees with lush foliage. The unique winged seeds that initially captivated your attention will now grow into majestic trees that provide shade, attract wildlife, and enhance the aesthetics of your garden or outdoor space.
Take the time to appreciate the intricate details of your helicopter plants, from their delicate leaves to the mesmerizing spinning wings of their seeds. Observe the changing seasons and how your trees adapt, transforming their appearance as they go through their natural growth cycles.
Remember, each helicopter seedling is unique, and the final size and shape of your trees may vary depending on the specific species and environmental conditions. Enjoy the element of surprise as they grow and unfold, adding their beauty and character to your garden.
Engage with your helicopter trees by learning more about their species, their medicinal or ecological significance, or their cultural symbolism. Share your gardening journey with others and inspire them to explore the wonders of nature and the joys of growing their own plants.
Lastly, don’t forget to capture the precious moments of your helicopter seedlings’ growth. Take photographs or keep a gardening journal to document their progress and reflect on the rewarding journey you’ve embarked upon.
So, sit back, relax, and treasure the growth of your helicopter seeds. Enjoy their beauty, the wonder of nature, and the satisfaction of nurturing life. Happy gardening!
With the completion of this final step, you have successfully followed the process of planting, caring for, and witnessing the growth of your helicopter seeds. May your garden flourish with the magic of these remarkable plants!
Read more: How To Germinate A Plant
Conclusion
Congratulations on your journey of planting and growing helicopter seeds! By following the steps outlined in this guide, you have gained the knowledge and skills necessary to successfully nurture these unique seeds into thriving plants.
Throughout the process, you learned how to gather helicopter seeds, prepare the planting area, soak the seeds, plant them, provide proper care and maintenance, watch for germination, and even transplant the seedlings if desired. Your dedication and patience have paid off as you witnessed the transformation of small, delicate seeds into robust and beautiful trees.
As you continue on your gardening adventure, remember the importance of tending to your plants, monitoring their growth, and adapting your care to their evolving needs. Each gardening experience is a learning opportunity, allowing you to deepen your connection with nature and develop a greener and more vibrant outdoor space.
But it doesn’t end here. Continue your exploration of the botanical world and discover new plants, trees, and gardening techniques. Embrace the beauty and joy that gardening brings, and share your knowledge with others who may be inspired by your experiences.
Whether you have a spacious garden or a modest balcony, the magic of helicopter seeds can find a place in your outdoor space. These remarkable seeds not only add visual appeal but also contribute to the ecological balance by attracting pollinators and supporting biodiversity.
So, let your garden flourish with the charm and grace of helicopter seeds. Embrace the wonder of their spiraling descent, their delicate wings, and the growth of their roots and foliage. Step outside, breathe in the fresh air, and enjoy the beauty of nature at its finest.
May your garden be a sanctuary of tranquility and a testament to the power of your green thumb. Get ready to embark on new gardening adventures and witness the endless possibilities of nurturing life from a tiny seed.
Happy gardening!
Frequently Asked Questions about How To Plant Helicopter Seeds
Was this page helpful?
At Storables.com, we guarantee accurate and reliable information. Our content, validated by Expert Board Contributors, is crafted following stringent Editorial Policies. We're committed to providing you with well-researched, expert-backed insights for all your informational needs.


0 thoughts on “How To Plant Helicopter Seeds”