Home>Garden Essentials>Garden Storage>How To Assemble A Wardrobe Box

Garden Storage
How To Assemble A Wardrobe Box
Modified: February 24, 2024
Learn how to efficiently assemble a wardrobe box for storage purposes with our detailed step-by-step guide. Simplify your moving process today!
(Many of the links in this article redirect to a specific reviewed product. Your purchase of these products through affiliate links helps to generate commission for Storables.com, at no extra cost. Learn more)
Introduction
Assembling a wardrobe box is an essential step when it comes to packing and moving your wardrobe items. Whether you’re relocating to a new home or simply need to store your clothing for a certain period, a wardrobe box provides a convenient and secure solution. This specialized box is designed to accommodate hanging clothes, keeping them wrinkle-free and organized during the moving process.
In this article, we will guide you through the step-by-step process of assembling a wardrobe box. By following these instructions, you’ll be able to handle this task efficiently and ensure that your clothes are well-protected during transportation or storage.
Key Takeaways:
- Efficiently assemble and secure a wardrobe box by following step-by-step instructions. Ensure stability, reinforce corners, and add a hanging rod for convenient and organized packing of clothes.
- Properly pack and label wardrobe items in the assembled box to maximize space, prevent wrinkles, and ensure easy identification during transportation or storage.
Read more: How Big Is A Wardrobe Box
Step 1: Gather the necessary materials
Before you begin assembling your wardrobe box, it’s important to gather all the necessary materials. Having everything at hand will make the process smoother and more efficient. Here’s a list of items you’ll need:
- A wardrobe box kit: You can purchase wardrobe boxes, including the necessary accessories, from packing supply stores or online retailers.
- Tape: Use strong packing tape to secure the box and reinforce the corners.
- A cutting tool: You’ll need a utility knife or a pair of scissors to cut the tape and make necessary adjustments to the box.
- Hanging rod (optional): Some wardrobe box kits come with a hanging rod, while others require you to purchase it separately. If your box doesn’t include a rod, ensure you have one that fits the box’s dimensions.
- Clothes hangers: Prepare enough clothes hangers to hang your wardrobe items. It’s best to use sturdy hangers that won’t break or bend easily.
- Wardrobe items: Gather your clothes and other wardrobe items that need to be packed in the box.
Once you have collected all these materials, you’re ready to move on to the next steps of assembling the wardrobe box.
Step 2: Prepare the box
Before you start assembling the wardrobe box, it’s important to prepare it properly. Follow these steps to ensure that the box is in the right condition for assembly:
- Inspect the box: Check for any damages or defects in the box. Make sure there are no tears, dents, or weak spots that could compromise the stability and protection of your wardrobe items.
- Clean the box: Remove any dust or debris from the inside of the box. Give it a quick wipe down if necessary. This will ensure that your clothes remain clean and free from any dirt or contaminants during transit or storage.
- Read the instructions: If your wardrobe box kit comes with instructions, read them carefully to familiarize yourself with the assembly process. Different kits may have specific assembly steps or variations, so it’s essential to have a clear understanding of how to assemble your specific box.
By preparing the box beforehand, you’ll ensure that it is in optimal condition and ready for assembly. This will help in maintaining the integrity of your wardrobe items while they are packed and stored during the moving process. Once you’ve prepared the box, you can move on to the next step of assembling it.
Step 3: Assemble the wardrobe box
Now that you have prepared the box, it’s time to start assembling it. Follow these steps to successfully assemble your wardrobe box:
- Lay the box flat: Start by laying the box flat on the ground or a large, open surface, such as a table or floor.
- Unfold the box: Unfold the wardrobe box, carefully following the creases and fold lines. Ensure that the box is fully opened up and flat.
- Find the flaps: Identify the flaps on the box. There are usually four flaps – two on the top and two on the bottom.
- Lift the flaps: Lift one of the bottom flaps upwards, then fold the adjacent flap inward towards the center of the box.
- Connect the flaps: Interlock the lifted flap and the folded flap together, ensuring that they fit securely. Repeat this step with the remaining flaps.
- Stand the box upright: Once all the flaps are connected, carefully stand the box upright. It should now take the shape of a rectangular box with an open top.
By following these steps, you will correctly assemble the wardrobe box and have it standing upright, ready to be used for packing your clothes. Ensure that all the flaps are securely connected to maintain the box’s structure and stability.
Now that the box is assembled, you can move on to the next steps of securing the flaps and reinforcing the corners to ensure the box is sturdy and capable of handling the weight of your wardrobe items.
Step 4: Secure the box flaps
Once you have assembled the wardrobe box, it’s important to secure the flaps to ensure that they stay in place during transportation or storage. Follow these steps to properly secure the box flaps:
- Apply packing tape: Start by applying packing tape along the inside edges of the box where the flaps meet. This will reinforce the connection and provide added strength to the box.
- Tape the top flaps: Flip the box over so that the open top is facing downwards. Apply packing tape along the outside edges of the top flaps, securing them tightly to the sides of the box.
- Apply additional tape: To further strengthen the box, apply additional strips of packing tape vertically and horizontally across the top flaps. This will create a grid-like pattern that reinforces the flaps and prevents them from opening during transportation.
- Repeat on the bottom flaps: Flip the box back over so that the open top is now facing upwards. Repeat the same taping process on the bottom flaps. Apply packing tape along the inside edges of the flaps, then tape the outside edges tightly to the sides of the box.
- Seal any gaps: Inspect the box to ensure there are no gaps or openings where items could potentially fall out. If you notice any gaps, add extra strips of tape to seal them securely.
Securing the box flaps with packing tape will provide added stability and ensure that your wardrobe items are well-protected. The tight seal created by the tape will prevent any dust, dirt, or moisture from entering the box, keeping your clothes clean and safe.
With the flaps securely taped, you can now move on to the next step of reinforcing the corners to further strengthen the wardrobe box.
Read more: How To Use Wardrobe Box
Step 5: Reinforce the box corners
Reinforcing the corners of your wardrobe box is an important step to ensure its durability and stability. This will help prevent the box from collapsing or becoming damaged during transit or storage. Follow these steps to reinforce the corners of your wardrobe box:
- Inspect the corners: Take a closer look at the corners of the box to ensure they are intact and free from any weak spots or damage. If you notice any areas that seem vulnerable, reinforce them with additional tape.
- Apply tape horizontally: Begin by applying a strip of packing tape horizontally across the corner of the box, covering the joint where the panels meet. Make sure to press the tape firmly to create a secure bond.
- Apply tape vertically: Next, apply a strip of packing tape vertically, crossing over the previously applied horizontal tape. This will provide additional support and reinforcement to the corner.
- Repeat for all corners: Repeat the taping process for each of the four corners of the box, ensuring that they are all adequately reinforced. Pay close attention to any corners that appear weak or vulnerable.
By reinforcing the corners of your wardrobe box, you significantly increase its strength and durability. This will help protect your clothes and other wardrobe items from potential damage caused by box collapse or shifting during transportation.
With the corners reinforced, your wardrobe box is now more secure and ready to accommodate and protect your clothes. The next step involves adding a hanging rod (if applicable) to make your wardrobe box even more convenient for packing and transporting hanging garments.
When assembling a wardrobe box, make sure to fold in the flaps on the bottom for added stability. Use packing tape to secure the bottom and top flaps for extra reinforcement.
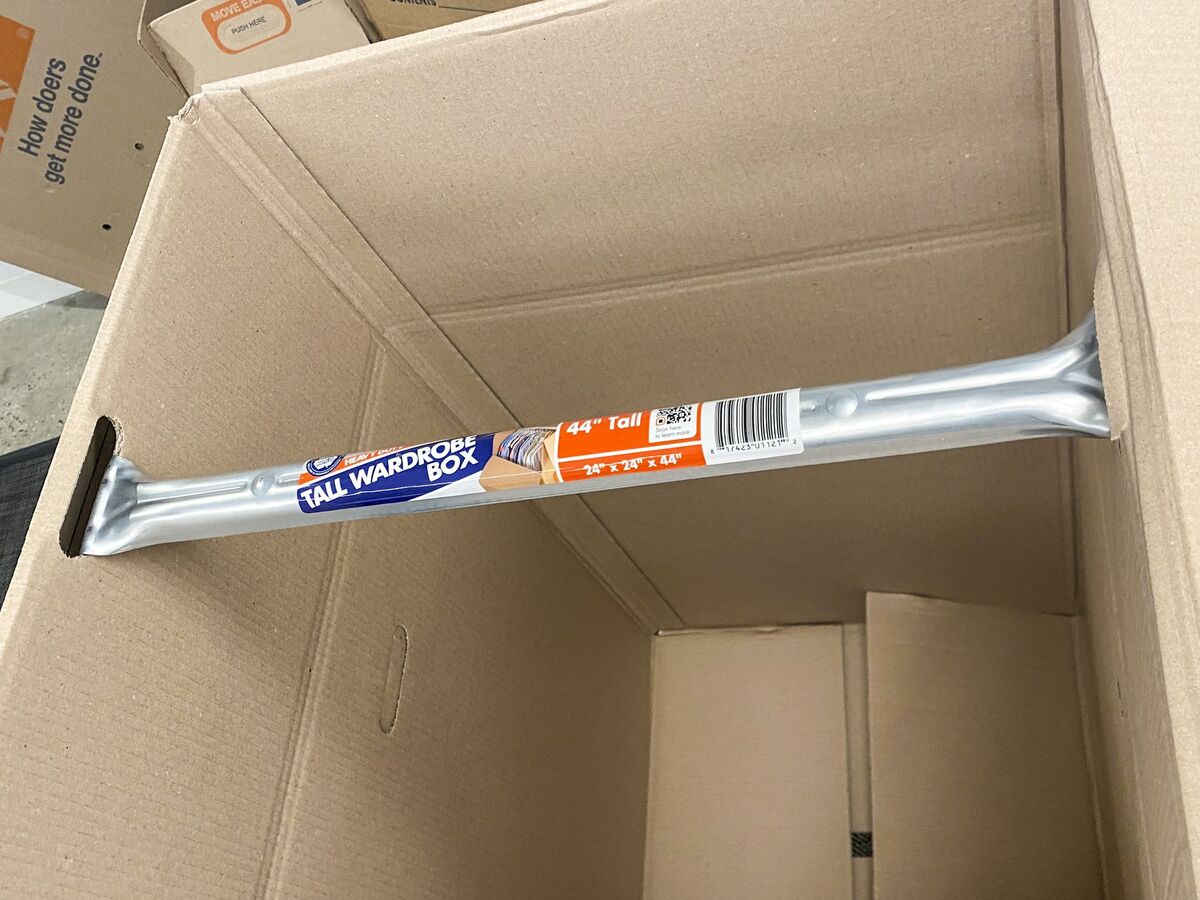
Step 6: Add hanging rod (if applicable)
If your wardrobe box kit includes a hanging rod, this step will allow you to easily hang your clothes inside the box, keeping them neatly organized and wrinkle-free. Follow these steps to add a hanging rod to your wardrobe box:
- Locate the pre-cut holes: Check the sides of the wardrobe box for pre-cut holes. These holes are specifically designed to accommodate the hanging rod.
- Insert the hanging rod: Insert one end of the hanging rod into one of the pre-cut holes. Slide the rod through the hole, ensuring that it is aligned with the opposite hole on the other side of the box.
- Secure the hanging rod: Once the hanging rod is inserted through both pre-cut holes, make sure it is stable and level inside the box. Adjust the rod if necessary to ensure it is securely positioned.
- Test the hanging rod: Gently tug on the hanging rod to ensure it can support the weight of your garments. If the rod feels secure and stable, you can proceed with packing your clothes.
Adding a hanging rod to your wardrobe box allows you to hang your clothes instead of folding them. This helps prevent wrinkles and makes it easier to access and organize your wardrobe items at your new location. Remember, if your wardrobe box kit does not include a hanging rod, you can purchase one separately and follow the same steps to install it.
Now that the hanging rod is in place (or if it’s not applicable to your box), you’re ready to move on to the next step of testing the stability of the assembled box.
Step 7: Test the stability of the assembled box
Before packing your wardrobe items into the box, it’s crucial to test the stability and sturdiness of the assembled wardrobe box. This step will help ensure that the box can withstand the weight of your clothes and other items during transportation or storage. Follow these steps to test the stability of the box:
- Give the box a gentle shake: Firmly hold onto the sides of the box and give it a gentle shake. Observe if there is any excessive movement or if the box feels unstable. If the box wobbles or collapses easily, you may need to reinforce the assembly or consider using additional packing tape.
- Check the corners: Inspect the corners of the box to ensure they are securely sealed and reinforced. If any corners appear weak or vulnerable, reinforce them with extra strips of packing tape.
- Apply pressure to the sides: Apply gentle pressure to the sides of the box using your hands. Ensure that the box maintains its shape and does not bulge or collapse under pressure. This will indicate the box’s ability to handle the weight of your wardrobe items.
If the box passes these stability tests and feels secure, you can proceed with packing your wardrobe items. However, if there are any concerns about the box’s stability, it is advisable to reinforce it further or consider using an alternative packing solution.
By testing the stability of the assembled box, you can have peace of mind knowing that your clothes and other items will be safely contained and protected during the moving or storage process. With the stability of the box confirmed, you can now move on to the next step of packing and organizing your wardrobe items.
Step 8: Pack and organize your wardrobe items
Now that your wardrobe box is assembled and stable, it’s time to pack and organize your clothes and other wardrobe items. Properly packing and organizing your items will not only help maximize space but also ensure that they remain in good condition during the move or storage. Follow these steps to pack and organize your wardrobe items:
- Categorize your items: Sort your wardrobe items into categories such as shirts, pants, dresses, and jackets. This will make it easier to locate specific items later.
- Consider seasonality: If you’re packing clothes for a specific season, separate them accordingly. This will help you easily unpack and access the appropriate clothing when needed.
- Remove hangers: Take each clothing item off the hangers. Fold them neatly to minimize wrinkles and make them easier to pack in the box.
- Pack similar items together: Group similar clothing items together to maintain organization. For example, pack all shirts in one section, pants in another section, and so on.
- Fill gaps: Fill any empty spaces in the box with smaller clothing items, such as socks or accessories. This will help maximize space and prevent items from shifting during transit.
- Avoid overpacking: While it’s tempting to stuff the box with as many items as possible, avoid overpacking. Make sure the box can still close properly without bulging excessively, as this may compromise the structural integrity of the box and can result in damage to your clothes.
- Label the box: Use a marker to label the box with its contents or the category of clothing inside. This will make it easier to identify and locate specific items when unpacking.
Packing and organizing your wardrobe items in a systematic way will not only make the process more efficient but also make it easier for you to find specific items later. It’s essential to handle your clothes with care and avoid overcrowding the box to prevent damage or wrinkles during the move or storage.
With your wardrobe items packed and organized, it’s time to move on to the final step of closing and labeling the wardrobe box.
Read more: How To Assemble A Pergola
Step 9: Close and label the wardrobe box
After packing and organizing your wardrobe items, the final step is to close and label the wardrobe box. Properly sealing and labeling the box will ensure that your clothes are secure and easily identifiable during transportation or storage. Follow these steps to close and label the wardrobe box:
- Carefully close the top flaps: Fold down the top flaps of the wardrobe box and ensure they are aligned with the sides of the box.
- Secure the flaps with packing tape: Apply packing tape along the outside edges of the top flaps, securely sealing them to the sides of the box.
- Apply additional tape for reinforcement: To provide extra reinforcement, add vertical and horizontal strips of packing tape across the top flaps. This will strengthen the seal and prevent any accidental opening of the box during transit.
- Label the box: Use a marker or adhesive labels to clearly label the box. Write a brief description of its contents or indicate the category of clothing packed inside. You may also want to include information such as your name, contact details, and the destination address.
- Place the box in an appropriate location: Once sealed and labeled, move the wardrobe box to a designated location for storage or place it with other packed boxes ready for transportation.
Closing and labeling the wardrobe box is crucial for easy identification and handling. Clearly labeling the box will also help you quickly locate specific items when unpacking at your new location. Remember to handle the box with care to avoid any damage or shifting of your clothes.
With the wardrobe box properly closed, sealed, and labeled, your clothes are now ready for safe transport or storage. You can now proceed to your next moving or storage tasks, knowing that your wardrobe items are securely packed and organized.
It’s important to note that the steps mentioned in this article are general guidelines. For specific instructions related to your wardrobe box kit or additional packing materials, always refer to the manufacturer’s instructions.
Conclusion
Assembling a wardrobe box is a crucial step when it comes to packing and moving your wardrobe items. By following the step-by-step process outlined in this article, you can ensure that your clothes are well-protected, organized, and easily accessible during the moving process or while in storage.
In this article, we discussed the importance of gathering the necessary materials and preparing the box before assembly. We covered the steps involved in assembling the wardrobe box, securing the flaps, reinforcing the corners, and adding a hanging rod if applicable. We also discussed the importance of testing the stability of the box before proceeding to pack and organize your wardrobe items.
With a properly assembled and stable wardrobe box, you can pack your clothes efficiently, categorize them, and maximize the use of space while avoiding overpacking. We highlighted the importance of properly sealing and labeling the box to ensure easy identification and handling of the contents.
Remember to handle your wardrobe items with care and consideration throughout the packing and moving process. By following these steps, you can safeguard your clothes from damage, wrinkles, and other potential issues that may occur during transportation or storage.
As always, it’s important to refer to the specific instructions provided with your wardrobe box kit for any additional guidelines or recommendations. Tailor the steps outlined in this article to suit your specific needs and circumstances.
By effectively assembling and packing your wardrobe box, you can provide the necessary protection for your clothes and ensure a smooth transition to your new location or during the storage period. With a little planning and careful execution, you can make the process of packing and moving your wardrobe items a stress-free experience.
Frequently Asked Questions about How To Assemble A Wardrobe Box
Was this page helpful?
At Storables.com, we guarantee accurate and reliable information. Our content, validated by Expert Board Contributors, is crafted following stringent Editorial Policies. We're committed to providing you with well-researched, expert-backed insights for all your informational needs.


0 thoughts on “How To Assemble A Wardrobe Box”