Home>Gardening & Outdoor>Outdoor Structures>How To Build An Octagonal Garden Tool Shed
Outdoor Structures
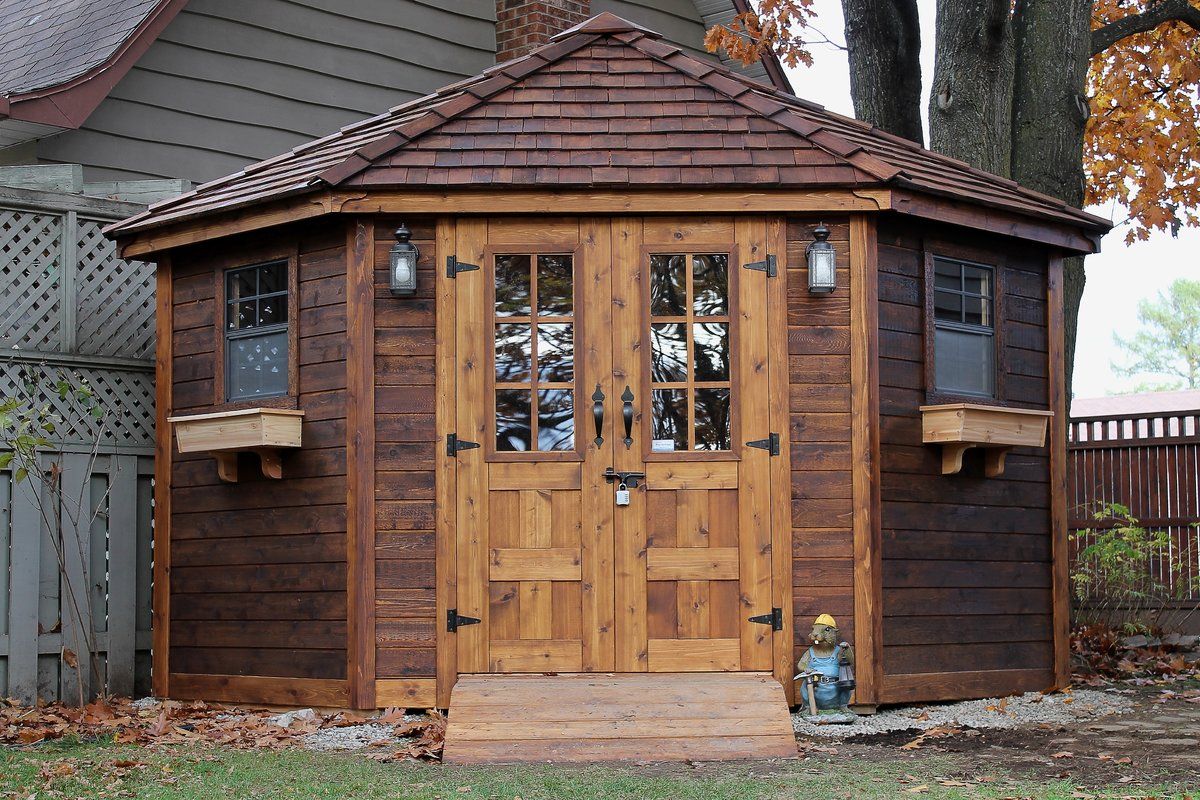
How To Build An Octagonal Garden Tool Shed
Modified: October 18, 2024
Learn how to construct a durable octagonal garden tool shed for your outdoor space with our comprehensive guide. Explore the best outdoor structures for your garden.
(Many of the links in this article redirect to a specific reviewed product. Your purchase of these products through affiliate links helps to generate commission for Storables.com, at no extra cost. Learn more)
Introduction
Welcome to the world of DIY outdoor structures, where creativity and functionality come together to transform your backyard into a haven of practicality and charm. In this guide, we will delve into the art of constructing an octagonal garden tool shed, a project that promises both utility and visual appeal.
A garden tool shed serves as a sanctuary for your gardening essentials, providing a dedicated space to store tools, equipment, and supplies while adding a touch of elegance to your outdoor environment. The unique octagonal design not only sets this structure apart from traditional rectangular sheds but also offers a spacious and versatile interior.
As we embark on this journey, envision the satisfaction of crafting a structure that not only meets your storage needs but also becomes a focal point in your garden landscape. Whether you are a seasoned DIY enthusiast or a novice looking to expand your skills, this project is designed to inspire and guide you through the rewarding process of building a functional and aesthetically pleasing octagonal garden tool shed.
Throughout this guide, we will explore the step-by-step construction of this charming outdoor structure, from meticulous planning and material selection to the final touches that infuse character and durability. So, roll up your sleeves, gather your tools, and let's embark on this fulfilling endeavor to create a stunning octagonal garden tool shed that will stand the test of time.
Key Takeaways:
- Planning and preparation are crucial for building an octagonal garden tool shed. Consider site selection, permits, design, materials, budget, and timeline to ensure a successful and rewarding DIY project.
- Building an octagonal garden tool shed involves meticulous steps, from constructing the foundation and walls to framing the roof and adding finishing touches. Attention to detail and careful execution are essential for creating a durable and visually appealing outdoor structure.
Read more: How To Build A Lean Tool Shed
Planning and Preparation
Before embarking on the construction of your octagonal garden tool shed, thorough planning and meticulous preparation are essential for a successful and rewarding build. Here are the key steps to consider:
- Site Selection: Choose a level area in your garden that receives ample sunlight and allows easy access to the shed. Consider the surrounding landscape and ensure that the shed’s placement complements the overall aesthetics of your outdoor space.
- Permits and Regulations: Check local building codes and regulations to determine if any permits are required for the construction of a garden shed. Compliance with legal requirements is crucial to avoid potential issues in the future.
- Design Considerations: Select an octagonal design that suits your preferences and complements the existing architecture of your property. Take precise measurements and create a detailed blueprint or plan to guide the construction process.
- Material and Tool Inventory: Compile a comprehensive list of materials and tools required for the project, including lumber, fasteners, roofing materials, and essential construction tools such as saws, drills, and measuring equipment.
- Budgeting: Determine a realistic budget for the shed construction, factoring in the cost of materials, tools, and any professional assistance that may be required. Consider potential additional expenses to ensure that the project remains within financial constraints.
- Timeline and Schedule: Establish a realistic timeline for the construction process, considering factors such as weather conditions, availability of assistance, and personal time constraints. Create a schedule that outlines each phase of the project to maintain a structured approach.
By meticulously planning and preparing for the construction of your octagonal garden tool shed, you set the foundation for a smooth and efficient building process. With careful consideration of site selection, regulations, design, materials, budget, and timeline, you pave the way for a rewarding and successful DIY endeavor.
Gathering Materials
With the planning phase complete, it’s time to gather the materials necessary to bring your octagonal garden tool shed to life. The following list outlines the essential materials required for the construction:
- Lumber: Select high-quality pressure-treated lumber for the framing, flooring, and siding of the shed. Consider the dimensions and quantity required based on your shed’s design and size.
- Fasteners: Choose appropriate nails, screws, and other fastening hardware to securely assemble the shed’s components. Ensure that the fasteners are suitable for outdoor use to withstand weather elements.
- Roofing Materials: Determine the roofing material based on your preference and local climate. Options include asphalt shingles, metal roofing, or cedar shakes. Additionally, gather roofing underlayment and flashing to ensure a watertight roof.
- Doors and Windows: If your shed design includes windows and a door, select durable and weather-resistant options that complement the overall aesthetics of the structure.
- Foundation Materials: Depending on your chosen foundation type, gather concrete blocks, gravel, or concrete mix to create a stable and level base for the shed.
- Hardware and Accessories: Stock up on hinges, latches, handles, and other hardware required for assembling the shed’s doors and windows. Additionally, consider accessories such as vents and hooks for added functionality.
- Tools: Ensure that you have a comprehensive set of construction tools, including a circular saw, drill, level, measuring tape, and safety equipment. Having the right tools on hand is crucial for a smooth building process.
Before making any purchases, review your shed’s blueprint and material requirements to ensure that you acquire the correct quantities and specifications. It’s also beneficial to source materials from reputable suppliers to guarantee quality and reliability.
By gathering the necessary materials and ensuring that you have the right tools at your disposal, you are poised to commence the construction phase with confidence and efficiency. The careful selection of high-quality materials sets the stage for a durable and visually appealing octagonal garden tool shed that will enhance your outdoor space for years to come.
Building the Foundation
The foundation serves as the crucial base upon which the structural integrity of your octagonal garden tool shed relies. Whether you opt for a concrete slab, concrete blocks, or a skid foundation, meticulous attention to detail during the foundation construction is paramount. Here’s a comprehensive guide to building a sturdy and level foundation for your shed:
- Site Preparation: Clear the designated area of any vegetation, rocks, and debris. Use a shovel and a rake to ensure that the ground is level and free from obstructions.
- Foundation Type: Based on your shed design and personal preference, choose the most suitable foundation type. A concrete slab provides a permanent and stable base, while concrete blocks or skids offer versatility and mobility.
- Marking and Layout: Use stakes and string to outline the dimensions of the foundation, ensuring that it aligns with the shed’s blueprint. Double-check the measurements to guarantee accuracy.
- Excavation: If constructing a concrete foundation, excavate the marked area to the required depth, allowing space for the concrete and reinforcing materials. For block or skid foundations, level the ground and prepare a bed of gravel for stability.
- Formwork and Reinforcement: If pouring a concrete slab, construct formwork using wooden boards to contain the concrete. Install reinforcement such as rebar or wire mesh to enhance the strength of the foundation.
- Pouring and Finishing: When pouring concrete, ensure a consistent mix and carefully fill the formwork. Use a screed to level the concrete surface and finish it with a trowel for a smooth and even finish. For block or skid foundations, position the blocks or skids according to the layout, ensuring they are level and stable.
- Curing and Setting: Allow the concrete to cure as per the manufacturer’s recommendations, maintaining proper moisture levels to facilitate optimal strength. For block or skid foundations, ensure that the components are securely positioned and aligned.
By meticulously executing the foundation construction process, you establish a solid and reliable base for your octagonal garden tool shed. A well-built foundation not only ensures the structural stability of the shed but also contributes to its longevity and resilience against environmental factors.
Constructing the Walls
As the foundation sets the stage, the construction of the walls marks a significant step in bringing your octagonal garden tool shed to fruition. The walls not only enclose the space but also contribute to the structural integrity and visual appeal of the structure. Here’s a detailed guide to constructing the walls of your shed:
- Lumber Preparation: Prepare the lumber for framing the walls, ensuring precise measurements and cuts according to the shed’s design specifications. Label the components to streamline the assembly process.
- Wall Framing: Begin by framing the individual wall sections, taking care to align the studs, plates, and headers accurately. Use a level to ensure that the walls are plumb and square, essential for a sturdy and well-constructed frame.
- Bracing and Reinforcement: Install diagonal bracing within the wall frames to enhance stability and resistance to lateral forces. Additionally, consider reinforcing key areas such as corners and door/window openings for added strength.
- Sheathing and Siding: Apply sheathing, such as plywood or oriented strand board (OSB), to the exterior of the framed walls. This provides rigidity and a base for attaching the siding material, whether it be wood, vinyl, or composite panels, to enhance the shed’s aesthetic appeal and weather resistance.
- Window and Door Openings: Cut out openings for windows and doors as per the shed’s design. Install headers and trimmers to support these openings and accommodate the installation of windows and doors at a later stage.
- Quality Check: Before proceeding, thoroughly inspect the constructed walls to ensure that they are structurally sound, plumb, and free from any defects. Address any issues or discrepancies to maintain the integrity of the shed’s framework.
By meticulously crafting and assembling the walls of your octagonal garden tool shed, you lay the groundwork for a resilient and visually appealing structure. The careful attention to framing, bracing, sheathing, and openings sets the stage for the next phase of the construction process, bringing you one step closer to realizing your DIY masterpiece.
When building an octagonal garden tool shed, make sure to accurately measure and cut the angles for the eight sides to ensure a perfect fit. Use a level to ensure the shed is properly aligned and stable.
Read more: How To Build Shelves For A Tool Shed
Framing the Roof
As your octagonal garden tool shed takes shape, the framing of the roof emerges as a pivotal phase in the construction process. The roof not only provides protection from the elements but also contributes to the aesthetic charm of the structure. Here’s a comprehensive guide to framing the roof of your shed:
- Rafter Preparation: Prepare the rafters, ensuring accurate cuts and appropriate angles to fit the octagonal shape of the shed. Label the rafters to maintain clarity during the assembly process.
- Ridge Board Installation: Install a sturdy ridge board at the peak of the octagonal roof, ensuring it is level and securely anchored to the top of the walls. The ridge board serves as a central support for the rafters.
- Rafter Assembly: Begin assembling and installing the rafters, taking care to position them accurately and secure them to the ridge board and wall plates. Use framing connectors and fasteners to ensure the rafters are firmly anchored.
- Birdsmouth and Overhangs: Cut birdsmouth notches at the base of each rafter to facilitate a secure connection to the wall plates. Additionally, consider the desired overhang of the roof and adjust the rafter tails accordingly.
- Bracing and Support: Install temporary bracing to stabilize the rafters during the framing process, ensuring that they remain plumb and aligned. Consider adding collar ties or ceiling joists to enhance the roof’s structural integrity.
- Sheathing and Roofing Underlayment: Once the rafters are in place, apply sheathing to the roof structure to provide a solid base for the roofing material. Install roofing underlayment to protect the shed from moisture and ensure a watertight seal.
By meticulously framing the roof of your octagonal garden tool shed, you establish a durable and visually striking crown for the structure. The careful attention to rafter assembly, bracing, and sheathing sets the stage for the final steps of roofing and finishing, bringing you closer to the completion of your DIY masterpiece.
Installing Doors and Windows
As your octagonal garden tool shed nears completion, the installation of doors and windows becomes a defining aspect of the construction process. These elements not only enhance the functionality of the shed but also infuse it with natural light and ventilation. Here’s a detailed guide to installing doors and windows in your shed:
- Door Selection: Choose a durable and weather-resistant door that complements the design of your shed. Consider factors such as size, material, and functionality to select the most suitable option.
- Window Selection: Select windows that align with the aesthetic and functional requirements of your shed. Ensure that the windows are designed for outdoor use and provide adequate light and ventilation for the interior space.
- Door and Window Placement: Based on your shed’s design, mark and prepare the openings for the doors and windows, ensuring precise measurements and alignment with the shed’s blueprint.
- Door Installation: Install the door according to the manufacturer’s instructions, ensuring that it is securely anchored to the door frame. Use appropriate hardware and hinges to facilitate smooth operation and a secure closure.
- Window Installation: Position the windows within the designated openings, ensuring a snug fit and proper alignment. Secure the windows in place and apply weather-resistant sealant to prevent water infiltration.
- Weathertight Seals: Install weather-stripping around the door and window frames to create a weathertight seal, preventing drafts and moisture from entering the shed’s interior. This step is crucial for maintaining a comfortable and protected space.
- Hardware and Accessories: Install locks, handles, and other hardware on the doors, ensuring smooth operation and security. Consider adding window latches and screens to enhance functionality and insect protection.
By meticulously installing doors and windows in your octagonal garden tool shed, you elevate its functionality, aesthetics, and overall appeal. The careful attention to door and window selection, placement, and weathertight seals brings you one step closer to completing your DIY masterpiece, creating a versatile and inviting space within your outdoor environment.
Finishing Touches
As the construction of your octagonal garden tool shed draws to a close, attention to the finishing touches elevates the structure from a functional space to a visually captivating and fully realized outdoor feature. Here’s a guide to adding the final details that will enhance the appearance and functionality of your shed:
- Exterior Finishes: Apply a protective finish, such as paint or wood stain, to the exterior surfaces of the shed. Choose a color that complements your outdoor environment while providing durability and weather resistance.
- Trim and Molding: Install trim and molding to accentuate the architectural features of the shed. Consider decorative elements such as window trim, corner moldings, and fascia to add character and charm.
- Gutters and Downspouts: Consider installing gutters and downspouts to manage rainwater runoff from the roof. This not only protects the shed’s exterior but also directs water away from the foundation, preserving its integrity.
- Interior Organization: Add shelving, hooks, and storage solutions to the interior of the shed to optimize organization and functionality. Customizing the interior space to accommodate your specific storage needs enhances the shed’s practicality.
- Lighting and Electrical: If desired, install lighting fixtures and electrical outlets within the shed. This allows for convenient illumination and the use of power tools or equipment, expanding the shed’s utility.
- Landscaping and Pathways: Enhance the shed’s surroundings with landscaping features such as flower beds, pathways, or a dedicated area for the shed. Thoughtful landscaping integrates the shed seamlessly into your outdoor space.
- Personalized Touches: Consider adding personal touches such as decorative accents, signage, or potted plants to infuse the shed with your unique style and personality.
By attending to the finishing touches, you transform your octagonal garden tool shed into a captivating and functional addition to your outdoor landscape. The careful consideration of exterior finishes, interior organization, and personalized details culminates in a space that not only serves a practical purpose but also enriches the visual appeal and character of your property.
Conclusion
Congratulations on completing the construction of your stunning octagonal garden tool shed! This journey from meticulous planning and preparation to the realization of a functional and visually captivating outdoor structure has been a testament to your dedication and craftsmanship. As you stand back and admire the fruits of your labor, it’s essential to reflect on the significance of this DIY endeavor.
Your octagonal garden tool shed is more than a mere storage space; it is a testament to your creativity and ingenuity, a tangible expression of your commitment to enhancing your outdoor environment. Beyond its practical utility, the shed stands as a symbol of your ability to transform raw materials into a purposeful and aesthetically pleasing structure.
Throughout the construction process, you have not only honed your carpentry skills but also cultivated a deeper connection to your outdoor space. The careful consideration of design, material selection, and finishing touches has resulted in a structure that seamlessly integrates with your garden landscape, enriching the overall ambiance of your property.
As you embark on this new chapter with your octagonal garden tool shed gracing your backyard, may it serve as a source of inspiration for future projects and a reminder of the gratifying nature of hands-on craftsmanship. Whether you find solace in organizing your gardening essentials, utilizing the shed as a creative space, or simply basking in the pride of your accomplishment, may it continue to bring joy and utility for years to come.
Thank you for allowing this guide to accompany you on your journey to construct a remarkable outdoor structure. Your dedication and passion for DIY craftsmanship have undoubtedly left a lasting imprint on your outdoor environment, enriching your surroundings and creating a space that is uniquely yours.
Frequently Asked Questions about How To Build An Octagonal Garden Tool Shed
Was this page helpful?
At Storables.com, we guarantee accurate and reliable information. Our content, validated by Expert Board Contributors, is crafted following stringent Editorial Policies. We're committed to providing you with well-researched, expert-backed insights for all your informational needs.


0 thoughts on “How To Build An Octagonal Garden Tool Shed”