Home>Gardening & Outdoor>Outdoor Structures>How To Build Shelves For A Tool Shed

Outdoor Structures
How To Build Shelves For A Tool Shed
Modified: August 20, 2024
Learn how to build sturdy and practical shelves for your outdoor tool shed with our step-by-step guide. Create organized storage space for your outdoor structures.
(Many of the links in this article redirect to a specific reviewed product. Your purchase of these products through affiliate links helps to generate commission for Storables.com, at no extra cost. Learn more)
Introduction
Are you tired of searching through a cluttered tool shed, desperately trying to find the right tool for the job? Well, the solution might be simpler than you think. Building shelves for your tool shed can transform it from a chaotic mess into an organized and efficient workspace. Not only will it make finding tools and equipment a breeze, but it will also maximize the available space, allowing you to store more items and keep everything tidy.
In this comprehensive guide, we will walk you through the process of building shelves for your tool shed. Whether you're a seasoned DIY enthusiast or a novice looking to tackle your first project, we've got you covered. From planning and preparation to choosing the right materials and assembling the shelves, we'll provide you with the knowledge and confidence to take on this rewarding endeavor.
So, roll up your sleeves, gather your tools, and let's dive into the world of DIY shelf building. By the end of this guide, you'll be well-equipped to create a functional and organized storage solution that will elevate your tool shed to a whole new level. Let's get started!
Key Takeaways:
- Transform your cluttered tool shed into an organized and efficient workspace by building shelves. Say goodbye to the frustration of searching for tools and hello to a seamless and hassle-free DIY experience.
- Building shelves for your tool shed is not just about storage, it’s about personalization and DIY accomplishment. Tailor the shelves to your unique needs and take pride in creating a functional addition to your space.
Read more: How To Build Shelves For A Shed
Planning and Preparation
Before you start hammering and sawing, it's crucial to lay a solid foundation for your shelf-building project. Planning and preparation are the keys to a successful outcome, so take the time to consider the following factors:
- Assess Your Needs: Begin by evaluating the items you intend to store on the shelves. Consider the size, weight, and quantity of tools and equipment to determine the dimensions and load-bearing capacity required for the shelves.
- Space Utilization: Take a close look at the layout of your tool shed. Identify the most suitable area for installing the shelves, ensuring that they won’t obstruct doorways or impede your movement within the shed.
- Design Considerations: Think about the shelf design that best suits your storage needs. Will you need adjustable shelves to accommodate items of varying heights? Are you planning to incorporate additional features such as hooks or compartments?
- Tools and Materials: Make a list of the tools and materials you’ll need for the project. This may include a tape measure, level, saw, drill, screws, brackets, and, of course, the lumber or pre-fabricated shelving units.
Once you’ve carefully considered these aspects, it’s time to move on to the next phase: measuring and cutting the materials. By investing effort in the planning and preparation stage, you’ll set the stage for a smooth and efficient shelf-building process, leading to a functional and well-organized tool shed.
Choosing the Right Materials
When it comes to building sturdy and reliable shelves for your tool shed, selecting the right materials is paramount. The choice of materials will not only impact the durability and strength of the shelves but also contribute to the overall aesthetic of your storage space. Here are some key considerations to guide you in choosing the appropriate materials:
- Lumber Selection: Opt for high-quality, pressure-treated lumber that can withstand the rigors of a tool shed environment. Common choices include pine, cedar, or redwood. Ensure that the lumber is straight, free from warping, and devoid of large knots or splits that could compromise its structural integrity.
- Shelving Options: If you prefer a more convenient and time-saving approach, pre-fabricated shelving units made of durable materials such as steel or heavy-duty plastic may be a suitable choice. These units often come with adjustable shelves and can support substantial weight.
- Hardware and Fasteners: Select corrosion-resistant screws, brackets, and other fastening hardware to ensure the longevity of your shelves. Stainless steel or galvanized hardware is ideal for withstanding the moisture and humidity commonly found in tool sheds.
- Finishing Touches: Consider applying a protective finish to the lumber to safeguard it against moisture and decay. Exterior-grade wood sealant or paint can enhance the longevity of the shelves, especially if your tool shed is exposed to the elements.
By carefully evaluating these material options and making informed decisions, you can ensure that your shelves are not only functional and durable but also visually appealing. The right materials will lay the groundwork for a successful and long-lasting storage solution in your tool shed.
Measuring and Cutting
Accurate measurements and precise cuts are the cornerstones of a well-constructed shelving system. Whether you’re working with lumber or pre-fabricated shelving units, the following steps will guide you through the crucial process of measuring and cutting:
- Measure Twice, Cut Once: This timeless adage holds true in the realm of shelf building. Use a reliable tape measure to take precise measurements of the space where the shelves will be installed. Double-check your measurements to ensure accuracy before making any cuts.
- Marking and Layout: Use a pencil and a straight edge to mark the cut lines on the lumber or shelving units. Clear and visible markings will help you execute clean and accurate cuts, preventing errors that could compromise the fit and stability of the shelves.
- Cutting Techniques: Whether you’re using a handsaw, circular saw, or a power miter saw, it’s essential to employ proper cutting techniques. Ensure that the cutting tools are sharp and well-maintained to achieve clean and precise cuts without splintering or tearing the material.
- Consider Safety: Prioritize safety by wearing appropriate protective gear, such as safety goggles and gloves, when handling cutting tools. If you’re using power tools, follow the manufacturer’s guidelines and take necessary precautions to prevent accidents.
By meticulously measuring and executing accurate cuts, you’ll lay the groundwork for a seamless and hassle-free assembly process. Whether you’re a seasoned craftsman or a DIY enthusiast, precision in measuring and cutting is a fundamental step toward achieving professional-looking shelves for your tool shed.
When building shelves for a tool shed, make sure to use sturdy materials like pressure-treated lumber to prevent warping and rot. Additionally, consider adding diagonal braces for extra support.
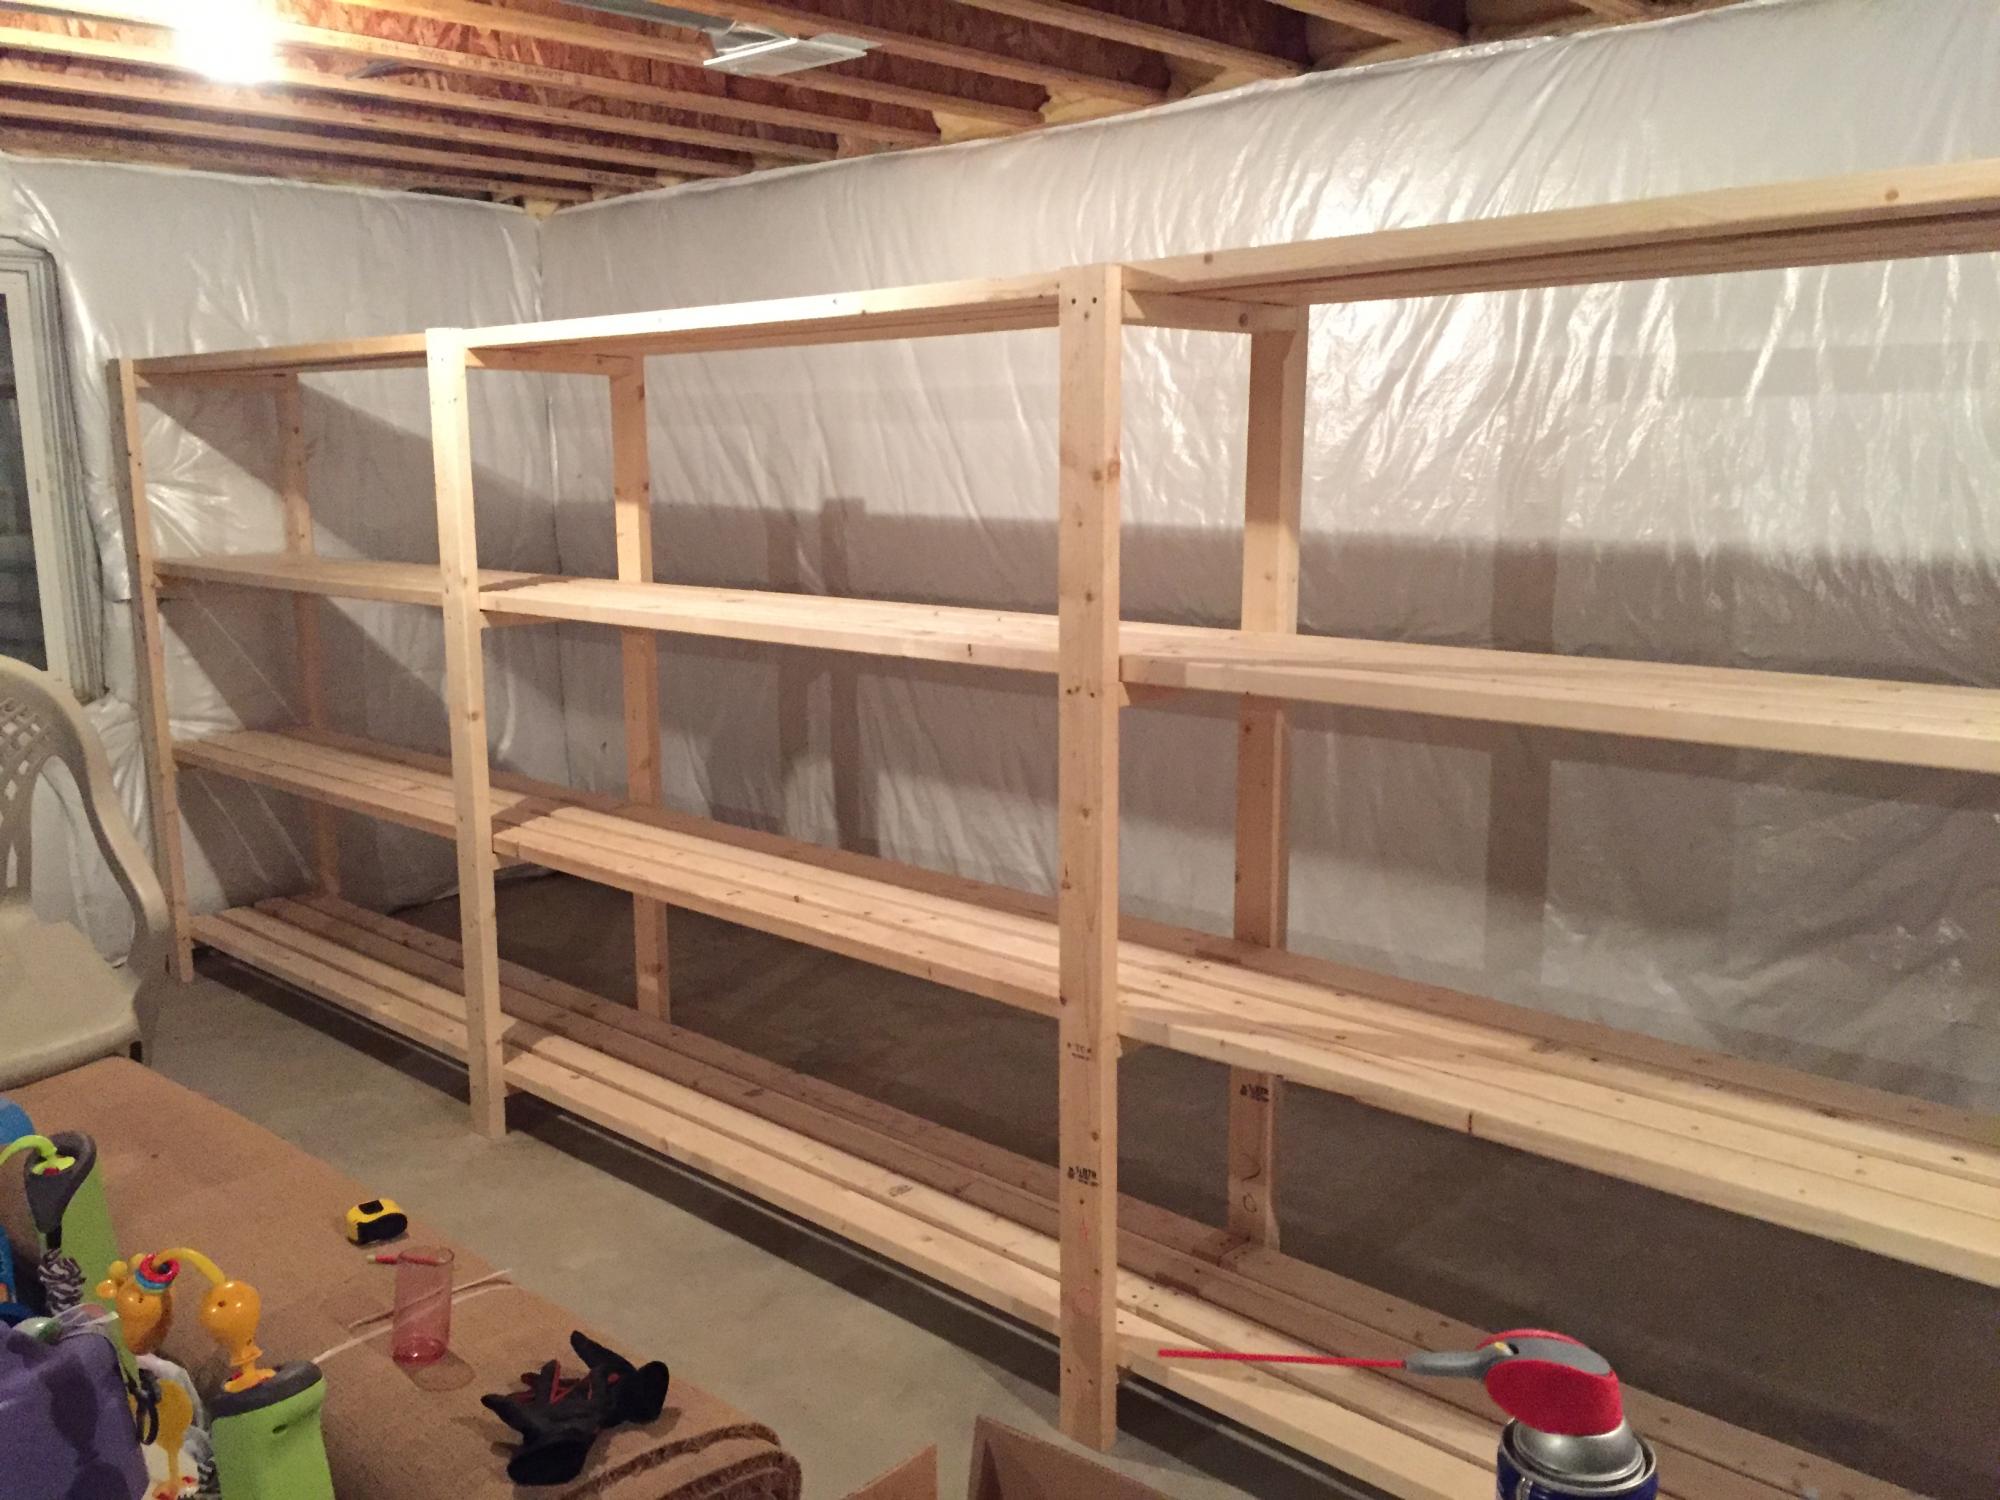
Assembling the Shelves
With the materials cut to size and the components prepared, it’s time to bring your shelves to life through the assembly process. Whether you’re constructing simple freestanding shelves or intricate wall-mounted units, the following steps will guide you through the assembly phase:
- Organize the Components: Lay out all the cut lumber or pre-fabricated shelving units, along with the necessary hardware and fasteners, in an organized manner. This will streamline the assembly process and help you identify any missing components before you begin.
- Follow the Design Plan: If you’ve devised a specific design plan for your shelves, adhere to it during the assembly process. Pay attention to the orientation of the shelves, the placement of support brackets, and any additional features or attachments you’ve incorporated into the design.
- Secure the Joints: Whether you’re using screws, nails, or specialized fasteners, ensure that the joints are securely fastened. Use a level to check the alignment and adjust the components as needed to achieve a stable and balanced shelving unit.
- Test for Stability: Once the shelves are assembled, perform a stability test by applying gentle pressure to the structure. Verify that the shelves remain steady and level, indicating that they can support the intended load without wobbling or sagging.
As you progress through the assembly phase, take your time to ensure that each step is executed with precision and attention to detail. By following these guidelines, you’ll be well on your way to creating sturdy, well-constructed shelves that will serve as the cornerstone of organization and efficiency in your tool shed.
Read more: How To Build A Lean Tool Shed
Installing the Shelves
With the shelves fully assembled, the final step in this rewarding endeavor is the installation process. Whether you’re mounting the shelves to the walls of your tool shed or setting up freestanding units, the following guidelines will assist you in achieving a secure and professional installation:
- Locate Wall Studs: If you’re mounting the shelves to the walls, use a stud finder to locate and mark the positions of the wall studs. Attaching the shelves to the studs will provide maximum stability and weight-bearing capacity.
- Positioning and Leveling: Carefully position the shelves at the desired height and orientation, ensuring that they are level and aligned with adjacent shelves or structural elements in the tool shed.
- Secure Mounting: Use appropriate hardware, such as heavy-duty screws or brackets, to securely mount the shelves to the walls or other support structures. Verify that the shelves are firmly anchored and can support the intended load without shifting or loosening over time.
- Freestanding Support: If you’re setting up freestanding shelves, ensure that they are positioned on a level surface and are adequately braced or anchored to prevent tipping or instability.
As you complete the installation of the shelves, step back and admire the transformation of your tool shed. The newly installed shelves will not only provide a dedicated space for organizing your tools and equipment but also enhance the functionality and visual appeal of the entire workspace. With the shelves in place, you can now enjoy the convenience of a well-organized tool shed that streamlines your DIY projects and maintenance tasks.
Conclusion
Congratulations on successfully completing the journey of building shelves for your tool shed! By embarking on this DIY project, you’ve not only enhanced the organization and functionality of your tool shed but also honed your skills as a craftsman. As you reflect on the process and the results, consider the following key takeaways:
- Organization and Efficiency: The newly installed shelves have transformed your tool shed into a well-organized and efficient workspace. Finding and accessing tools and equipment is now a seamless and hassle-free experience, allowing you to focus on your projects with ease.
- Personalized Storage Solutions: Through careful planning and consideration, you’ve tailored the shelves to accommodate your specific storage needs. Whether it’s adjustable shelving, additional compartments, or custom configurations, the shelves reflect your unique requirements.
- DIY Accomplishment: This project has provided you with the opportunity to apply your DIY skills and craftsmanship, resulting in a tangible and functional addition to your tool shed. The sense of accomplishment and pride that comes with building something with your own hands is truly rewarding.
As you stand back and admire the newly installed shelves, take a moment to appreciate the dedication and effort you’ve invested in this project. Your tool shed has been elevated to a new level of organization and practicality, setting the stage for a more enjoyable and productive DIY experience.
Remember, the knowledge and skills you’ve gained from this project can be applied to future endeavors, whether it’s building furniture, tackling home improvement projects, or crafting personalized storage solutions. The experience of building shelves for your tool shed serves as a testament to your creativity, resourcefulness, and ability to transform ideas into reality.
So, as you embark on your next DIY adventure, carry forward the lessons learned from this project and continue to explore the boundless possibilities of creating and enhancing your living spaces. With your newfound expertise, there’s no limit to what you can achieve in the world of DIY craftsmanship and home improvement.
Frequently Asked Questions about How To Build Shelves For A Tool Shed
Was this page helpful?
At Storables.com, we guarantee accurate and reliable information. Our content, validated by Expert Board Contributors, is crafted following stringent Editorial Policies. We're committed to providing you with well-researched, expert-backed insights for all your informational needs.


0 thoughts on “How To Build Shelves For A Tool Shed”