Home>Renovation & DIY>Tools & Equipment>How To Sharpen Clipper Blades With Sandpaper
Tools & Equipment
How To Sharpen Clipper Blades With Sandpaper
Modified: January 19, 2024
Learn how to sharpen clipper blades with sandpaper and keep your tools and equipment in top condition. Follow our easy step-by-step guide for effective maintenance.
(Many of the links in this article redirect to a specific reviewed product. Your purchase of these products through affiliate links helps to generate commission for Storables.com, at no extra cost. Learn more)
Introduction
Are you tired of dull clipper blades that just don't cut it anymore? If so, you're in luck! In this guide, we'll walk you through the process of sharpening clipper blades using a simple yet effective tool: sandpaper. Whether you're a professional groomer or a pet owner looking to maintain your furry friend's coat, learning how to sharpen clipper blades with sandpaper can save you time and money.
Sharpening clipper blades is a crucial aspect of pet grooming and maintenance. Dull blades not only make the grooming process more challenging and time-consuming but can also cause discomfort and irritation to the animal. By mastering the art of sharpening clipper blades with sandpaper, you can ensure that your clippers remain in top condition, delivering precise and efficient cuts with every grooming session.
In the following sections, we'll delve into the intricacies of clipper blades, discuss the materials needed for the sharpening process, and provide a detailed, step-by-step guide to help you achieve razor-sharp results. Additionally, we'll share valuable tips and tricks to elevate your sharpening skills and extend the lifespan of your clipper blades. So, grab your sandpaper and let's embark on this enlightening journey to sharpening success!
Key Takeaways:
- Keep your clipper blades sharp with sandpaper to ensure efficient and precise grooming for your furry friends. Regular maintenance and attention to detail are key to achieving professional-quality results.
- Understanding clipper blade anatomy and following a step-by-step sharpening guide empowers you to maintain grooming tools with precision and finesse, enhancing the well-being of your pets.
Understanding Clipper Blades
Clipper blades are the unsung heroes of pet grooming, responsible for effortlessly shearing through fur to create a neat and tidy appearance. Understanding the anatomy and functionality of clipper blades is essential for anyone seeking to maintain their clippers and achieve professional grooming results.
Clipper blades consist of two primary components: the comb and the cutter. The comb, often referred to as the stationary blade, features a series of evenly spaced teeth that guide the hair towards the cutting edge. On the other hand, the cutter, also known as the moving blade, glides back and forth against the comb, snipping the hair as it passes through the teeth.
These blades come in various sizes, each designed for specific grooming tasks. From close trims to longer cuts, different blade sizes cater to the diverse needs of pet owners and professional groomers. Understanding the nuances of blade sizes and their corresponding cutting lengths is crucial for achieving the desired grooming outcome.
It’s important to note that clipper blades, like any cutting tool, can become dull over time. Factors such as frequent use, hair buildup, and improper storage can contribute to blade dullness, resulting in subpar cutting performance. Recognizing the signs of dull blades, such as snagging, uneven cutting, or excessive heat generation, is imperative for maintaining grooming quality and ensuring the comfort of the animal being groomed.
By comprehending the intricate interplay between the comb and cutter, as well as the impact of blade size on cutting precision, individuals can gain a deeper appreciation for the role of clipper blades in the grooming process. This understanding serves as a foundation for effectively sharpening clipper blades, thereby prolonging their usability and preserving their cutting prowess.
Materials Needed
Before diving into the process of sharpening clipper blades with sandpaper, it’s essential to gather the necessary materials. Fortunately, the items required for this task are readily available and relatively inexpensive, making the sharpening process accessible to both professional groomers and pet owners alike.
- Sandpaper: The star of the show, sandpaper is available in various grits, with finer grits offering smoother finishes. For sharpening clipper blades, medium to fine-grit sandpaper, such as 220 or 320 grit, is recommended. This allows for effective removal of burrs and nicks while restoring the blade’s cutting edge.
- Flat Surface: A flat, stable surface is essential for achieving consistent results when sharpening clipper blades. This can be a sturdy table or workbench, providing ample space to maneuver the sandpaper and blades effectively.
- Cleaning Brush: A small cleaning brush or toothbrush is useful for removing debris and accumulated hair from the clipper blades before and after sharpening. Keeping the blades clean ensures optimal sharpening and prevents contamination during the grooming process.
- Lubricating Oil: High-quality clipper blade oil or lubricating spray is vital for maintaining the blades’ smooth operation and preventing corrosion. Applying a few drops of oil to the blades after sharpening helps reduce friction and prolongs their longevity.
- Cloth: A clean, lint-free cloth is handy for wiping down the clipper blades and removing any residual oil or debris. This ensures that the blades are clean and ready for use after sharpening.
- Screwdriver (if applicable): Depending on the clipper model, a screwdriver may be needed to detach the blades from the clippers for sharpening. It’s important to refer to the clipper’s user manual to determine if blade removal is necessary and to follow the manufacturer’s guidelines.
By assembling these essential materials, you’ll be well-prepared to embark on the journey of restoring your clipper blades to their former sharpness, ultimately enhancing the grooming experience for both you and your furry companions.
When sharpening clipper blades with sandpaper, make sure to use a fine-grit sandpaper and gently rub the blade in one direction. Be patient and consistent for best results.
Step-by-Step Guide to Sharpening Clipper Blades with Sandpaper
Now that you have gathered the necessary materials, it’s time to roll up your sleeves and commence the sharpening process. Sharpening clipper blades with sandpaper is a straightforward yet meticulous task that, when executed with care, can yield remarkable results. Follow these step-by-step instructions to breathe new life into your clipper blades:
- Prepare the Work Area: Find a well-lit, flat surface to set up your sharpening station. Ensure that the area is clean and free from clutter, providing ample space to maneuver the sandpaper and clipper blades effectively.
- Remove the Blades (if applicable): If your clipper model allows for blade removal, carefully detach the blades from the clippers using the appropriate tools, following the manufacturer’s instructions. This step is crucial for unhindered access to the blade edges during sharpening.
- Clean the Blades: Use a cleaning brush or toothbrush to meticulously remove any hair, debris, or residual oil from the clipper blades. Clean blades ensure optimal sharpening and prevent contamination during the process.
- Assess the Blade Condition: Inspect the clipper blades for nicks, burrs, or signs of wear. Identifying areas that require attention will guide your sanding efforts and ensure comprehensive blade restoration.
- Cut the Sandpaper Strips: Cut the sandpaper into strips that are slightly wider than the clipper blades. This allows for ample coverage of the blade surface during sharpening. For convenience, use sandpaper of medium to fine grit, such as 220 or 320 grit.
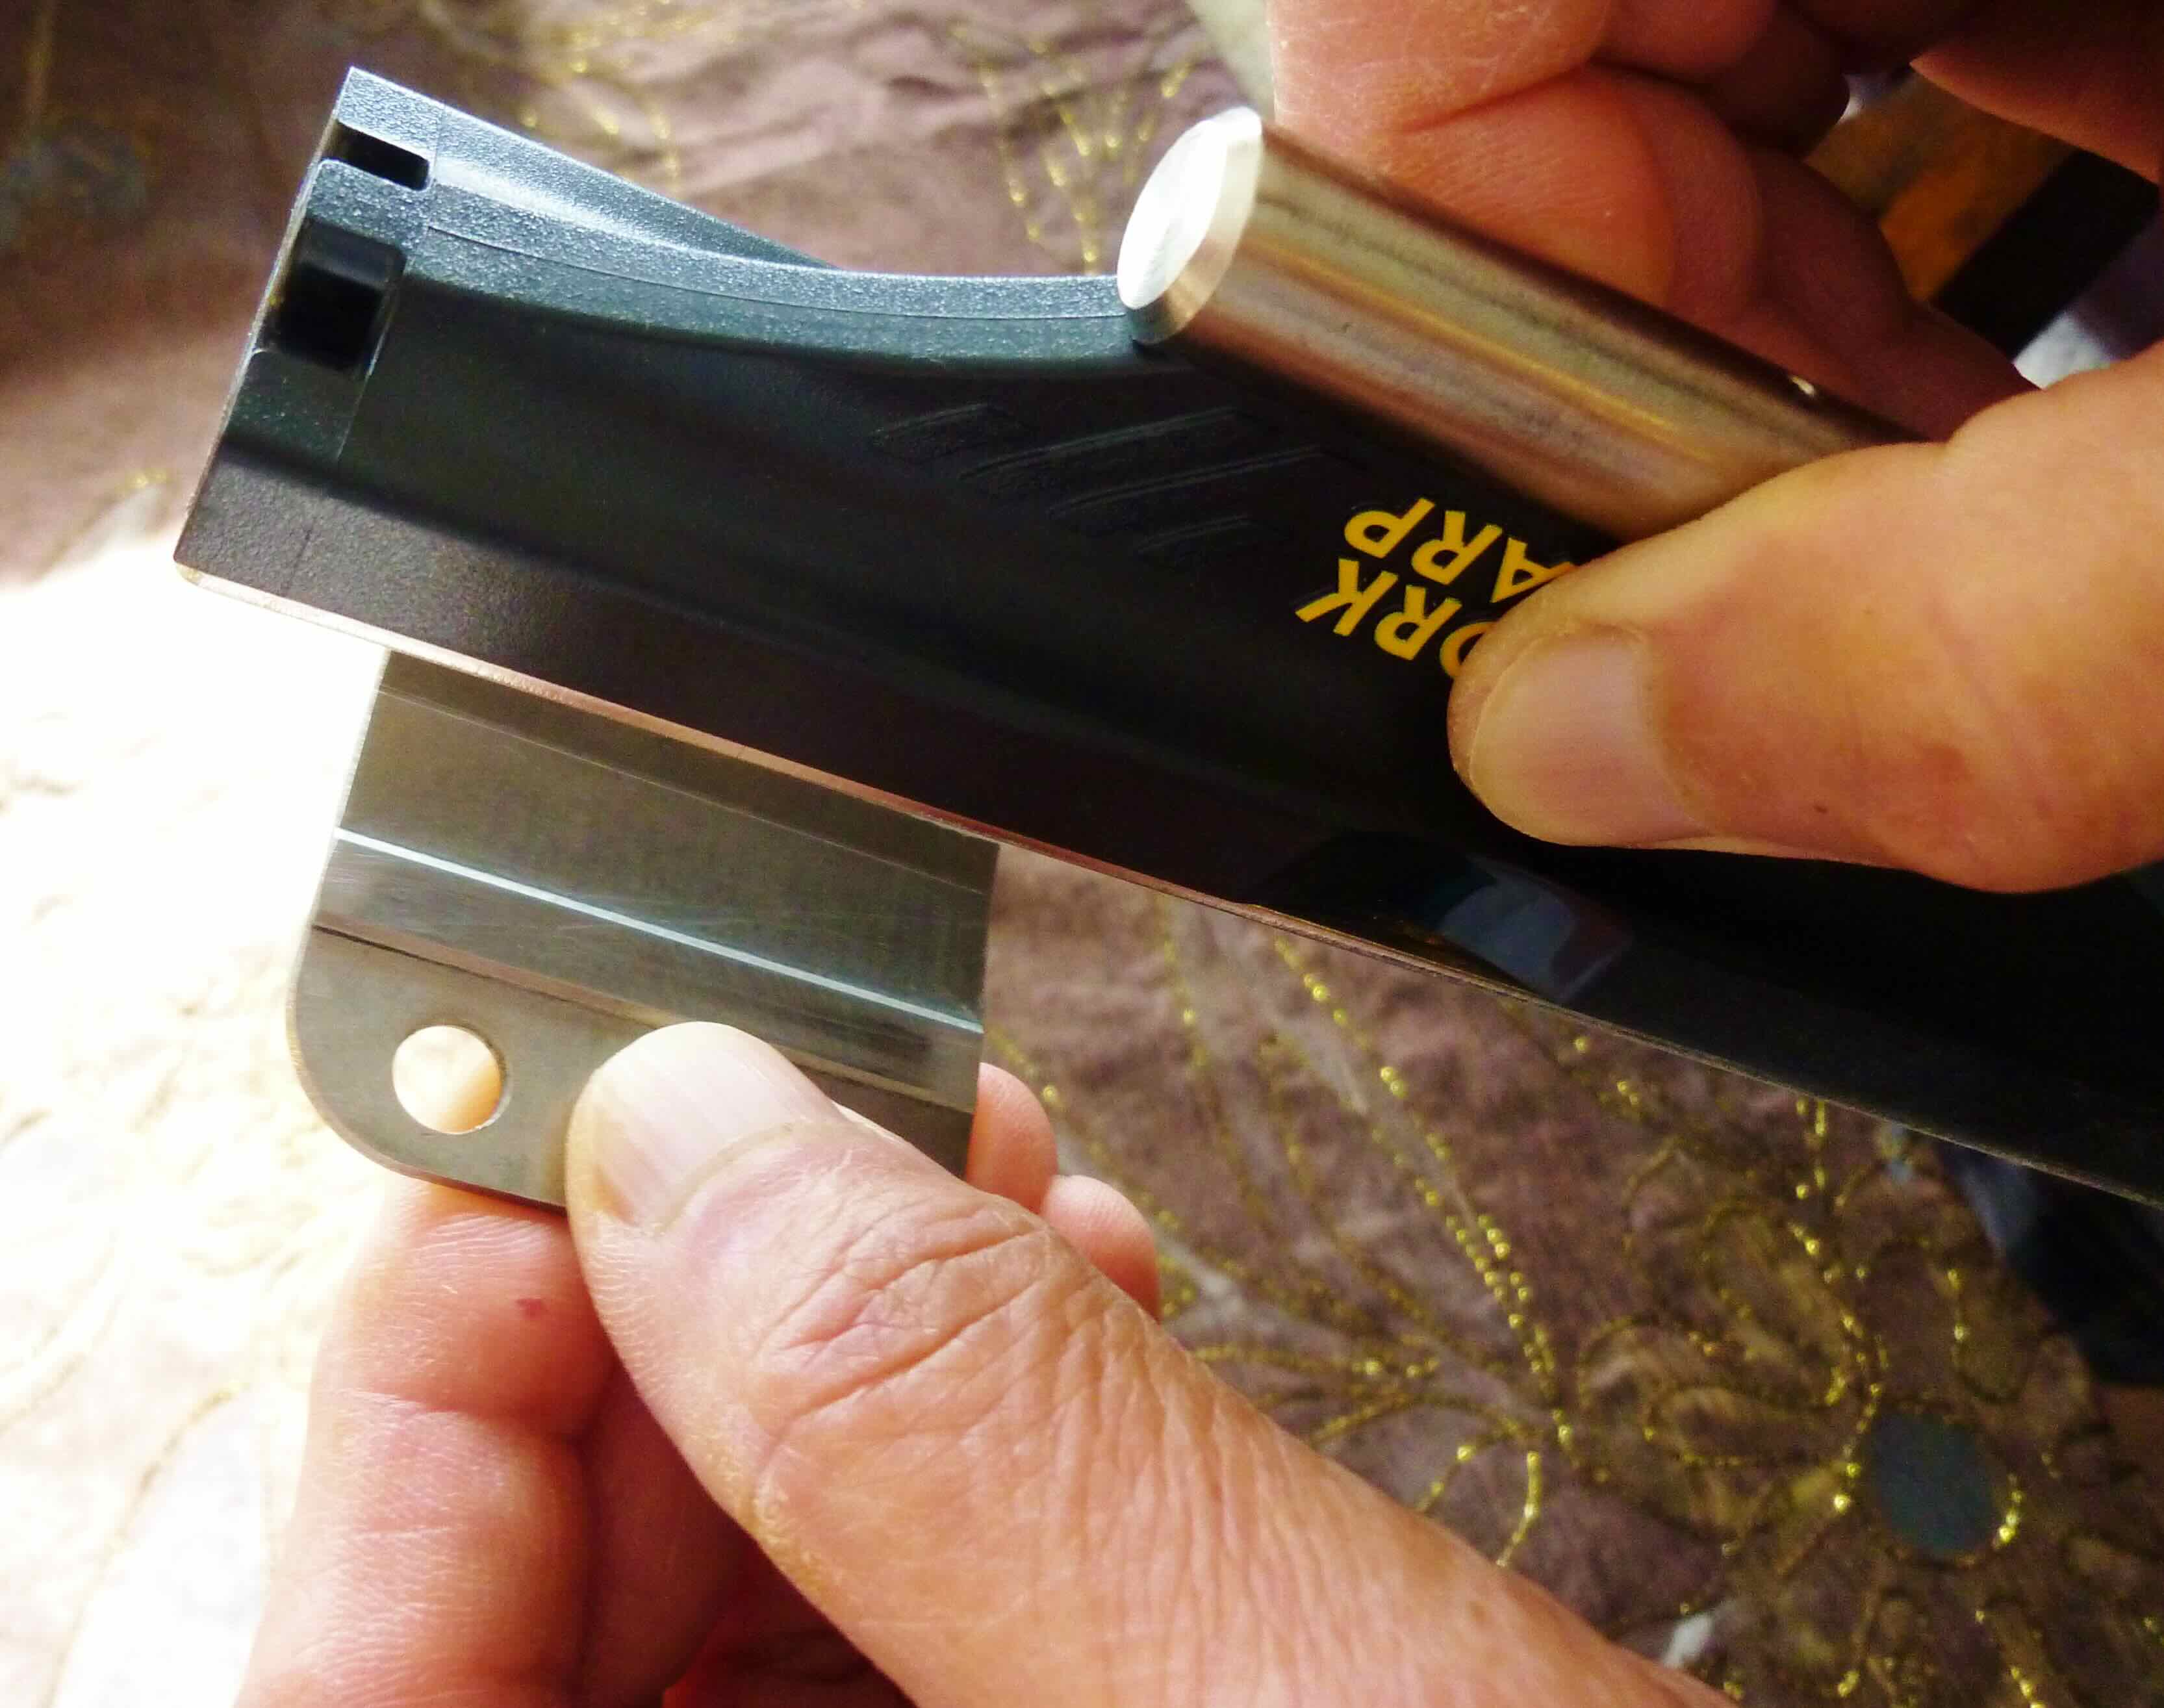
- Sand the Blades: Holding the sandpaper strip firmly, glide it along the cutting edge of the blade, maintaining a consistent angle and applying gentle pressure. Use smooth, even strokes to remove nicks and burrs, gradually restoring the blade’s sharpness. Repeat this process until the blade edge feels smooth and uniform.
- Clean and Lubricate: Once satisfied with the blade’s sharpness, wipe off any residual debris and apply a few drops of high-quality clipper blade oil to the blades. This lubrication reduces friction and safeguards the blades against corrosion, ensuring smooth operation during grooming.
- Reassemble the Blades (if applicable): If the blades were removed, carefully reattach them to the clippers, following the manufacturer’s guidelines for proper alignment and secure fastening.
- Test the Blades: Before resuming grooming tasks, test the sharpened blades on a small section of hair to ensure optimal cutting performance. The revitalized sharpness should result in effortless, precise cuts, signaling the successful completion of the sharpening process.
By meticulously following these steps and exercising patience and precision, you can breathe new life into your clipper blades, elevating the grooming experience for both you and your furry companions. Sharpening clipper blades with sandpaper is a rewarding endeavor that empowers you to maintain grooming tools with confidence and achieve professional-quality results.
Tips and Tricks
As you embark on the journey of sharpening clipper blades with sandpaper, consider the following tips and tricks to enhance your sharpening prowess and maximize the effectiveness of the process:
- Regular Maintenance: Incorporate blade sharpening into your regular grooming tool maintenance routine. By addressing blade dullness promptly, you can prevent excessive wear and maintain consistent cutting performance.
- Angle Consistency: When sanding the blades, maintain a consistent angle to ensure uniform sharpening. This helps avoid uneven blade edges and promotes optimal cutting precision.
- Patience is Key: Take your time when sanding the blades, focusing on gradual and deliberate strokes. Rushing the process may compromise the quality of the sharpening results.
- Inspect Thoroughly: After sanding, inspect the blades under adequate lighting to ensure that nicks and burrs have been effectively removed. This meticulous inspection guarantees a thorough sharpening outcome.
- Quality Sandpaper: Invest in high-quality sandpaper with medium to fine grit for optimal sharpening results. Quality sandpaper facilitates efficient removal of imperfections while imparting a smooth finish to the blade edges.
- Blade Alignment: When reattaching the blades to the clippers, ensure proper alignment and secure fastening to maintain cutting accuracy and prevent blade misalignment during grooming sessions.
- Test Cuts: Before engaging in full grooming tasks, perform test cuts on a small section of hair to evaluate the sharpness and cutting precision of the blades. This allows you to fine-tune the sharpness as needed before proceeding with extensive grooming.
- Storage and Protection: After sharpening, store the clipper blades in a clean, dry environment to prevent contamination and preserve their sharpness. Consider using blade guards or protective cases to shield the blades from damage.
- Professional Maintenance: If you encounter complex blade issues or prefer professional maintenance, consider seeking assistance from a certified blade sharpening service or a knowledgeable groomer to ensure optimal blade performance.
By integrating these tips and tricks into your sharpening routine, you can elevate the quality and longevity of your clipper blades, fostering a seamless and enjoyable grooming experience for both you and your furry companions. Sharpening clipper blades with sandpaper becomes a skillful endeavor when coupled with these valuable insights and best practices.
Conclusion
Congratulations on mastering the art of sharpening clipper blades with sandpaper! By delving into the intricacies of clipper blades, understanding the essential materials, and following a detailed step-by-step guide, you’ve empowered yourself to maintain grooming tools with precision and finesse. The ability to revitalize dull clipper blades not only enhances the grooming experience for pets but also saves time and resources in the long run.
As you embark on your sharpening journey, remember that regular maintenance and attention to detail are key components of preserving the sharpness and functionality of clipper blades. By incorporating the tips and tricks provided, you can refine your sharpening skills and ensure consistent, professional-quality results with each grooming session.
Sharpening clipper blades with sandpaper transcends a routine maintenance task – it embodies a commitment to grooming excellence and the well-being of the animals in your care. Whether you’re a seasoned professional or a dedicated pet owner, the art of blade sharpening allows you to uphold grooming standards with confidence and precision.
So, the next time you embark on a grooming session, armed with your newly sharpened clipper blades, take pride in the craftsmanship and care you’ve invested in maintaining your grooming tools. Your furry companions will undoubtedly appreciate the effortless, precise cuts delivered by your revitalized clipper blades, reaffirming the value of your sharpening endeavors.
As you continue to refine your grooming skills and expand your knowledge of clipper maintenance, remember that the journey of sharpening clipper blades with sandpaper is a testament to your dedication to grooming excellence and the comfort of your beloved pets. Embrace this journey with enthusiasm and a commitment to continual improvement, and may your grooming endeavors be marked by sharp blades and delightful results!
Frequently Asked Questions about How To Sharpen Clipper Blades With Sandpaper
Was this page helpful?
At Storables.com, we guarantee accurate and reliable information. Our content, validated by Expert Board Contributors, is crafted following stringent Editorial Policies. We're committed to providing you with well-researched, expert-backed insights for all your informational needs.


0 thoughts on “How To Sharpen Clipper Blades With Sandpaper”