Home>Technology>Home Office Tech>How To Make A Charging Station
Home Office Tech
How To Make A Charging Station
Modified: August 16, 2024
Learn how to create a convenient home office tech charging station with our step-by-step guide. Keep your devices organized and fully charged. Ideal for a clutter-free workspace.
(Many of the links in this article redirect to a specific reviewed product. Your purchase of these products through affiliate links helps to generate commission for Storables.com, at no extra cost. Learn more)
**
Introduction
**
Welcome to the world of DIY tech organization! In today's digital age, our homes are often filled with an assortment of electronic devices that require regular charging. From smartphones and tablets to smartwatches and wireless earbuds, keeping track of all these gadgets and their accompanying charging cables can quickly become a tangled mess. Fortunately, there's a solution that not only declutters your space but also adds a touch of personalization to your home office or living area – creating your own charging station.
A charging station serves as a dedicated hub for charging multiple devices simultaneously, offering a convenient and tidy way to keep your electronics powered up and ready to go. By customizing your own charging station, you can tailor it to fit your specific needs and aesthetic preferences, resulting in a practical yet stylish addition to your home.
In this comprehensive guide, we'll walk through the step-by-step process of designing and constructing a personalized charging station that suits your unique style and accommodates all your charging needs. Whether you're a tech-savvy enthusiast or simply looking to streamline your home office setup, this DIY project is an excellent way to exercise your creativity while enhancing the functionality of your living space.
So, roll up your sleeves, gather your tools, and get ready to embark on an exciting journey of crafting your very own charging station. With a bit of creativity and a few simple materials, you'll soon have a sleek and efficient solution for keeping all your devices charged and organized. Let's dive in and bring your vision of the perfect charging station to life! **
**
**
Key Takeaways:
- Create a personalized charging station to keep your devices organized and charged. Embrace creativity and practicality to design a sustainable and efficient tech solution for your home office.
- Crafting a DIY charging station allows you to express creativity, optimize efficiency, and showcase your resourcefulness. Enjoy the convenience and style of a personalized tech organization solution.
Read more: How To Charge A Tesla At A Charging Station
Materials Needed
**
Before diving into the construction of your DIY charging station, it's essential to gather all the necessary materials and tools. Here's a comprehensive list of items you'll need to bring your charging station to fruition:
- A wooden plank or board: This will serve as the base of your charging station. Choose a size that accommodates the number of devices you intend to charge simultaneously.
- Power strip or USB charging hub: Depending on your preference, select a power strip with multiple outlets or a USB charging hub to provide power to your devices.
- Adhesive cable clips or cable management sleeves: These accessories will help keep charging cables organized and prevent them from tangling or becoming misplaced.
- Decorative paper or adhesive vinyl wrap: Opt for a design or color that complements your home decor and adds a personalized touch to your charging station.
- Wood glue or screws: Choose the appropriate fastening method based on the construction of your charging station and the materials you're using.
- Optional: Decorative elements such as knobs, hooks, or small storage containers to enhance the aesthetic appeal and functionality of your charging station.
- Sandpaper and wood finish (optional): If you prefer a polished look, sandpaper and wood finish can be used to smooth the edges and add a protective layer to the wooden base.
- Basic tools: Hammer, screwdriver, measuring tape, and any other tools required for cutting or assembling the materials.
Once you've gathered these materials, you'll be well-equipped to commence the construction of your DIY charging station. With a clear vision of the design and functionality you desire, these materials will serve as the building blocks for your personalized tech organization solution. Now that you have everything you need, it's time to roll up your sleeves and bring your charging station to life!
Step 1: Designing the Charging Station
**
Before you start assembling the components of your charging station, it's crucial to have a clear vision of the design and layout you want to achieve. Consider the following factors to ensure that your charging station not only meets your functional needs but also complements your living space:
- Device Compatibility: Take an inventory of the devices you plan to charge at the station. Consider their sizes, shapes, and the types of charging cables they require. This will help you determine the spacing and arrangement of the charging areas on the station.
- Location: Decide on the ideal placement of the charging station within your home or office. Consider factors such as accessibility to power outlets, visibility, and the overall aesthetic of the space.
- Aesthetic Appeal: Determine the style and finish you want for the charging station. Whether you prefer a sleek, minimalist look or a more decorative and personalized design, this is the time to envision the overall aesthetic of the station.
- Cable Management: Plan for efficient cable organization to prevent tangling and maintain a neat appearance. Consider incorporating cable clips, channels, or integrated cable management features into the design.
- Add-On Features: If you desire additional functionality, such as built-in storage for small accessories or a dedicated spot for a smart speaker, plan for these elements during the design phase.
By carefully considering these aspects, you can create a design blueprint that aligns with your preferences and practical requirements. Whether you opt for a simple and streamlined design or a more elaborate and multifunctional approach, the initial design phase sets the stage for a successful and personalized charging station. Once you have a clear vision of the design, you're ready to move on to the next step of gathering the necessary tools to bring your concept to life.
Step 2: Gathering the Necessary Tools
**
With your design blueprint in hand, it's time to gather the essential tools required to bring your charging station to fruition. Depending on the materials and construction methods you've chosen, you'll need a set of tools to facilitate the assembly process. Here's a list of basic tools that will come in handy as you embark on this DIY project:
- Measuring Tape: An indispensable tool for ensuring accurate dimensions and spacing as you cut and position the components of your charging station.
- Saw or Jigsaw: Depending on the complexity of your design, you may need a saw or jigsaw to cut the wooden base or other materials to the desired dimensions.
- Screwdriver: Choose a screwdriver that matches the type of screws you'll be using to secure the various components of the charging station.
- Hammer: If your design involves attaching elements with nails or requires light tapping to adjust components, a hammer will be essential.
- Wood Glue: If you opt for a construction method that involves bonding wooden components, a reliable wood glue will be necessary to ensure sturdy and durable joints.
- Power Drill: If your design includes the use of screws or requires creating holes for cable management, a power drill will expedite the process.
- Sandpaper: To achieve a smooth and polished finish, sandpaper will be essential for refining the edges and surfaces of the wooden base or other materials.
- Protective Gear: Depending on the tools and materials you'll be working with, it's important to prioritize safety by using protective gear such as gloves and safety goggles.
By assembling these tools, you'll be well-prepared to tackle the construction of your charging station with confidence and precision. With the right tools at your disposal, you can proceed to the next step of assembling the components and bringing your personalized charging station to life.
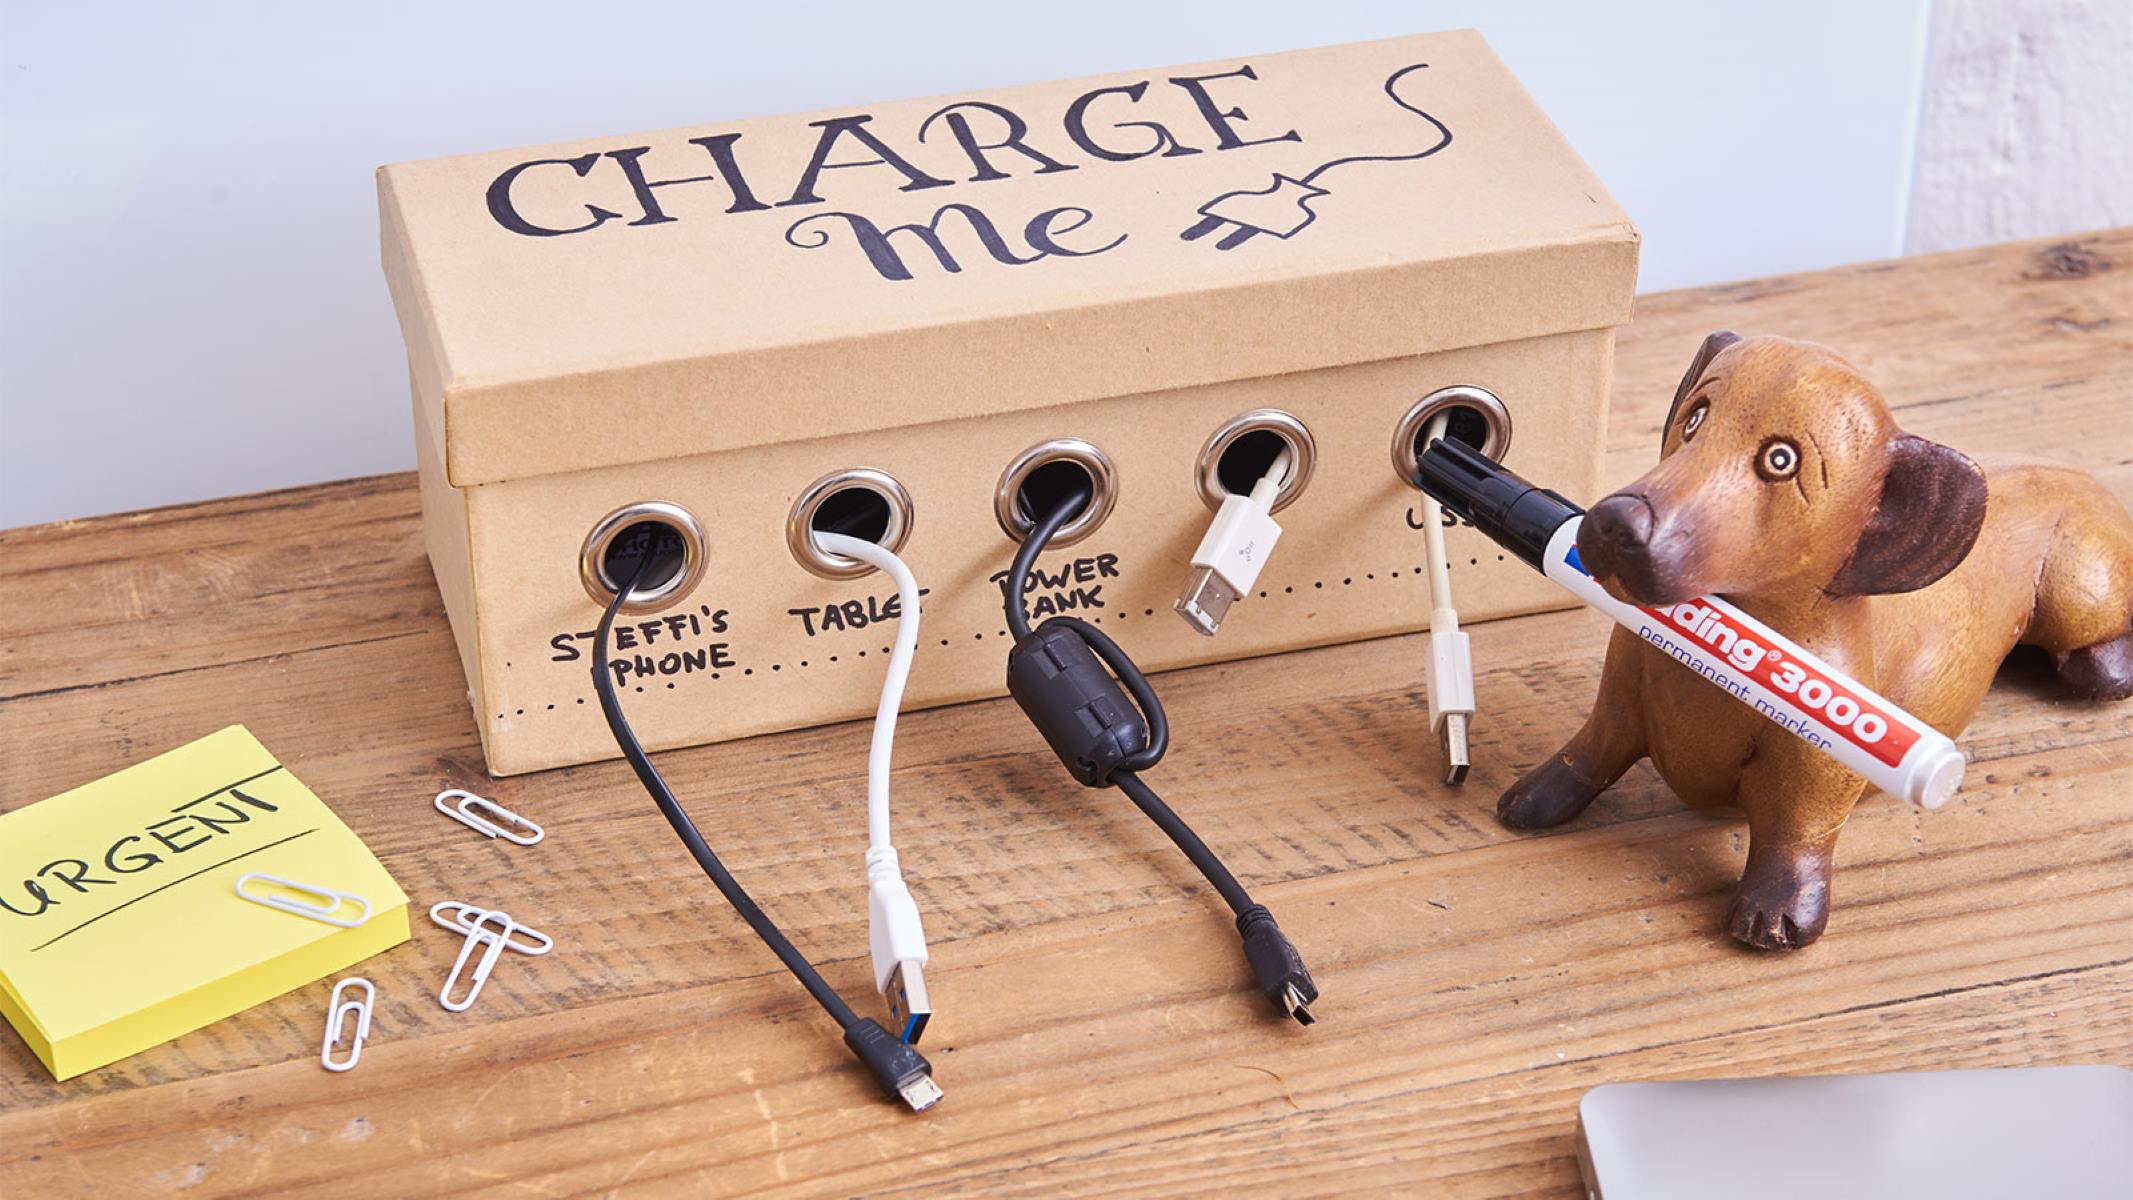
When making a charging station, make sure to include multiple USB ports and outlets to accommodate different devices. Label each port for easy identification.
Step 3: Assembling the Charging Station
**
With your design finalized and the necessary tools at hand, it’s time to bring your custom charging station to life through the assembly process. Follow these steps to ensure a smooth and successful construction:
- Prepare the Base: If you’re using a wooden plank or board as the base of your charging station, ensure that it’s cut to the desired dimensions and sanded to achieve a smooth finish. This is also the stage where you can apply a wood finish if you prefer a polished look.
- Position the Power Source: Depending on whether you’ve opted for a power strip or a USB charging hub, position and secure the power source to the base of the charging station. Ensure that it’s easily accessible and can accommodate the number of devices you intend to charge.
- Implement Cable Management: Use adhesive cable clips or cable management sleeves to organize and secure the charging cables along the surface of the base. This step is crucial for maintaining a neat and tangle-free charging area.
- Add Personalized Touches: If you’ve chosen to incorporate decorative paper or adhesive vinyl wrap, apply it to the base of the charging station to add a personalized and visually appealing touch. This is also the stage where you can attach any decorative elements or additional features to enhance the station’s functionality.
- Secure the Components: Whether you’re using wood glue or screws, ensure that all components are securely fastened to the base. Double-check the stability of the power source, cable management accessories, and any additional features you’ve included.
- Test the Functionality: Before considering the assembly complete, test the charging station by plugging in and charging a few devices. Ensure that the power source functions as intended and that the cable management system effectively keeps the charging area organized.
By following these steps, you’ll transform your design blueprint into a fully functional and personalized charging station that caters to your specific needs. The assembly process is where your vision takes shape, and with careful attention to detail, you’ll soon have a sleek and efficient solution for keeping all your devices charged and organized.
Step 4: Adding Finishing Touches
**
As the assembly of your charging station nears completion, it’s time to add the finishing touches that will elevate its functionality and aesthetic appeal. Consider the following steps to put the perfect final touches on your DIY creation:
- Optimize Cable Organization: Take a final look at the cable management system and make any necessary adjustments to ensure that the charging cables are neatly organized and easily accessible. Tidy cable management not only enhances the visual appeal of the charging station but also contributes to its overall functionality.
- Personalize the Design: If you’ve chosen to incorporate decorative paper or adhesive vinyl wrap, take the opportunity to ensure that the design aligns with your personal style and complements the surrounding decor. This step adds a personalized touch to the charging station and integrates it seamlessly into your living space.
- Add Storage and Organization Features: If you’ve included additional elements such as hooks, knobs, or small storage containers, ensure that they are strategically placed to enhance the station’s functionality. These features can provide convenient storage for charging accessories or serve as a dedicated spot for small tech essentials.
- Apply Protective Measures: Consider adding protective elements such as rubber feet to the base of the charging station to prevent it from scratching surfaces or sliding. This step ensures that your charging station remains stable and protects the underlying surface from any potential damage.
- Final Quality Check: Before declaring the charging station complete, conduct a thorough quality check to confirm that all components are securely fastened, the power source functions as intended, and the overall construction meets your standards of craftsmanship and durability.
- Showcase Your Creation: Once the finishing touches are in place and you’re satisfied with the results, proudly showcase your custom charging station in a prominent location within your home or office. This not only highlights your DIY prowess but also provides a practical and visually appealing solution for charging your devices.
By following these steps, you’ll add the perfect finishing touches to your DIY charging station, ensuring that it not only meets your practical needs but also reflects your personal style and creativity. With a blend of functionality and aesthetics, your charging station will stand as a testament to your ingenuity and practical craftsmanship.
Conclusion
**
Congratulations on successfully crafting your personalized charging station! Through meticulous design, thoughtful assembly, and the addition of personalized touches, you’ve transformed a simple collection of materials into a functional and visually appealing hub for keeping your electronic devices charged and organized. As you admire your handiwork, consider the following key takeaways from this DIY project:
- Personalization and Practicality: By customizing your own charging station, you’ve tailored a tech organization solution to suit your specific needs and aesthetic preferences. This fusion of personalization and practicality ensures that your charging station seamlessly integrates into your living space while serving as a reliable hub for keeping your devices powered up.
- Creative Expression: Crafting a charging station from scratch provides an opportunity for creative expression and hands-on engagement with home office tech organization. From envisioning the design to adding finishing touches, this DIY project allows you to showcase your creativity and practical skills in a tangible and functional creation.
- Efficiency and Organization: With a well-designed and carefully assembled charging station, you’ve optimized the efficiency of charging multiple devices while maintaining a clutter-free and organized space. The thoughtful incorporation of cable management and additional storage features contributes to a streamlined and visually appealing tech organization solution.
- Sustainable Solution: By creating a personalized charging station, you’ve embraced a sustainable approach to tech organization. Rather than relying on generic, mass-produced charging solutions, your DIY creation reflects a conscious effort to repurpose materials and customize a long-lasting and environmentally friendly charging solution.
As you revel in the satisfaction of completing this DIY project, take pride in the fact that your custom charging station is not only a practical addition to your home but also a reflection of your ingenuity and resourcefulness. Whether you’ve chosen a minimalist design or infused it with decorative elements, your charging station stands as a testament to your ability to blend functionality with creativity.
As technology continues to evolve, your personalized charging station will serve as a reliable and stylish companion, ensuring that your devices are always charged and ready for use. Embrace the convenience and visual appeal of your DIY creation, and let it inspire future endeavors in home office tech organization and creative DIY projects.
Congratulations once again on bringing your vision of the perfect charging station to life. Here’s to a future filled with innovative DIY creations and personalized solutions that enhance both the functionality and aesthetics of your living space!
**
Frequently Asked Questions about How To Make A Charging Station
Was this page helpful?
At Storables.com, we guarantee accurate and reliable information. Our content, validated by Expert Board Contributors, is crafted following stringent Editorial Policies. We're committed to providing you with well-researched, expert-backed insights for all your informational needs.


0 thoughts on “How To Make A Charging Station”