Articles
How To Disassemble Waterpik Showerhead
Modified: May 6, 2024
Learn how to easily disassemble your Waterpik showerhead with this informative article. Get step-by-step instructions and expert tips in just a few minutes.
(Many of the links in this article redirect to a specific reviewed product. Your purchase of these products through affiliate links helps to generate commission for Storables.com, at no extra cost. Learn more)
Introduction
A Waterpik showerhead can provide a refreshing and invigorating shower experience, but over time, it may start to lose its effectiveness due to mineral deposits and clogs. Disassembling and cleaning the showerhead can help restore its performance and extend its lifespan. In this article, we will guide you through the step-by-step process of disassembling a Waterpik showerhead. With the right tools and a little bit of patience, you’ll have your showerhead working like new in no time.
Before we begin, it’s important to note that disassembling your Waterpik showerhead may void any warranty it comes with. If your showerhead is still under warranty, it’s recommended to reach out to the manufacturer or consult the product documentation before attempting any disassembly. Additionally, make sure to turn off the water supply and take necessary precautions to avoid any potential injuries.
Now that we’ve covered the necessary precautions, let’s gather the tools and materials you’ll need for this disassembly project.
Key Takeaways:
- Easily restore your Waterpik showerhead’s performance and longevity by following simple disassembly and cleaning steps. Enjoy revitalizing showers with minimal effort and the right tools.
- Regular maintenance and cleaning of your Waterpik showerhead can prevent mineral buildup and ensure a consistent, refreshing shower experience. Take the time to give your showerhead the attention it deserves for long-lasting performance.
Read more: How To Attach A Waterpik Showerhead
Tools and Materials Needed
Before you start disassembling your Waterpik showerhead, make sure you have the following tools and materials ready:
- Adjustable wrench or pliers: You’ll need these to grip and loosen the showerhead or any connecting parts.
- Soft cloth or towel: This will come in handy for cleaning and drying the disassembled components.
- White vinegar or descaling solution: Vinegar is an effective natural cleaner that helps break down mineral deposits. If you prefer, you can also use a commercially available descaling solution.
- Toothbrush or small brush: Use this to scrub away any stubborn deposits on the showerhead components.
- Bowl or container: You’ll need this to soak the showerhead parts in vinegar or descaling solution.
- Bucket or plastic bag: These will be useful for catching any water that may drip during the disassembly process.
- Teflon tape: This plumbers’ tape is used to create a watertight seal when reassembling the showerhead.
Once you have all these tools and materials ready, you’re set to move on to the next step – turning off the water supply.
Step 1: Turn off the Water Supply
Before you begin disassembling your Waterpik showerhead, you need to turn off the water supply to prevent any water leakage or accidents during the process.
Locate the water shut-off valve for your shower or bathroom. This valve is typically located near the showerhead or in the basement or utility room.
If you have trouble finding the shut-off valve, you can turn off the water supply to your entire house temporarily. Locate the main water shut-off valve, usually found near the water meter or where the main water line enters your home. Turn the valve in a clockwise direction to shut off the water supply.
Once the water supply is turned off, turn on the shower to release any remaining water pressure in the pipes. This will ensure that no water is present when you start disassembling the showerhead.
Remember to follow any specific instructions provided by your shower manufacturer or refer to the product documentation for guidance on turning off the water supply.
With the water supply turned off, you can move on to the next step – removing the showerhead from the hose.
Step 2: Remove the Showerhead from the Hose
Now that you’ve turned off the water supply, it’s time to remove the showerhead from the hose. This will allow you to access and disassemble the different components of the showerhead.
Start by gripping the showerhead with an adjustable wrench or pliers. Be sure to use a cloth or towel to protect the finish and prevent any scratches.
Now, rotate the showerhead counterclockwise to loosen it from the hose. Apply gentle pressure while turning until the showerhead is completely detached from the hose.
If the showerhead is stubborn and does not easily come off, you can try applying some heat to loosen any sealant or mineral deposits that may be holding it in place. Use a hairdryer on low heat or a heat gun, carefully directing the heat towards the connection point. This should help to loosen the showerhead.
Once the showerhead is removed, inspect the hose for any debris or buildup. Wipe it clean with a soft cloth or rinse it with warm water if necessary.
Set the detached showerhead aside, and proceed to the next step – detaching the faceplate.
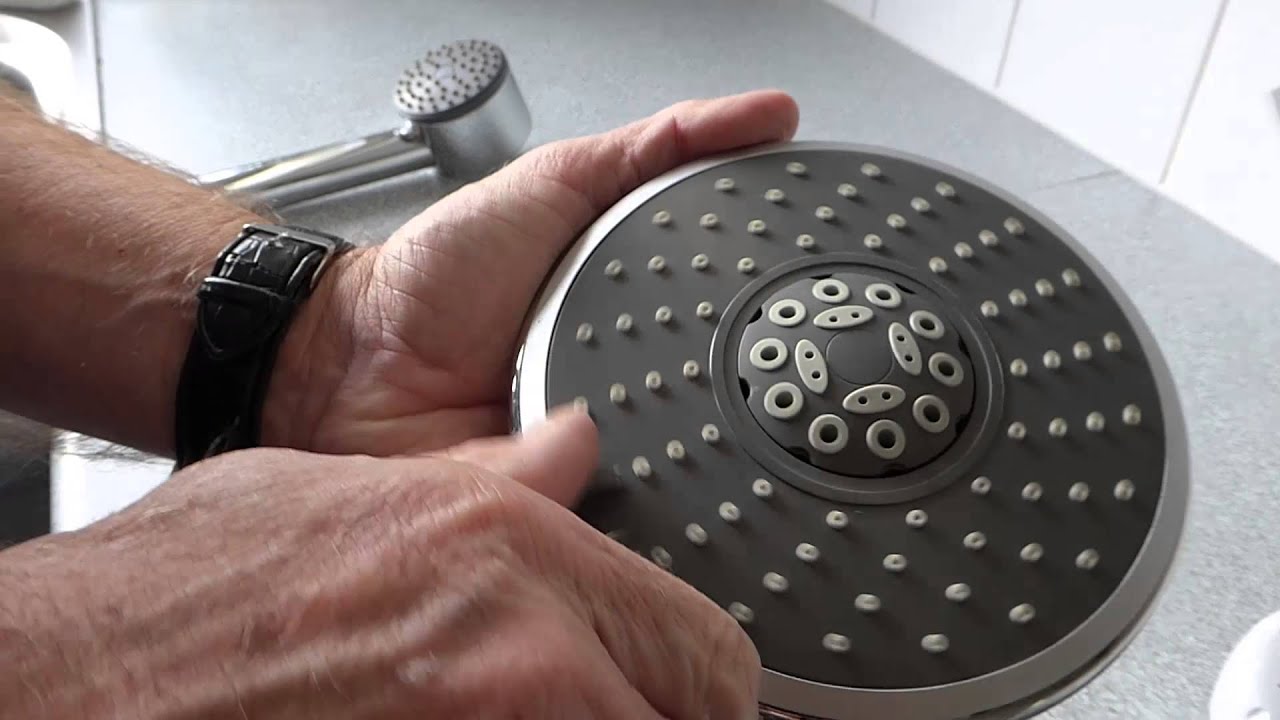
Step 3: Detach the Faceplate
With the showerhead removed from the hose, the next step is to detach the faceplate. The faceplate is the part of the showerhead that holds the spray nozzles and controls the water flow.
Look for any screws or clips that are securing the faceplate to the showerhead body. Depending on the model of your Waterpik showerhead, these fasteners may be located on the top, bottom, or sides of the faceplate.
Use a screwdriver or your fingers to remove the screws or release the clips. Take care not to lose any small screws or components while doing this.
Once the fasteners are removed, gently pry the faceplate away from the showerhead body. It may be sealed with rubber gaskets or o-rings, so use caution not to damage these seals.
Set the faceplate aside, and examine it for any mineral deposits or debris. If you notice any buildup, clean the faceplate using a toothbrush or a small brush. You can also soak it in a mixture of vinegar and water for a few minutes to help dissolve any stubborn deposits.
Now that the faceplate is detached and cleaned, you can move on to the next step – removing the flow regulator (if present).
Read also: 15 Amazing Waterpik Showerhead for 2024
Step 4: Remove the Flow Regulator (if present)
In some Waterpik showerhead models, there may be a flow regulator installed to limit the water flow rate. This regulator helps conserve water and maintain a consistent water pressure. However, if you prefer a stronger water flow, you have the option to remove the flow regulator.
Locate the flow regulator, which is usually a small plastic disk or insert situated between the faceplate and the showerhead body. It may be secured in place with a screw or simply inserted snugly.
If there is a screw holding the flow regulator, use a screwdriver to loosen and remove it. Be careful not to lose any small screws or components.
If the flow regulator is not secured with a screw, gently grip it with your fingers or use a pair of pliers to pull it out. Take care not to damage the surrounding parts or the showerhead body.
Once the flow regulator is removed, inspect it for any mineral deposits or debris. Clean it using a toothbrush or soak it in a mixture of vinegar and water to dissolve any buildup.
Alternatively, if you prefer to keep the flow regulator in place, you can clean it thoroughly using a toothbrush or soak it in vinegar solution to remove any deposits.
With the flow regulator removed or cleaned, you’re ready to move on to the next step – disassembling the spray nozzles.
Before disassembling a Waterpik showerhead, make sure to turn off the water supply to the shower. Use a wrench to carefully loosen and remove the showerhead from the shower arm, being cautious not to damage the threads.
Step 5: Disassemble the Spray Nozzles
Now that you have removed the flow regulator (if present), it’s time to disassemble the spray nozzles. The spray nozzles are responsible for delivering the water in various patterns and intensities.
Inspect the faceplate to locate the individual spray nozzles. Depending on the model of your Waterpik showerhead, there may be multiple nozzles arranged in a specific pattern.
To disassemble the spray nozzles, gently twist them counterclockwise or use a small screwdriver to pry them out. Be careful to apply gentle pressure to avoid damaging the nozzles or the faceplate.
As you remove each spray nozzle, take note of its orientation and position. This will help when reassembling the showerhead later.
Once the spray nozzles are removed, inspect them closely for any mineral deposits or debris. These deposits can restrict water flow and reduce the performance of the showerhead.
Use a toothbrush or small brush to clean the spray nozzles thoroughly. If the deposits are stubborn, you can soak the nozzles in a mixture of vinegar and water for a few minutes to loosen them.
Rinse the spray nozzles with clean water to remove any vinegar residue, and set them aside to dry.
With the spray nozzles disassembled and cleaned, you can now proceed to the next step – cleaning and rinsing the showerhead components.
Step 6: Clean and Rinse the Showerhead Components
Now that you have disassembled the spray nozzles, it’s time to clean and rinse all the showerhead components to remove any mineral deposits or debris.
Start by filling a bowl or container with equal parts white vinegar and water. Place the faceplate, flow regulator (if removed), and spray nozzles into the mixture. Ensure that all the components are fully submerged.
Allow the components to soak in the vinegar solution for about 30 minutes. The vinegar will help dissolve any mineral deposits and break down stubborn buildup.
While the components are soaking, use a toothbrush or soft brush to clean the main body of the showerhead. Pay attention to the threaded connection and any hard-to-reach areas.
If there are any visible mineral deposits or debris on the showerhead body, you can scrub them with a mixture of vinegar and water using the toothbrush.
Rinse all the components and the showerhead body thoroughly with clean water to remove any vinegar residue.
Inspect each component and ensure that they are clean and free from any deposits or debris. If necessary, repeat the cleaning process or use a toothpick to remove any stubborn buildup from the nozzles.
Once the components are clean and rinsed, allow them to air dry completely before moving on to the next step – reassembling the showerhead.
Step 7: Reassemble the Showerhead
Now that you have cleaned and rinsed all the showerhead components, it’s time to reassemble them to restore your Waterpik showerhead to its original condition.
Start by taking the faceplate and aligning it with the showerhead body. Ensure that any rubber gaskets or O-rings are properly in place.
Gently press the faceplate onto the showerhead body, taking care not to force it or damage any seals. If there were screws or clips to secure the faceplate, insert and tighten them appropriately.
If you removed the flow regulator earlier, now is the time to reinsert it. Position it according to the manufacturer’s instructions or based on how it was originally installed.
Next, take the spray nozzles and insert them back into their respective positions on the faceplate. Ensure that they are securely fastened and in the correct orientation as noted during disassembly.
Once all the components are in place, use an adjustable wrench or pliers to carefully tighten the showerhead onto the hose. Ensure that it is tightened securely, but be careful not to overtighten and damage the threads.
Before proceeding to the final step, it’s a good idea to wrap some Teflon tape around the threads of the showerhead to create a watertight seal. This helps prevent any potential leaks.
Now that the showerhead is reassembled, it’s time to move on to the final step – testing the reassembled showerhead.
Step 8: Test the Reassembled Showerhead
After reassembling your Waterpik showerhead, it’s important to test it to ensure that everything is working properly before you resume regular use. Follow these steps to test the reassembled showerhead:
- Turn on the water supply to your shower. Slowly increase the water pressure to a comfortable level.
- Check for any leaks around the connections. If you notice any leaks, turn off the water supply and double-check the tightness of the showerhead and hose connections. If necessary, use an adjustable wrench or pliers to tighten them further.
- Once you’re satisfied that there are no leaks, step into the shower and switch the showerhead to different spray settings.
- Check if the water flows smoothly and evenly from all the spray nozzles. If you notice any clogs or uneven flow, turn off the water supply and take apart the showerhead again to ensure there are no obstructions.
- Pay attention to the water pressure and spray pattern. If you feel that the water pressure is weaker than usual, you may have forgotten to reinsert the flow regulator. In that case, repeat the disassembly process and insert the flow regulator correctly.
If everything is functioning properly and you’re satisfied with the water flow and spray patterns, congratulations! You have successfully disassembled, cleaned, and reassembled your Waterpik showerhead.
Remember, regular maintenance and cleaning of your showerhead can help prevent mineral deposits and ensure a consistent shower experience. It is recommended to clean your showerhead every few months or as needed.
By following these steps, you can keep your Waterpik showerhead in great condition and enjoy refreshing and invigorating showers for years to come.
Now go ahead and enjoy your freshly cleaned showerhead!
Conclusion
Disassembling and cleaning your Waterpik showerhead is a simple yet effective way to restore its performance and maintain its longevity. By following the step-by-step process outlined in this guide, you can easily remove mineral deposits, unclog spray nozzles, and ensure a consistent water flow for a refreshing shower experience.
Remember to exercise caution throughout the disassembly process to avoid any injuries and to prevent damage to the showerhead components. Always refer to the manufacturer’s instructions or product documentation for specific guidance, especially if your showerhead is still under warranty.
Regular maintenance and cleaning of your showerhead is crucial to prevent mineral buildup and maintain optimal functionality. It is recommended to clean your showerhead every few months or as needed, depending on the water quality in your area.
By dedicating a little time and effort to clean your Waterpik showerhead, you’ll not only improve its performance, but also prolong its lifespan. So don’t wait any longer – give your showerhead the attention it deserves and enjoy the revitalizing showers it can provide.
With the knowledge and tools you’ve gained from this guide, you can confidently disassemble, clean, and reassemble your Waterpik showerhead, ensuring a delightful shower experience every time.
So go ahead, give your showerhead some TLC and enjoy the rejuvenating showers that await you!
Just fixed your Waterpik showerhead? Now, imagine you're in the middle of a warm shower when suddenly the showerhead starts wobbling. It's not only annoying but could lead to worse issues if not tackled promptly. Lucky for you, we've got a handy guide on showerhead repair that'll sort out that loose showerhead pipe in no time. Don't let a shaky shower spoil your relaxation time—learn how to secure it back into place today!
Frequently Asked Questions about How To Disassemble Waterpik Showerhead
Was this page helpful?
At Storables.com, we guarantee accurate and reliable information. Our content, validated by Expert Board Contributors, is crafted following stringent Editorial Policies. We're committed to providing you with well-researched, expert-backed insights for all your informational needs.


0 thoughts on “How To Disassemble Waterpik Showerhead”