Home>Gardening & Outdoor>Outdoor Structures>How To Disassemble A Shed
Outdoor Structures
How To Disassemble A Shed
Published: January 20, 2024
Learn how to properly disassemble your outdoor shed with our step-by-step guide. Save time and effort with our expert tips for dismantling outdoor structures.
(Many of the links in this article redirect to a specific reviewed product. Your purchase of these products through affiliate links helps to generate commission for Storables.com, at no extra cost. Learn more)
Introduction
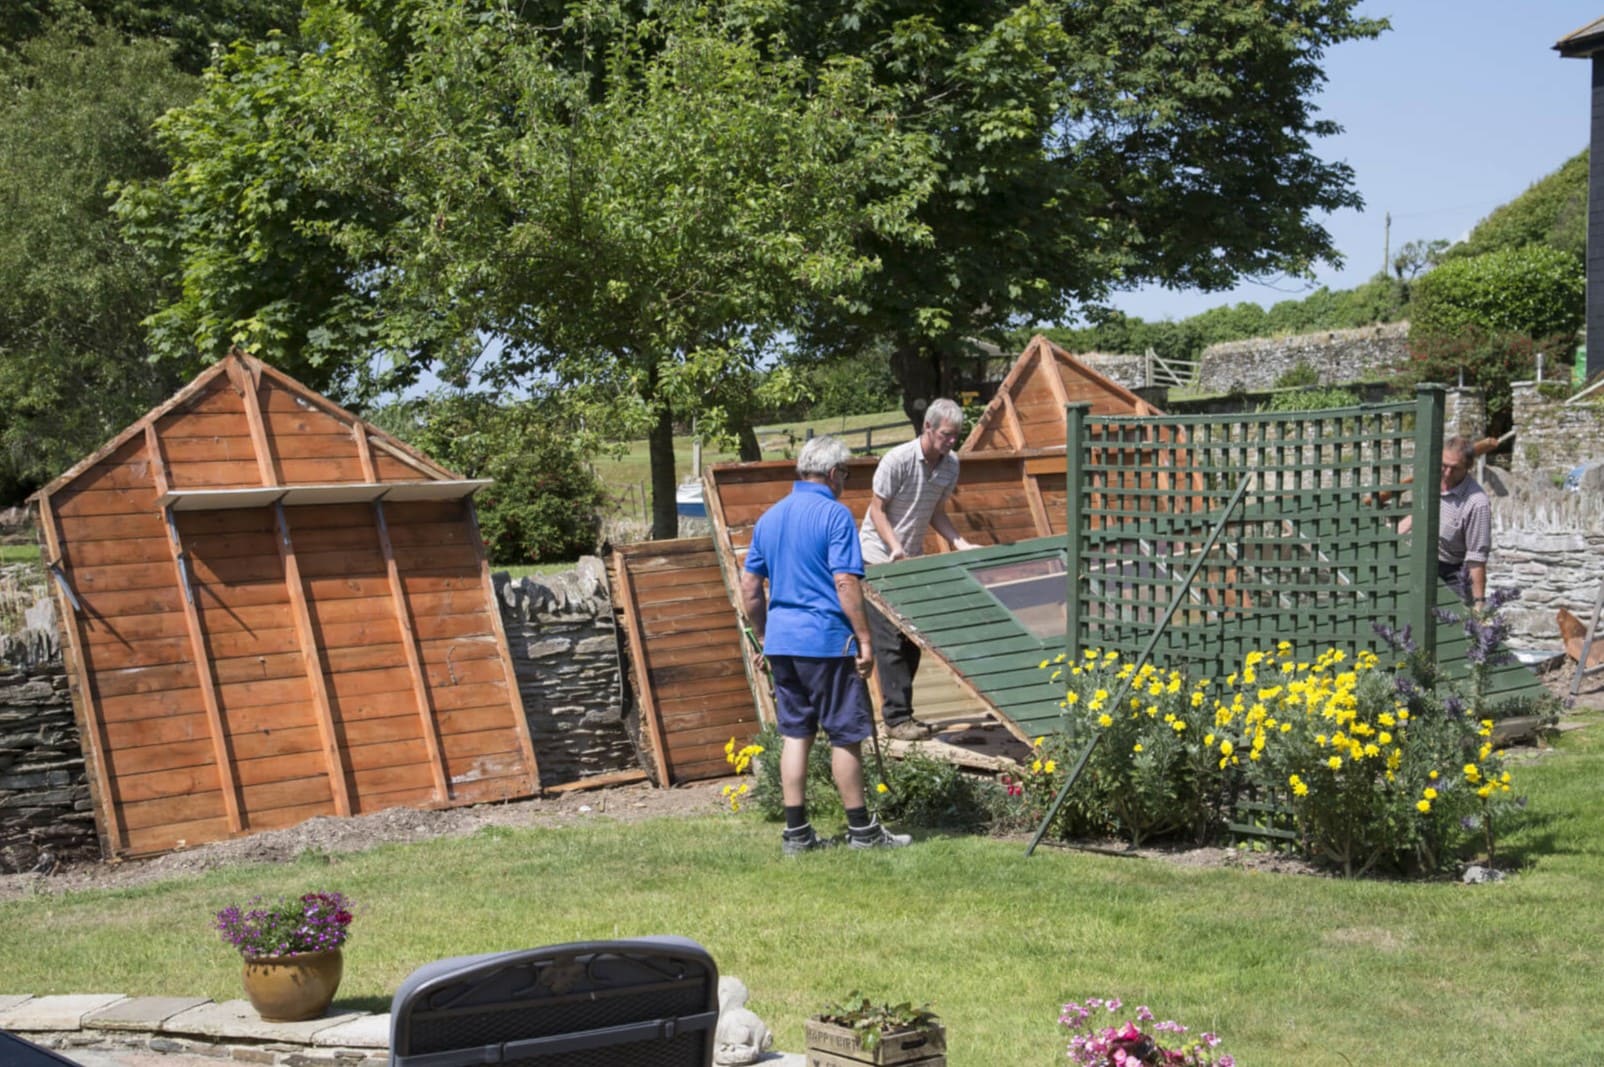
Disassembling a shed may seem like a daunting task, but with the right tools, knowledge, and a methodical approach, it can be a manageable and rewarding endeavor. Whether you are relocating, renovating, or simply looking to replace your current shed, understanding the process of disassembly is crucial for a smooth transition. In this comprehensive guide, we will walk you through the step-by-step process of disassembling a shed, from the essential tools and equipment needed to the meticulous organization of shed components. By following these instructions, you can efficiently disassemble your shed while ensuring that its components remain intact for future use. So, roll up your sleeves and let's dive into the world of shed disassembly!
Key Takeaways:
- Disassembling a shed requires careful preparation, the right tools, and a methodical approach to ensure safe and efficient removal of components for future use or relocation.
- Organizing and storing shed components after disassembly is crucial for easy reassembly, requiring labeling, inventorying, and protective storage to streamline the reconstruction process.
Read more: How To Disassemble Spikeball
Tools and Equipment Needed
Before embarking on the disassembly of a shed, it’s essential to gather the necessary tools and equipment to facilitate a smooth and efficient process. Here’s a comprehensive list of the tools and equipment you’ll need:
- Protective Gear: Safety goggles, work gloves, and sturdy work boots are essential to protect yourself during the disassembly process.
- Power Drill: A power drill with screwdriver bits will expedite the removal of screws and fasteners.
- Hammer: A claw hammer will come in handy for removing nails and separating stubborn components.
- Pry Bar: A pry bar is indispensable for prying apart tightly joined sections of the shed.
- Ladder: Depending on the height of your shed, a ladder may be needed to access the roof and upper sections safely.
- Screwdriver Set: A set of screwdrivers, including flathead and Phillips head varieties, will assist in the removal of screws and hardware.
- Saw: A handsaw or reciprocating saw will aid in cutting through stubborn or larger wooden components.
- Tarpaulin or Plastic Sheets: These will be useful for protecting disassembled parts from the elements during storage and transportation.
- Marker or Labeling Tool: To ensure easy reassembly, it’s essential to label or mark each component with its placement and orientation.
- Assistants: Enlist the help of a few friends or family members to assist with heavy lifting and maneuvering of larger shed sections.
By ensuring that you have these tools and equipment at your disposal, you’ll be well-prepared to tackle the disassembly of your shed with confidence and efficiency.
Preparing the Shed for Disassembly
Before diving into the physical disassembly process, it’s crucial to prepare the shed and its surroundings to ensure a safe and organized disassembly. Here are the essential steps to prepare the shed for disassembly:
- Clear the Surrounding Area: Remove any obstacles, debris, or vegetation around the shed to create a clear and accessible workspace.
- Remove Contents: Empty the shed of all its contents, including tools, equipment, and any personal belongings. This will lighten the load and prevent damage to items during disassembly.
- Inspect for Hazards: Check for any potential hazards such as wasp nests, loose electrical connections, or unstable structural elements. Address and rectify these issues before proceeding.
- Secure Loose Components: If there are any loose or protruding components, such as nails, screws, or splintered wood, secure or remove them to prevent accidents during disassembly.
- Disconnect Utilities: If your shed is equipped with electrical or plumbing connections, ensure that these utilities are safely disconnected to avoid any mishaps during disassembly.
- Take Photographs: Before disassembly, take photographs of the shed from various angles. These photos can serve as a visual reference during reassembly.
By meticulously preparing the shed and its surroundings, you’ll create a safe and organized environment for the disassembly process. This groundwork will set the stage for a smoother and more efficient disassembly experience, allowing you to proceed with confidence and peace of mind.
Removing the Roof
Disassembling the roof of a shed is a significant step that requires careful attention to detail and safety measures. Here’s a systematic approach to removing the roof of your shed:
- Clear the Interior: Remove any items or debris from the interior of the shed to create a clear workspace.
- Unscrew Roof Panels: Using a power drill or screwdriver, carefully unscrew and remove the fasteners securing the roof panels to the underlying structure.
- Label and Stack Panels: As each roof panel is detached, label it according to its position (e.g., front, back, left, right) using a marker or labeling tool. Stack the panels in an organized manner to facilitate reassembly.
- Remove Roofing Material: If your shed has roofing material such as shingles or metal sheets, carefully remove and stack them for disposal or future use.
- Inspect and Repair: While the roof is exposed, inspect the underlying structure for any damage or wear. Make necessary repairs before proceeding with the disassembly of the walls.
By following these steps, you can effectively and safely remove the roof of your shed, setting the stage for the subsequent disassembly of its walls and other components. Remember to exercise caution when working at heights and to enlist the assistance of others when handling larger roof panels.
Before disassembling a shed, make sure to take inventory of all the parts and label them for easy reassembly. Use the right tools and work with a partner for safety.
Dismantling the Walls
Once the roof has been removed, the next phase involves the careful dismantling of the shed’s walls. This process requires precision and attention to detail to ensure that the components are disassembled without damage. Here’s how to dismantle the walls of your shed:
- Start with Door and Window Frames: If your shed has door and window frames, begin by removing the doors and windows, followed by the frames themselves. Unscrew any fasteners and carefully detach the frames from the surrounding structure.
- Remove Siding or Cladding: Whether your shed is clad with wooden siding, vinyl panels, or another material, start by removing the cladding from the walls. Work methodically, starting from the top and progressing downwards to expose the underlying framework.
- Unscrew Wall Supports: Using a power drill or screwdriver, unscrew and remove the fasteners securing the wall supports (studs) to the shed’s base and top plates.
- Label and Stack Components: As each wall section is disassembled, label the components and stack them in an organized manner. Proper labeling will streamline the reassembly process.
- Inspect for Damage: While dismantling the walls, inspect the individual components for any signs of damage or wear. Address any issues promptly to ensure the structural integrity of the shed during reassembly.
By following these steps, you can systematically dismantle the walls of your shed, preparing the components for storage or transportation to a new location. Exercise caution when handling sharp or heavy materials, and consider enlisting the help of others to ensure a safe and efficient disassembly process.
Read more: How To Disassemble Vinyl Fence
Disassembling the Flooring
Disassembling the flooring of a shed is often the final step in the disassembly process. This phase requires attention to detail and careful handling to ensure that the flooring components are preserved for future use or disposal. Here’s a systematic approach to disassembling the flooring of your shed:
- Clear the Interior: Ensure that the shed’s interior is free of any remaining items, tools, or debris to create a clear workspace for disassembling the flooring.
- Remove Floor Covering: If your shed has a floor covering such as plywood, laminate, or vinyl, carefully remove and stack these materials for disposal or reuse in the future.
- Unscrew Floor Joists: Using a power drill or screwdriver, unscrew and remove the fasteners securing the floor joists to the shed’s base or foundation. Take care to preserve the integrity of the joists during removal.
- Lift and Stack Flooring Panels: If your shed has individual flooring panels, carefully lift and stack them in an organized manner. Labeling the panels according to their position can aid in reassembly.
- Inspect the Foundation: With the flooring removed, inspect the shed’s foundation or base for any signs of damage, moisture, or pest infestation. Address any issues before reassembling the shed at a new location.
By following these steps, you can effectively disassemble the flooring of your shed, ensuring that the components are preserved and ready for future use. Exercise caution when handling heavy or cumbersome flooring materials, and consider enlisting the assistance of others to facilitate a smooth disassembly process.
Organizing and Storing the Shed Components
After successfully disassembling the various components of your shed, it’s crucial to organize and store them properly to ensure their preservation and facilitate easy reassembly at a new location. Here’s a guide to organizing and storing the shed components:
- Labeling and Inventory: Label each disassembled component with its position, orientation, and any relevant assembly instructions. Create an inventory list to keep track of all the components and their respective locations.
- Secure Storage Space: Find a secure and dry storage space, such as a garage, shed, or storage unit, to protect the disassembled components from the elements and potential damage.
- Stacking and Arrangement: Stack the components in an organized manner, taking care to prevent any shifting or damage during storage. Place heavier items at the bottom and lighter, more fragile components on top.
- Protective Coverings: Use tarpaulins, plastic sheets, or drop cloths to cover and protect the stored components from dust, moisture, and potential impact.
- Secure Fasteners and Hardware: Store all screws, nuts, bolts, and small hardware in labeled containers or bags. Keep these items together with their corresponding components to streamline the reassembly process.
- Documentation and Photos: Keep the labeled components’ inventory list and any relevant assembly instructions or manuals with the stored components. Retain the photographs taken during disassembly for reference during reassembly.
By meticulously organizing and storing the shed components, you can ensure that they remain intact and accessible for future use. Proper organization and storage will streamline the reassembly process, allowing you to reconstruct the shed with ease and confidence at its new location.
Conclusion
Disassembling a shed is a task that requires careful planning, attention to detail, and a methodical approach. By following the step-by-step process outlined in this guide, you can efficiently and effectively disassemble your shed while preserving its components for future use. From preparing the shed and removing its roof to dismantling the walls and flooring, each phase of the disassembly process plays a crucial role in ensuring a successful outcome.
Throughout the disassembly process, safety should always be a top priority. Utilizing the appropriate tools, enlisting the help of others for heavy lifting, and maintaining a clear and organized workspace are essential elements of a safe disassembly experience.
Furthermore, the meticulous organization and storage of shed components are pivotal in facilitating a seamless reassembly at a new location. By labeling, inventorying, and protecting the disassembled components, you can streamline the reconstruction process and minimize the risk of misplaced or damaged parts.
Whether you are relocating your shed, renovating your outdoor space, or simply looking to replace an existing structure, the knowledge and skills acquired through the disassembly process can be invaluable. Not only does it allow for efficient relocation and reassembly, but it also provides a deeper understanding of the shed’s construction and components.
As you embark on the journey of shed disassembly, remember to approach each step with patience and diligence. By doing so, you can transform what may seem like a daunting task into a rewarding and manageable project. With the shed disassembled and its components safely stored, you are well-prepared to embark on the next phase of your outdoor structure endeavors.
Frequently Asked Questions about How To Disassemble A Shed
Was this page helpful?
At Storables.com, we guarantee accurate and reliable information. Our content, validated by Expert Board Contributors, is crafted following stringent Editorial Policies. We're committed to providing you with well-researched, expert-backed insights for all your informational needs.


0 thoughts on “How To Disassemble A Shed”