Articles
How To Fix A Sinking Porch
Modified: September 1, 2024
Learn how to fix a sinking porch with our informative articles. Fixing your porch is easy with our step-by-step guides and expert advice.
(Many of the links in this article redirect to a specific reviewed product. Your purchase of these products through affiliate links helps to generate commission for Storables.com, at no extra cost. Learn more)
Introduction
A sinking porch is not only unattractive but can also pose safety hazards. A porch that is sinking or tilting can be a result of various factors such as poor soil conditions, inadequate support structures, or water damage. If you notice your porch sinking or leaning, it’s essential to address the issue promptly to prevent further damage and to ensure the safety of anyone using the porch.
In this article, we will guide you through the steps to fix a sinking porch and restore it to its original level position. We will discuss common causes of a sinking porch, the tools and materials needed for the project, and a step-by-step process to address the issue effectively. By following these instructions, you can save yourself the cost of hiring professionals and successfully repair your sinking porch.
Please note that some porch sinking issues may require expert assistance, particularly if the damage is severe or if you are not comfortable handling the repairs yourself. In such cases, it’s always advisable to consult a professional contractor specialized in porch repair to ensure the job is done safely and effectively.
Now, without further ado, let’s dive into the details of how to fix a sinking porch and restore its stability and beauty.
Key Takeaways:
- Identifying the root cause of a sinking porch is crucial for effective repair. From poor soil conditions to water damage, understanding the issue is the first step in restoring stability and safety to your outdoor space.
- Reinforcing the support structure, lifting and leveling the porch, and securing it in place are essential steps in successfully repairing a sinking porch. By following these steps, you can restore your porch to its original beauty and functionality.
Read more: How To Fix A Porch
Common Causes of a Sinking Porch
A sinking porch can be caused by several factors, and understanding the root cause is crucial to effectively addressing the issue. Here are some common causes of a sinking porch:
- Poor Soil Conditions: One of the primary causes of a sinking porch is poor soil quality or improper soil compaction. If the soil beneath the porch is unstable or lacks the ability to support the weight of the porch, it can lead to sinking or tilting.
- Water Damage: Water accumulation around the porch foundation can weaken the soil and compromise its load-bearing capacity. When the soil becomes saturated with water, it can lose its compactness, resulting in the porch sinking or settling.
- Inadequate Support Structures: Insufficient or deteriorated support structures, such as beams, columns, or footings, can also lead to a sinking porch. Over time, these structural elements may decay, become damaged, or fail to provide adequate support, causing the porch to sag or sink.
- Settling of the Foundation: If the porch was not built on a stable foundation or if the foundation has shifted or settled over time, it can result in the porch sinking or becoming unlevel.
- Natural Ground Movement: Natural geological processes, such as soil erosion, soil expansion and contraction, or seismic activity, can contribute to the sinking or tilting of a porch. These movements can cause the underlying soil to shift, leading to instability and sinking of the porch structure.
By identifying the specific cause of your sinking porch, you can determine the appropriate course of action to fix it. Keep in mind that some causes may require professional intervention, especially if they involve complex structural issues or extensive damage. Consulting with a porch repair specialist can help you accurately diagnose the cause and devise an effective repair plan.
Tools and Materials Needed
Repairing a sinking porch requires the right set of tools and materials to ensure a successful outcome. Here are the essential tools and materials you will need:
Tools:
- Level
- Tape measure
- Shovel
- Wheelbarrow
- Hammer
- Drill
- Concrete mixer (if needed)
- Jack or hydraulic lift
- Support brackets
- Screws or nails
- Concrete mix or foundation repair foam
- Waterproof membrane
- Paint and paintbrush (optional, for finishing touches)
Materials:
- Pressure-treated lumber or composite boards
- Concrete blocks or pavers
- Gravel
- Cement
- Rebar (if needed)
- Wood screws or nails
- Structural adhesive or epoxy
- Backer rod and sealant
- Primer and paint (if desired)
- Porch post brackets (if required)
It’s important to have all the necessary tools and materials readily available before you start the porch repair process. This ensures that you can complete the project efficiently and without unnecessary delays. Additionally, ensure that you have the required safety equipment, such as gloves, goggles, and a dust mask, to protect yourself during the repair process.
If you are unsure about which specific tools or materials are needed for your porch repair project, consult with a professional or refer to the manufacturer’s guidelines. They can provide you with expert advice and ensure that you have everything you need for a successful porch repair.
Read more: How To Fix A Sink
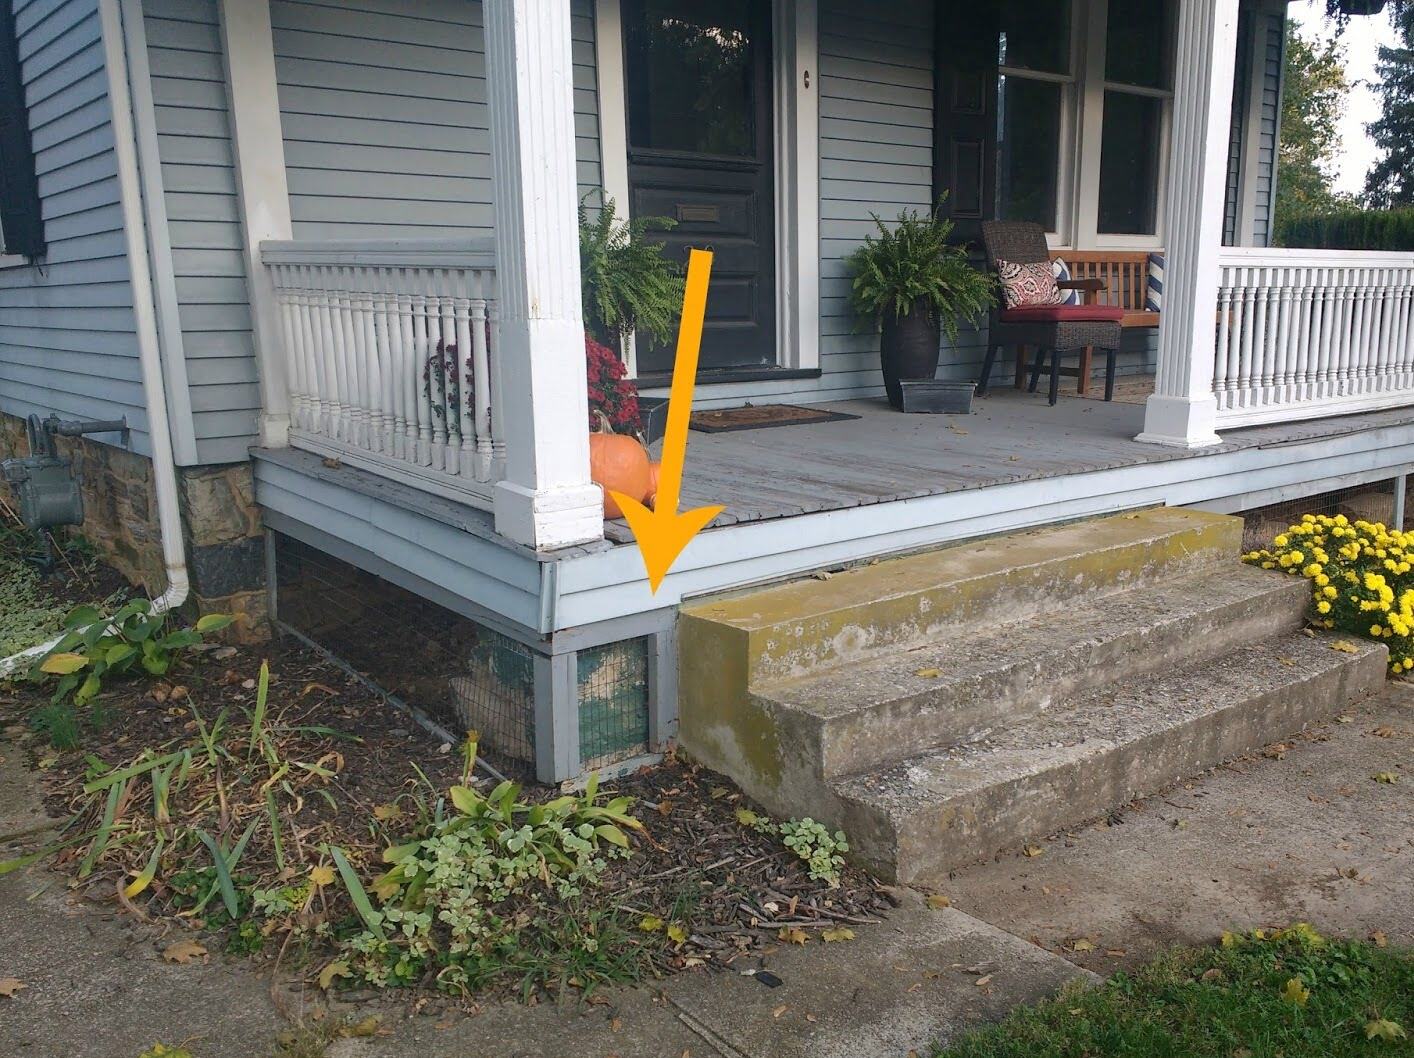
Step 1: Identify the Problem
Before you can fix a sinking porch, you need to accurately identify the underlying problem causing the sinking or tilting. This step is crucial to ensure that you address the root cause and implement the appropriate solution. Here’s how you can identify the problem:
- Observe the Porch: Examine your porch carefully and look for signs of sinking or tilting. Check if the porch is leaning to one side, sagging in the middle, or showing any visible cracks or gaps.
- Inspect the Support Structure: Take a closer look at the support beams, columns, and footings. Look for any signs of damage, deterioration, or inadequate support. Ensure that all support beams are solidly connected to the porch and the foundation.
- Check for Water Damage: Look for any signs of water damage around the porch, such as pooling water, wet soil, or water stains. Water accumulation can weaken the soil and lead to sinking or settling of the porch.
- Measure and Level: Use a level and a tape measure to assess the levelness of the porch. Measure the height of each corner and compare the measurements. If there is a significant difference in height, it indicates that the porch is not level.
- Consult a Professional: If you are unsure about the problem or need expert advice, consider consulting a professional contractor or a structural engineer specialized in porch repairs. They can conduct a thorough assessment and provide you with a detailed diagnosis and repair plan.
By carefully inspecting and analyzing the porch, you can gather valuable information to determine the cause of the sinking and devise an appropriate repair strategy. Keep in mind that some issues may require professional expertise to accurately identify, so don’t hesitate to seek professional help if needed.
Step 2: Determine the Best Approach
Once you have identified the problem causing your sinking porch, it’s time to determine the most suitable approach for fixing it. The approach will depend on the severity of the issue, the underlying cause, and your comfort level with DIY repairs. Here are some common approaches:
- DIY Repairs: If the sinking porch is a minor issue and you have the necessary tools and skills, you may choose to tackle the repairs yourself. This approach typically involves reinforcing the support structure and lifting the porch back to its original level position.
- Surface Repair: In some cases, the sinking porch may be due to minor surface settlement without significant underlying structural damage. Surface repair can involve techniques like filling cracks, leveling the surface using self-leveling compounds, or installing new flooring over the existing porch.
- Professional Repairs: For more complex or severe sinking porch issues, it’s advisable to hire a professional contractor experienced in porch repairs. They have the expertise and equipment to handle structural repairs, such as replacing support beams, strengthening the foundation, or installing helical piers to stabilize the porch.
- Foundation Replacement: If the porch sinking is due to extensive foundation damage, it may be necessary to replace the entire foundation. This approach involves excavating the area around the porch, removing the existing foundation, and installing a new one to provide long-term stability.
It’s essential to carefully consider the approach that best suits your situation. Factors such as budget, time constraints, and the severity of the issue may influence your decision. Consulting with professionals and obtaining multiple opinions can help you make an informed choice and ensure that the chosen approach effectively addresses the sinking porch problem.
Remember, safety should be a top priority when deciding on the repair approach. If you are uncertain about your ability to perform the repairs safely or if the issue requires specialized skills, it’s always best to seek professional help to ensure the job is done correctly and to minimize the risk of further damage.
Step 3: Reinforce the Support Structure
Once you have determined the best approach for fixing your sinking porch, it’s time to reinforce the support structure to provide stability and prevent further sinking. Here are the steps to reinforce the support structure:
- Assess the Damage: Start by thoroughly inspecting the support beams, columns, and footings. Look for signs of decay, rot, cracks, or any other damage that may compromise their structural integrity. Identify the areas that require reinforcement and make a note of the necessary repairs.
- Replace Damaged Components: If you find any damaged or deteriorated support elements, such as beams or columns, remove and replace them. Use pressure-treated lumber or composite materials that are resistant to rot and decay, ensuring the new components are securely attached to the porch and the foundation.
- Install Support Brackets: To further strengthen the support structure, consider installing support brackets. These brackets provide additional stability and distribute the weight of the porch evenly. Secure the brackets to the beams and columns using screws or nails, ensuring a secure connection.
- Reinforce Footings: If the footings are unstable or inadequate to support the porch, consider reinforcing them. This may involve pouring additional cement around the existing footings or installing new concrete pads or piers for added support. Follow local building codes and regulations while reinforcing the footings.
- Consider Helical Piers: In cases where the sinking is due to poor soil conditions, installing helical piers may be necessary. These piers are driven deep into the ground to provide stable support for the porch. Consult with a professional to determine if helical piers are suitable for your situation.
Ensure that all the support structure repairs are done accurately and securely. Use appropriate screws, nails, or structural adhesives to ensure a sturdy and lasting connection. Reinforcing the support structure is a critical step in the porch repair process, as it strengthens the foundation and prevents further sinking or instability.
Remember to follow all safety precautions and building codes while completing this step. If you are unsure about any aspect of the repair process, consult a professional for guidance and assistance.
Inspect the foundation of the porch for any signs of damage or settling. Use a hydraulic jack to raise and support the sinking area, then add additional support with concrete piers or footings.
Step 4: Lift and Level the Porch
Now that you have reinforced the support structure of your sinking porch, it’s time to proceed with lifting and leveling the porch to restore its original position. Here are the steps to lift and level the porch:
- Clear the Area: Remove any furniture, plants, or debris from the porch area to create a clear and safe workspace.
- Choose the Lifting Method: Depending on the size and complexity of your porch, there are a few methods to lift it. Common methods include using hydraulic jacks, screw jacks, or a lifting machine. Choose the method that is suitable for your situation and follow the manufacturer’s instructions for proper operation.
- Begin Lifting: Start by placing the lifting equipment at strategic points along the porch. Gradually and evenly raise the porch to the desired level. Use a level tool to ensure that the porch is being lifted evenly and maintain a slow and controlled lifting process.
- Check for Levelness: Once the porch is lifted, use a level to check its levelness. Adjust the lifting equipment as needed to achieve a level position. It’s important to check the level at multiple points throughout the porch to ensure an accurate and even levelness.
- Support the Porch: Once the porch is level, it’s crucial to provide additional support to maintain its position. Use support beams, blocks, or other suitable materials to secure the porch and prevent it from sinking again. Ensure that the support is sturdy and positioned to distribute the weight evenly.
- Reinforce the Connections: Inspect the connections between the porch and the support structure. Secure any loose screws or nails and reinforce them with additional fasteners if necessary. This will ensure that the porch remains securely attached to the support structure.
It’s important to take your time during the lifting and leveling process to ensure that the porch is properly aligned. Rushing or using uneven lifting can lead to additional damage or an unstable porch.
If you are unsure about the lifting and leveling process or feel uncomfortable performing it yourself, it’s highly recommended to hire a professional with experience in porch repairs. They have the expertise and equipment to safely lift and level the porch, ensuring a successful and long-lasting result.
Read more: How To Fix A Sinking Driveway
Step 5: Secure the Porch in Place
After successfully lifting and leveling your porch, the next step is to secure it in place to prevent any further sinking or movement. Securing the porch will ensure its long-term stability and structural integrity. Follow these steps to secure your porch:
- Install Bracing: Use braces or support brackets to reinforce the connections between the porch and the support structure. Secure the braces with screws or nails to ensure a sturdy and secure attachment.
- Anchor to the Foundation: If your porch is not already anchored to the foundation, it’s essential to do so. Install anchor bolts or brackets to securely attach the porch to the foundation. This will prevent any lateral movement or shifting of the porch.
- Use Structural Adhesive or Epoxy: Apply structural adhesive or epoxy to reinforce the connections between the porch components, such as the beams, columns, or boards. This will further strengthen the porch structure and enhance its stability.
- Consider Adding Support Columns: Depending on the size and design of your porch, you may need to add additional support columns. These columns can provide added stability and distribute the weight evenly. Consult a professional if you are unsure about the need for support columns or their placement.
- Check for Secure Attachment: Once all the necessary steps are completed, thoroughly inspect the porch to ensure that everything is securely attached. Give the porch a gentle shake to test its stability. If you notice any looseness or movement, reinforce the connections or seek professional assistance.
It’s crucial to follow manufacturer guidelines and local building codes while securing your porch. Properly securing the porch will help prevent future sinking or structural issues, giving you peace of mind and ensuring the safety of anyone using the porch.
If you are uncertain about the best way to secure your porch or if you prefer professional guidance, it’s advisable to consult a porch repair specialist. They have the expertise and knowledge to recommend the appropriate methods and ensure that your porch is securely fixed in place.
Step 6: Finishing Touches
Now that you have successfully lifted, leveled, and secured your porch, it’s time to add the finishing touches to complete the repair process. These finishing touches will not only enhance the appearance of your porch but also help protect it from future damage. Follow these steps for the final touches:
- Repair Surface Imperfections: Inspect the surface of the porch for any cracks, gaps, or uneven areas. Fill in any cracks or gaps with a suitable patching compound or epoxy filler. Smooth out any uneven surfaces using sandpaper or a sander to create a uniform look.
- Apply Waterproofing Sealant: To protect your porch from water damage, apply a waterproofing sealant. Choose a sealant that is appropriate for the material of your porch, such as wood or concrete. Apply the sealant according to the manufacturer’s instructions, ensuring that all exposed surfaces are covered.
- Consider Painting or Staining: If desired, you can further improve the appearance of your porch by painting or staining it. Choose a paint or stain that is suitable for outdoor use and matches your desired aesthetic. Apply the paint or stain following the manufacturer’s instructions, and allow it to dry completely before using the porch.
- Enhance with Landscaping: Complete the renovation of your porch by adding landscaping elements around it. Plant flowers, shrubs, or create a garden bed to complement the beauty of your porch. Ensure that any plants or landscaping features are positioned a safe distance away from the porch to prevent water damage or interference with the structure.
- Maintain Regular Inspections: After completing the repair and adding the finishing touches, it’s important to schedule regular inspections of your porch. Check for any signs of damage, movement, or deterioration. Address any issues promptly to prevent them from escalating into more significant problems.
By taking these extra steps to add the finishing touches, you can transform your repaired porch into a beautiful and functional space. These final touches not only improve the aesthetics but also help maintain the integrity and durability of your porch for years to come.
Remember to follow safety guidelines when using any construction or finishing materials. If you are unsure about any aspect of the finishing process, consult a professional or refer to manufacturer recommendations for the specific products you are using.
Conclusion
Repairing a sinking porch is a challenging yet rewarding project that can restore the beauty and functionality of your outdoor space. By following the steps outlined in this guide, you can successfully address the underlying causes of a sinking porch and restore it to its original level position.
Throughout this process, it’s important to prioritize safety and take necessary precautions. If you are unsure about any aspect of the repair or feel uncomfortable performing certain tasks, don’t hesitate to seek professional assistance. Professionals have the expertise and specialized equipment to handle complex porch repairs efficiently and effectively.
Remember that prevention is key to avoid future sinking or damage to your porch. Regularly inspect your porch for signs of deterioration, maintain proper drainage, and address any issues promptly. By being proactive, you can extend the lifespan of your porch and minimize the need for extensive repairs.
A sinking porch is not only a visual eyesore but can also be a safety hazard. It’s essential to address the problem as soon as you notice it to prevent further damage to the porch and to ensure the safety of those using it.
By following the step-by-step instructions in this guide, identifying the problem, reinforcing the support structure, lifting and leveling the porch, securing it in place, and adding the finishing touches, you can proudly enjoy a stable, level, and beautiful porch once again.
Remember, when in doubt, consult with professionals who can provide expert guidance and ensure that the repair process is carried out to the highest standards. With proper care and maintenance, your porch will continue to be a welcoming space where you can relax and enjoy the beauty of your outdoor surroundings for years to come.
Frequently Asked Questions about How To Fix A Sinking Porch
Was this page helpful?
At Storables.com, we guarantee accurate and reliable information. Our content, validated by Expert Board Contributors, is crafted following stringent Editorial Policies. We're committed to providing you with well-researched, expert-backed insights for all your informational needs.


0 thoughts on “How To Fix A Sinking Porch”