Articles
How To Fix A Toilet Handle
Modified: August 30, 2024
Learn how to fix a toilet handle with step-by-step articles. Fix your toilet handle easily with our informative guides and troubleshooting tips.
(Many of the links in this article redirect to a specific reviewed product. Your purchase of these products through affiliate links helps to generate commission for Storables.com, at no extra cost. Learn more)
Introduction
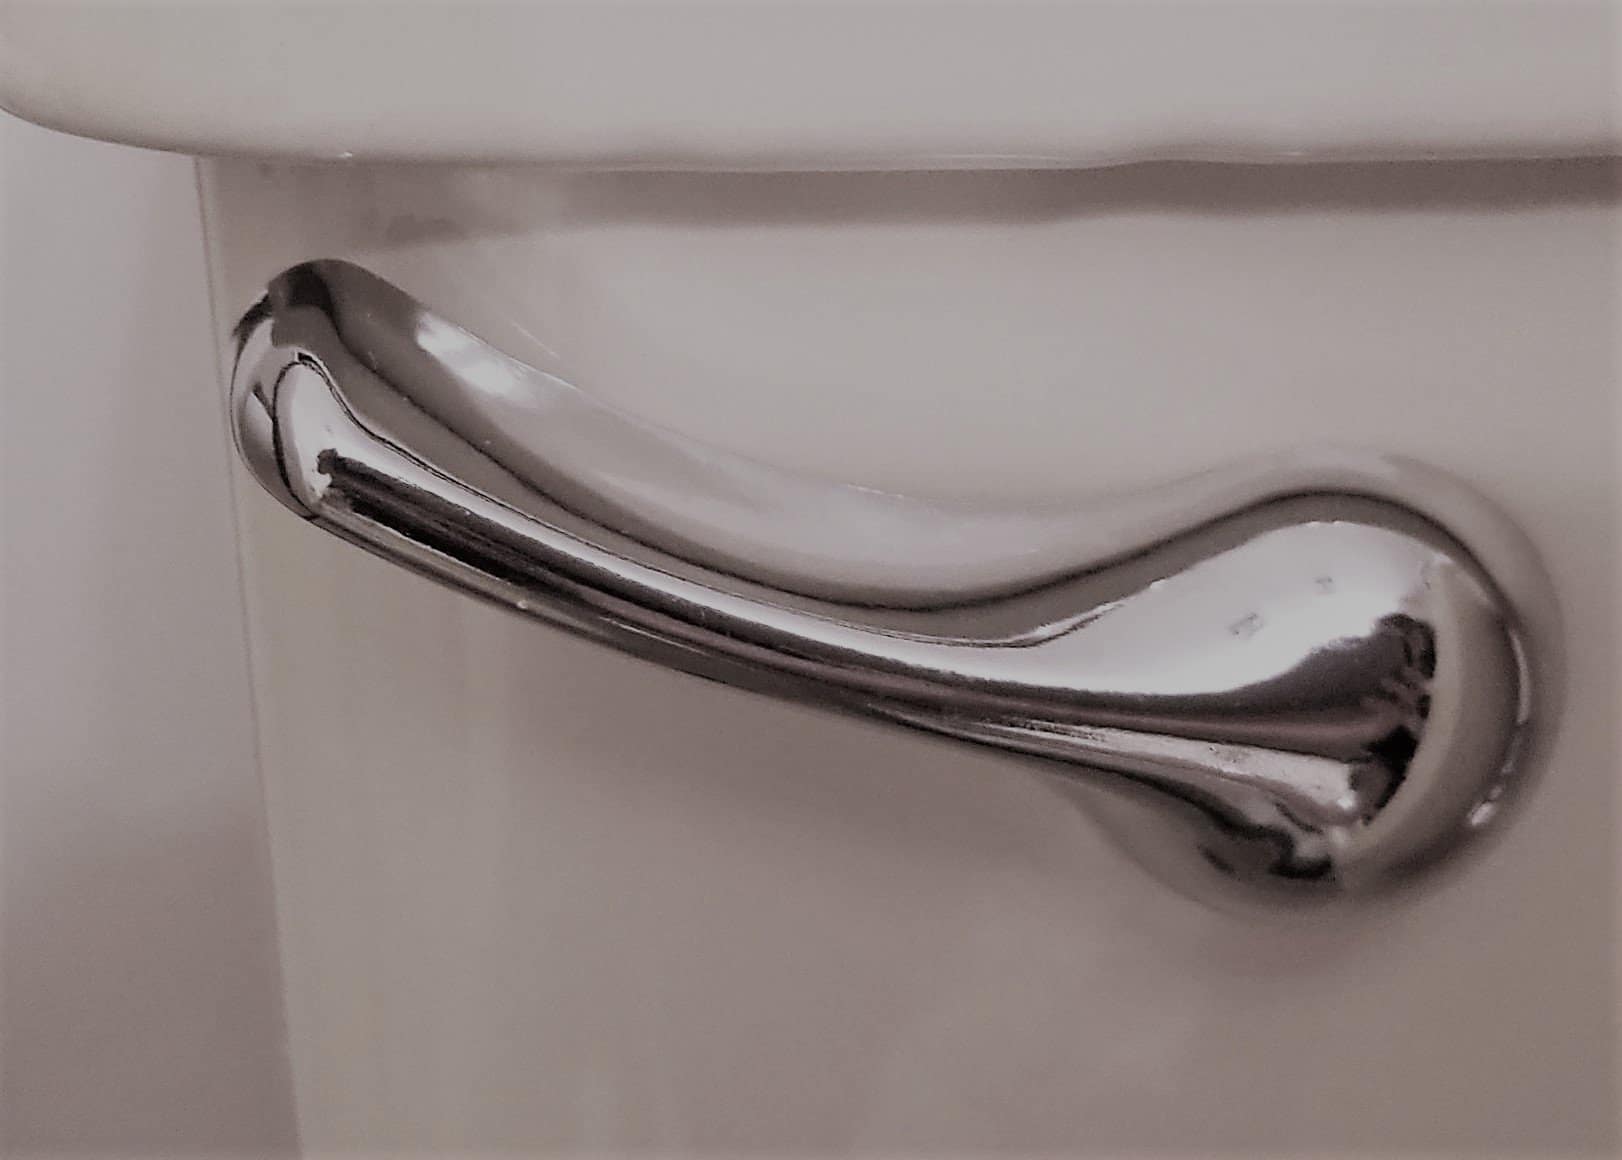
A toilet handle is an essential component of your toilet’s flushing mechanism. It allows you to flush away waste and keep your bathroom clean and odor-free. However, just like any other hardware, a toilet handle may encounter issues over time, such as becoming loose or failing to function properly. If you’re experiencing problems with your toilet handle, don’t worry. In this article, we will guide you through the step-by-step process of fixing a toilet handle, so you can restore functionality to your toilet quickly and easily.
Before we dive into the troubleshooting and repair process, let’s go over some basics. The toilet handle, also known as the flush lever, is what you use to activate the flushing mechanism. When you press down on the handle, it lifts the flapper or flush valve, allowing water to rush into the toilet bowl and carry away the waste. When released, the flapper drops back into place, preventing water from continuously flowing into the bowl.
Now that you understand the role of the toilet handle, let’s gather the necessary tools and materials before we get started with the repair.
Key Takeaways:
- Fixing a toilet handle is a straightforward DIY project that can save time and money, ensuring a smoothly functioning bathroom for years to come.
- Identifying the issue, shutting off the water, installing the new handle, and adjusting the chain are crucial steps in successfully repairing a toilet handle.
Read more: How To Fix Sink Handle
Tools and Materials Required
Before you begin fixing your toilet handle, make sure you have the following tools and materials on hand:
- Adjustable wrench
- Screwdriver
- Replacement toilet handle
- New flush valve chain or flush lever, if needed
- Bucket or towel
The adjustable wrench will be used to loosen and tighten nuts and bolts, while the screwdriver will be necessary for removing and installing the handle. It’s important to have a replacement toilet handle, as this is the component that may be causing the issue in the first place. If the chain or flush lever connecting the handle to the flapper valve needs to be replaced, make sure you have the appropriate replacement part on hand.
Lastly, having a bucket or towel nearby is always handy to catch any excess water that may spill during the repair process. Now that you have your tools and materials ready, let’s move on to the step-by-step process of fixing a toilet handle.
Step 1: Identify the Issue
The first step in fixing a toilet handle is to identify the specific issue you are facing. This will help you determine the appropriate course of action and ensure that you don’t waste time and effort on unnecessary repairs.
Common problems with toilet handles include a loose handle, a handle that does not return to its original position after flushing, or a handle that feels stuck or resistant. Take a close look at your toilet handle and try to determine what’s causing the issue.
If your handle feels loose, it may be due to a loose nut or bolt that attaches the handle to the toilet tank. Tighten these connections using an adjustable wrench but be careful not to overtighten and risk damaging the handle or other components.
If the handle does not return to its original position after flushing, it may indicate a problem with the flush lever or the chain. In this case, you may need to replace either of these components to restore the proper functioning of the handle.
Lastly, if the handle feels stuck or resistant, it could indicate a buildup of dirt, debris, or mineral deposits in the flushing mechanism. In this case, you may need to clean the components or replace them if they are severely damaged.
By identifying the issue, you can move forward with the appropriate steps to fix your toilet handle. Let’s proceed to step two to shut off the water before beginning the repair process.
Step 2: Shut off the Water
Before you start working on your toilet handle, it’s crucial to shut off the water supply to prevent any potential flooding or mess. The water shut-off valve is typically located near the base of the toilet, either on the wall or the floor.
Locate the shut-off valve and turn it clockwise until it is fully closed. To ensure that the water is completely shut off, flush the toilet and wait for the tank to empty. This will also help you identify any issues with the handle’s function before proceeding with the repair.
If you aren’t able to locate the shut-off valve or if it is not functioning properly, you may need to shut off the main water supply to your home. The main shut-off valve is usually located near the water meter. If you’re unsure about how to do this, it’s recommended to consult a professional plumber to avoid any damage or unnecessary complications.
Once the water has been turned off, you can proceed to the next step of removing the tank lid to gain access to the inner workings of the toilet.
Step 3: Remove the Tank Lid
Now that you have shut off the water supply, it’s time to remove the tank lid to gain access to the inside of the toilet. The tank lid is typically made of porcelain or plastic and is positioned on top of the tank.
Carefully lift the tank lid with both hands, taking caution not to drop it or damage it in any way. Place the lid on a stable surface nearby, such as a towel or a soft cloth, to prevent any accidental breakage.
With the tank lid removed, you will have a clear view of the inner workings of the toilet, including the flush valve, fill valve, and the existing handle mechanism. Take a moment to familiarize yourself with these components, as it will help you understand the repair process better.
Now that you have access to the inside of the tank, you can proceed to the next step, which is removing the old handle.
Read more: How To Fix A Recliner Handle
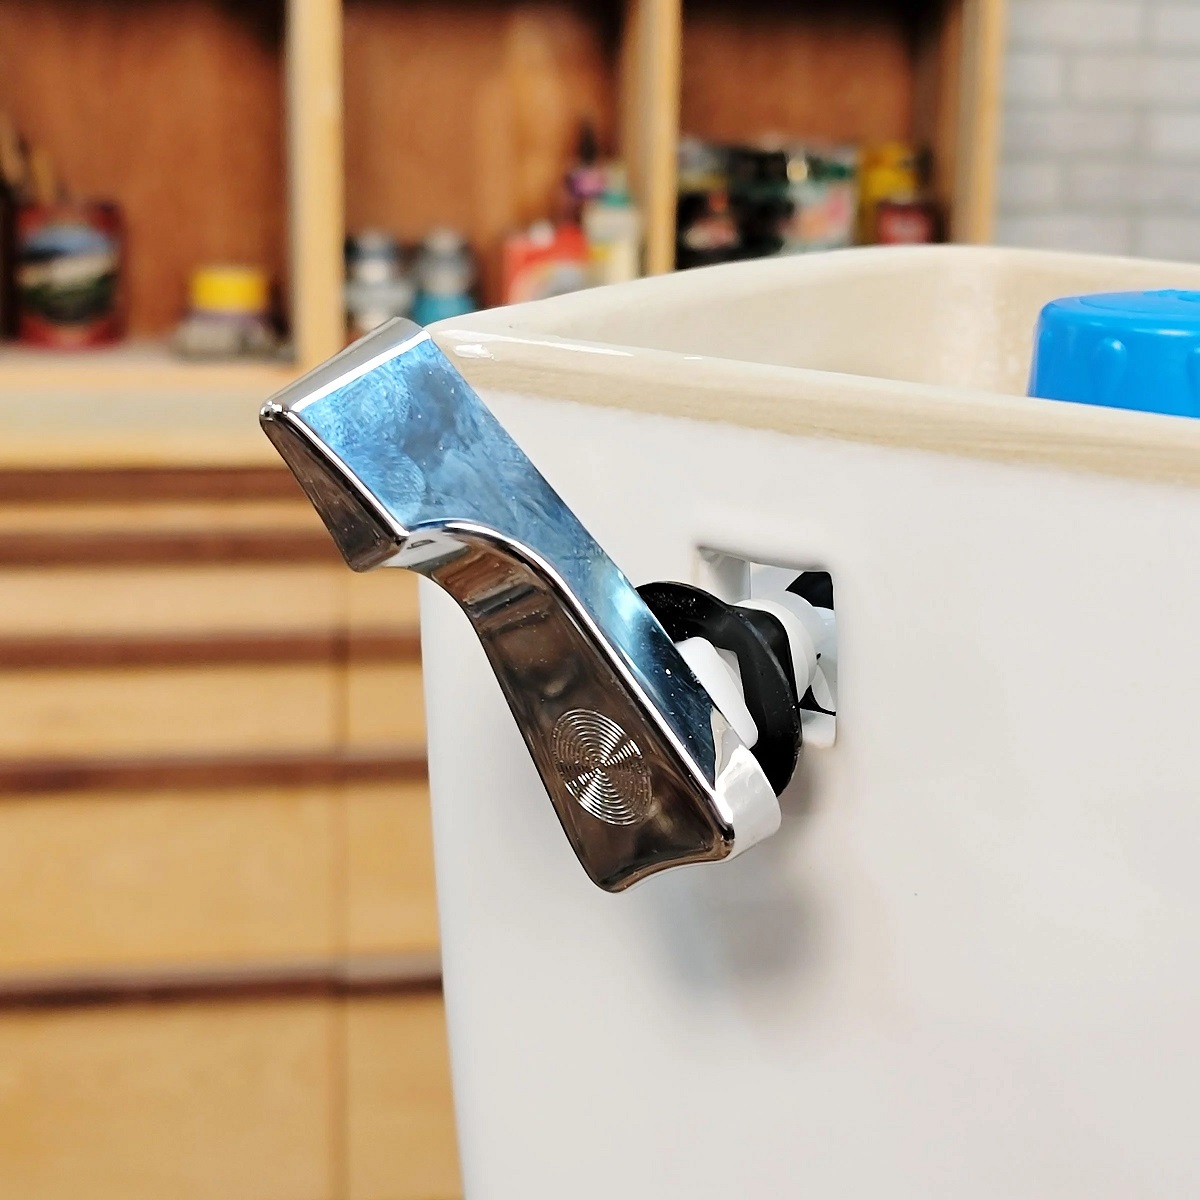
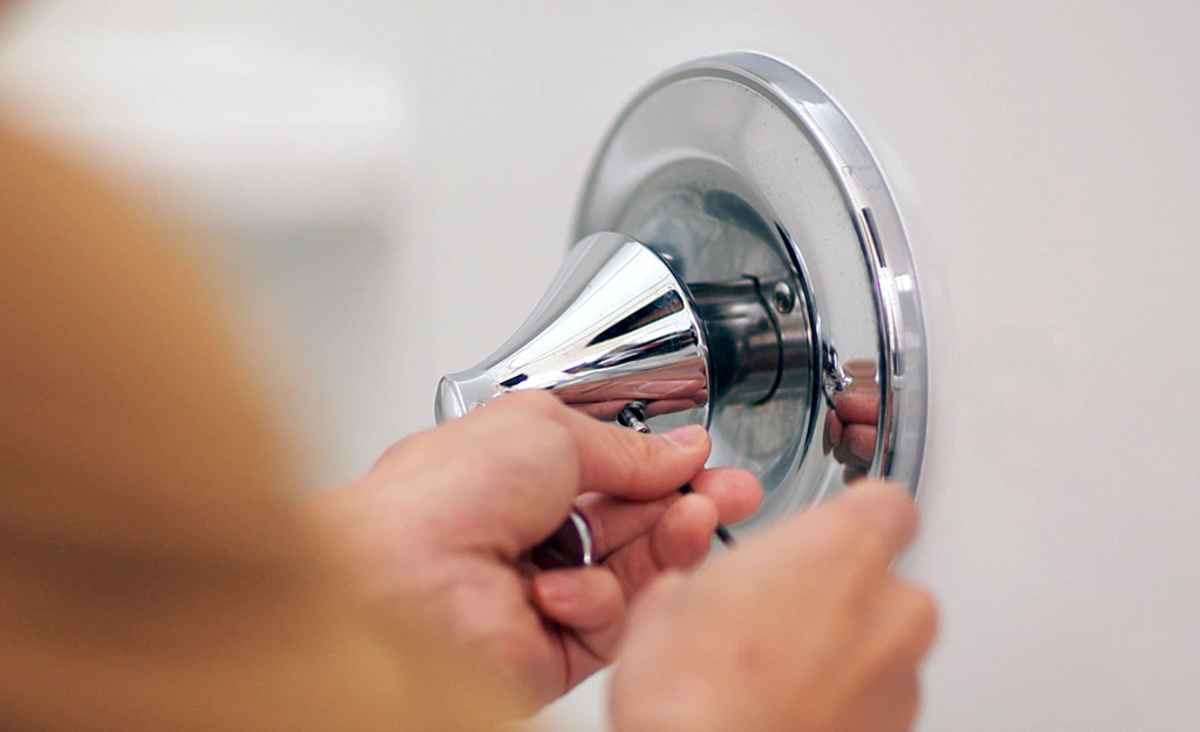
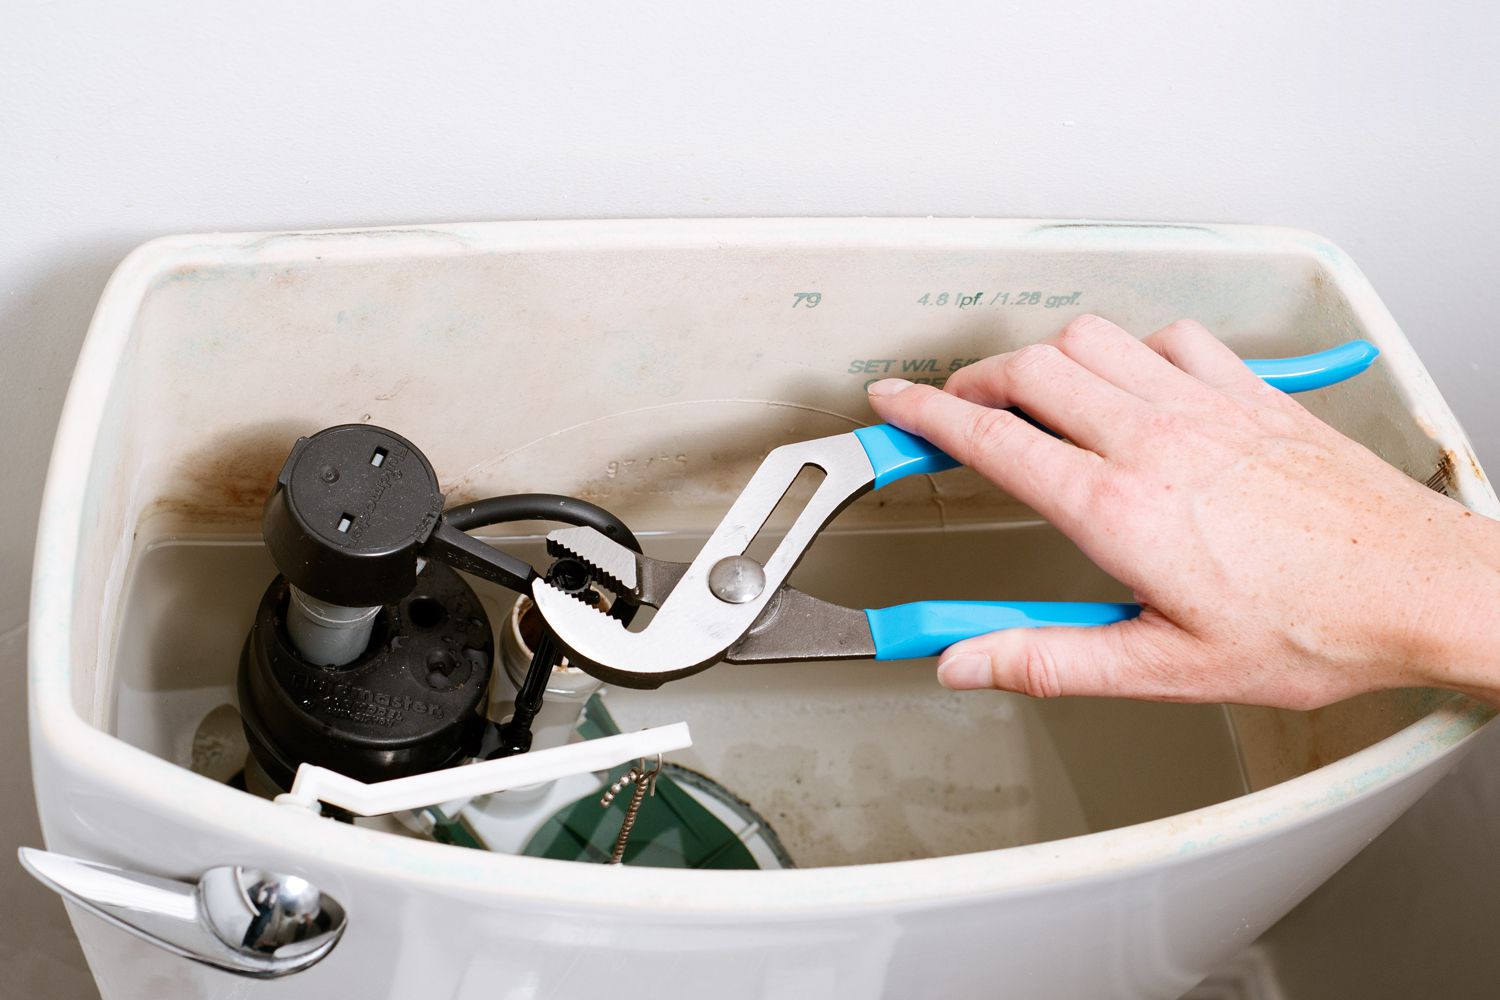
Step 4: Remove the Old Handle
With the tank lid removed, you can now focus on removing the old toilet handle. The handle is typically held in place by a nut or bolt near the inside of the tank.
Locate the nut or bolt that secures the handle to the toilet tank. Using an adjustable wrench or a pair of pliers, loosen the nut or bolt by turning it counterclockwise. Be gentle and avoid using excessive force to prevent stripping or damaging the threads.
Once the nut or bolt is sufficiently loosened, you can remove it along with the old handle from the tank. Carefully lift the handle out of the mounting hole, ensuring that you don’t drop any components into the tank.
Place the old handle aside, and take a moment to inspect it for any signs of damage or wear. If the handle appears broken or corroded, it’s a good idea to replace it with a new one. A damaged handle can affect the smooth operation of your toilet and may need to be replaced periodically.
Now that you have removed the old handle, you are ready to install the new handle, which we will cover in the next step.
If the toilet handle is loose or not working properly, try tightening the mounting nut inside the tank. If that doesn’t work, you may need to replace the handle or the entire flush mechanism.
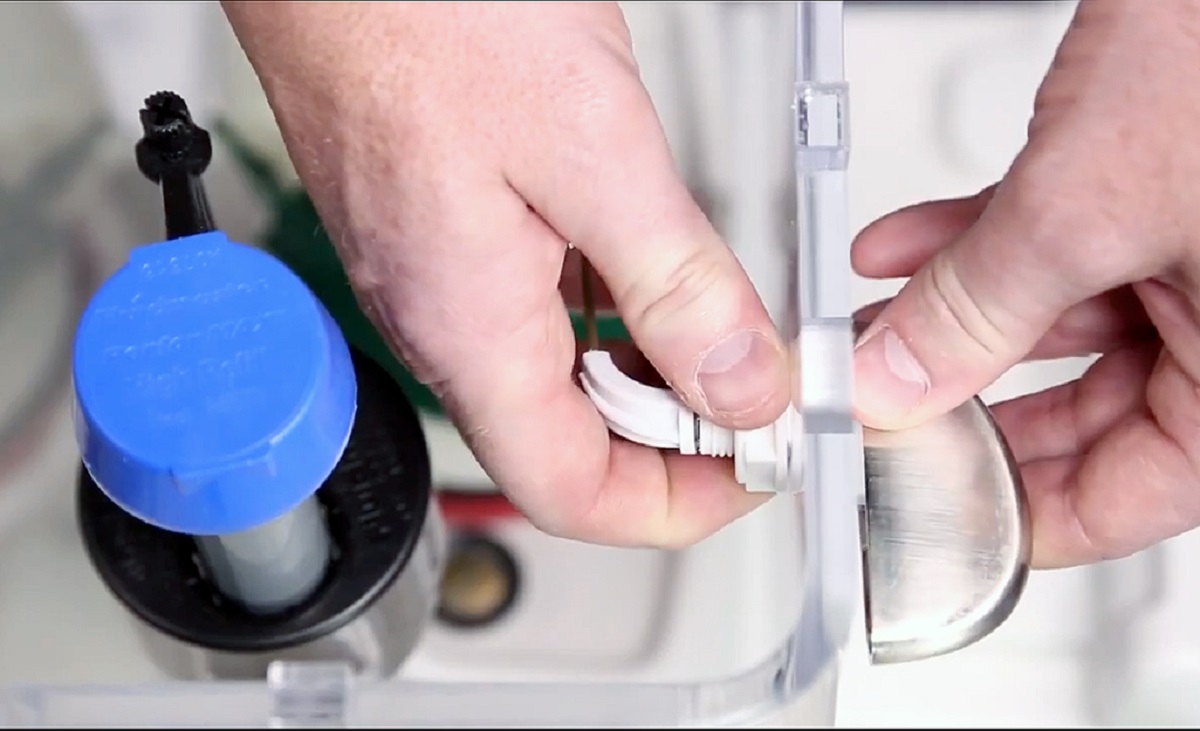
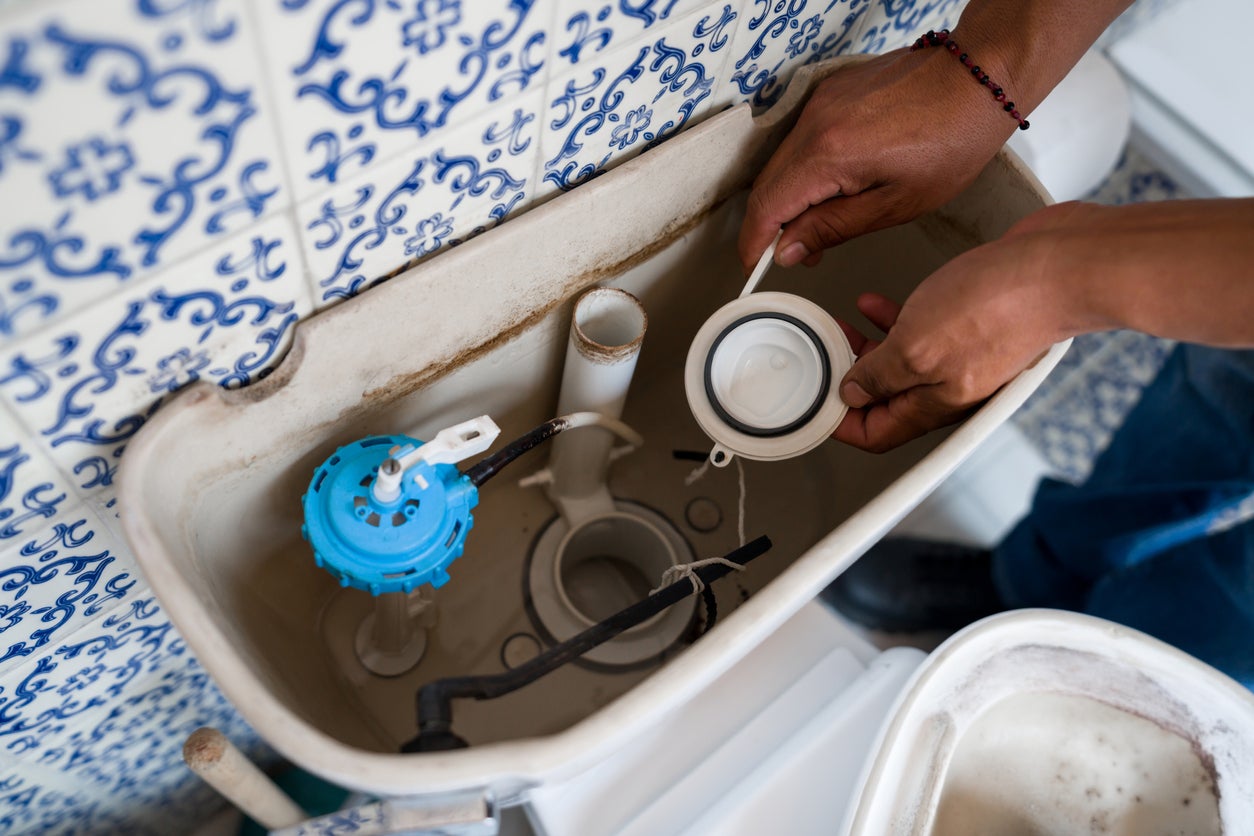
Step 5: Install the New Handle
Now that you have removed the old handle, it’s time to install the new one. Installing a new toilet handle is relatively straightforward and can be done in just a few simple steps.
Begin by taking the new handle and aligning it with the mounting hole in the toilet tank. Make sure the handle is facing the correct direction, as indicated by the manufacturer’s instructions or previous handle position.
Insert the threaded end of the handle into the mounting hole, ensuring a secure fit. Take note of any rubber or plastic gaskets that may come with the new handle, as these can help provide a tight seal and prevent leakage.
Once the handle is in place, secure it using the provided nut or bolt. Use an adjustable wrench or pliers to tighten the nut or bolt clockwise until it is snug but not overly tight. Be careful not to overtighten, as this can cause damage to the handle or the toilet tank.
With the new handle securely installed, give it a quick test to ensure that it moves freely and without any resistance. This step will help you verify that the handle functions properly before proceeding to the next steps.
Now that the new handle is installed, you can move on to adjusting the chain or flush lever, which we will cover in step six.
Step 6: Adjust the Chain or Flush Lever
After installing the new toilet handle, you may need to adjust the chain or flush lever to ensure proper operation. This step is important to ensure that the handle can effectively lift the flapper or flush valve to initiate the flushing process.
If your toilet handle has a chain that connects to the flush valve, check if the chain is properly aligned and has the right amount of slack. If the chain is too loose, it may prevent the flapper from fully opening, resulting in weak or incomplete flushing. On the other hand, if the chain is too tight, it can interfere with the proper function of the handle and may cause it to stick or feel resistant.
To adjust the chain, simply loosen or tighten the chain’s connection to the flush lever. This can usually be done by sliding the chain up or down on the lever’s hook or by using a pair of pliers to detach and reattach the chain at a different link. Make sure to leave a small amount of slack in the chain to allow for smooth movement of the handle.
If your toilet handle uses a flush lever instead of a chain, check if the lever is properly positioned and aligned with the flapper or flush valve. The lever should be able to lift the flapper without any obstructions or resistance. Adjust the lever’s position if necessary by loosening the nut or bolt that holds it in place and repositioning it to align with the flapper.
Once you have made the necessary adjustments to the chain or flush lever, test the handle by pressing and releasing it. Ensure that the flapper or flush valve lifts and closes smoothly, allowing a full and powerful flush.
If the handle operates smoothly and the flushing mechanism is functioning properly, you can proceed to the next step of reassembling the tank.
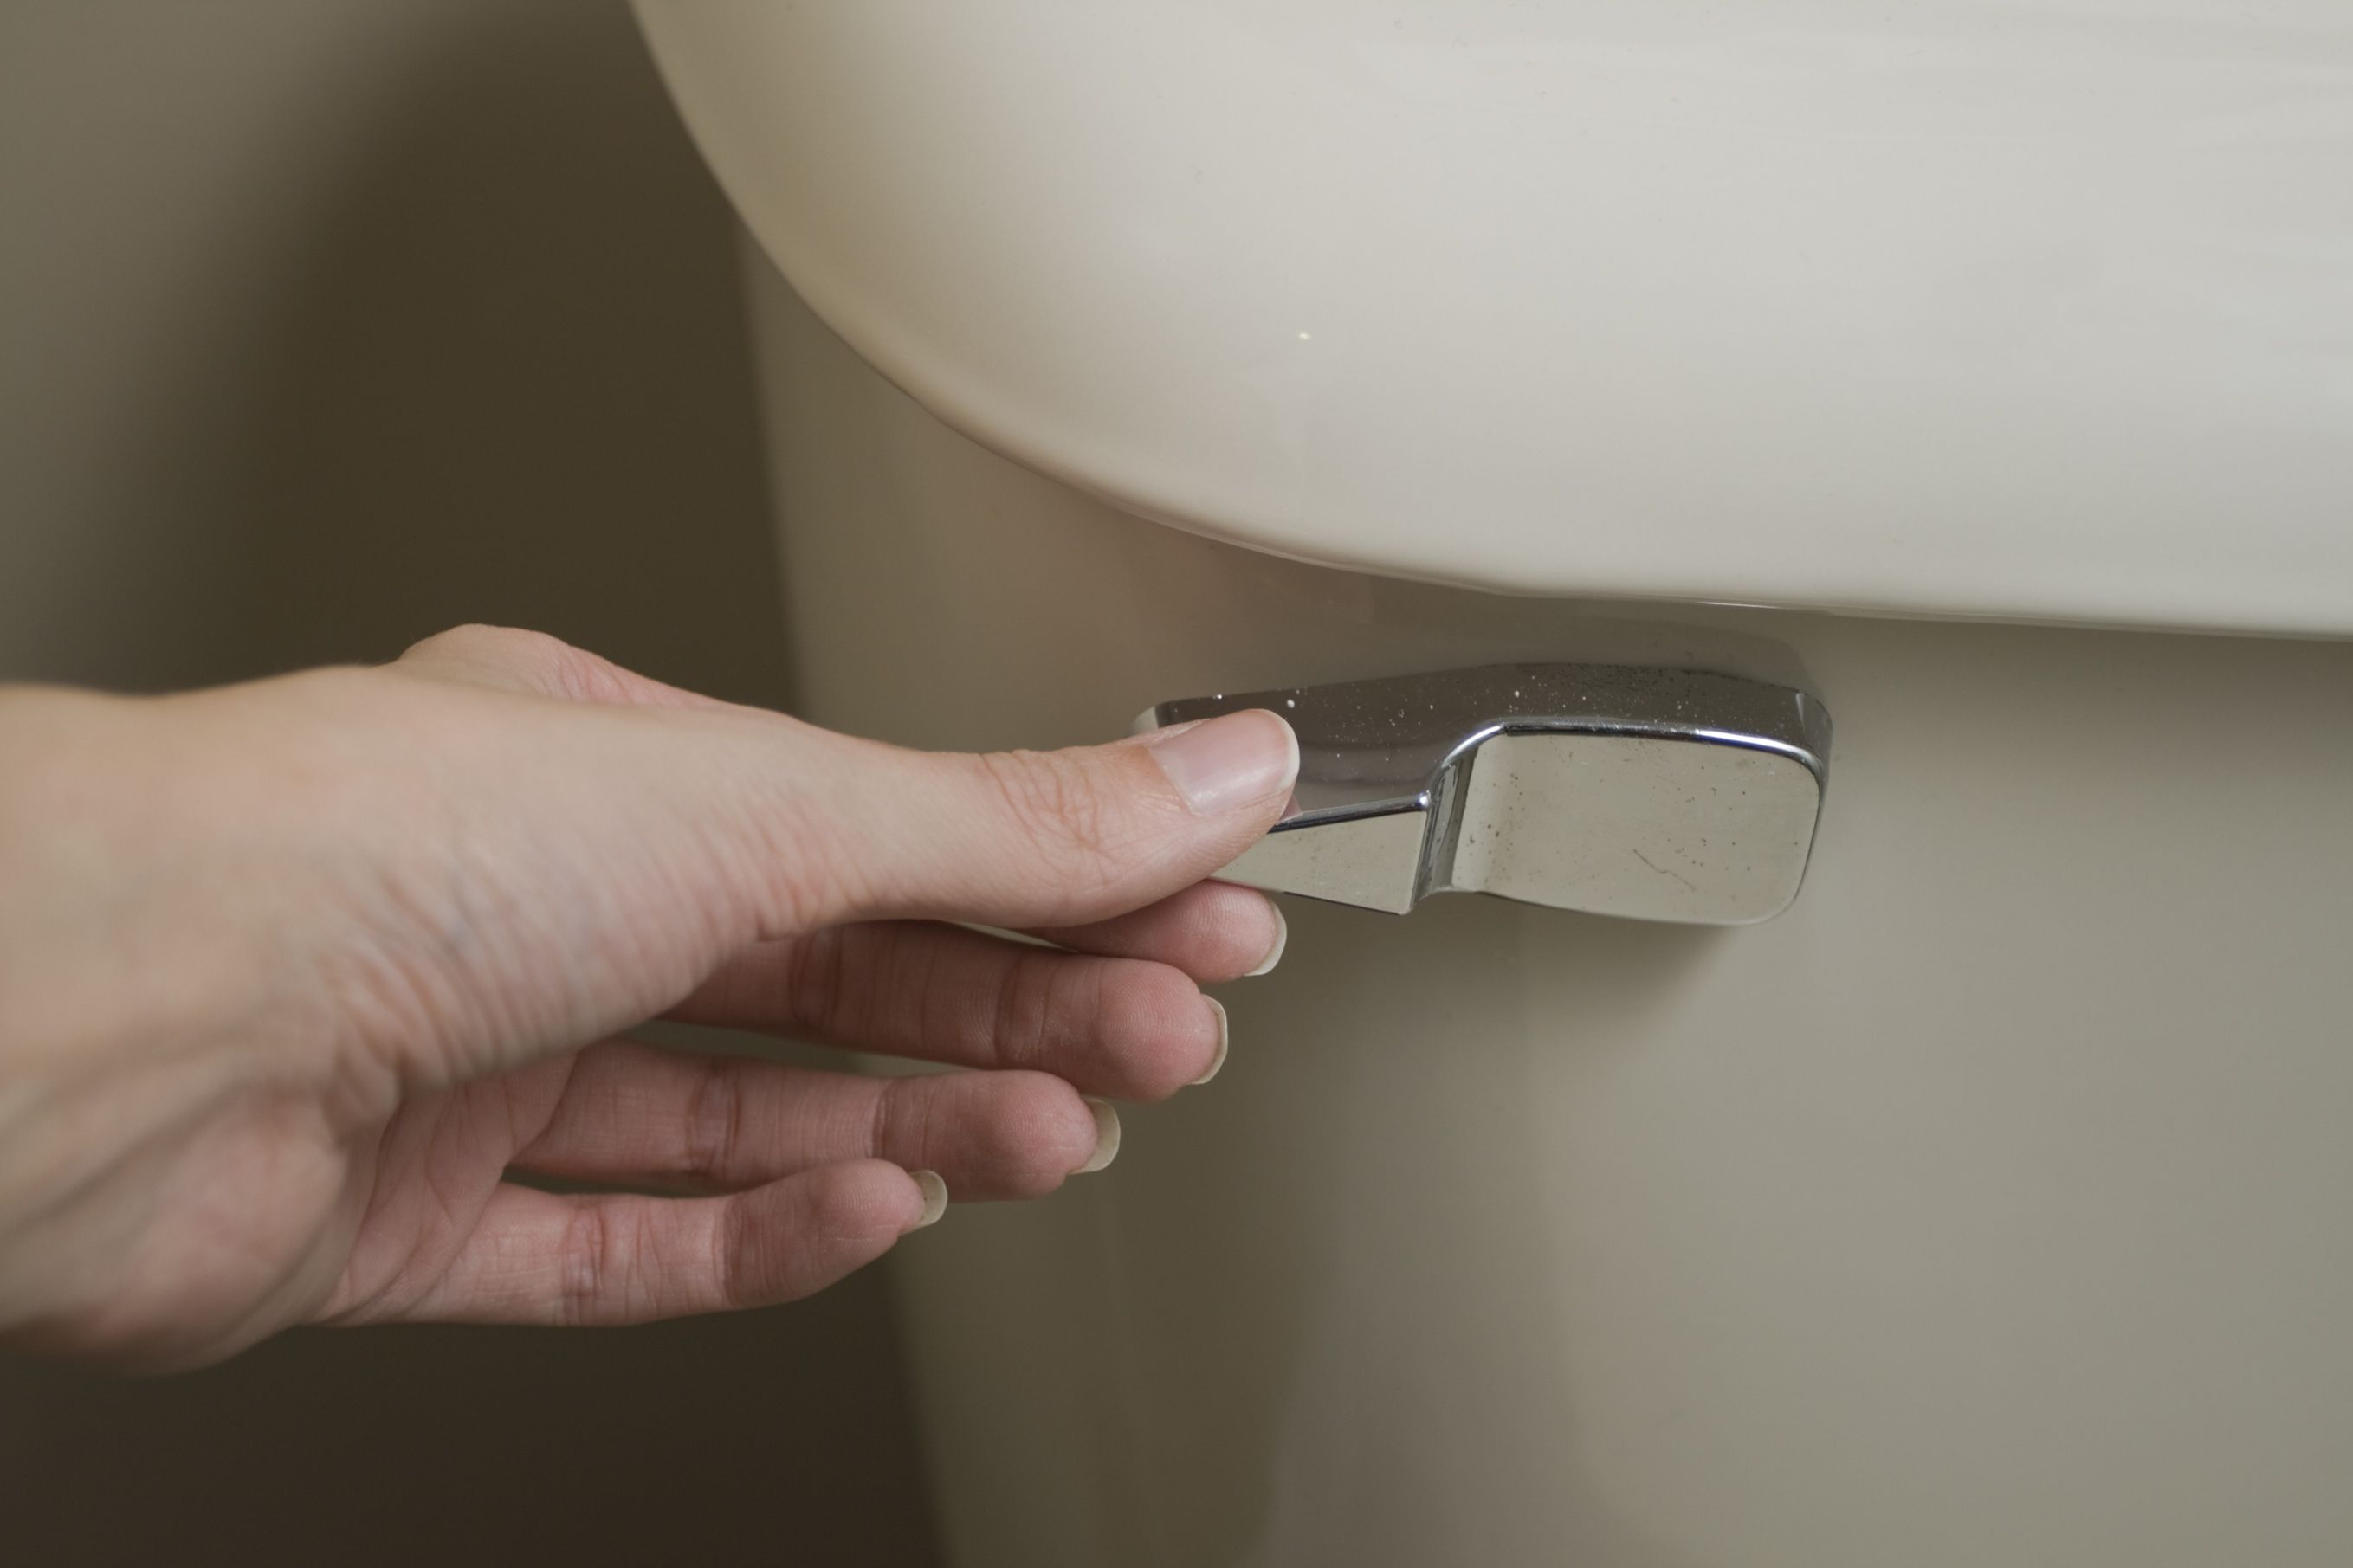
Step 7: Test the Handle
After adjusting the chain or flush lever, it’s important to test the newly installed toilet handle to ensure that it is working correctly. Testing the handle will allow you to verify that the flushing mechanism operates smoothly and effectively.
To test the handle, simply push it down as you would when flushing the toilet. Observe the flushing process to ensure that the flapper or flush valve lifts fully, allowing water to rush into the toilet bowl and create a strong, efficient flush.
If the handle feels smooth and the flushing process occurs without any issues, congratulations! You have successfully installed and tested the new toilet handle. Your toilet should now be functioning properly, providing reliable flushing whenever needed.
If, however, you encounter any problems during the testing process, such as a weak flush, slow refill, or other irregularities, you may need to revisit the previous steps to troubleshoot the issue. Check if the handle is properly aligned, the chain or flush lever are adjusted correctly, or if there are any other components that may need further inspection or replacement.
Remember, each toilet may have unique characteristics, so it’s essential to follow the manufacturer’s instructions and guidelines specific to your toilet model for the best results. Additionally, if you encounter any difficulties or complex issues, it is recommended to seek the help of a professional plumber for expert assistance.
Once you have confirmed that the handle is working as intended, you can proceed to the final step of reassembling the toilet tank.
Read more: How To Fix A Stripped Faucet Handle
Step 8: Reassemble the Tank
With the toilet handle successfully installed and tested, it’s time to reassemble the tank to complete the repair process. Follow these steps to ensure the tank is securely and properly put back together.
First, place the tank lid back onto the tank. Carefully position it so that it aligns with the openings and sits snugly on top. Gently lower it into place, taking care not to damage the lid or any components inside the tank.
Next, check that the lid is centered and level on the tank. Adjust the position if necessary to ensure a proper fit and an aesthetically pleasing appearance. Make sure any rubber or foam gaskets between the lid and the tank are in place and provide a tight seal.
Tighten any screws or bolts on the tank lid, but again, be cautious not to overtighten and risk damaging the lid or the tank.
Once the lid is securely in place, it’s time to turn the water supply back on. Locate the water shut-off valve and turn it counterclockwise to open the valve and allow water to fill the tank.
Observe the tank as it fills with water. Listen for any signs of leaks or unusual noises, and visually inspect the connections and components for any signs of water seepage or drips. If you notice any issues, turn off the water supply again and make the necessary adjustments or repairs. If everything looks good, proceed to the final step.
Lastly, give the toilet handle one more test by flushing the toilet. Ensure that the handle operates smoothly, the flapper or flush valve lifts fully, and that the tank refills properly after flushing. If everything is working correctly, congratulations! You have successfully reassembled the tank and completed the repair.
Take a moment to admire your handiwork, knowing that you have successfully fixed the toilet handle and restored functionality to your bathroom. A properly functioning toilet handle is essential for maintaining a clean and sanitary bathroom environment.
If you encountered any difficulties or were unable to resolve the issue with the toilet handle, it’s recommended to consult a professional plumber for further assistance. They will have the expertise and experience to diagnose and resolve complex toilet handle problems.
By following these steps and being proactive in maintaining your toilet handle, you can ensure a smooth and effortless flushing experience for years to come.
Conclusion
Fixing a toilet handle is a simple and rewarding DIY project that can save you time and money. By following the step-by-step process outlined in this article, you can successfully repair a loose, stuck, or non-functional toilet handle.
Remember, the toilet handle is a crucial component of the flushing mechanism, allowing you to efficiently flush away waste and maintain a clean and hygienic bathroom. By properly maintaining and addressing any issues with the handle, you can ensure the smooth operation of your toilet for years to come.
Throughout the repair process, we discussed the importance of identifying the issue, shutting off the water supply, removing the tank lid, replacing the old handle with a new one, adjusting the chain or flush lever, testing the handle’s functionality, and reassembling the tank. Each step is vital in ensuring a successful repair and restoring the proper function of your toilet handle.
While it’s essential to follow the guidelines outlined in this article, it’s important to remember that each toilet may have specific characteristics and requirements. Always consult the manufacturer’s instructions and guidelines specific to your toilet model for the best results.
If you encounter any difficulties or are unsure about any steps in the repair process, don’t hesitate to seek the help of a professional plumber. They have the expertise and knowledge to tackle complex issues and provide the best solutions.
By taking the time to fix a toilet handle, you can avoid potential disruptions and inconveniences, ensuring a smoothly functioning bathroom. So, grab your tools, follow the steps outlined in this article, and confidently tackle the repair of your toilet handle.
Remember, a well-functioning toilet handle is not only important for your convenience, but it also contributes to a cleaner and more enjoyable bathroom experience for you and your family.
Frequently Asked Questions about How To Fix A Toilet Handle
Was this page helpful?
At Storables.com, we guarantee accurate and reliable information. Our content, validated by Expert Board Contributors, is crafted following stringent Editorial Policies. We're committed to providing you with well-researched, expert-backed insights for all your informational needs.


0 thoughts on “How To Fix A Toilet Handle”