Articles
How To Install Ceiling Molding
Modified: January 23, 2024
Learn the step-by-step process of installing ceiling molding with our comprehensive articles. Enhance the look of your space with this elegant and timeless home improvement project.
(Many of the links in this article redirect to a specific reviewed product. Your purchase of these products through affiliate links helps to generate commission for Storables.com, at no extra cost. Learn more)
Introduction
Adding ceiling molding is a fantastic way to enhance the visual appeal and elegance of any room. Whether you are looking to create a classic, traditional look or a modern, stylish atmosphere, ceiling molding can provide the finishing touch that ties the entire room together.
In this article, we will guide you through the step-by-step process of installing ceiling molding. From measuring the ceiling to sanding and painting the molding, we will cover all the necessary details to ensure a successful installation.
Before we begin, it’s important to gather all the materials needed for the project. This will help streamline the installation process and ensure you have everything at your disposal. Let’s take a look at the materials you’ll need.
Key Takeaways:
- Elevate the aesthetic appeal of any room by following our comprehensive guide to installing ceiling molding. From measuring and cutting to filling gaps and painting, achieve a professional finish with precision and patience.
- Embrace the opportunity to enhance your living space with the timeless elegance of ceiling molding. Follow our step-by-step instructions to create a visually captivating and polished addition to your home.
Materials Needed
Before you start the installation process, gather the following materials to ensure a smooth and efficient project:
- Ceiling Molding: Choose the style and length of molding that suits your design preferences. Measure the length of the walls to determine how much molding you will need.
- Saw: A miter saw or a coping saw will be necessary for cutting the molding to the correct size and angles.
- Measuring Tape: Accurate measurements are essential for a precise installation. Use a measuring tape to measure the length and height of the walls and the dimensions of the room.
- Pencil: Use a pencil to mark the measurements and cutting lines on the molding.
- Level: A level will ensure that the molding is installed straight and even.
- Nails or Adhesive: Depending on the type of molding and your personal preference, you may need nails or adhesive to attach the molding to the ceiling.
- Hammer: If you are using nails, a hammer will be necessary for driving them into place.
- Spackle or Wood Filler: This will be used to fill any gaps or nail holes in the molding.
- Sandpaper: Sandpaper will be needed to smooth out any rough edges or imperfections in the molding.
- Primer and Paint: Once the molding is installed and filled, you will need primer and paint to finish the project and achieve the desired look.
Gather these materials before starting the installation process to ensure a seamless and efficient project. Now that you have everything you need, let’s move on to the first step: measuring the ceiling.
Step 1: Measure the Ceiling
Before you can begin installing the ceiling molding, you need to accurately measure the dimensions of the ceiling. This step is crucial for determining the amount of molding you will need and ensuring a precise installation.
Here is how you can measure the ceiling:
- Start by measuring the length of each wall in the room. Use a measuring tape and record the measurements.
- Next, measure the height of the walls from the floor to the ceiling.
- Take note of any obstacles on the walls, such as windows, doors, or light fixtures. These will require special attention when installing the molding.
- Add up the measurements of the wall lengths to determine the total length of molding needed. It’s always a good idea to purchase a little extra to account for any mistakes or miscalculations.
Once you have measured the ceiling and determined the amount of molding needed, you are ready to move on to the next step: choosing the right molding for your project.
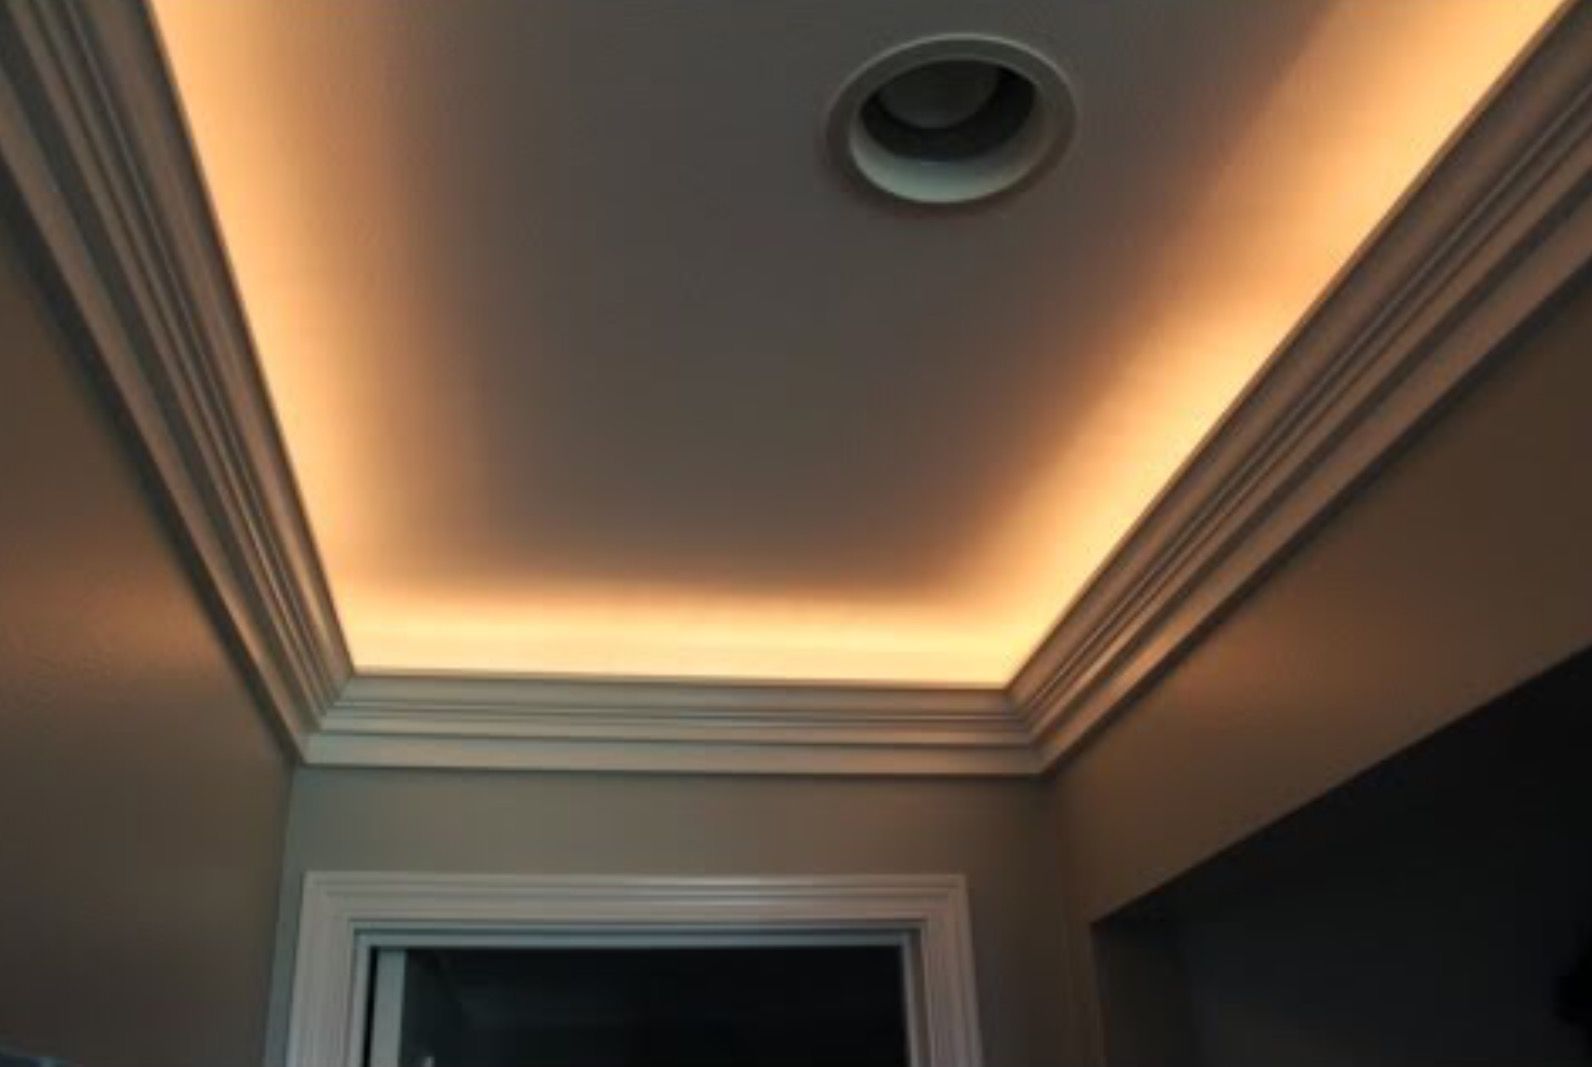
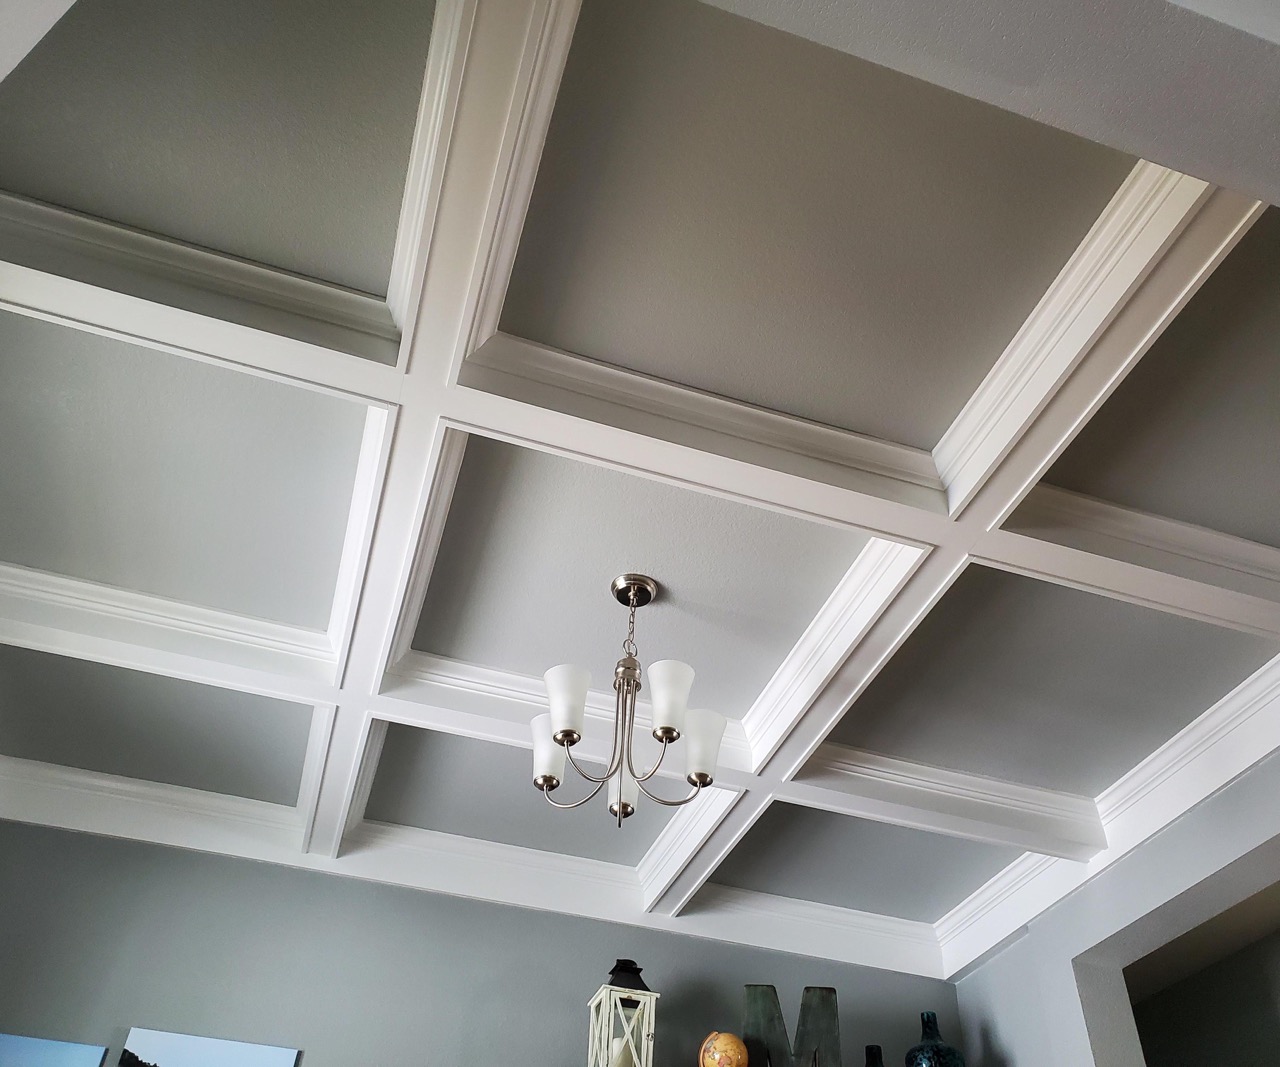
Step 2: Choose the Right Molding
Choosing the right molding is essential for achieving the desired aesthetic and style for your room. There are various types, styles, and sizes of molding available, each offering a distinct look and feel. Here’s how you can select the right molding for your project:
- Consider the Room: Think about the overall style and atmosphere you want to create in the room. For a traditional look, you may opt for crown molding with intricate designs and details. If you prefer a more modern and minimalistic style, simple and clean-lined molding may be the better choice.
- Take Room Size into Account: The size of the room can also play a role in selecting the appropriate molding. In larger rooms with higher ceilings, wider and more elaborate molding can make a statement, while smaller rooms may benefit from narrower molding to maintain a sense of proportion.
- Consider Ceiling Height: The height of the ceiling can also influence your molding choice. Higher ceilings can accommodate taller molding, while lower ceilings may require shorter and more subtle options.
- Coordinate with Existing Trim: If you have existing trim or baseboards in the room, it’s important to choose molding that complements and coordinates with them. This will create a cohesive and unified look throughout the space.
- Visualize the End Result: It can be helpful to visualize how the chosen molding will look once installed. Look for samples or photos of similar installations to get a sense of the final outcome.
By considering the style, size, room dimensions, and coordination with existing elements, you can choose the right molding that will enhance the overall aesthetic of your room. Once you have selected the molding, it’s time to move on to the next step: preparing the ceiling surface for installation.
Step 3: Prepare the Ceiling Surface
Before you begin installing the molding, it is important to properly prepare the ceiling surface. This step ensures that the molding adheres securely and provides a smooth and finished look. Here are the essential steps to prepare the ceiling surface:
- Clean the Ceiling: Start by cleaning the ceiling to remove any dust, dirt, or debris. Use a duster or a damp cloth to wipe the surface, ensuring it is free from any obstacles that could affect the installation process.
- Fill Any Cracks or Holes: Inspect the ceiling for any cracks, holes, or imperfections. If you find any, use a spackle or wood filler to fill them in. Smooth out the filler with a putty knife and allow it to dry completely. Sand the filled areas to ensure a seamless surface.
- Sand the Ceiling: It is essential to sand the entire ceiling, even if there are no visible imperfections. Sanding helps to create a smooth and uniform surface for the molding. Use fine-grit sandpaper and sand in gentle, circular motions. Be sure to wipe away any dust after sanding.
- Apply Primer: Before installing the molding, consider applying a coat of primer to the ceiling. Primer helps to create a better adhesion surface and improve the final finish. Follow the manufacturer’s instructions for proper application and drying time.
Preparing the ceiling surface ensures a clean and even base for the molding installation. Taking the time to complete these steps will ensure a professional-looking result. Once the ceiling surface is prepared, you can move on to the next step: cutting the molding to the correct size.
When installing ceiling molding, make sure to measure and cut the pieces accurately to ensure a seamless fit. Use a miter saw for precise angles and adhesive to secure the molding in place.
Step 4: Cut the Molding
Now that the ceiling surface is prepared, it’s time to cut the molding to the correct size and angles. Cutting the molding accurately is essential for a seamless installation. Here’s how you can cut the molding:
- Measure and Mark: Begin by measuring the length needed for your first piece of molding. Use a measuring tape and mark the measurement on the molding with a pencil. Repeat this step for each piece of molding you will be installing.
- Set the Cutting Angle: Most ceiling moldings require angled cuts to ensure a precise fit at corners and along the walls. Determine the angle needed for your moldings, which is typically 45 degrees for corners. Set the miter saw or coping saw to the correct angle.
- Cut the Molding: Place the molding securely on the miter saw or coping saw, aligning the mark with the cutting guide. Slowly and carefully cut along the marked line to create the desired angle. Double-check the accuracy of the cut before moving on to the next piece of molding.
- Cope the Inner Corners: If you have inner corners in your room, coping is a technique used to ensure a tight and seamless fit. Use a coping saw to cut along the profile of the molding, allowing it to fit snugly against the adjacent piece. Take your time and practice this technique if you are new to coping.
Remember to take precise measurements and double-check your cuts to ensure a proper fit. It’s always better to measure twice and cut once to avoid any waste or mistakes. Once all the moldings are cut to size, you are ready to move on to the next step: installing the molding.
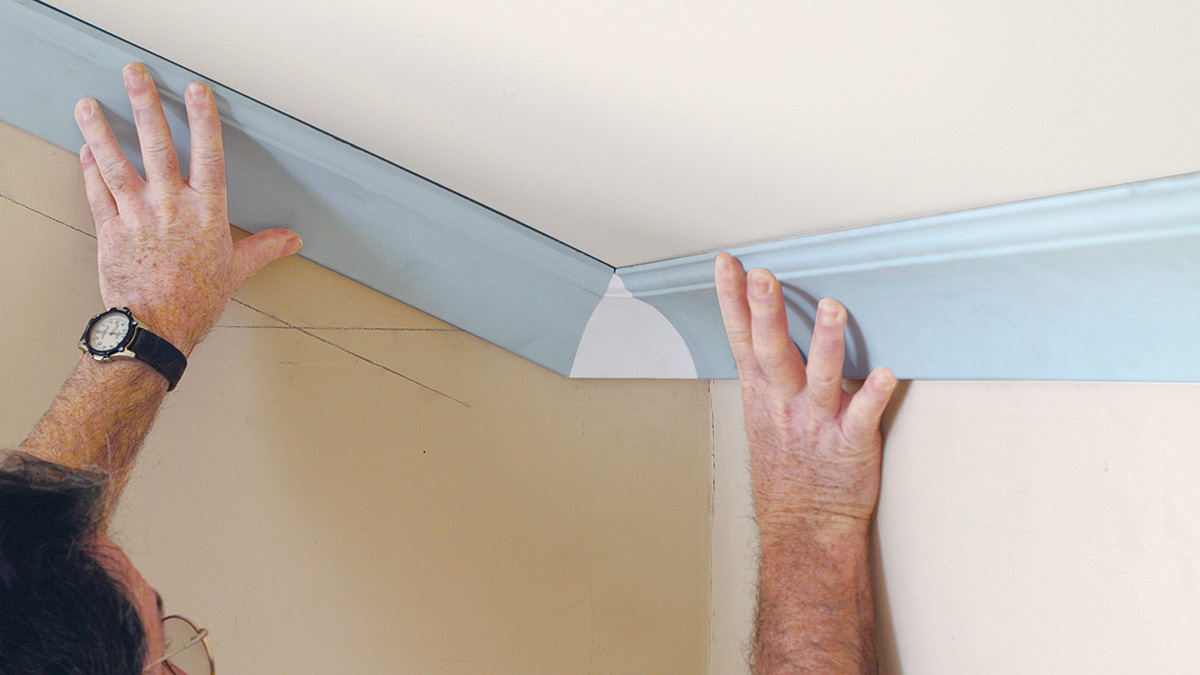
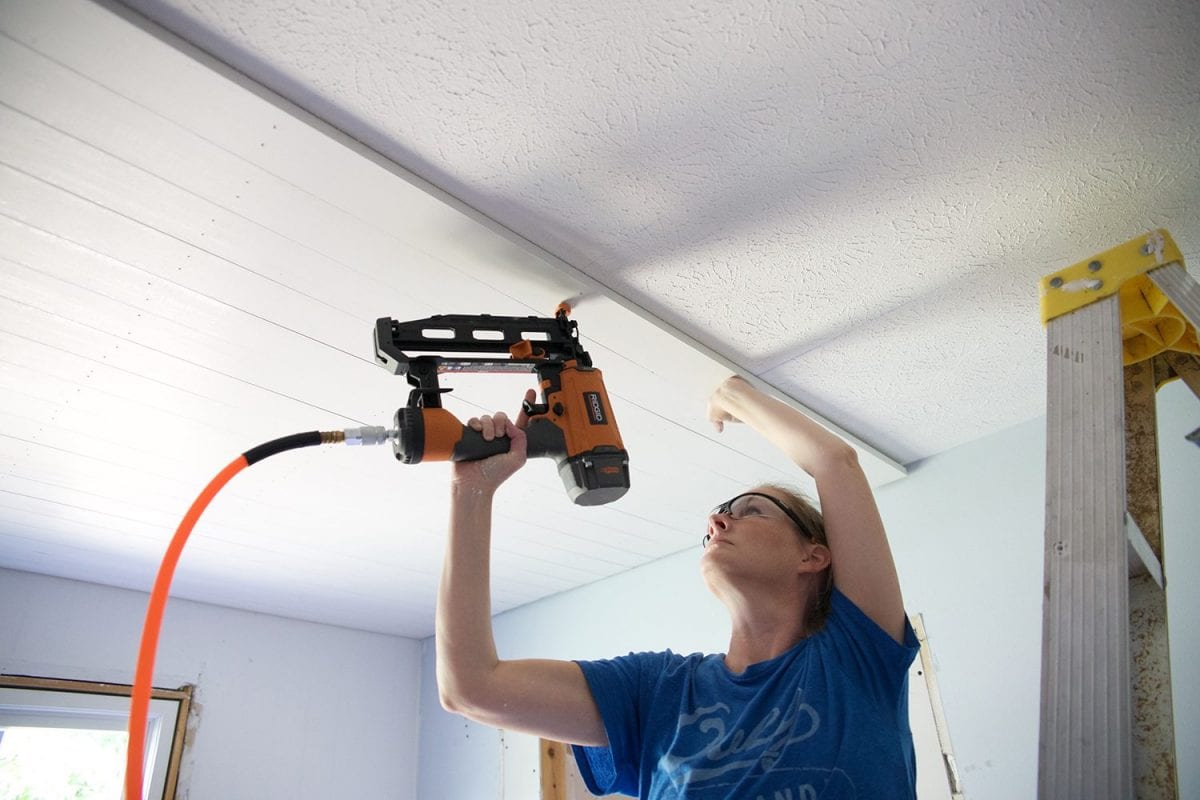
Step 5: Install the Molding
Now that you have cut the molding to the correct size and angles, it’s time to install it on the ceiling. Follow these steps to ensure a proper and secure installation:
- Start with the First Piece: Begin by installing the first piece of molding along one of the walls. Apply a thin line of adhesive along the back of the molding or pre-drill holes for nails, depending on the type of molding you are using. Hold the molding in place and gently press it against the ceiling.
- Secure the Molding: Once the first piece is in place, secure it by nailing it into the ceiling or pressing it firmly against the adhesive. Use a level to ensure the molding is straight and aligned with the wall.
- Continue with the Remaining Pieces: Move along the walls, installing the remaining pieces of molding one by one. Be sure to miter the corners for a seamless and professional look. Use a miter saw or coping saw to cut the angles and ensure a tight fit at corners.
- Adjustments and Trimming: In some cases, you may need to make slight adjustments or trim the moldings to fit certain areas, such as around light fixtures or vents. Take your time to measure and cut these pieces accurately for a clean installation.
- Overlap the Ends: When you reach the end of a wall, cut the molding to fit and overlap the end of the previous piece. This creates a seamless transition and a polished appearance.
Throughout the installation process, periodically step back and assess the alignment and overall look of the molding. Make any necessary adjustments or corrections as you go along to ensure a professional finish.
Once all the pieces of molding are installed, it’s time to move on to the next step: filling any gaps or nail holes.
Step 6: Fill Any Gaps or Nail Holes
After installing the molding, you may notice small gaps between the molding and the ceiling or walls, as well as nail holes from securing the molding in place. It’s important to fill these imperfections to achieve a seamless and professional-looking finish. Follow these steps to fill any gaps or nail holes:
- Clean the Moldings: Before filling any gaps or holes, clean the moldings to remove any dirt or debris that may interfere with the filling process. Use a soft cloth or brush to gently clean the surface of the moldings.
- Select the Filling Material: Choose an appropriate filling material based on the type of molding and its finish. For painted moldings, spackle or joint compound can be used. For stained or natural wood moldings, a wood filler that matches the color can be used.
- Apply the Filling Material: Use a putty knife or a small spatula to apply the filling material into the gaps or nail holes. Press the filler firmly into the voids, ensuring it completely fills the space. Smooth out the excess filler with the putty knife.
- Allow the Filler to Dry: Follow the manufacturer’s instructions for the drying time of the filling material. It’s important to allow the filler to fully dry and harden before moving on to the next step.
- Sand the Filled Areas: Once the filling material is dry, lightly sand the filled areas with sandpaper. This helps to achieve a smooth finish and blend the filled areas with the surrounding moldings.
By filling gaps and nail holes, you ensure that the molding appears seamless and professionally installed. Take your time with this step, as it contributes to the overall aesthetics of the room.
Now that the gaps and nail holes have been filled, it’s time to move on to the next step: sanding and painting the molding.
Step 7: Sand and Paint the Molding
After the molding installation is complete and any gaps or nail holes have been filled, it’s time to sand and paint the molding. This final step adds the finishing touch and ensures a polished and cohesive look. Follow these steps to sand and paint the molding:
- Sand the Molding: Use fine-grit sandpaper to gently sand the surface of the molding. This helps to smooth out any rough edges, imperfections, or residue from the filling material. Sand in the direction of the grain for wood molding or in smooth, even strokes for painted or composite molding. Wipe away any dust after sanding.
- Apply Primer: Applying a coat of primer to the molding helps to create a smooth and even base for the paint. Use a brush or a roller to apply a thin, even layer of primer. Allow it to dry completely according to the manufacturer’s instructions.
- Paint the Molding: Once the primer is dry, it’s time to paint the molding in your desired color. Use a brush or a roller to apply a thin and even coat of paint. Pay attention to any intricate details or edges of the molding to ensure thorough coverage. Allow the paint to dry between coats, and apply additional coats as needed for a consistent finish.
- Clean Up: After painting the molding, clean up any spills or drips immediately to avoid unwanted marks or streaks. Remove any painter’s tape or protective coverings carefully to avoid damaging the newly painted surface.
Once the paint has dried completely, step back and admire your newly installed and beautifully painted ceiling molding. The sanding and painting process adds the final touch, transforming the molding into a seamless and cohesive part of the room’s design.
Congratulations! You have successfully completed the installation of ceiling molding and achieved a stunning result. Take a moment to appreciate the enhanced aesthetic appeal and the added charm that the molding brings to your space.
Remember, installing ceiling molding requires precision, patience, and attention to detail. By following these step-by-step instructions, you can create a professional-looking installation that elevates the style and sophistication of your room.
We hope this guide has been helpful to you in your ceiling molding installation project. Enjoy your newly transformed space!
Wrap up the article by using a concluding statement and wrapping it up by
.
Read more: How To Clean Ceilings And Moldings
Conclusion
Ceiling molding is a wonderful way to add elegance, charm, and architectural interest to any room. By following the step-by-step instructions in this guide, you can successfully install and create a stunning finish that enhances the overall aesthetic appeal of your space.
From measuring the ceiling and choosing the right molding to preparing the surface, cutting the molding, and installing it with precision, each step plays a crucial role in achieving a professional-looking result. By paying attention to detail and taking your time throughout the process, you can ensure a seamless and cohesive installation.
Additionally, filling any gaps or nail holes, as well as sanding and painting the molding, add the final touch that brings the project together. These finishing steps help create a polished and refined appearance that transforms the molding into a visually captivating element of the room’s design.
Remember, patience and precision are key when installing ceiling molding. Take the time to measure accurately, make precise cuts, and secure the molding properly. By following these guidelines, you can create a beautiful and timeless addition to your home.
Now that you have the knowledge and the steps to install ceiling molding, it’s time to put your skills to work. Embrace the opportunity to enhance your living space and enjoy the elevated beauty and sophistication that ceiling molding brings to your room.
Thank you for reading this guide, and we wish you success in your ceiling molding installation project!
Frequently Asked Questions about How To Install Ceiling Molding
Was this page helpful?
At Storables.com, we guarantee accurate and reliable information. Our content, validated by Expert Board Contributors, is crafted following stringent Editorial Policies. We're committed to providing you with well-researched, expert-backed insights for all your informational needs.


0 thoughts on “How To Install Ceiling Molding”