Home>Furniture>How To Install A Chandelier In A High Ceiling

Furniture
How To Install A Chandelier In A High Ceiling
Modified: October 20, 2024
Learn how to install a chandelier in a high ceiling with our step-by-step guide. Elevate your furniture and add a touch of elegance to your space.
(Many of the links in this article redirect to a specific reviewed product. Your purchase of these products through affiliate links helps to generate commission for Storables.com, at no extra cost. Learn more)
Introduction
Welcome to our guide on how to install a chandelier in a high ceiling! Chandeliers are elegant and stylish lighting fixtures that can instantly elevate the ambiance of any room. However, when it comes to installing a chandelier in a high ceiling, there are a few extra steps and considerations to keep in mind. In this article, we will walk you through the process step-by-step, ensuring a successful and safe installation.
Installing a chandelier in a high ceiling can be a bit more challenging compared to a standard ceiling height. The added height requires careful planning and proper execution to ensure both functionality and aesthetics. By following this guide, you will be well-equipped to tackle the installation with confidence, creating a stunning focal point in your space.
Before diving into the installation process, it’s essential to take accurate measurements, choose the right size chandelier, gather the necessary tools and equipment, and make sure you turn off the power to avoid any electrical accidents. Additionally, it’s crucial to follow the manufacturer’s instructions and consult a professional if you are unsure about any aspect of the installation.
Now, let’s get started with the first step: measuring the ceiling height.
Key Takeaways:
- Elevate your high-ceilinged space with a stunning chandelier by accurately measuring the ceiling height and choosing the right size fixture to create a balanced and visually appealing look.
- Prioritize safety and gather the necessary tools and equipment before turning off the power and carefully assembling, hanging, and testing the chandelier to achieve a safe and successful installation.
Read more: How To Clean Chandeliers On High Ceiling
Step 1: Measure the Ceiling Height
The first step in installing a chandelier in a high ceiling is to accurately measure the height of the ceiling. This measurement will help you determine the appropriate length for the chandelier chain or downrod.
To measure the ceiling height, you will need a measuring tape or a laser measuring device. Start by standing directly underneath the desired location for the chandelier. Extend the measuring tape or laser device upwards until it reaches the ceiling. Take note of the measurement, ensuring it is in feet or meters depending on your preference.
It is important to consider the overall height of the chandelier when determining the appropriate chain or downrod length. As a general rule of thumb, the bottom of the chandelier should hang approximately 30 to 36 inches above the surface below it, such as a dining table or foyer. This allows for proper illumination and maintains visual balance in the room.
If the chandelier has an adjustable chain, you can easily adjust the length to match the height of your ceiling. However, if your ceiling is exceptionally high, you may need to purchase a longer downrod or have a professional assist with the installation.
Remember, accurate measurements are crucial to ensure the chandelier is installed at the correct height, creating a stunning visual impact in your space. Once you have measured the ceiling height, you can move on to the next step: choosing the right size chandelier.
Step 2: Choose the Right Size Chandelier
Choosing the right size chandelier is essential to create a balanced and visually appealing look in your high-ceilinged space. A chandelier that is too small may get lost in the vastness of the room, while a chandelier that is too large can overpower the space and look out of proportion.
One method to determine the appropriate size is to consider the dimensions of the room. Start by measuring the width and length of the room in feet or meters. Add these two measurements together. The sum, in inches, can give you an idea of the ideal diameter of the chandelier.
For example, if your room measures 12 feet wide and 16 feet long, the sum would be 28 feet. In this case, a chandelier with a diameter of around 28 inches would be a good fit. However, it’s important to also consider the overall scale and height of the room to ensure the chandelier doesn’t appear too small or too large.
In addition to the dimensions of the room, consider the ceiling height. In high-ceilinged spaces, you can often opt for larger chandeliers to fill the vertical space. However, be mindful of where the chandelier will be positioned relative to the ceiling. If there is a significant distance between the chandelier and the ceiling, it may create an unbalanced look.
Another factor to consider is the style and design of the chandelier. Depending on your personal preference and the overall aesthetic of the room, you may choose a chandelier with a more ornate and intricate design or a sleek and contemporary style. Just make sure that the size and style of the chandelier complement the room’s overall decor.
By carefully considering the dimensions of the room, the ceiling height, and the desired style, you can confidently choose the right size chandelier for your high-ceilinged space. Once you have selected the perfect chandelier, it’s time to gather the necessary tools and equipment for the installation process.
Step 3: Gather the Necessary Tools and Equipment
Before you begin the chandelier installation process, it is essential to gather all the necessary tools and equipment. Having everything ready beforehand will save you time and ensure a smooth installation. Here is a list of tools and equipment you will likely need:
- Step ladder or scaffolding: Since you will be working with a high ceiling, a step ladder or scaffolding will help you safely reach the installation area.
- Chandelier: Select the chandelier of your choice, ensuring it is the appropriate size and design for your high-ceilinged space.
- Chain or downrod: Depending on the height of your ceiling and the design of the chandelier, you may need a chain or downrod to hang the chandelier at the desired height.
- Mounting bracket: A sturdy mounting bracket is necessary to securely attach the chandelier to the ceiling.
- Wire connectors: You will need wire connectors to connect the chandelier wires to the electrical wires in the ceiling.
- Wire cutter/stripper: A wire cutter/stripper tool is essential for cutting and stripping the electrical wires if needed.
- Screwdriver: A screwdriver will be required to tighten screws and secure the chandelier components.
- Voltage tester: Before beginning any electrical work, use a voltage tester to ensure the power is turned off and there is no live current running through the wires.
Other tools and equipment may be required depending on the specific instructions provided by the manufacturer of your chandelier. Always refer to the manufacturer’s guidelines and instructions for any additional tools or equipment needed for your particular chandelier model.
Remember to prioritize safety and use protective gear such as gloves and safety goggles during the installation process. Additionally, if you are unsure about any aspect of the installation or if you don’t have experience working with electrical wiring, it is highly recommended to consult a professional electrician for assistance.
Now that you have gathered all the necessary tools and equipment, you are ready to move on to the next step: turning off the power.
Step 4: Turn Off the Power
Before beginning any electrical work, it is crucial to turn off the power to the area where you will be installing the chandelier. This step is essential to ensure your safety and prevent any electrical accidents during the installation process.
To turn off the power, follow these steps:
- Locate the electrical panel in your home or building.
- Open the panel door and look for the circuit breaker labeled with the area or room where the chandelier will be installed. If there isn’t a specific label, identify the breaker connected to the room where the chandelier will be located.
- Flip the corresponding circuit breaker to the “Off” position. This will cut off the power supply to the designated area.
- Use a voltage tester to double-check that there is no live current running through the wires. Place the voltage tester next to the wires to ensure it does not detect any electric current. If the voltage tester indicates electricity, double-check the circuit breakers to ensure the power is completely off.
It is essential to handle electrical components with caution and avoid touching any exposed wires or connections. Turning off the power eliminates the risk of electrical shocks or short circuits during the installation process.
Remember, it is always a good idea to consult a professional electrician if you’re uncertain about any electrical work or if you feel uncomfortable performing this step on your own.
Once the power is turned off and you have confirmed that there is no electricity flowing to the installation area, you can proceed to the next step: assembling the chandelier.
Read more: How To Change A High Ceiling Chandelier
Step 5: Assemble the Chandelier
After ensuring the power is turned off and the area is safe, it’s time to assemble the chandelier. Most chandeliers come with separate components that need to be put together before installation. Follow these steps to assemble your chandelier:
- Lay out all the components of the chandelier on a clean and safe surface. This will allow you to easily identify and access each part as you assemble the chandelier.
- Refer to the manufacturer’s instructions to identify and familiarize yourself with each component.
- Start by attaching any hooks or chains that will hold the chandelier to the main body or frame.
- Proceed to attach any decorative elements, such as crystals or glass shades, according to the manufacturer’s instructions.
- Ensure that all screws and fasteners are securely tightened, but be careful not to overtighten, as this can damage the components.
- Use a screwdriver or any necessary tools provided by the manufacturer during the assembly process.
- Double-check that all components are properly attached, and everything is in its correct place.
Assembling the chandelier correctly is crucial for its stability and safe operation. Take your time with this step to ensure all components are securely attached and aligned properly.
If you encounter difficulties during the assembly process or if the chandelier comes with complex instructions, don’t hesitate to consult the manufacturer’s support or reach out to a professional for guidance.
Once the chandelier is fully assembled, you are ready to proceed to the next step: attaching the mounting bracket.
Consider using a chandelier lift system to safely install and maintain a chandelier in a high ceiling. This will make the installation process much easier and safer.
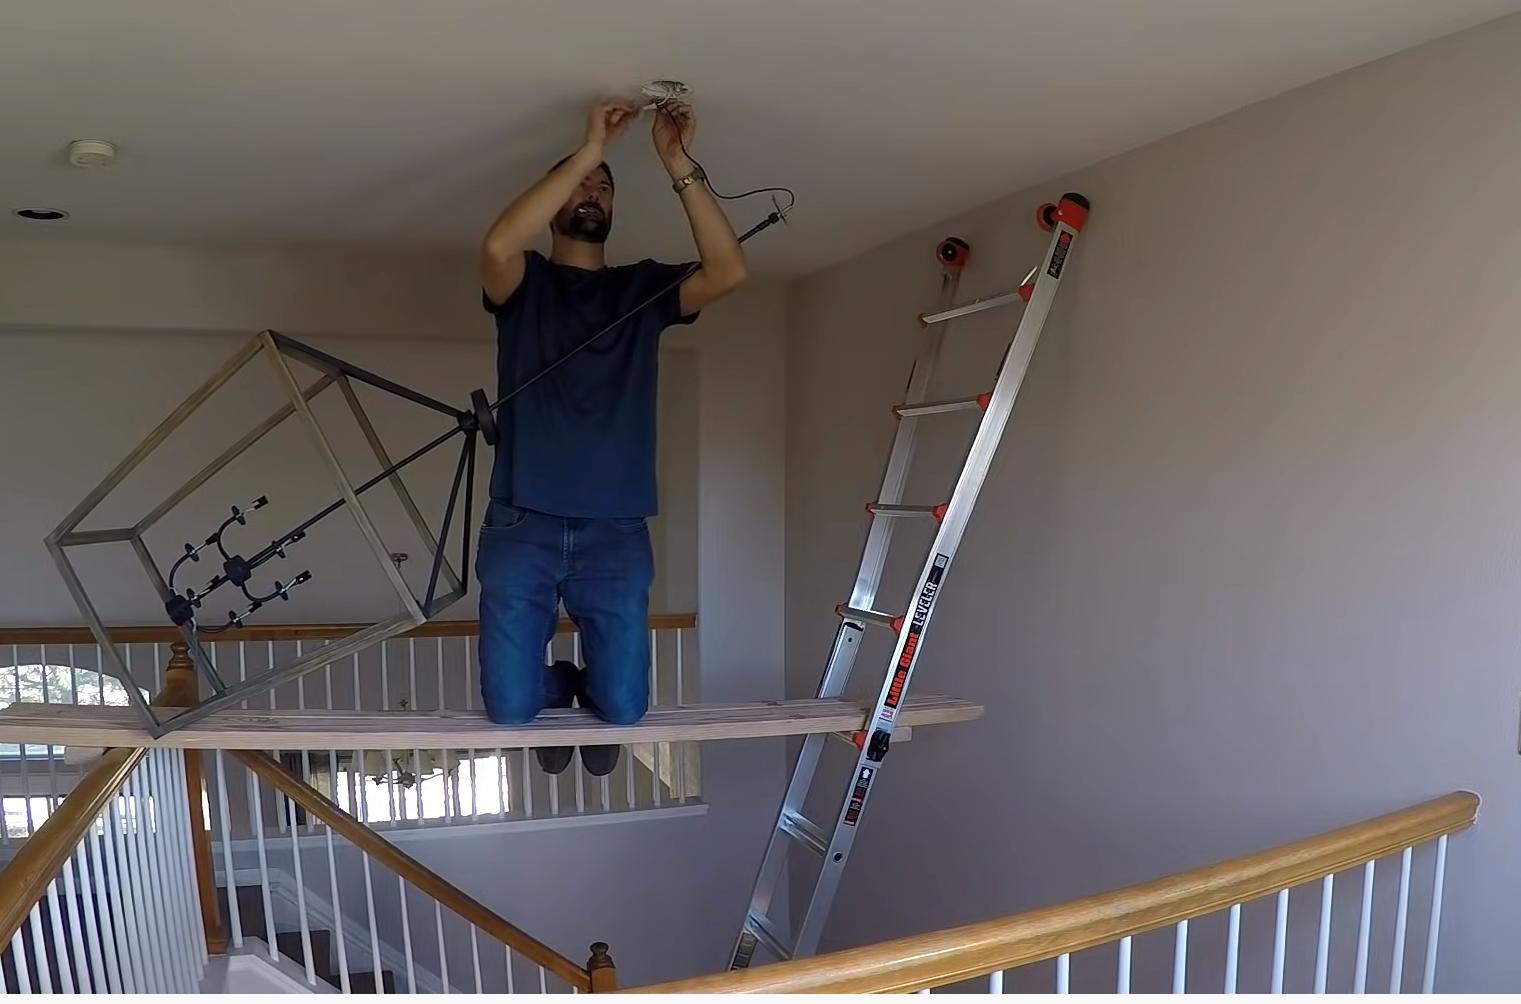
Step 6: Attach the Mounting Bracket
The mounting bracket is a crucial component that will securely attach the chandelier to the ceiling. It provides stability and ensures that the chandelier is properly supported. Follow these steps to attach the mounting bracket:
- Locate the mounting bracket included with your chandelier. This bracket is typically a metal plate with several screw holes.
- Hold the mounting bracket against the ceiling in the desired installation location. Ensure that it is level and aligned with the existing electrical box or junction box.
- Using a screwdriver or the appropriate tool, secure the mounting bracket to the ceiling by driving screws into the pre-drilled holes.
- Tighten the screws firmly, but be cautious not to overtighten and risk damaging the bracket or the ceiling.
- Double-check the stability of the mounting bracket by gently shaking it. It should be securely attached to the ceiling without any wobbling or movement.
It is crucial to follow the manufacturer’s instructions for attaching the mounting bracket as the specific steps and hardware required may vary depending on your chandelier model.
Once the mounting bracket is securely attached, you are now ready to hang the chandelier in the next step.
Step 7: Hang the Chandelier
With the mounting bracket firmly in place, it’s time to hang the chandelier in its designated location. Follow these steps to ensure a proper and secure installation:
- Locate the chain or downrod that came with your chandelier. Depending on the height of your high ceiling, you may need to use a longer chain or downrod to achieve the desired hanging height.
- Attach one end of the chain or downrod to the mounting bracket using the provided hardware. Ensure that the chain or downrod is securely fastened.
- If using a chain, you can adjust the length by removing or adding chain links to achieve the desired hanging height. If using a downrod, check that it is the appropriate length for your ceiling.
- Carefully lift the chandelier and hang it on the open end of the chain or downrod. Make sure the chandelier is centered and level.
- Check the stability of the chandelier by giving it a gentle shake. It should hang securely without any excessive movement or wobbling.
If you are installing a heavy chandelier or if you have any concerns about the stability, consider enlisting the help of another person to assist with the lifting and hanging process.
Once the chandelier is hung, you can move on to the next step.
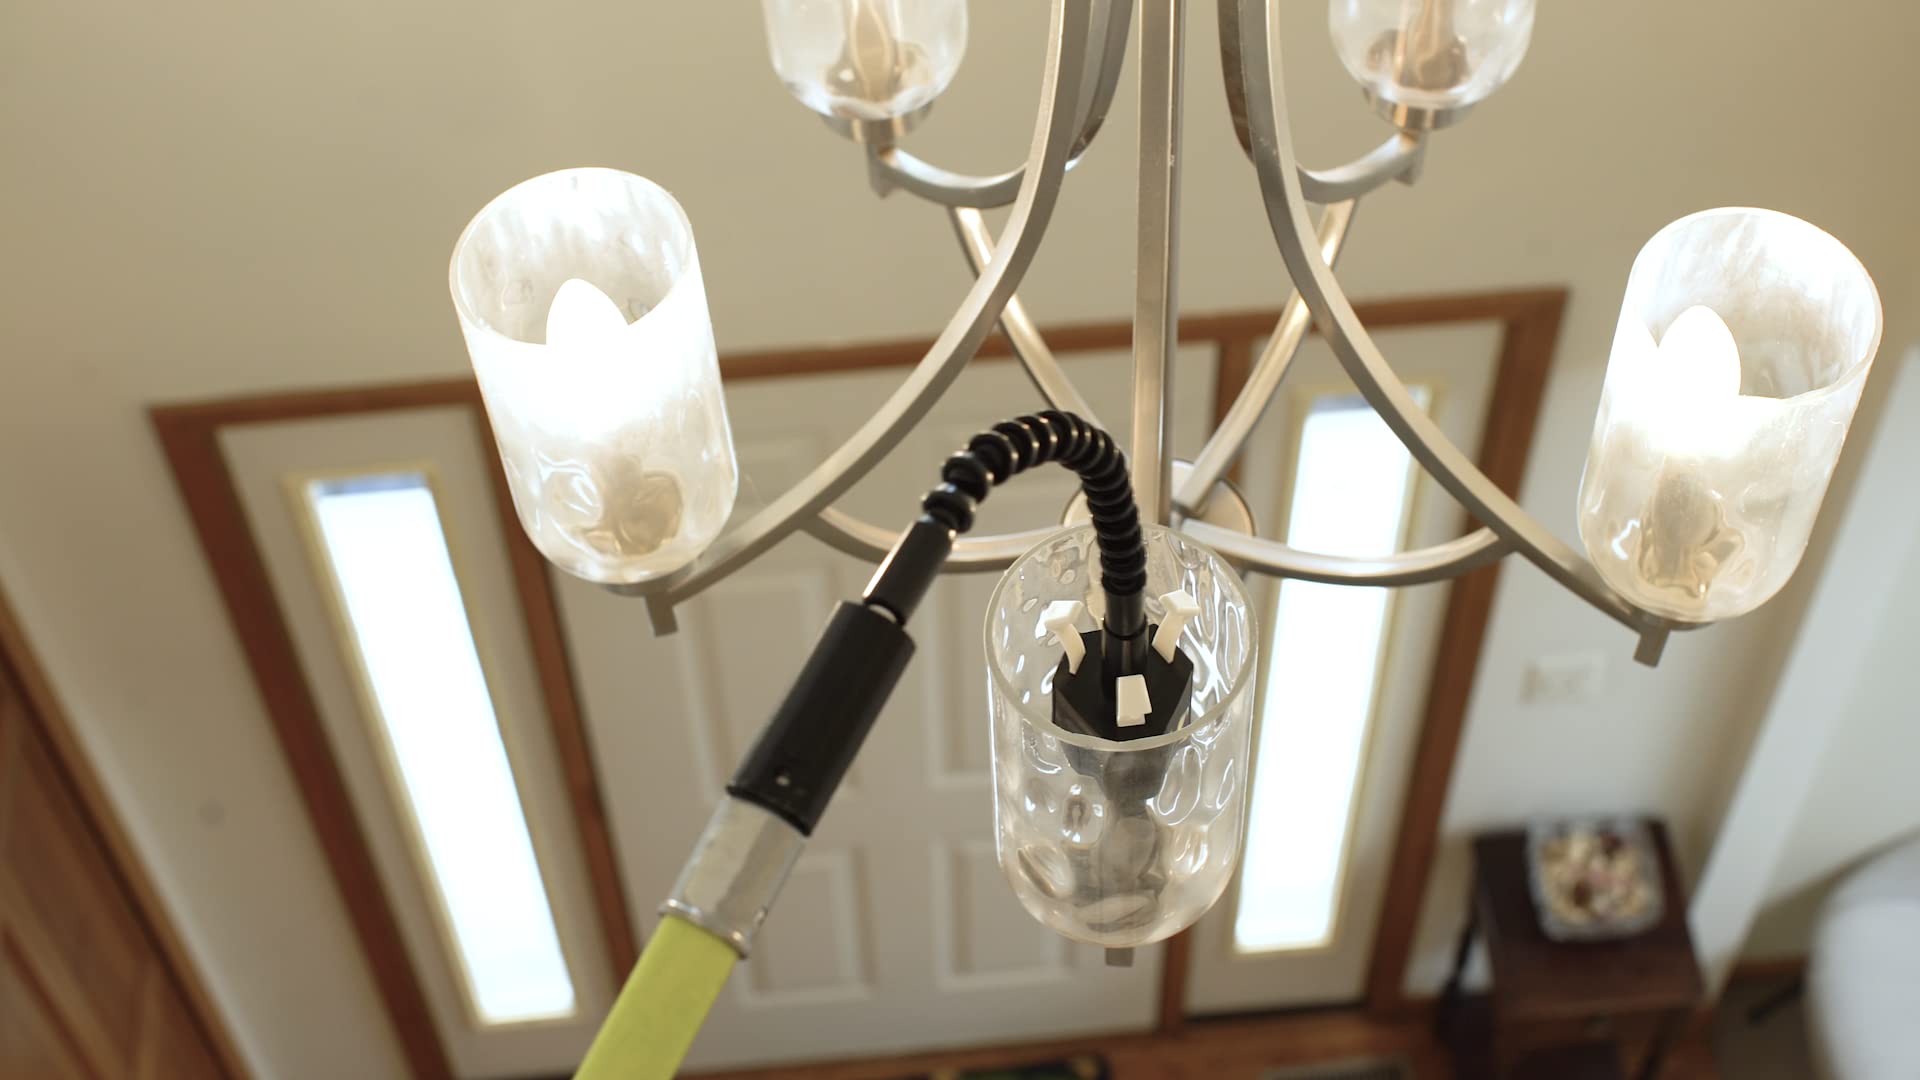
Step 8: Connect the Wiring
Now that the chandelier is securely hung, it’s time to connect the wiring to provide power and functionality. Follow these steps to connect the wiring:
- Ensure that the power to the area is still turned off from earlier steps. Safety should always be your top priority when working with electrical connections.
- Locate the chandelier’s wiring, which typically consists of a black (hot) wire, a white (neutral) wire, and sometimes a green or copper (ground) wire.
- Use a wire cutter/stripper to carefully remove about half an inch of insulation from the end of each wire, exposing the bare copper inside.
- Identify the corresponding wires in the ceiling electrical box. The black wire connects to the black or hot wire, the white wire connects to the white or neutral wire, and the green or copper wire connects to the ground wire.
- Twist the exposed copper wires together, making sure they are securely joined. Use wire connectors to connect the chandelier wires to the corresponding wires in the ceiling electrical box.
- For added safety, wrap each connected wire with electrical tape, ensuring that no bare wire is exposed.
- Gently push the connected wires into the electrical box, making sure they do not get pinched or tangled.
- Double-check that all connections are secure and there are no loose or exposed wires.
It is important to follow the color-coding and instructions provided by the manufacturer of your chandelier. If you are unsure about the wiring connections or do not have experience working with electrical connections, it is highly recommended to consult a professional electrician for assistance.
Once the wiring connections are made, you can move on to the next step: testing the chandelier.
Step 9: Test the Chandelier
Before completing the installation process, it is crucial to test the chandelier to ensure that it is functioning properly and that all connections have been made correctly. Follow these steps to test the chandelier:
- Turn on the power to the area where the chandelier is installed. Flip the circuit breaker or switch back to the “On” position.
- Use the wall switch or any designated controls to turn on the chandelier. It should illuminate and fill the room with a beautiful glow.
- Observe the chandelier for any flickering, dimming, or unusual behavior. The light should shine steadily without any fluctuations.
- If you notice any issues, such as flickering or dimming, turn off the power immediately and inspect the wiring connections. Make sure they are secure and properly connected.
- If the chandelier is not functioning at all, double-check the wiring connections, as there may be a loose or faulty connection. Consult a professional electrician if you are unable to troubleshoot the issue.
By testing the chandelier, you can ensure that the installation was successful and that the lighting fixture is operating as intended. If everything looks and works properly, you can proceed to the final step: adjusting the height if necessary.
Step 10: Adjust the Height if Needed
After testing the chandelier, you may find that the height needs to be adjusted to achieve the desired aesthetics and functionality in your space. Here are some steps to follow if you need to adjust the height of the chandelier:
- Turn off the power to the chandelier by flipping the corresponding circuit breaker to the “Off” position.
- Carefully lower the chandelier by removing chain links or adjusting the downrod, depending on the hanging mechanism of your chandelier.
- Take note of the desired height and make the necessary adjustments to the chain or downrod, ensuring that it is securely fastened.
- Once you have achieved the desired height, test the chandelier again by turning on the power and observing its lighting effects and position in the room.
- If you are satisfied with the new height, proceed with securing the adjusted chain links or downrod.
- If necessary, repeat the adjustments until you achieve the perfect height for your high-ceilinged space.
Always exercise caution when making adjustments to the chandelier’s height, ensuring that you have a secure grip on the fixture and that the power is completely turned off to prevent electrical accidents.
When adjusting the height, it’s important to maintain the proper clearance above any furniture, such as a dining table or seating area, to prevent any head bumps or obstructed views.
Once you have adjusted the height to your satisfaction, you can consider the installation process complete. Enjoy the beauty and illumination of your chandelier in your high-ceilinged space!
Finally, remember that if you are unsure about any part of the installation process or if you do not have experience working with electrical components, it is always advisable to seek the assistance of a professional electrician for a safe and successful installation.
Conclusion
Installing a chandelier in a high ceiling can seem like a daunting task, but with the right knowledge and approach, it can be a rewarding endeavor. By following the step-by-step guide we’ve provided, you can confidently install a chandelier that adds elegance and beauty to your high-ceilinged space.
Remember to start by measuring the ceiling height accurately to determine the appropriate length for the chandelier chain or downrod. Choosing the right size chandelier is also crucial to create a balanced and visually appealing look in your space.
Gathering the necessary tools and equipment beforehand will save you time and ensure a smooth installation process. Turning off the power is a critical step to ensure your safety while connecting the wiring and assembling the chandelier.
By following the instructions provided by the manufacturer, attaching the mounting bracket securely, and hanging the chandelier carefully, you can achieve a stable and visually pleasing installation.
Testing the chandelier’s functionality is essential, as it allows you to identify any issues and make any necessary adjustments. In the case of height adjustment, follow our guidelines to ensure the chandelier is positioned at the perfect height for your space.
Throughout the entire process, safety should always be a priority. If you are unsure about any step or are uncomfortable working with electrical components, it is advisable to consult a professional electrician for assistance.
With a beautifully installed chandelier in your high-ceilinged space, you can create a captivating focal point that enhances the ambiance and adds a touch of sophistication to your room.
Now that you have the knowledge and instructions to install a chandelier in a high ceiling, go ahead and embark on your chandelier installation journey. Enjoy the transformation that this exquisite lighting fixture will bring to your space!
Frequently Asked Questions about How To Install A Chandelier In A High Ceiling
Was this page helpful?
At Storables.com, we guarantee accurate and reliable information. Our content, validated by Expert Board Contributors, is crafted following stringent Editorial Policies. We're committed to providing you with well-researched, expert-backed insights for all your informational needs.


0 thoughts on “How To Install A Chandelier In A High Ceiling”