Articles
How To Install Coffered Ceiling
Modified: October 19, 2024
Learn how to install coffered ceilings in this informative article. Find step-by-step instructions and tips to easily transform your space.
(Many of the links in this article redirect to a specific reviewed product. Your purchase of these products through affiliate links helps to generate commission for Storables.com, at no extra cost. Learn more)
Introduction
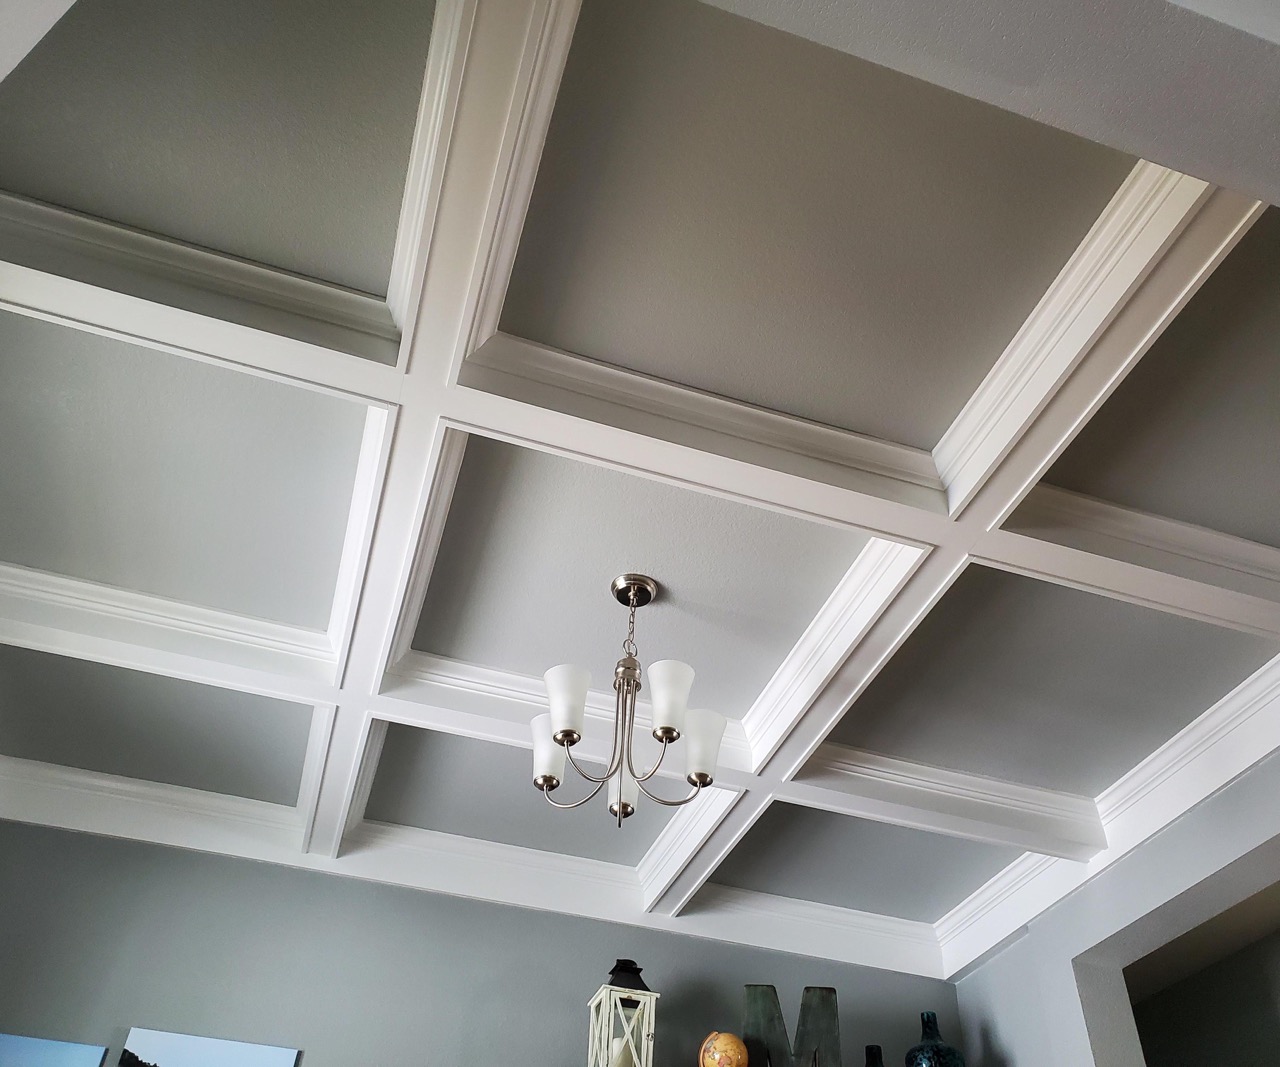
Installing a coffered ceiling is a great way to add elegance and sophistication to any room. This architectural feature consists of a series of sunken panels or beams that create a grid-like pattern on the ceiling. Not only does it create visual interest, but it also adds depth and character to the space.
In this article, we will guide you through the step-by-step process of installing a coffered ceiling. We will discuss the materials you will need, how to measure the ceiling, prepare it for installation, create the grid pattern, install the ceiling beams, add crown molding, fill in the coffered panels, and finally, paint or finish the ceiling.
While this project may seem daunting at first, with the right tools and techniques, you can achieve professional results. So, roll up your sleeves and let’s get started on transforming your ceiling into a stunning focal point!
Key Takeaways:
- Transform any room with elegance and sophistication by installing a coffered ceiling. Follow the step-by-step guide for professional results, from measuring and preparation to finishing touches.
- Prioritize safety, attention to detail, and creativity when embarking on the exciting DIY journey of installing a coffered ceiling. Achieve a stunning and lasting impression in any space.
Read more: How To Install Ceiling Speakers
Materials Needed
Before you begin installing a coffered ceiling, it’s important to gather all the necessary materials. Here is a list of what you will need:
- Measuring tape
- Pencil
- Chalk line or straight edge
- Safety goggles
- Work gloves
- Power drill
- Screws
- Wood glue
- Saw (circular or miter)
- Level
- Crown molding
- Wood filler
- Sandpaper (medium and fine grit)
- Paint or stain
- Paintbrushes or rollers
It’s crucial to make sure you have all the tools and materials on hand before you begin the installation process. This will save you time and make the installation process smoother.
Additionally, it’s important to prioritize safety while working on this project. Remember to wear safety goggles and work gloves to protect your eyes and hands from any potential accidents or injuries.
Once you have gathered all the necessary materials and are equipped with the right safety gear, you are ready to move on to the next step: measuring the ceiling.
Step 1: Measure the Ceiling
Before you start installing a coffered ceiling, you need to accurately measure the dimensions of your ceiling. This will help you determine the size and layout of the coffered panels and beams.
Here’s how to measure the ceiling:
- Start by measuring the length and width of the room using a measuring tape. Write down these measurements for reference.
- Next, determine the desired size of the coffered panels. Typically, coffered panels are square or rectangular in shape, with each panel being the same size. Make sure to choose dimensions that are proportional to the size of your room.
- Divide the ceiling into equal sections based on the desired size of the coffered panels. Use a pencil and straight edge to mark the lines where the panels will be located.
- Measure the distance from the walls to the first row of panels. This will ensure the panels are evenly spaced and centered within the room.
- Repeat this process for the remaining rows of panels, making sure to maintain equal spacing between each row.
Once you have completed these measurements, double-check your calculations to ensure accuracy. Making precise measurements will ensure that your coffered ceiling is symmetrical and visually appealing.
Keep in mind that the number of coffered panels and beams will depend on the size of your ceiling and the desired layout. Take the time to plan out the grid pattern before moving on to the next step.
Now that you have measured the ceiling and determined the layout of the coffered panels, it’s time to prepare the ceiling for installation.
Step 2: Prepare the Ceiling for Installation
Preparing the ceiling for the installation of a coffered ceiling is an essential step that ensures a smooth and secure installation. Proper preparation will help the panels and beams adhere to the ceiling and create a sturdy framework.
Follow these steps to prepare the ceiling:
- Clear the room: Remove all furniture, fixtures, and other items from the room. This will provide you with a clear working space and prevent any damage or interference during the installation process.
- Clean the ceiling: Use a soft cloth or sponge to wipe the ceiling surface and remove any dirt, dust, or debris. A clean surface will promote better adhesion of the panels and beams.
- Repair any damages: Inspect the ceiling for any cracks, holes, or imperfections. If you find any, fill them in with a suitable filler and allow it to dry completely. Sand the patched areas to create a smooth surface.
- Prime the ceiling: Apply a coat of primer to the entire ceiling surface. Priming helps improve the adhesion of the panels and provides a uniform base for the paint or finish. Follow the manufacturer’s instructions for the recommended drying time.
- Mark the panel locations: Use a pencil and the measurements from the previous step to mark the locations of the coffered panels on the primed ceiling. This ensures accurate placement during the installation process.
By properly preparing the ceiling, you create a solid foundation for the coffered ceiling installation. This will result in a more professional and long-lasting finish.
With the ceiling now primed and marked, you are ready to move on to the next step: creating the grid pattern for the coffered ceiling.
Step 3: Create the Grid Pattern
Creating the grid pattern is an important step in installing a coffered ceiling. This pattern will guide you in placing the ceiling beams and determining the layout of the coffered panels.
Follow these steps to create the grid pattern:
- Begin by marking the center of the ceiling. Measure the width of the ceiling and divide it by 2 to find the center point. Use a pencil to make a small mark at this location.
- Using a chalk line or a straight edge, extend a line from the center mark to one end of the ceiling. Repeat this process for the other end. These lines will serve as the main reference points for the grid pattern.
- Decide on the size of the coffered panels and the spacing between the panels. Use a measuring tape and pencil to mark these measurements along the main reference lines.
- From the main reference lines, extend additional lines perpendicular to them, creating a grid pattern. The distance between the perpendicular lines should match the desired width of the coffered panels.
- Double-check your measurements and make any necessary adjustments. It’s important to ensure that the grid pattern is symmetrical and evenly spaced.
Creating a precise and well-aligned grid pattern is crucial for achieving a visually appealing coffered ceiling. Take your time to carefully measure and mark the lines, as this will provide a solid framework for the rest of the installation process.
With the grid pattern in place, you are ready to move on to the next step: installing the ceiling beams.
When installing a coffered ceiling, make sure to carefully measure and plan the layout before starting. Use a laser level to ensure the beams are perfectly aligned.
Read more: How To Install Insulation In The Ceiling
Step 4: Install the Ceiling Beams
Installing the ceiling beams is the next step in creating a stunning coffered ceiling. The beams not only add structural support but also define the grid pattern and enhance the overall visual impact of the ceiling.
Follow these steps to install the ceiling beams:
- Measure and cut the beams: Using a saw (circular or miter), cut the beams to the desired length according to your grid pattern. Make sure to wear safety goggles and follow all safety precautions while cutting the beams.
- Apply wood glue: Apply a generous amount of wood glue to the backside of each beam that will come in contact with the ceiling. This will ensure a strong bond between the beams and the ceiling.
- Position the beams: Carefully place each beam on the marked lines of the grid pattern. Press firmly to secure them in place. Use a level to make sure the beams are perfectly straight and aligned.
- Secure the beams: Use a power drill and screws to secure the beams to the ceiling. Ensure that the screws are long enough to penetrate the ceiling and provide a secure attachment.
- Check for level alignment: Use a level again to verify that the beams are still level and straight after being secured in place. Make any adjustments as necessary.
- Continue installing beams: Repeat the above steps to install all the remaining beams, following the grid pattern you created.
By securely installing the ceiling beams, you create a strong and visually appealing framework for the coffered ceiling. Take your time to ensure that the beams are level and properly aligned to achieve the desired outcome.
After installing the ceiling beams, it’s time to move on to the next step: adding crown molding to enhance the elegance of the coffered ceiling.
Step 5: Add Crown Molding
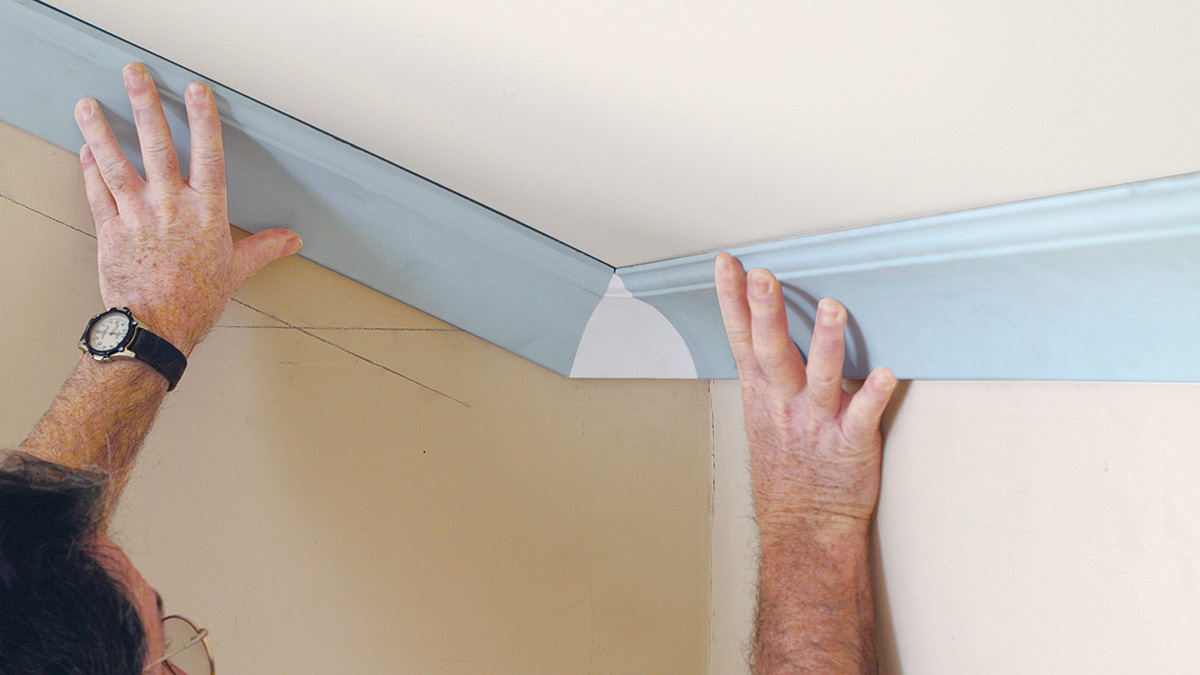
Adding crown molding to your coffered ceiling is an excellent way to enhance its elegance and give it a finished and polished look. Crown molding not only adds a decorative touch but also helps to seamlessly blend the coffered panels and beams together.
Follow these steps to add crown molding:
- Measure and cut the crown molding: Using a saw (miter saw works best for angled cuts), measure and cut the crown molding to fit along the perimeter of the coffered ceiling. Take accurate measurements and make precise cuts for a seamless fit.
- Apply wood glue: Apply wood glue to the backside of the crown molding that will come in contact with the beams and panels. This will help promote a secure bond between the molding and the ceiling components.
- Position and attach the crown molding: Carefully position the crown molding along the edges where the beams and panels meet. Press firmly to secure it in place. Use a level to ensure that the molding is straight and even.
- Secure the molding: Use a power drill and screws to secure the crown molding to the beams and panels. Predrill holes to prevent splitting of the molding, and countersink the screws for a flush finish.
- Fill in nail holes: Use wood filler to fill in any nail holes or gaps along the crown molding. Smooth the filler with a putty knife and allow it to dry. Sand the filled areas until they are smooth and seamless.
- Final touch-ups: Inspect the crown molding and make any necessary touch-ups, such as additional sanding or filling, to ensure a flawless finish. Clean off any excess glue or debris.
By adding crown molding, you achieve a cohesive and refined appearance for your coffered ceiling. The molding enhances the architectural details and creates an impressive visual impact.
With the crown molding in place, you’re almost ready to enjoy your newly installed coffered ceiling. The next step involves filling in the coffered panels for a complete and polished look.
Step 6: Fill in the Coffered Panels
Now that the ceiling beams and crown molding are in place, it’s time to fill in the coffered panels. This step is important for adding depth and visual interest to your coffered ceiling.
Follow these steps to fill in the coffered panels:
- Measure and cut the panel material: Determine the dimensions of each coffered panel and measure the corresponding panels accordingly. Cut the panel material, such as plywood or MDF, to fit the size of each panel.
- Apply wood glue: Apply wood glue to the backside of each panel. This will help ensure a secure attachment to the beams and provide stability to the coffered ceiling.
- Position the panels: Carefully position each panel within the designated opening of the coffered ceiling. Press firmly to ensure proper adhesion and alignment.
- Secure the panels: Use a power drill and screws to secure the panels to the beams. Place the screws strategically along the edges or corners of the panels to maintain a clean and seamless appearance.
- Fill any nail holes: Use wood filler to fill in any nail holes or gaps along the coffered panels. Smooth the filler with a putty knife and allow it to dry. Sand the filled areas until they are smooth and flush with the material of the panels.
- Sand and finish: Gently sand the filler and any rough edges on the panels with fine-grit sandpaper. This will create a smooth surface for painting or finishing.
By filling in the coffered panels, you bring your coffered ceiling to life with a beautiful interplay of textures and patterns. It creates a sense of depth and visual allure that enhances the overall sophistication of the room.
With the coffered panels filled in, you’re almost ready to enjoy the transformed beauty of your ceiling. The final step involves painting or finishing the ceiling to complete the installation process.
Step 7: Paint or Finish the Ceiling
Painting or finishing the coffered ceiling is the final step in the installation process. This step not only adds the desired color or finish to the ceiling but also protects the surface and enhances its overall aesthetic appeal.
Follow these steps to paint or finish the ceiling:
- Prepare the surface: Before painting or finishing, ensure that the ceiling surface is clean and free from dust or debris. Use a soft cloth or sponge to wipe away any dirt or residue.
- Primer (if needed): If you are painting the ceiling, applying a primer is highly recommended. The primer creates a smooth and even base for the paint and helps it adhere better. Follow the manufacturer’s instructions for the appropriate drying time.
- Choose your paint or finish: Select a paint color or finish that complements the overall design and theme of the room. Consider factors such as lighting, furniture, and style to achieve the desired ambiance.
- Apply the paint or finish: Using a paintbrush or roller, apply the paint or finish to the coffered ceiling. Start from one corner and work your way across the whole ceiling. Apply multiple coats as needed, allowing each coat to dry before applying the next one.
- Clean up and final touches: Once the paint or finish has dried, clean up any drips or spills on the beams, panels, or crown molding. Inspect the ceiling for any touch-ups needed, such as uneven spots or missed areas.
Painting or finishing the coffered ceiling gives it the final touch that brings the whole installation together. Whether you opt for a bold color or a subtle finish, it will transform your room and showcase the beauty of the coffered ceiling design.
Congratulations! You have successfully installed and finished your coffered ceiling. Step back and admire your work as you enjoy the elegant and sophisticated atmosphere it adds to your space.
It’s important to keep in mind that the drying time for the paint or finish may vary based on the product and the environmental conditions. Follow the instructions provided by the manufacturer to ensure the best results.
With the installation process complete, your coffered ceiling is now ready to be a standout feature in your room, providing a touch of architectural beauty and timeless elegance.
Read more: How To Install Shiplap On A Ceiling
Conclusion
Installing a coffered ceiling can transform an ordinary room into a sophisticated and visually stunning space. Throughout this article, we have outlined the step-by-step process of installing a coffered ceiling, from measuring the ceiling to painting or finishing the final result. By following these instructions and using the right tools and materials, you can achieve professional-looking results.
Remember, the key to a successful coffered ceiling installation is careful planning and attention to detail. Take the time to measure accurately, create a precise grid pattern, and secure the beams, panels, and crown molding properly. This will ensure a sturdy and visually appealing final product.
Adding crown molding and filling in the coffered panels will give your ceiling a polished and finished appearance. Finally, painting or finishing the ceiling will bring out its beauty and tie the whole room together.
As with any home improvement project, it’s important to prioritize safety. Wear appropriate safety gear such as goggles and gloves, and exercise caution when using power tools.
Now that you have gained knowledge and understanding of how to install a coffered ceiling, it’s time to put that knowledge into action. Plan your project, gather your materials, and embark on this exciting DIY journey. Whether you’re looking to add elegance to a dining room, a touch of luxury to a living room, or an upscale feel to any other space, a coffered ceiling is sure to make a lasting impression.
Enjoy the process, embrace your creativity, and revel in the beautiful transformation of your room with a stunning coffered ceiling.
Frequently Asked Questions about How To Install Coffered Ceiling
Was this page helpful?
At Storables.com, we guarantee accurate and reliable information. Our content, validated by Expert Board Contributors, is crafted following stringent Editorial Policies. We're committed to providing you with well-researched, expert-backed insights for all your informational needs.


0 thoughts on “How To Install Coffered Ceiling”