Home>Pantry Storage>9 Best Pantry Drawers That Organize Your Kitchen Supplies


Pantry Storage
9 Best Pantry Drawers That Organize Your Kitchen Supplies
Modified: December 6, 2023
Photographed by: Rūta Celma on Unsplash
Discover fascinating facts about the classic Italian film La Dolce Vita and delve deeper into its iconic scenes, memorable characters, and timeless themes.
(Many of the links in this article redirect to a specific reviewed product. Your purchase of these products through affiliate links helps to generate commission for Storables.com, at no extra cost. Learn more)
Pantry drawers can make or break the future of your kitchen pantry. These storage options, while often overlooked, can save your kitchen spaces from becoming a jumble of condiments, utensils, and more.
As one of a home’s most-used spaces, it is important to keep your kitchen areas intact. These pantry drawers are your keys to getting there.
Pantry Drawers: Benefits and Uses
Maximizes Spaces
Pantry drawers save you time, energy, and space. To some, upgrading their pantries means needing a bigger house. This shouldn’t always be the case, and pantry drawers are here to prove that.
Pull-out pantry drawers can maximize space with their roll-out feature. Better space usage means less chaos. When you make the shift from shelves to pantry drawers, you no longer have to take too long searching for a ketchup bottle at the very back of your pantry.
Keeps Food Fresh
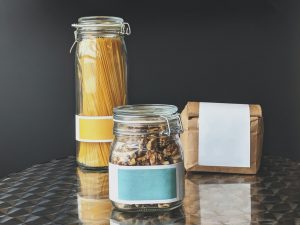
Photo from Sigmund on Unsplash
Riding on the back of the previous thought, a lot of food gets lost at the very back of pantries. Because of this, a lot of pantry food expires without their owners ever realizing it.
People could also buy the same items not knowing they already have them. Getting a pantry cabinet with drawers is a quick and easy fix to this. This decision can save you a lot of money, too.
Accessible to Kids
Not every household has the time to attend to each kid’s needs. Breakfast, for example, can be a hassle, especially since not every kid will want the same thing for the most important meal of the day.
Pull-out pantry drawers can solve this by being extendable. This means they can give kids access to the food they want to have. Should you use these pantry drawers for other means, think of it as a way to teach kids responsibility. You can store cleaning materials in these pantry drawers too.
Saves You Physical Hassle
Photo from Waparm on Unsplash
To some, crouching and reaching are not easy things to do. Cabinets filled to the brim with food often ask you to do both, but what if it physically hurts to do so? Bad backs are not uncommon, and kitchen pantries are not bad-back safe.
When you buy pull-out pantry drawers, you not only save time and money. You also save your energy. Gone are the days you scour through each pantry item, searching for your jar of cereal. Simply roll your drawers out and see everything you have at a glance.
Pantry Drawers For Your Kitchen Areas
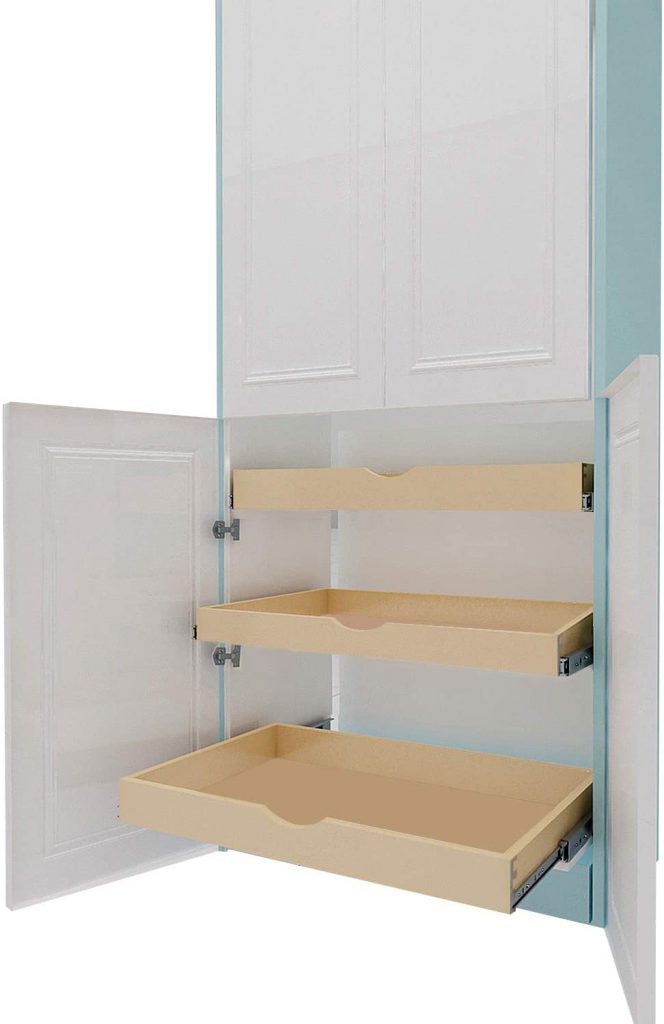
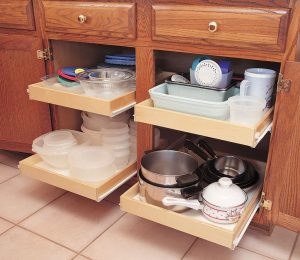
With seven available sizes, this maple wood slide-out cabinet makes for the best pantry drawers you can find for your kitchen. Save up to 50% of kitchen space when you use these DIY pull-out pantry drawers from CabinetRTA.
Compared to other pull-out pantry drawers, the soft-close feature of this slide-out cabinet makes it sturdy and easy to assemble. No more glue guns and long hours spent reading instructions. In only a few steps, you will have a minimalist drawer with dovetail joints and a lush natural wood finish.
Of course, this is only the beginning of its features. These are also some of the best options you have for soft slide-out drawers for the pantry. These roller ‘soft-close slides can slide out of cabinets. Kids and adults can now have easy pantry access, without having to worry about the mumbo-jumbo of putting things back where you got them.
Save money, space, and trouble when you get these pull-out pantry drawers.
Key Features
- Made with hardwood and plywood
- Natural wood finished
- Roller soft-close slides
- Seven available sizes
- Side-mounted drawer options
Specifications
- 1st drawer: 3” H x 14” W x 21.25” Deep
- 2nd drawer: 3” H x 17” W x 21.25” Deep
- 3rd drawer: 3” H x 20” W x 21.25” Deep
- 4th drawer: 3” H x 23” W x 21.25” Deep
- 5th drawer: 3” H x 26” W x 21.25” Deep
- 6th drawer: 3” H x 29” W x 21.25” Deep
- 7th drawer: 3” H x 32” W x 21.25” Deep
Pros
- Size variation
- Comes all-natural: can be painted whichever color and style you want
- Soft roll-out slides
Cons
- Bracket instructions can be unclear
- Comes unassembled
For those looking for pantry drawers with more than a steel-wood minimalist feel, this professional wood cabinet organizer from Lynk is a premium pick. Combining the rustic look of wood and the shine of steel makes this stand out.
As pull-out pantry drawers, the goal is to be as accessible as possible. Lynk’s slide-out drawers fit this bill: you can use them for your appliances, pantry products, and even cleaning items. Best of all, they are easily mountable — a bonus for those sprucing up their homes for the first time.
These pantry cabinet drawers are also available in 7 sizes. Choose how deep you want your pantry drawers to be and plan away. This cabinet organizer wants you to save as much space as you can, and you will.
Key Features
- Made with durable wood laminate, chrome, and steel
- Uses ProGlide Industrial-Grade Ball Bearing Glides
- Seven available sizes
Specifications
- 1st drawer: 11” W x 18” D
- 2nd drawer: 11” W x 21” D
- 3rd drawer: 14” W x 18” D
- 4th drawer: 14” W x 21” D
- 5th drawer: 17” W x 18” D
- 6th drawer: 17” W x 21” D
- 7th drawer: 20” W x 21” D
Pros
- Size variation
- Easy installation
- Uses patented grade ball glides
Cons
- Height is not adjustable
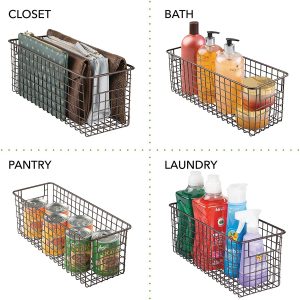
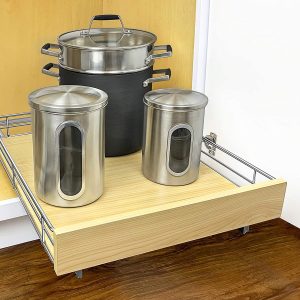
Now jumping into the space of fully metal pantry drawers, mDesign provides a farmhouse-decor flair to your pantry. Can be used as both an organizer and a stand-alone drawer, this metal basket can hold all kinds of dry goods you can think of.
Prepare yourself a clean and clearer kitchen as you store your pasta, spices, snacks, juice boxes, and canned food in neat containers.
Sold in sets of two, make the most out of this because of its versatility. With five available sizes, you can mix and match your pantry’s organizers (pseudo-pantry drawers) however you’d like. These are also portable, with easy-grip handles that make them convenient to pull in and out of your shelf.
As this is also made with sturdy steel wires and rust-resistant finishes, this storage organizer bin can seem to do it all, and it’s in style too.
Key Features
- Made sturdy steel wire
- Farmhouse-deco aesthetic
- Both an organizer and a quality pull out pantry drawer
- Rust-resistant
Specifications
- 1st drawer: 16” x 12” x 6”
- 2nd drawer: 16” x 6” x 3”
- 3rd drawer: 16” x 6” x 6”
- 4th drawer: 16” x 9” x 3”
- 5th drawer: 16” x 9.25” x 6.25”
Pros
- Rust-resistant
- Can be stacked in small spaces
- Has space for labels
- Can be used in any room and storage area (even refrigerators)
Cons
- Limited color variation
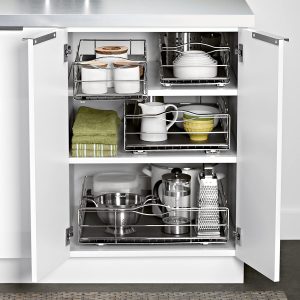
Also sporting metal materials and a wired aesthetic is simplehuman’s pull-out cabinet organizer. Compared to mDesign, these pantry drawers have a sleeker, more business-casual look. These are best for chromatic kitchens that want to save up on space.
With a heavy-duty frame that can hold up to 20 pounds, these pantry drawers make great storage areas for heavy boxes and kitchen appliances. This feature, paired with this drawer’s easy-access handle, makes getting anything from your pantry simple, regardless of weight.
These pull out pantry drawers also use ball-bearing tracks, but it is still relatively easy to assemble. They already come with an adjustable divider and pre-assembled tracks. Even better, they also come with their easy-access steel handles. No need to waste hours trying to DIY.
Key Features
- Made with a heavy gauge steel
- Uses commercial-grade ball-bearing tracks
- Holds up to 20 pounds
Specifications
- Comes in three sizes: 9-inch, 14-inch, and 20-inch
- Length and height are fixed at 20” and 6” respectively.
Pros
- Heavy duty
- Pre-assembled pieces
- Adjustable divider
Cons
- When storing in high spaces, you may need “locking pegs”. This is not included in simplehuman’s pantry drawers.
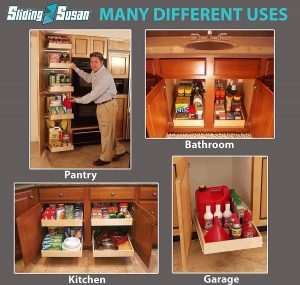
Going back to wooden pantry drawers, these SlidingSusan pull-out pantry drawers are smooth, durable extensions to your cabinets. Each drawer can hold up to 100 pounds, making it a smart buy not only for your kitchen pantry but also for any other room in your house.
These pantry drawers offer full extension — meaning, getting items from the back of your cabinet will no longer be much of a hassle.
The company offers nine various sizes for your cabinet space, which is the most any product in this list has offered so far. Each drawer can be assembled quickly and easily. The pantry drawers come out fully assembled and all you need to screw down are its base units.
Optimize your cabinet space to the best it can be with these SlidingSusans. Complete with dovetail designs without any hanging nails or screws, these pantry drawers are proudly made in the USA.
Key Features
- Made with 9-ply Baltic Birch Wood
- Full-extension with dovetail design
- UV coated protection finish
- Holds up to 100 lbs.
Specifications
- 1st drawer: 12” x 18” x 3”
- 2nd drawer: 12” x 21” x 3”
- 3rd drawer: 14” x 18” x 3”
- 4th drawer: 14” x 21” x 3”
- 5th drawer: 16” x 18” x 3”
- 6th drawer: 16” x 21” x 3”
- 7th drawer: 18” x 18” x 3”
- 8th drawer: 18” x 21” x 3”
- 9th drawer: 20” x 18” x 3”
- Five width types: 12″, 14″, 16″, 18″ and 20″
Pros
- Soft-close technology
- Can hold up to 100 pounds when fully extended
- Easy installation (cabinets come fully assembled)
Cons
- Needs you to exercise caution when measuring your cabinet size
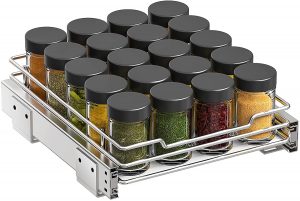
Most pantry drawers are used to organize the hanging bits and pieces of your pantry. For the most part, these are your collection of spices, which you have to rummage through to find the perfect spice.
The best pantry drawers, such as G-Ting’s pantry cabinet drawers, are made for specific reasons. This spice rack organizer is durable and easily storable around your kitchen. Made with ball-bearing slides and heavy-duty wire structures, these are fail-safe ways to organize your kitchen.
Moreover, these pantry drawers from G-Ting also have a no-slip mat design that makes it easy to get things in and out of the drawer. This also keeps your cabinet safe from spills and accidental messes because of its water-resistant feature.
Beyond organizing your spices, these G-Ting pull-out pantry drawers can also work for your dress tables, cleaning areas, and bedrooms. As they can fit small items effectively, these pantry drawers are multifunctional and flexible.
Key Features
- Made with alloy steel, iron, plastic, and metal
- Bright silver color
- Uses ball-bearing slides
- Water-resistant
Specifications
- Comes in 1-tier and 2-tier variants
- 1-tier pantry drawer: 9.5″ W x 10.2″ D x 2.8″ H
- 2-tier pantry drawer: 8.6″ W x 10.4″ D x 9″ H
Pros
- Can be installed anywhere you need it
- Keeps spices fresh and potent
- Sturdy but lightweight
- Offers variety
Cons
- Requires that you install about eight screws
- Could use more dividers
Simple but effective, these birch wood pantry drawers are for those who just want to get their storage areas over with. A pack of this sliding pull-out shelf for cabinets includes one pull-out shelf, a set of extension slides, mounting hardware, and a plastic door protector.
Besides keeping your cabinets unscathed, these inclusions also make for easy installation with durable results. With one compartment that has a 75-pound capacity, these pantry drawers promise to be worth a buy. No more crouching and sitting on the floor to find that one jar of peanut butter or bottle of ketchup.
Able to fit most cabinets, those interested in these sliding pull-out pantry drawers can choose from over 20 size offerings, with width choices ranging from 15 inches to 25 inches.
Key Features
- Made with birch wood
- Sliding shelves
- Base mount
Specifications
- There are over 20 variations of these sliding pull-out pantry drawers from Shelves That Slide. Their width ranges from 15” to 20”.
- The cabinet gaps can only be 2 5/8″ tall and 21 3/4″ deep.
Pros
- Can handle products of different shapes and sizes
- Fast customer service
- Simple but durable
- Can work in any cabinet
Cons
- The product has no finishes so you will need to add the lacquer yourself.
- The installation was not that easy.
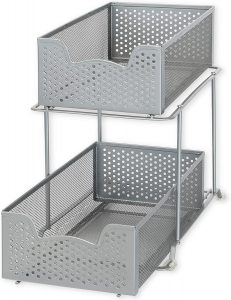
Coming in five colors, these pantry drawers from Simple Houseware are perfect for sprucing up any storage space you have. Compared to other pantry drawers on this list, this comes with its own “cabinet”, so it gets rid of any installation woes you may have.
Best for limited spaces, this two-tier sliding basket is made up of metal and coated in paint. This can give you more cabinet space, whether it is for your kitchen, your bedroom, or someplace else. Put this in your pantry or leave it out for visitors to see — which is a testament to SimpleHouseware’s versatility.
As a bonus, these sliding baskets are completely stackable, but there are only compatible models for stacking. These also have their carrying handles, making them easy to move around the house.
Unfortunately, these two-tier pantry drawers only come in one size. Despite this, they are still flexible additions to your storage area because of the size they do come in.
Key Features
- Made with metal and five finish options
- Freestanding (no mounting required)
- Stackable with other Simple Houseware products
Specifications
- Product dimensions: 14”L x 8” W x 12.75”
- Drawer height and drawer width and height: 3.8” x 6.75”
- Two compartments
- Four items weigh in pounds
Pros
- Comes in five finishes: silver, white, turquoise, pink, and bronze
- Little assembly required
- Sliding baskets
Cons
- Cannot hold too much weight
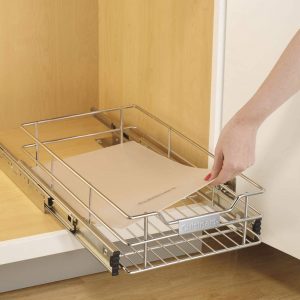
The last option on this list for slide-out drawers for pantry areas is Cuisinart’s 11-inch cabinet organizer. Not unlike the other metal pantry drawers mentioned, this product is made up of metal and chrome finishes.
Weighing 8.5 pounds, these come with their sliding mechanisms. However, these can only fit in cabinets with 12-inch openings or more.
There are four variations of this sliding cabinet organizer, each with its unique dimensions. You can get one that is 11 inches long, 14 inches long (both 1 tier and 2 tier), and 17 inches long. Kitchen pantries tend to have a variety of dry goods, and this sliding cabinet organizer from Cuisinart is a smart way to store them.
Key Features
- Made with metal and chrome finishes
- Sliding pull out pantry drawers
Specifications
- Four product variations: 11”, 14”, 14” (2 tier), and 17” long.
- 8.63 package weight in pounds
Pros
- Easy installation
- Size variation
- Has a thick plastic bottom for durability and cleanliness
Cons
- Size variety is limited.
For the best results and a more efficient way of using your Pull out Pantry Drawers why don’t we answer the following questions …
How to Organize Pull-Out Pantry Drawers?
Photo from Jarek Ceborski on Unsplash
Even the best of pantry drawers need organizing. There is no use in stacking them on top of one another and not having at least a method to the madness.
Pull-out pantry drawers have the advantage of giving you a bird’s eye view of everything in it. Compared to reaching to the back of your cabinets and touching each condiment before you find the right one, pantry drawers that slide are always the more convenient option.
However, there is more to organizing pull-out pantry drawers than just using them. Here is how you can organize your pull-out pantry drawers.
Arrange Them By Item
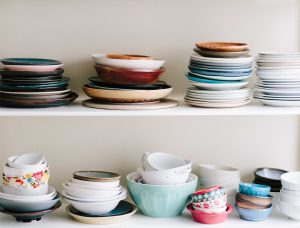
Photo from Brooke Lark on Unsplash
As mentioned above, the main problem with pantries is that once they’re full, it can be hard to see what is in them.
This problem becomes bigger if you do not have an idea where the right kitchen goods and items should go. For example, if condiments, canned goods, and appliances are in one area, then you would have to check and read most bottles to find what you need.
Make the most out of your pantry drawers by limiting their use. Since a lot of the best pantry drawers we listed are stackable, you can buy as many as you need for each item type. You can group your spices better now. Your condiments can be in another layer and your canned food can be right above it.
These pantry drawers give you the freedom to be as creative as you can, especially since most of them have minimalist designs.
Read more: How To Store Leggings In A Drawer
Double Check Your Items
Photo from Dan Counsell on Unsplash
When you start reorganizing your pantry, be sure to double-check which items can be carried over to its cleaner, sleeker version. Buying slide-out drawers for pantry areas is not enough; you also need to see which of your “pantry staples” are worth keeping.
You’d be surprised to find several bottles of the same spice, which have only accumulated because of the pantry’s disorganized nature. Pull-out pantry drawers address this problem, but it won’t help you unless you help it.
Your spices, for example, can grow in number over time. This is because you only use a little of it for a standard meal. Moreover, spices are not the main things you think of in a pantry — so buying them can become like an afterthought that needs no questioning.
Next thing you know, you have several expired spices in your pantry area. These do not need to be stored in pantry drawers anymore.
Invest in Containers

Photo from Diana Polekhina on Unsplash
Keeping your pantry drawers organized also has a lot to do with your containers. While some items come with their own, like canned goods and spices, others still need them. This goes especially for cereals, grains, sugars, and some vegetables.
To give your pantry drawers a sleeker look, you can invest in matching containers of different sizes. Moreover, you can label each canister to make things easier. There are at least 20 kitchen storage containers that can do this job for you in a jiffy.
You can find clear jars, silicone containers, and other types of kitchen storage containers for your pantry drawers.
Read more: How To Organize Vanity Drawers
Look Into Pantry Drawer Alternatives

Photo from Leonie wise on Unsplash
Sometimes, a kitchen pantry’s aesthetic does not benefit from having pull-out pantry drawers in every possible storage space. Because of this, people suggest having a mix of types of storage spaces.
Of course, an obvious move for this would be to explore the sizing options of your pantry drawers. However, the other side of the coin proves to be more fun if not as effective: find alternatives.
There is nothing quite like pull-out pantry drawers when it comes to reliability, economic value, and organization. Still, some kitchen pantries can use more flair. This is where alternatives such as baskets and crates come in.
Beyond DIY pantry drawers, using old baskets and old crates can be effective pantry drawers too. You can even DIY storage baskets for your kitchen shelves if you are up for it.
For others, using old berry baskets is another viable option. You can also opt to repurpose old crates from deliveries and previous gifts.
How to Make Pantry Drawers?
DIY pantry drawers are always an option. While many would want to explore this possibility, making slide-out drawers for pantry areas can be a daunting task. Can you make drawers out of old pantry cabinet spaces? Where should you start?
These questions have answers. Yes, you can make pantry drawers from old pantry cabinet spaces. The answer to the second question follows: you just have to remove the doors of your cabinet and extend its shelves by a few inches.
Taking off your cabinet’s drawers includes removing its hinges and handles. Once this is done, you can take off the shuffle the order of shelves or stick to the original. When converting shelves into drawers, you just have to under its screws (the ones holding it into your cabinet’s frame).
Read more: How To Store Belts In Drawer
Deciding on Pull Out Features

Photo from Scott Rodgerson on Unsplash
When you are done with the skeleton of your cabinet, it is time to decide on how it is going to roll. Of course, to those not interested in pull-out pantry drawers, this is where you stop.
If you want to make pantry drawers like the one on this list though, read on.
You have two easy options in creating your pull-out pantry drawers. The first is by buying roller slides with plastic wheels, and the second is by investing in ball-bearing slides (like the ones from the list). Roller slides are easier to find, but ball-bearings are more heavy-duty.
Whichever is the better option is your decision, but it is important to know how extendable you want your DIY pantry drawers to be. Moreover, you should also take into account what items you are planning to put in your pantry drawers. Heavier items tend to skew roller slides, which narrows down your choices.
Your Organizing Sidekick: Pantry Drawers
Organizing your pantry can be a herculean task. Food is the most replenished item in a household, no matter how small or big a family is. At the end of the day, these pantries will have dry goods of different shapes, sizes, and uses.
For some kitchen pantries, these pantry drawers are more effective as kitchen appliance storage areas. Pair them with other items such as craft tables with storage or use them on their own. Put spices on them or your cleaning materials instead.
Whichever purpose you decide on for these pantry drawers, one thing is clear: they will be your organizing sidekicks.
Was this page helpful?
At Storables.com, we guarantee accurate and reliable information. Our content, validated by Expert Board Contributors, is crafted following stringent Editorial Policies. We're committed to providing you with well-researched, expert-backed insights for all your informational needs.


0 thoughts on “9 Best Pantry Drawers That Organize Your Kitchen Supplies”