Home>Articles>How To Install Tongue And Groove Porch Flooring
Articles
How To Install Tongue And Groove Porch Flooring
Modified: February 25, 2024
Learn how to install tongue and groove porch flooring with our informative articles. Step-by-step guides and tips for a perfect installation.
(Many of the links in this article redirect to a specific reviewed product. Your purchase of these products through affiliate links helps to generate commission for Storables.com, at no extra cost. Learn more)
Introduction
Installing tongue and groove porch flooring is a great way to enhance the beauty and functionality of your outdoor space. With its interlocking design, tongue and groove flooring provides a seamless surface that is not only visually appealing but also durable and long-lasting. Whether you’re looking to create a welcoming porch area or renovate your existing one, this step-by-step guide will walk you through the process of installing tongue and groove porch flooring.
Before we dive into the installation process, it’s important to have a basic understanding of the tools and materials you’ll need. You’ll want to gather the following:
- Tongue and groove porch flooring boards
- Circular saw or miter saw
- Tape measure
- Drill
- Deck screws or nails
- Adhesive
- Spacers
- Hammer
- Level
- Safety glasses
Now that you have all the necessary tools and materials, let’s get started!
Key Takeaways:
- Transform your outdoor space with a seamless and durable tongue and groove porch flooring installation. From preparation to finishing touches, create a visually appealing and long-lasting porch with the right tools and materials.
- Elevate your porch with professional-quality tongue and groove flooring. Follow step-by-step guidance for proper preparation, precise installation, and finishing touches to achieve a beautiful and inviting outdoor space.
Tools and Materials Required
Before you begin installing tongue and groove porch flooring, it’s important to gather all the necessary tools and materials. Here’s a list of what you’ll need:
Tools:
- Circular saw or miter saw: This will be used to cut the porch flooring boards to the desired length.
- Tape measure: To accurately measure the length and width of the porch area.
- Drill: Required for pre-drilling holes and securing the boards.
- Deck screws or nails: These will be used to fasten the tongue and groove boards to the subfloor.
- Adhesive: A construction adhesive is recommended for added stability and to prevent squeaks.
- Spacers: These will help maintain consistent spacing between the boards.
- Hammer: To assist in tapping the boards into place.
- Level: Essential for ensuring a level and even porch floor.
- Safety glasses: It’s important to always protect your eyes when working with power tools.
Materials:
- Tongue and groove porch flooring boards: Choose a material that suits your style and budget. Common options include pressure-treated wood, composite, or PVC.
Once you have gathered all the necessary tools and materials, you’ll be ready to move on to the next steps of the installation process. Make sure to have everything on hand before you begin to ensure a smooth and efficient installation.
Step 1: Preparation
Before you start installing the tongue and groove porch flooring, it is important to prepare the porch area to ensure a successful installation. Here’s what you need to do:
- Clean the porch: Remove any debris, dirt, or old flooring material from the porch. Sweep or vacuum the surface thoroughly to create a clean and smooth base for the new flooring.
- Inspect the subfloor: Check the condition of the subfloor to ensure it is structurally sound and free of any rot or damage. Repair or replace any damaged areas before proceeding with the installation.
- Check for levelness: Use a level to ensure that the porch area is level. If necessary, adjust the subfloor or use leveling compound to create a flat surface.
- Allow for proper ventilation: To prevent moisture buildup and potential damage, ensure that there is proper ventilation beneath the porch. This can be achieved by ensuring adequate spacing between the boards and leaving ventilation gaps at the edges.
- Acclimate the boards: If you are using natural wood boards, it is important to acclimate them to the environment by storing them in the porch area for a few days. This will allow the boards to adjust to the temperature and humidity of the surroundings, minimizing the risk of warping or buckling.
By properly preparing the porch area, you will create a solid foundation for the tongue and groove porch flooring installation. This will help ensure a smooth and long-lasting finished result.
Step 2: Measuring and Cutting the Boards
Once the porch area is properly prepared, you can move on to measuring and cutting the tongue and groove boards. Follow these steps:
- Measure the porch: Using a tape measure, measure the length and width of the porch area. This will help you determine the number of boards you’ll need and their dimensions.
- Calculate the number of boards: Determine the number of boards you’ll need based on the measurements. Keep in mind that you’ll want to leave a small gap between each board for expansion and contraction due to temperature and moisture changes.
- Mark the boards: Using a pencil or marker, mark the desired length on each tongue and groove board. Ensure that the marks are accurate and aligned.
- Cut the boards: Using a circular saw or miter saw, carefully cut along the marked lines to create the desired length for each board. Take your time and make straight and clean cuts.
- Double-check the measurements: Before proceeding with the installation, double-check the measurements of the boards to ensure they are the correct size and will fit properly on the porch.
Accurate measuring and cutting of the tongue and groove boards is crucial for a seamless and professional-looking installation. Take your time and double-check the measurements to avoid any mistakes or discrepancies.
Step 3: Preparing the Subfloor
Before installing the tongue and groove porch flooring, it is important to properly prepare the subfloor. Follow these steps:
- Inspect the subfloor: Thoroughly inspect the subfloor to ensure it is free of any debris, nails, or staples. Remove any obstacles that may interfere with the installation process.
- Install a moisture barrier (if necessary): Depending on your location and climate, it may be necessary to install a moisture barrier on the subfloor to protect the tongue and groove boards from moisture damage. Follow manufacturer instructions for proper installation.
- Apply construction adhesive: Apply a continuous bead of construction adhesive along the entire length of the subfloor, near the edges and centerline. This adhesive will help secure the tongue and groove boards and prevent squeaks.
- Use spacers: Place spacers between each board to create consistent spacing. Spacers can be purchased or made by cutting small pieces of scrap wood to the desired thickness.
- Begin installation: With the subfloor prepped and the adhesive applied, you are ready to start installing the tongue and groove porch flooring.
Preparing the subfloor is a crucial step in ensuring a stable and long-lasting tongue and groove porch flooring installation. It helps create a solid foundation for the boards and minimizes the risk of issues such as squeaking or buckling.
When installing tongue and groove porch flooring, make sure to leave a small gap between the boards to allow for expansion and contraction due to changes in temperature and humidity. This will help prevent buckling and warping over time.
Step 4: Applying Adhesive
Applying adhesive is an important step in the installation process of tongue and groove porch flooring. Follow these steps:
- Choose the right adhesive: Select a high-quality construction adhesive that is recommended for outdoor use. Read the manufacturer’s instructions carefully to ensure proper application and drying time.
- Apply the adhesive: Working in small sections, apply a generous amount of adhesive along the edges and centerline of the subfloor. Use a caulking gun or adhesive applicator to apply a continuous bead of adhesive.
- Spread the adhesive: Use a trowel or adhesive spreader to evenly spread the adhesive over the subfloor. Ensure that the adhesive is applied in a thin and even layer, covering the entire area where the tongue and groove boards will be installed.
- Work efficiently: Adhesive dries quickly, so it’s important to work efficiently. Install the boards while the adhesive is still tacky to ensure a strong bond.
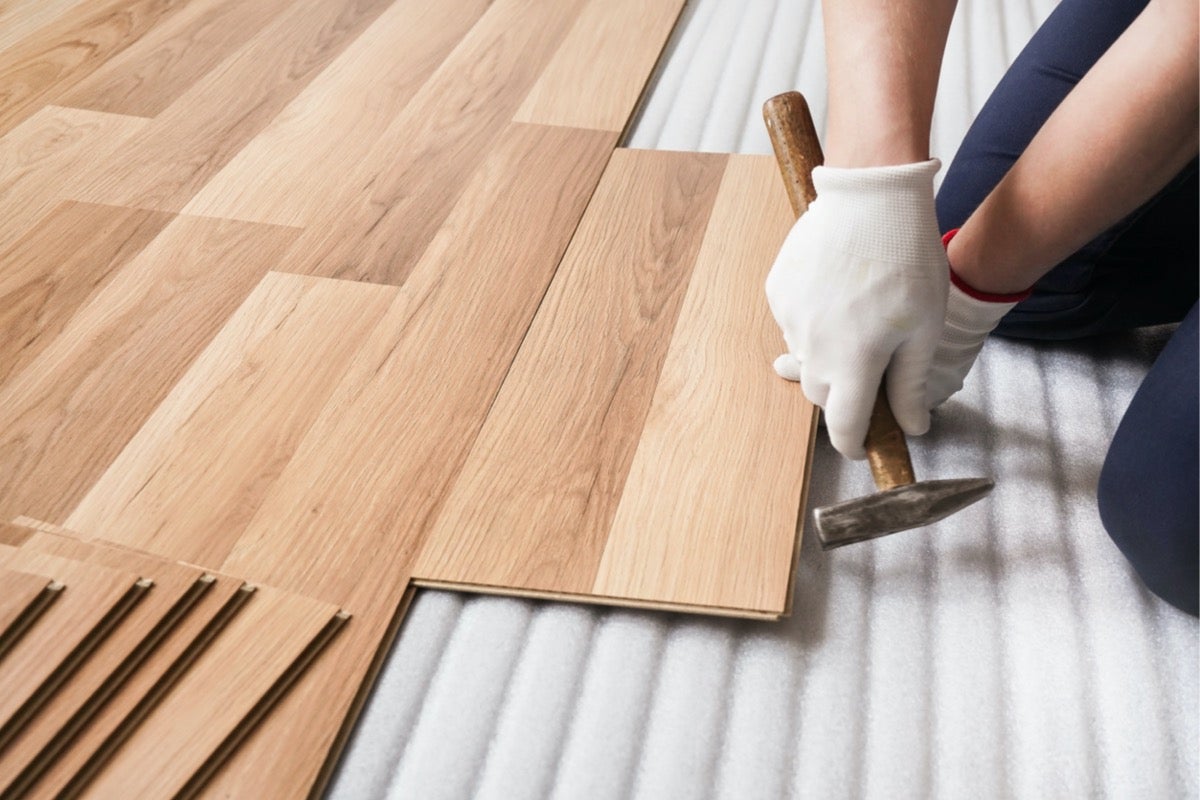
- Secure the boards: Once the adhesive is applied, carefully place the first tongue and groove board into position, ensuring it is aligned and seated properly. Use a hammer and tapping block to gently tap the board into place.
- Continue the installation: Repeat the process with the remaining boards, applying adhesive and securing them one by one. Use spacers to maintain consistent spacing between the boards.
- Wipe off excess adhesive: As you install each board, use a damp cloth to immediately wipe off any excess adhesive that may seep out from the joints.
Applying adhesive provides additional stability to the tongue and groove porch flooring, ensuring a secure and durable installation. It helps prevent movement or shifting of the boards, promoting a solid and long-lasting porch surface.
Step 5: Installing the First Board
Now that the adhesive is applied, it’s time to start installing the tongue and groove porch flooring. Follow these steps to install the first board:
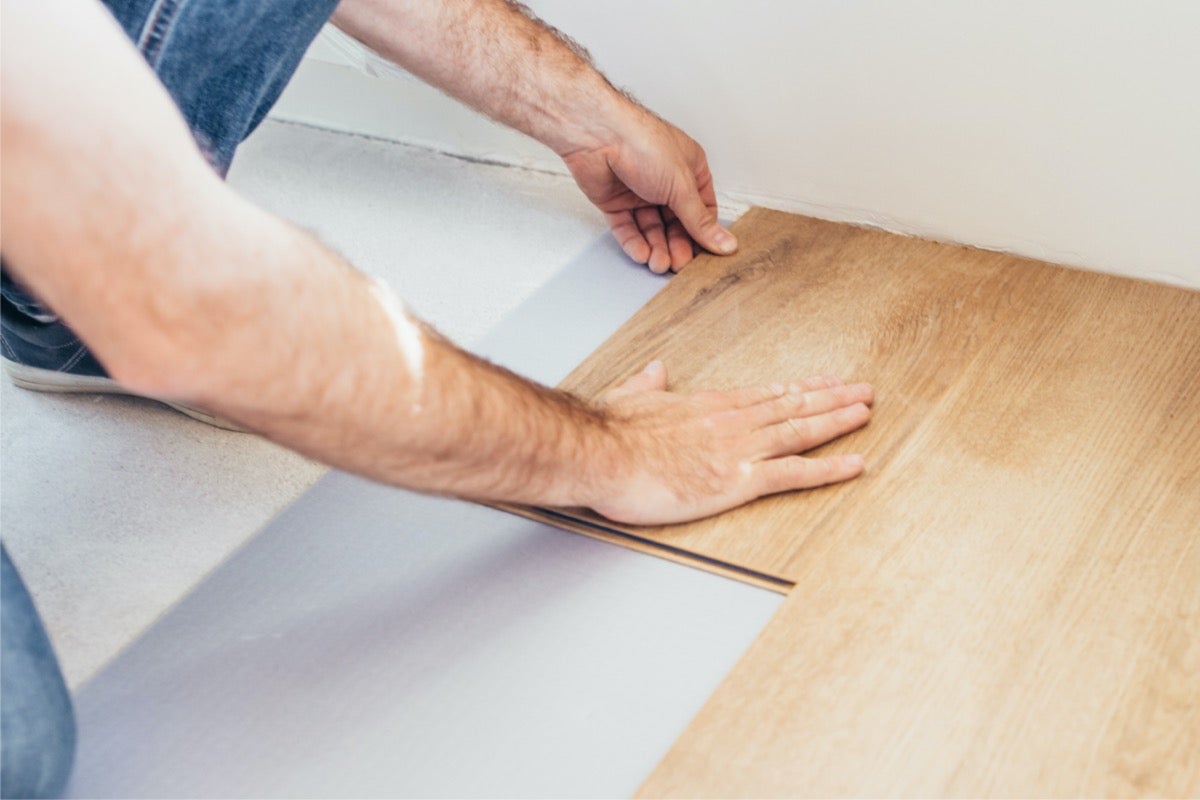
- Align the board: Position the first board at one end of the porch area, ensuring that the tongue side is facing towards the outside edge of the porch.
- Secure the board: Use deck screws or nails to secure the first board to the subfloor. Make sure to drive the fasteners through the tongue of the board at a slight angle to conceal them.
- Check for levelness: Use a level to ensure that the first board is level. If necessary, tap the board gently with a hammer or adjust it slightly to achieve an even and level surface.
- Apply adhesive to the next board: Apply a bead of adhesive along the exposed tongue of the first board and on the corresponding groove of the next board.
- Fit the second board: Carefully insert the tongue of the second board into the groove of the first board, making sure it is aligned and flush with the surface. Use a tapping block and a hammer to gently tap the board into place.
- Secure the second board: Fasten the second board to the subfloor using deck screws or nails, driving them through the tongue at a slight angle.
- Continue the installation: Repeat the process of applying adhesive, fitting the boards together, and securing them to the subfloor. Use spacers to maintain consistent spacing between the boards.
Installing the first board correctly sets the foundation for the rest of the tongue and groove porch flooring. Take your time to align and secure the board properly, ensuring a smooth and professional-looking installation.
Step 6: Installing the Remaining Boards
With the first board in place, it’s time to continue installing the remaining tongue and groove porch flooring boards. Follow these steps:
- Apply adhesive: Apply a bead of adhesive along the exposed tongue of the previously installed board and on the corresponding groove of the next board.
- Fit the next board: Carefully insert the tongue of the next board into the groove of the previous board, ensuring that the boards are aligned and snugly fitted together.
- Tap the boards: Use a tapping block and a hammer to gently tap the boards into place. This helps ensure a tight and secure fit between the tongue and groove.
- Secure the boards: Fasten the boards to the subfloor using deck screws or nails, driving them through the tongue at a slight angle. Make sure to conceal the fasteners for a clean and polished look.
- Continue the installation: Repeat the process of applying adhesive, fitting the boards together, and securing them to the subfloor. Use spacers to maintain consistent spacing between the boards.
As you progress with the installation, periodically check for levelness and make any necessary adjustments. The tongue and groove boards should fit together tightly, creating a seamless and visually appealing porch flooring.
Continue installing the remaining boards in the same manner until the entire porch area is covered. Take your time and work carefully to achieve a professional-quality finish.
Step 7: Finishing Touches
After installing all the tongue and groove porch flooring boards, it’s time to add the finishing touches. Follow these steps to complete the installation:
- Trim the edges: Use a circular saw or a miter saw to trim the edges of the porch flooring to ensure a clean and polished look. Make sure to measure and mark the boards accurately before making any cuts.
- Fill nail or screw holes: If there are any visible nail or screw holes on the porch flooring, fill them with wood putty or a filler that matches the color of the boards. Smooth out the filler and allow it to dry before proceeding.
- Sand the surface: If desired, lightly sand the surface of the porch flooring to create a smooth and even finish. Use sandpaper with a fine grit and sand in the direction of the wood grain.
- Apply a protective finish: To enhance the durability and longevity of the porch flooring, consider applying a protective finish such as a clear sealant or a deck stain. Follow the manufacturer’s instructions for proper application.
- Clean the porch: Once the finishing touches are complete, thoroughly clean the porch area to remove any dust or debris. Sweep or vacuum the surface, and wipe down the boards with a damp cloth if necessary.
With the finishing touches complete, take a moment to step back and admire your beautifully installed tongue and groove porch flooring. Enjoy the inviting and functional space created by your hard work!
Remember to follow any additional maintenance instructions provided by the manufacturer of your chosen porch flooring material to ensure its longevity and continued beauty.
Conclusion
Installing tongue and groove porch flooring can significantly enhance the beauty and functionality of your outdoor space. By following the step-by-step guide outlined in this article, you can achieve a professional-quality installation that will stand the test of time.
From preparing the porch area and measuring the boards to applying adhesive and securing the tongue and groove boards, each step is crucial in creating a seamless and durable porch flooring. Taking the time to properly prepare the subfloor, align the boards, and secure them with the right tools and materials will ensure a stable and visually appealing finished product.
Remember to pay attention to the details, such as trimming the edges, filling holes, sanding the surface, and applying a protective finish. These finishing touches will add the final finesse to your porch flooring, enhancing its overall appearance and longevity.
Whether you choose pressure-treated wood, composite, or PVC porch flooring boards, proper installation and maintenance will maximize the lifespan of your porch and provide you with a beautiful and inviting outdoor space for years to come.
Now that you have a comprehensive understanding of how to install tongue and groove porch flooring, it’s time to gather your tools, materials, and confidence, and get started on transforming your porch into a stunning and functional retreat.
Frequently Asked Questions about How To Install Tongue And Groove Porch Flooring
Was this page helpful?
At Storables.com, we guarantee accurate and reliable information. Our content, validated by Expert Board Contributors, is crafted following stringent Editorial Policies. We're committed to providing you with well-researched, expert-backed insights for all your informational needs.


0 thoughts on “How To Install Tongue And Groove Porch Flooring”