Articles
How To Lay Out Floor Tile
Modified: August 26, 2024
Learn step-by-step instructions for laying out floor tile with informative articles. Discover expert tips and techniques to achieve a flawless tile installation.
(Many of the links in this article redirect to a specific reviewed product. Your purchase of these products through affiliate links helps to generate commission for Storables.com, at no extra cost. Learn more)
Introduction
When it comes to laying out floor tile, it’s important to have a solid plan and the right materials. Whether you’re looking to upgrade the look of your kitchen, bathroom, or any other room in your home, this comprehensive guide will walk you through the process step by step.
One of the main advantages of floor tile is its durability and versatility. Not only does it provide a beautiful and polished finish, but it also withstands heavy foot traffic, stains, and moisture. By following these instructions, you can achieve professional-looking results and transform the appearance of any room.
Before you get started, it’s essential to gather the necessary materials. To lay out floor tile, you will need the following:
Key Takeaways:
- Proper planning, preparation, and attention to detail are essential for successfully laying out floor tiles. From gathering materials to grouting, each step contributes to achieving a professional and durable tiled surface.
- Choosing the right tiles, preparing the surface, applying adhesive and grout correctly, and thorough cleaning are key factors in creating a visually appealing and long-lasting tiled floor. Attention to detail and patience are crucial for a successful tile installation.
Read more: How To Lay Tile On Concrete Floor
Step 1: Gather the Necessary Materials
- Tiles: Choose tiles that suit your style and the room’s décor. They come in various sizes, shapes, and materials, such as ceramic, porcelain, or natural stone.
- Tile adhesive: This is used to bond the tiles to the floor. Make sure you choose the appropriate adhesive for the type of tile you are using.
- Tile spacers: These small plastic pieces help maintain consistent spacing between the tiles, ensuring a professional finish.
- Trowel: A trowel is used to evenly spread the adhesive on the floor. The size of the trowel depends on the tile size and thickness.
- Tile cutter: Depending on your layout, you may need to cut tiles to fit along the edges or around obstacles. A tile cutter will make this task much easier.
- Grout: Grout is the material that fills the gaps between the tiles. It comes in various colors to complement your chosen tiles.
- Grout float: This tool is used to spread the grout evenly into the gaps between the tiles.
- Sponge: You will need a sponge to wipe away excess grout and clean the tiles after grouting.
- Level: A level is essential to ensure that the tiles are laid flat and even.
- Measuring tape: Accurate measurements are crucial for a successful tile layout, so a measuring tape is a must-have tool.
Now that you have all the necessary materials, you’re ready to start preparing the surface for the tile installation. Continue reading for the next step.
Key Takeaways:
- Proper planning, preparation, and attention to detail are essential for successfully laying out floor tiles. From gathering materials to grouting, each step contributes to achieving a professional and durable tiled surface.
- Choosing the right tiles, preparing the surface, applying adhesive and grout correctly, and thorough cleaning are key factors in creating a visually appealing and long-lasting tiled floor. Attention to detail and patience are crucial for a successful tile installation.
Read more: How To Lay Tile On Concrete Floor
Step 1: Gather the Necessary Materials
Before you begin laying out floor tile, it’s essential to gather all the necessary materials. Having everything prepared in advance will save you time and ensure a smooth installation process. Here are the key materials you will need:
Tiles
The first and most crucial component of any tiling project is the tiles themselves. Select tiles that not only suit your style and preferences but also fit the overall design and theme of the room. Tiles come in various materials, such as ceramic, porcelain, or natural stone, each with its own unique qualities and characteristics.
Tile Adhesive
Tile adhesive is the bonding agent used to attach the tiles to the floor. It is important to choose a high-quality adhesive that is suitable for the type of tiles you are using, as different tiles require different adhesives. Follow the manufacturer’s instructions to ensure proper mixing and application of the adhesive.
Read more: How To Lay Mosaic Floor Tile
Tile Spacers
Tile spacers are small plastic pieces that help maintain consistent spacing between tiles. These spacers are essential for achieving even and professional-looking grout lines. Choose spacers that are the appropriate size for your desired grout line spacing.
Trowel
A trowel is a handheld tool with a flat, notched blade that is used to spread the tile adhesive evenly on the floor. The size and shape of the trowel notches will depend on the size and thickness of the tiles. Be sure to choose a trowel that is specifically designed for tile installation.
Tile Cutter
Inevitably, you will need to cut some tiles to fit in specific areas or around obstacles like doorways or cabinets. A tile cutter is a specialized tool that allows for precise and clean cuts. There are different types of tile cutters available, such as snap cutters or wet saws. Choose the one that best suits your needs and the type of tiles you are working with.
Grout
Grout is the material that fills the gaps between the tiles, providing stability and preventing moisture from seeping underneath. There are various types and colors of grout to choose from, depending on your aesthetic preferences. It’s essential to select a grout that is meant for the type and size of tiles you are using.
Read more: How To Lay A Ceramic Tile Floor
Grout Float
A grout float is a rubber or foam tool used to spread the grout evenly into the gaps between the tiles. It allows for smooth application and helps ensure that the grout fills the joints completely. Use the float to spread the grout diagonally across the tiles, pressing it into the gaps and removing any excess as you go.
Sponge
A sponge is necessary for cleaning the tiles and removing excess grout. After spreading the grout with the float, gently wipe the tiles to remove any grout residue. Rinse the sponge frequently to prevent the grout from smearing across the tile surface.
Level
Using a level is essential to ensure that your tiles are laid flat and even. It helps you identify any high or low spots in the surface and make the necessary adjustments before applying the adhesive. A level is a crucial tool that ensures a professional-looking tile installation.
Measuring Tape
Accurate measurements are key to a successful tile layout. A measuring tape allows you to measure the dimensions of the room, determine the placement of tiles, and make precise cuts. Make sure to double-check your measurements to ensure a precise and seamless tile installation.
By gathering all these materials before you start, you’ll be well-prepared and ready to tackle the next steps in laying out your floor tile. The right materials and tools will make the process smoother and help you achieve a professional-looking result.
Read more: How To Lay Tile On Wood Floor
Step 2: Prepare the Surface
Before you can start laying out your floor tiles, it’s crucial to properly prepare the surface. Taking the time to prepare the floor will ensure a smooth and durable tile installation. Here are the key steps to follow:
Clean the Floor
Begin by thoroughly cleaning the floor to remove any dirt, dust, or debris. Sweep or vacuum the area to get rid of loose particles. For stubborn stains or grime, consider using a mild cleaning solution or appropriate floor cleaner. Ensure that the floor is completely dry before moving on to the next step.
Remove Any Existing Flooring or Carpet
If there is any existing flooring or carpet in the room, it must be removed before laying out the new floor tiles. Use appropriate tools to lift and remove the old flooring, ensuring that the underlying surface is exposed and ready for tile installation. Removing the existing flooring will create a smooth and level base for your new tiles.
Fill in Cracks or Uneven Areas
If there are any cracks or uneven areas on the floor, it’s important to address them before laying out the tiles. Cracks can compromise the stability and integrity of the tile installation, so fill them in with an appropriate leveling compound or patching material. Smooth out the surface, ensuring that it is level and free of any irregularities. Allow the filling material to dry completely before proceeding.
Read more: How To Lay Peel And Stick Tile Floors
Apply a Primer (if necessary)
In some cases, it may be necessary to apply a primer before laying out the floor tiles. A primer improves the adhesion between the subfloor and the tile adhesive, ensuring a strong bond. Check the manufacturer’s instructions for the specific type of primer suitable for your subfloor material. Apply the primer evenly and allow it to dry according to the recommended time before moving on to the next step.
Properly preparing the surface is essential for a successful tile installation. By cleaning the floor, removing old flooring or carpet, filling in cracks, and applying a primer if needed, you will create a solid foundation for your new tiles. Taking these steps will ensure that your floor tiles adhere properly and provide long-lasting durability.
Step 3: Plan the Tile Layout
Before you start installing your floor tiles, it’s crucial to plan out the layout to ensure a visually appealing and balanced result. Taking the time to plan your tile placement will help you avoid awkward cuts and ensure that the tiles fit the space perfectly. Here are the key steps to follow when planning your tile layout:
Measure the Room
The first step in planning your tile layout is to accurately measure the dimensions of the room. Use a measuring tape to measure the length and width of the floor area. Take note of any areas that are irregularly shaped or have obstacles such as cabinets or doorways. These measurements will serve as a guide when determining tile placement and making any necessary cuts.
Determine the Center Point
Once you have the room’s measurements, determine the center point of the floor. This is where you will begin laying the tiles, ensuring that the layout is balanced and visually pleasing. To find the center point, measure and mark the midpoint of each wall, both lengthwise and widthwise. The intersection of these marks will be the center point of the room.
Read more: How To Lay Peel And Stick Floor Tile
Dry Lay the Tiles
Before applying any adhesive, it’s a good idea to dry lay the tiles to get a visual representation of how they will fit in the space. Start by placing a few tiles at the center point of the room, following the marks you made earlier. Gradually work your way out from the center, ensuring that the tiles are evenly spaced and aligned. Use tile spacers to maintain consistent spacing between the tiles.
During the dry lay process, pay attention to the placement of the tiles and make any necessary adjustments to achieve your desired layout. This is also the time to identify any areas where you may need to make cuts to fit around obstacles or along the edges of the room. Take note of these areas for reference during the installation process.
By measuring the room, determining the center point, and dry laying the tiles, you can plan and visualize the layout before permanently adhering the tiles to the floor. This step is crucial to ensure that your tile installation is visually pleasing, balanced, and fits the space perfectly. Take your time with this step to avoid any issues during the installation process.
Step 4: Apply the Tile Adhesive
Once you have planned your tile layout, it’s time to move on to the next step: applying the tile adhesive. The adhesive is what bonds the tiles to the floor, ensuring a secure and long-lasting installation. Here’s how to apply the tile adhesive:
Mix the Adhesive According to the Instructions
Start by preparing the tile adhesive according to the manufacturer’s instructions. Each adhesive may have specific mixing ratios and instructions, so it’s important to follow them carefully. Use a clean bucket and mix the adhesive thoroughly to achieve a smooth and consistent consistency. Allow the adhesive to hydrate for the recommended time, as this can affect its bonding properties.
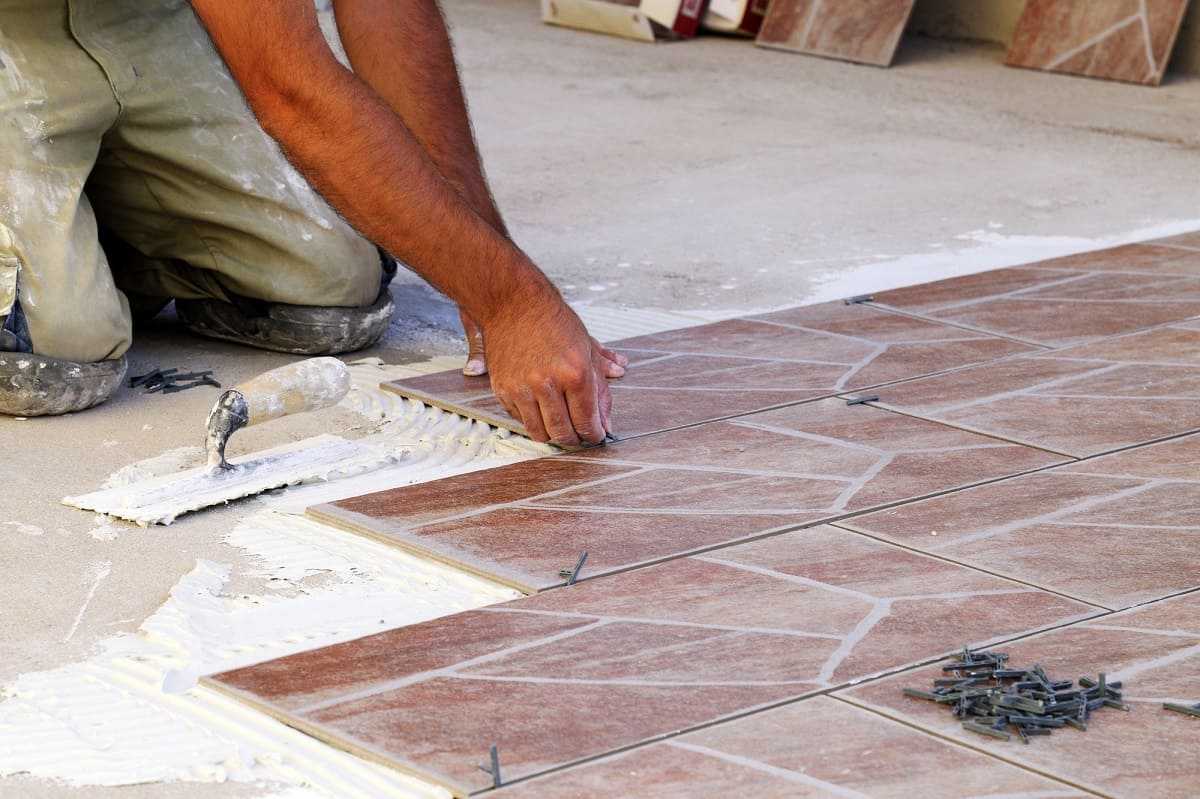
Apply the Adhesive to the Floor Using a Trowel
With the adhesive mixed and ready, it’s time to apply it to the floor. Begin by spreading a layer of adhesive on the floor using a trowel. Hold the trowel at a 45-degree angle and use the flat side to spread a thin and even layer of adhesive on the floor. Start at the center point of the room and work your way outward, covering an area that can be covered with tiles within the adhesive’s open time.
Spread the Adhesive Evenly
After applying the adhesive, use the notched side of the trowel to create grooves in the adhesive. This helps create a firm and even bond between the tiles and the floor. Make sure to hold the trowel at a consistent angle to achieve uniform notches in the adhesive. The size of the notches will depend on the size and thickness of the tiles you are using.
Continue spreading the adhesive and creating notches as you work your way across the floor. It’s important to spread only as much adhesive as you can cover with tiles within the adhesive’s open time, so it remains workable and tacky. This will allow the tiles to adhere properly and minimize any adhesive skinning on the surface before tile installation.
By mixing the adhesive correctly, applying it with a trowel, and spreading it evenly on the floor, you provide a strong and secure base for your tiles. The adhesive ensures that the tiles stay in place and creates a durable bond that withstands daily wear and tear. Take your time during this step to ensure the adhesive is applied correctly, as it plays a vital role in the success of your tile installation.
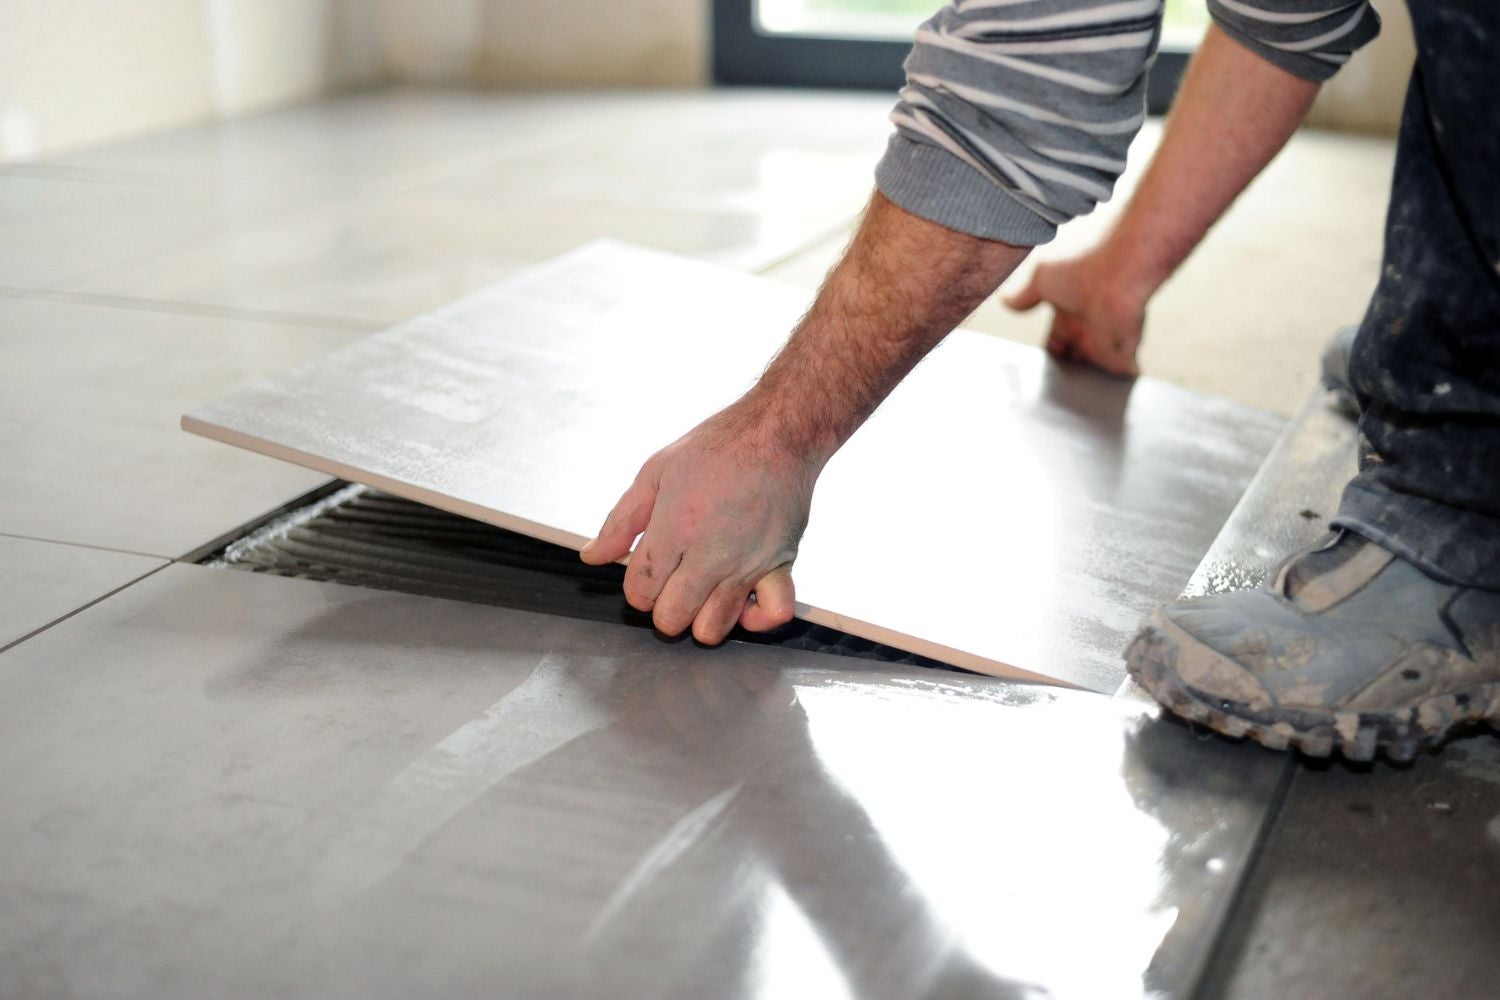
Step 5: Install the Tiles
Now that the adhesive is applied, it’s time to start laying out the floor tiles. This step brings your planned tile layout to life and creates the foundation of your new floor. Follow these steps to ensure a smooth and successful tile installation:
Start at the Center Point
Begin by placing your first tile at the center point of the room, where you previously marked. Align the edges of the tile with the layout lines you created during your dry lay. Press the tile firmly into the adhesive, making sure it is securely bonded to the floor.
Place the Tiles on the Adhesive, Using Spacers for Consistent Spacing
Continue laying the tiles from the center point outward, following your planned layout. Place each tile onto the adhesive, applying even pressure to ensure a strong bond. Use tile spacers to maintain consistent spacing between the tiles. Insert the spacers at each corner or side of the tile, creating equal gaps throughout the installation.
Read more: How To Lay Decking Tiles
Cut Tiles If Necessary
As you reach the edges of the room or encounter obstacles such as cabinets or doorways, you may need to make cuts to fit the tiles properly. Use a tile cutter to trim the tiles to the required size and shape. Measure each area carefully and mark your cutting lines before making any cuts. Take your time to achieve accurate cuts that fit seamlessly into the overall installation.
Continue Laying the Tiles Until the Whole Floor Is Covered
Work methodically and continue laying the tiles, row by row, until the entire floor is covered. Follow your planned layout, ensuring that the tiles are properly aligned and the spacing is consistent. Check the level of each tile as you go to ensure a flat and even surface. Adjust the tile as needed by tapping lightly with a rubber mallet.
During the installation process, periodically check the tiles for any adhesive that may have squeezed up between them. Wipe away any excess adhesive with a damp cloth or sponge before it dries. This will ensure a clean and professional finish once the tile installation is complete.
By starting at the center point, placing the tiles on the adhesive with spacers, cutting tiles when necessary, and continuing the installation until the entire floor is covered, you will achieve a visually appealing and well-laid tile floor. Take your time and pay attention to detail to ensure a successful installation that will enhance the beauty and functionality of the space.
Step 6: Allow the Adhesive to Dry
After installing the floor tiles, it’s crucial to allow the adhesive to dry properly. This step ensures that the tiles bond securely to the floor, creating a strong and durable surface. Follow these guidelines to ensure that the adhesive fully cures:
Follow the Drying Time Specified on the Adhesive Packaging
Each type of tile adhesive has a specific drying time, which is usually indicated on the packaging. It’s important to follow these guidelines to allow the adhesive to cure properly. The drying time can vary depending on the adhesive type, room temperature, humidity levels, and the size and thickness of the tiles. Make sure to read and understand the instructions to determine the appropriate drying time for your specific adhesive.
Avoid walking on the tiles or placing any heavy objects on the floor during the drying period. Doing so can disrupt the adhesive bond and compromise the installation. It’s essential to allow the adhesive to fully set and cure before moving on to the next step in the tile installation process.
Keep in mind that the drying time may differ between different areas of the room. Adhesive near walls may take longer to dry due to limited air circulation. Take extra care when navigating these areas to prevent any damage or disturbance to the tiles.
It’s worth noting that proper drying time is essential not only for the integrity of the tile installation but also for the success of the grouting process. Applying grout before the adhesive has fully cured can weaken the bond between the tiles and cause problems in the future.
By following the specified drying time on the adhesive packaging, you allow the adhesive to fully cure and ensure a strong bond between the tiles and the floor. Patience during this step will contribute to the overall quality and longevity of your tile installation.
Read more: How To Lay Out A Garden
Step 7: Grout the Tiles
Grouting is the final step in laying out floor tiles, and it plays a crucial role in providing a finished and polished look to your tiled surface. Follow these steps to ensure a successful grouting process:
Mix the Grout According to the Instructions
Before you start applying the grout, prepare the grout mixture according to the manufacturer’s instructions. The instructions may vary depending on the type of grout you are using, so it’s important to read and follow them carefully. Mix the grout thoroughly in a clean bucket to achieve a smooth consistency without any lumps.
Apply the Grout Using a Grout Float
Using a grout float, scoop a generous amount of grout mixture onto the float’s flat edge. Hold the float at a 45-degree angle and use it to spread the grout diagonally across the tiles. Push the grout into the joints, making sure the gaps are completely filled. Work in small sections, and avoid leaving any gaps or voids in the grouted lines.
Remove Excess Grout with a Sponge
Once you have applied the grout, use a damp sponge to remove excess grout from the tiles’ surface. Hold the sponge at a 45-degree angle and gently wipe across the tiles in a diagonal motion, ensuring that you don’t dislodge any grout from the joints. Rinse the sponge frequently in clean water to prevent smearing the grout. Continue cleaning the tiles until the grout lines appear neat and defined.
Read more: How To Lay Laminate Floor
Let the Grout Dry
Allow the grout to dry according to the manufacturer’s instructions. The drying time may vary depending on the type of grout and environmental conditions. Avoid walking on the freshly grouted surface until it is fully dry to prevent any damage or shifting of the grout lines. It’s crucial to let the grout cure undisturbed to achieve a strong and resilient finish.
During the drying process, you may notice a haze or residue on the tiles’ surface. This is a normal occurrence and can be easily removed once the grout has fully dried. Use a clean, dry cloth or a haze remover recommended by the grout manufacturer to clean the tiles and restore their natural shine.
By mixing the grout correctly, applying it with a grout float, removing excess grout with a sponge, and allowing the grout to dry undisturbed, you will achieve beautifully grouted tiles. Grouting not only enhances the aesthetic appeal of your tiled surface but also provides stability and protection to the tiles and their joints.
Step 8: Clean the Tiles
After grouting the tiles, it’s essential to thoroughly clean the surface to remove any remaining grout haze and ensure a pristine finish. Follow these steps to effectively clean your newly grouted floor tiles:
Remove Any Remaining Grout Haze
Once the grout has dried, you may notice a haze or residue left on the tiles’ surface. This is a common occurrence that can be easily removed. For this step, you will need a haze remover or a mixture of water and vinegar.
Apply the haze remover or the water and vinegar solution to the tiles, following the manufacturer’s instructions. Use a clean, lint-free cloth or a soft sponge to gently scrub the surface in a circular motion. Pay close attention to the grout lines and any areas where the haze is visible. Rinse the cloth or sponge frequently and change the cleaning solution as needed.
Clean the Tiles with a Damp Sponge
Once the grout haze is fully removed, it’s time to give your tiles a final cleaning. Dampen a clean sponge with fresh water and gently wipe down the entire surface of the tiles, paying attention to any remaining residue or dirt. Rinse the sponge frequently to prevent spreading any grime or residue.
Make sure to remove any excess water from the tiles after cleaning by wiping them dry with a clean, dry cloth. This step will prevent water spots and streaks from forming on the tiles once they dry.
By thoroughly cleaning the tiles after grouting, you will achieve a pristine and professional-looking finished result. Removing any grout haze and cleaning the tiles not only enhances their appearance but also helps maintain their longevity and cleanliness.
With the completion of the cleaning process, your newly laid out and grouted floor tiles are now ready to be admired and enjoyed. Take a moment to appreciate the transformation and the hard work that went into creating a beautiful and functional tiled surface in your home.
Read more: How To Lay Brick Floor
Conclusion
Congratulations! You have successfully completed the process of laying out floor tiles. With careful planning, proper preparation, and attention to detail, you have transformed the look and feel of your space. Tiled floors not only bring aesthetic appeal to a room but also offer durability and easy maintenance.
From gathering the necessary materials to grouting the tiles, each step played a crucial role in achieving a professional and long-lasting result. By following this comprehensive guide, you have learned the importance of measuring, planning, and applying adhesive and grout correctly. These skills will serve you well in future tiling projects.
Remember to always choose tiles that suit your style and preferences while ensuring they are suitable for the area you are working on. Properly preparing the surface by cleaning, removing old flooring, and filling in cracks or uneven areas sets the stage for a successful tile installation.
Throughout the process, take your time to ensure that each tile is laid with precision, using spacers for consistent spacing and making necessary cuts to fit the edges or obstacles. Allow the adhesive and grout to dry fully before moving on to the next step, as this ensures a strong bond and polished finish.
Lastly, don’t forget to thoroughly clean the tiles after grouting, removing any residue or remaining grout haze. This final step adds the finishing touch and gives your tiled floor a clean and beautiful appearance.
With your newly tiled floor, you have not only given your space a refreshed and upgraded look but also added value to your home. Whether it’s in the kitchen, bathroom, or any other room, your newly laid out floor tiles will bring functionality, style, and lasting beauty for years to come.
Enjoy your new space and take pride in the work you have accomplished. Remember, always consult the manufacturer’s instructions and guidelines for the specific materials and tools you are using. Happy tiling!
Frequently Asked Questions about How To Lay Out Floor Tile
Was this page helpful?
At Storables.com, we guarantee accurate and reliable information. Our content, validated by Expert Board Contributors, is crafted following stringent Editorial Policies. We're committed to providing you with well-researched, expert-backed insights for all your informational needs.


0 thoughts on “How To Lay Out Floor Tile”