Articles
How To Level A Concrete Basement Floor
Modified: January 19, 2024
Learn how to level a concrete basement floor with our informative articles. Gain valuable tips and expert advice to achieve a smooth and even flooring surface.
(Many of the links in this article redirect to a specific reviewed product. Your purchase of these products through affiliate links helps to generate commission for Storables.com, at no extra cost. Learn more)
Introduction: Understanding the Importance of Leveling a Concrete Basement Floor
When it comes to renovating or remodeling a basement, one crucial aspect often overlooked is the levelness of the concrete floor. A level basement floor not only improves the overall aesthetics but also ensures the functionality and safety of the space. Whether you plan to use the basement for storage, recreation, or as an additional living area, leveling the concrete floor is essential.
A concrete basement floor that is not level can cause a myriad of problems. It can create an uneven surface, making it difficult to install flooring materials, such as tiles, carpet, or hardwood. Furthermore, an uneven floor can lead to the development of cracks, which can compromise the structural integrity of the space. Uneven floors also pose safety hazards, causing people to trip and fall.
Leveling a concrete basement floor is a process that involves assessing the condition of the floor, preparing the area, mixing and applying the leveling compound, and ensuring proper curing and drying. By following the steps outlined in this article, you can achieve a level and smooth basement floor that serves as a sturdy foundation for your renovation endeavors.
In the following sections, we will discuss in detail how to assess the floor for any unevenness or cracks, the tools and materials required for the leveling process, steps for preparing the basement, mixing and applying the leveling compound, techniques for smoothing and finishing the floor, and additional considerations for maintenance and care.
So, if you’re ready to transform your basement into a functional and visually appealing space, let’s dive into the process of leveling your concrete basement floor.
Key Takeaways:
- Transform your basement into a functional and visually appealing space by leveling the concrete floor. It’s essential for safety, aesthetics, and ensuring a sturdy foundation for your renovation endeavors.
- Properly assess, prepare, and apply the leveling compound to achieve a level and smooth basement floor. Follow manufacturer’s guidelines for curing, drying, and maintenance to ensure long-term durability and stability.
Read more: How To Level A Concrete Floor
Assessing the Floor: Inspecting the Condition of the Concrete Basement Floor – Identifying Any Cracks, Unevenness, or Dips
Before you can begin the process of leveling a concrete basement floor, it’s essential to conduct a thorough inspection to assess its condition. This step will help you identify any cracks, unevenness, or dips that need to be addressed for a successful leveling project.
Start by clearing the floor of any debris or loose items. This will allow you to have a clear view of the entire surface. Use a flashlight to inspect the floor closely, paying attention to any signs of damage or wear.
Look for visible cracks that may have developed over time. It’s important to differentiate between typical shrinkage cracks and larger cracks that may indicate more significant structural issues. Take note of the location and extent of each crack.
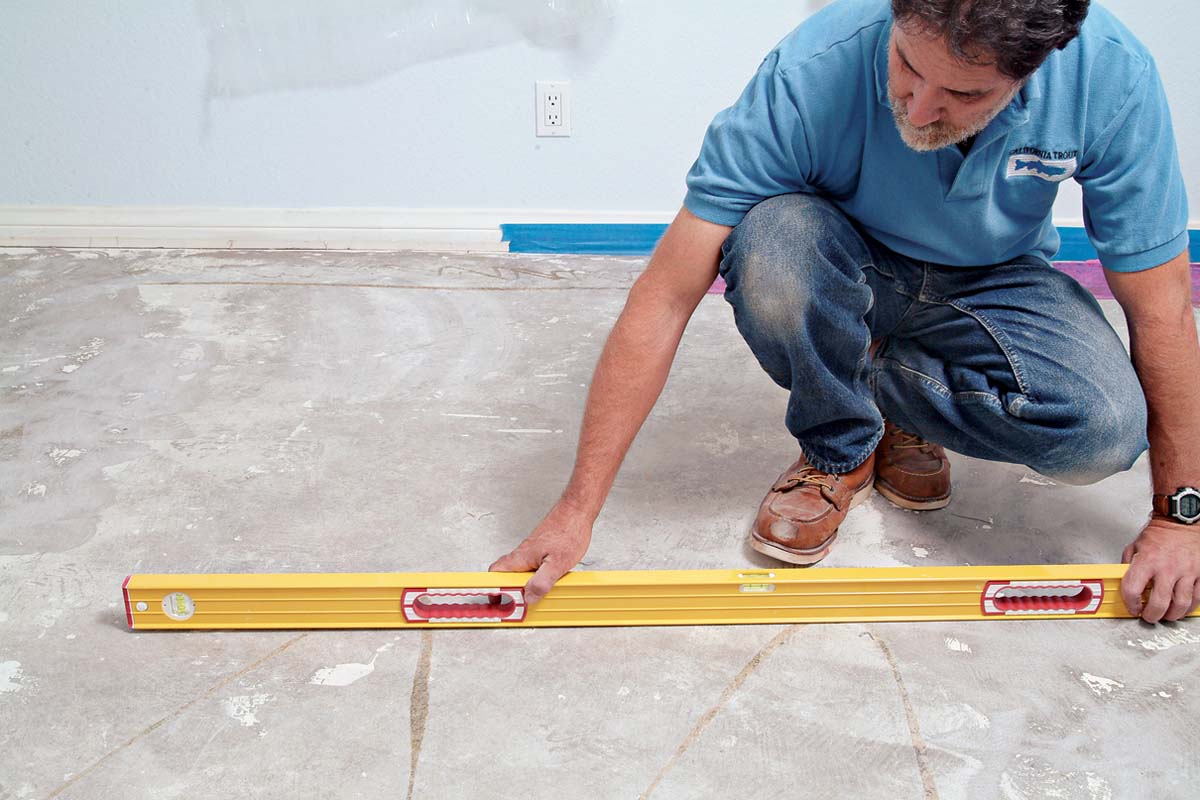
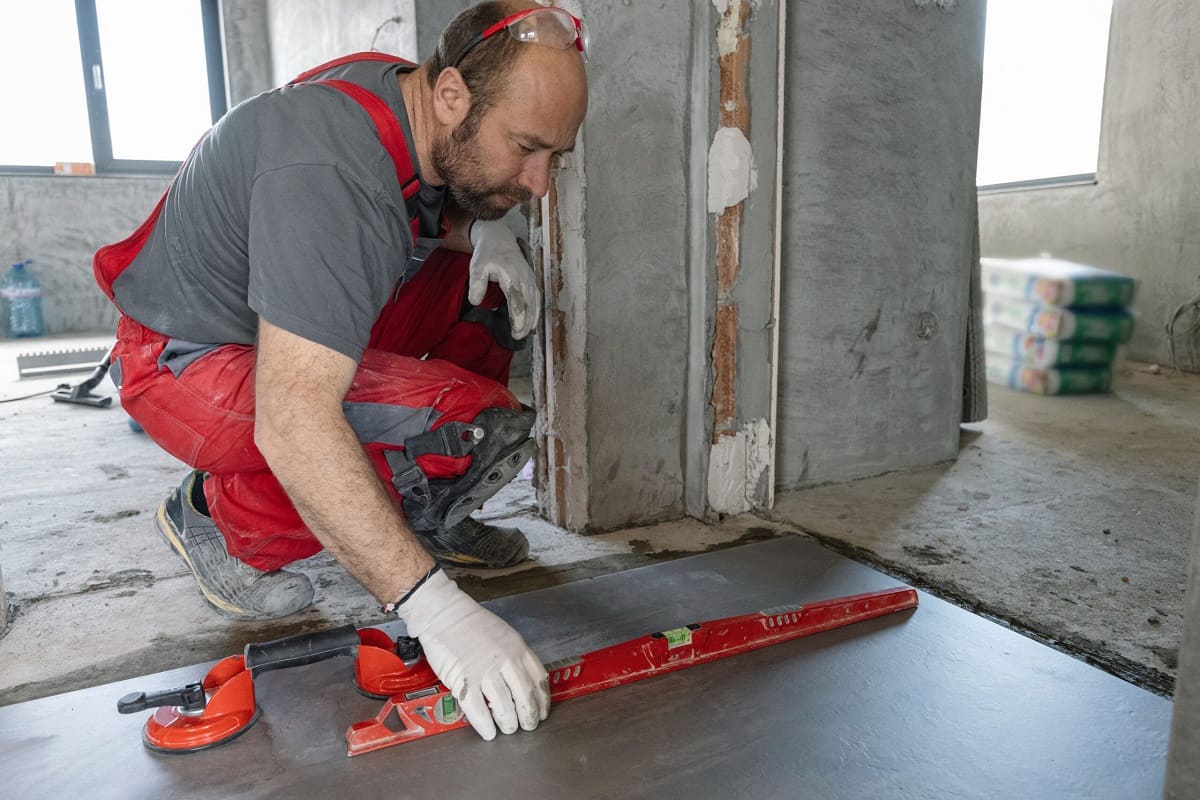
In addition to cracks, check for any areas of the floor that appear uneven or have dips. You can do this by using a long, straight board or a level. Place the board or level on various sections of the floor and observe for any gaps or tilting. These uneven areas may require more attention during the leveling process.
Unevenness in the basement floor can be caused by various factors, such as settling or shifting of the foundation, moisture-related issues, or poor initial installation. Understanding the underlying cause of the unevenness will help you determine the most appropriate solution.
Once you have completed a thorough inspection and identified any cracks, unevenness, or dips, you can proceed with the next steps in the basement floor leveling process. Remember to take accurate measurements and document the condition of the floor before moving forward. This will help you track your progress and evaluate the effectiveness of the leveling techniques you apply.
By taking the time to assess the condition of your concrete basement floor, you create a foundation for a successful leveling project. Identifying and addressing any cracks, unevenness, or dips beforehand will ensure a smoother and more durable floor surface. So let’s move on to the next stage and gather the necessary tools and materials for leveling the basement floor.
Gathering the Necessary Tools and Materials: List of Tools Required for Leveling a Concrete Basement Floor – Recommended Materials for the Leveling Process
Before you can start leveling your concrete basement floor, it’s essential to gather all the necessary tools and materials. Having the right equipment and supplies on hand will ensure a smooth and efficient leveling process. Here is a list of the tools and materials you’ll need:
Tools:
- Tape measure – for accurate measurements
- Straightedge or level – to check for unevenness
- Chalk line – for marking reference lines
- Hammer – for removing any loose debris
- Power drill – for mixing the leveling compound
- Mixing paddle – to blend the leveling compound
- Trowel – for applying the leveling compound
- Squeegee or floor scraper – to spread and smooth the compound
- Protective gear – including safety glasses, gloves, and a mask, to ensure safety during the process
- Vacuum or broom – for cleaning the floor surface before leveling
Materials:
- Leveling compound – choose a high-quality and self-leveling compound that is suitable for your specific basement floor requirements
- Primer – if recommended by the manufacturer of the leveling compound
- Crack filler – for repairing any cracks before applying the leveling compound
- Concrete bonding agent – if needed to improve adhesion between the existing floor and the leveling compound
- Plastic sheeting or drop cloths – to protect surrounding areas from any spills or splatters
- Clean water – for mixing the leveling compound
It’s important to note that the specific tools and materials needed may vary depending on the condition of your basement floor, the chosen leveling compound, and any additional requirements specified by the manufacturer. Therefore, it’s always a good idea to check the instructions and guidelines provided with your chosen products.
Having all the necessary tools and materials ready before you start the leveling process will save you time and ensure a more efficient workflow. So, once you have gathered everything, it’s time to prepare your basement for the leveling project. In the next section, we will discuss the steps for preparing the basement prior to leveling the concrete floor.
Read more: How Thick Is Basement Concrete Floor
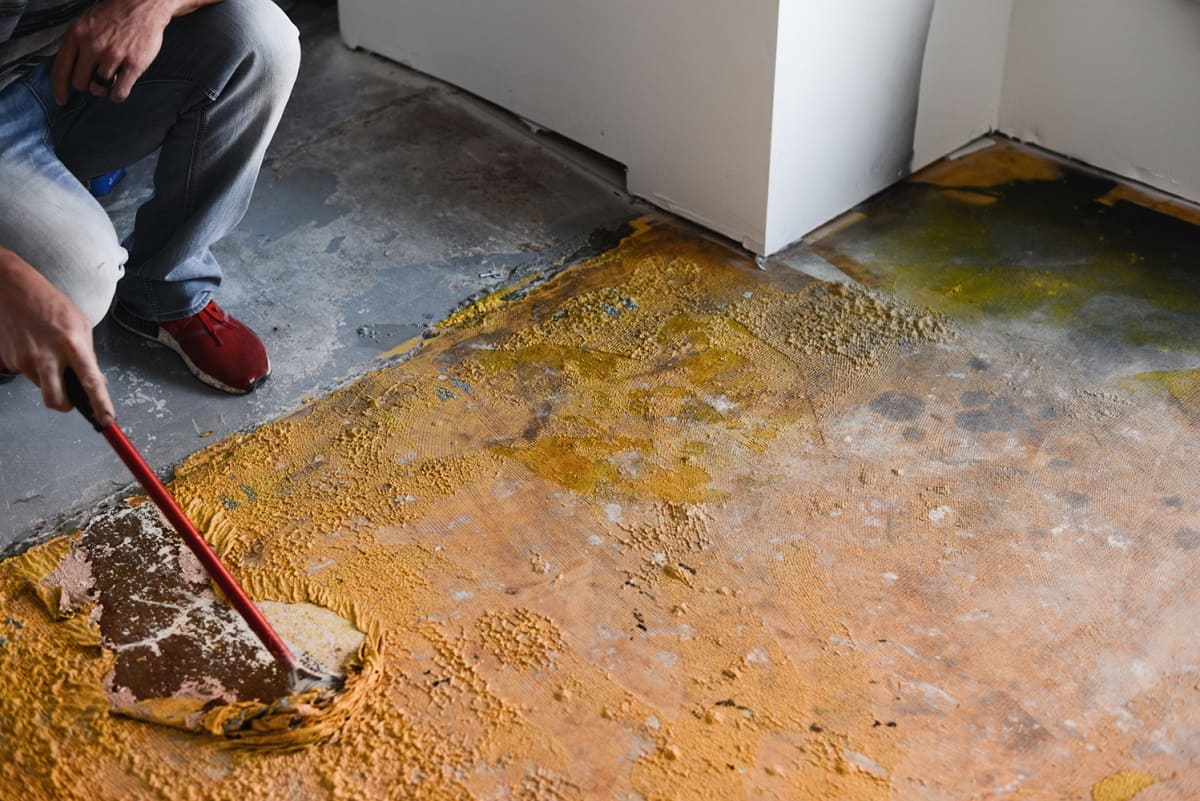
Preparing the Basement: Clearing the Area and Removing Any Obstacles – Cleaning the Concrete Surface Before Leveling
Before you can begin the process of leveling your concrete basement floor, it’s crucial to properly prepare the area. Preparing the basement involves clearing the space, removing any obstacles, and thoroughly cleaning the concrete surface. By taking these steps, you create a clean and debris-free environment for a successful leveling project.
Clearing the Area and Removing Any Obstacles:
The first step in preparing your basement is to clear the area of any furniture, boxes, or other items that may obstruct your work. Remove any obstacles that could get in the way or hinder the even application of the leveling compound. This will give you ample space and unrestricted access to the entire floor surface.
Cleaning the Concrete Surface:
Once the area is clear, it’s time to clean the concrete surface. Use a broom or vacuum cleaner to remove any loose dirt, dust, or debris from the floor. Pay special attention to corners, edges, and hard-to-reach areas. Take care to remove any cobwebs or spider nests that may have formed in the basement.
Next, prepare a solution of warm water and a mild detergent. Use a mop or a scrub brush to clean the entire surface of the floor. Scrub away any stubborn stains or dirt buildup. Rinse the floor thoroughly with clean water to remove any residue from the cleaning solution.
After cleaning, allow sufficient time for the floor to dry completely. The drying time can vary depending on factors such as the temperature and humidity levels in the basement. It’s important to ensure that the concrete surface is completely dry before proceeding to the next steps.
By clearing the area and removing any obstacles, you create a workspace that is free of obstructions, allowing you to work efficiently and effectively. Cleaning the concrete surface removes dirt and debris, ensuring a clean and smooth foundation for the leveling compound.
Now that the basement is prepared, it’s time to move on to the next step – mixing the leveling compound. In the following section, we will provide instructions for preparing the leveling compound mixture and tips for achieving the right consistency.
Mixing the Leveling Compound: Instructions for Preparing the Leveling Compound Mixture – Tips for Achieving the Right Consistency
Once you have prepared your basement and cleaned the concrete surface, the next step in leveling the floor is to mix the leveling compound. This process involves carefully following the manufacturer’s instructions and ensuring that the mixture achieves the right consistency for optimal results. Here are the instructions for preparing the leveling compound mixture and some tips to help you achieve the desired consistency:
Read more: How To Clean Basement Concrete Floor
Instructions for Preparing the Leveling Compound Mixture:
- Read the manufacturer’s instructions: Begin by carefully reading the instructions provided by the manufacturer. Each leveling compound may have specific mixing ratios and instructions that need to be followed.
- Gather the necessary materials: Collect the leveling compound, clean water, and any additional products required, such as primer or bonding agent, as recommended by the manufacturer.
- Choose the mixing container: Select a clean, sturdy container that is appropriate in size for the amount of leveling compound needed. A clean plastic bucket or mixing tub can work well.
- Pour the leveling compound: Empty the required amount of leveling compound powder into the mixing container. Use a scale or measure according to the manufacturer’s instructions to ensure accurate proportions.
- Add water gradually: Begin adding clean water to the powder in the mixing container. Follow the manufacturer’s guidelines for the recommended water-to-powder ratio.
- Mix thoroughly: Use a power drill with a mixing paddle attachment to blend the leveling compound and water. Start at a low speed and gradually increase as you mix. Ensure that all the powder is incorporated and the mixture is smooth and lump-free.
- Check the consistency: Periodically stop mixing and evaluate the consistency of the mixture. The leveling compound should have a smooth, pourable consistency, similar to pancake batter. It should not be too thick or too thin.
Tips for Achieving the Right Consistency:
- Follow the manufacturer’s instructions: Always refer to the specific instructions provided by the manufacturer for accurate mixing ratios and guidelines.
- Start with less water: It’s easier to add water gradually to achieve the desired consistency. Begin with a smaller amount of water and gradually increase as needed.
- Avoid overmixing: While it’s important to thoroughly mix the leveling compound, be careful not to overmix. Overmixing can introduce air bubbles into the mixture, which can affect the leveling process.
- Test the consistency: Conduct a small test application of the leveling compound on a small area of the floor. This will help you determine if the consistency is appropriate and make adjustments if needed.
Properly mixing the leveling compound is essential for achieving a consistent and workable material. By following the manufacturer’s instructions and paying attention to the mixture’s consistency, you ensure that the leveling compound can be applied smoothly and effectively. With the leveling compound mixture ready, you can now proceed to the next step – applying the leveling compound to the concrete basement floor.
Applying the Leveling Compound: Step-by-Step Guide for Applying the Leveling Compound – Techniques for Achieving an Even and Smooth Surface
Once you have prepared the leveling compound mixture, the next step in leveling your concrete basement floor is applying the leveling compound. This process involves careful application techniques to ensure an even and smooth surface. Here is a step-by-step guide for applying the leveling compound and some techniques to achieve the desired results:
Step-by-Step Guide for Applying the Leveling Compound:
- Mix small batches: Start by mixing smaller batches of leveling compound at a time. This will give you more control over the application process and prevent the mixture from drying out before you can properly work with it.
- Prime the surface (if necessary): Some leveling compounds require a primer to improve adhesion. If recommended by the manufacturer, apply a thin layer of primer according to the instructions and allow it to dry before proceeding.
- Start in a corner: Begin by applying the leveling compound in a corner of the basement. This allows you to work your way out of the space without stepping on the freshly applied compound.
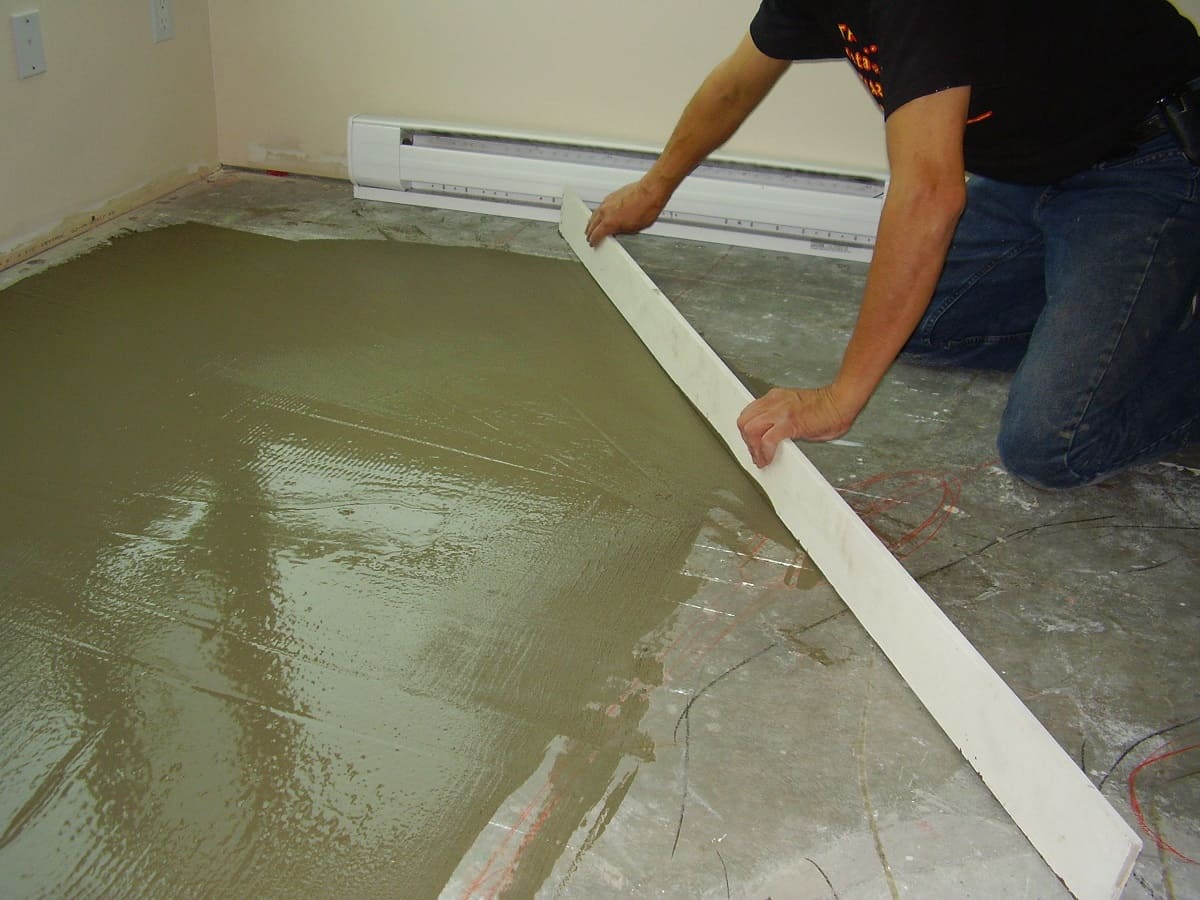
- Pour the compound: Pour a small amount of the leveling compound onto the floor in front of you. Use a trowel to spread and push the compound evenly across the floor surface.
- Work in sections: Divide the basement floor into manageable sections and focus on one section at a time. This will help you maintain control over the application and ensure an even thickness of the leveling compound.
- Spread with a trowel: Using a trowel, spread the leveling compound smoothly over the section, aiming for an even thickness. Take care to fill in any cracks or low spots, and feather out the edges of each section to create a seamless transition.
- Level with a straightedge or level: After spreading the compound, use a straightedge or level to check the evenness of the surface. Adjust the compound as needed to achieve a level and smooth finish.
- Remove excess compound: Cleanly wipe off any excess leveling compound from the edges and corners of the section. This will ensure a neat and professional-looking finish.
- Continue section by section: Repeat the process for each section of the basement floor until the entire area is covered with the leveling compound.
Read more: How To Seal Concrete Basement Floor
Techniques for Achieving an Even and Smooth Surface:
- Use a self-leveling compound: If working with a self-leveling compound, it will naturally settle and level itself out to a large extent. However, it’s still important to guide the flow of the compound and ensure an even application.
- Take your time: Applying the leveling compound requires patience and attention to detail. Take your time to spread and level the compound carefully for a professional-looking finish.
- Work in small areas: By focusing on smaller sections at a time, you can maintain control and achieve a more even thickness of the leveling compound.
- Smooth out any imperfections: Use a trowel or squeegee to smooth out any imperfections, ridges, or air bubbles that may have formed during the application process. This will result in a smoother surface.
- Follow the manufacturer’s instructions: Always refer to the manufacturer’s recommended techniques for applying the specific leveling compound you’re using. Different compounds may have unique requirements.
By following these step-by-step instructions and employing the suggested techniques, you can apply the leveling compound to your basement floor with confidence. Remember to work systematically and consistently across the entire area to achieve an even and smooth surface. Once the leveling compound has been applied, it’s time to move on to the next stage: smoothing and finishing the floor. This step will help refine the surface and create a polished appearance.+
Smoothing and Finishing: Tools and Methods for Smoothing Out the Leveling Compound – Applying Finishing Touches for a Polished Appearance
After applying the leveling compound to your concrete basement floor, the next step is to smooth out the surface and apply finishing touches for a polished appearance. This stage involves using the right tools and techniques to achieve a level and smooth finish. Here are some tools and methods you can use to smooth out the leveling compound and apply finishing touches:
Tools for Smoothing Out the Leveling Compound:
- Trowel: A trowel is a versatile tool that can be used to spread and level the leveling compound during the application process. It is also handy for smoothing out any rough patches or ridges.
- Float: A float is a tool with a flat surface, typically made of wood or plastic. It is useful for smoothing out larger areas of the leveling compound and ensuring an even finish.
- Squeegee: A squeegee with a rubber blade can be used to spread and smooth the leveling compound, particularly when working with self-leveling compounds. It helps to distribute the compound evenly and remove excess moisture.
- Sanding block or sandpaper: If there are any minor imperfections or bumps on the surface of the leveling compound after it has dried, a sanding block or sandpaper can be used to gently smooth them out.
Methods for Smoothing Out the Leveling Compound:
- Float and trowel method: Start by using a float or a trowel to smooth out larger sections of the leveling compound. Hold the tool at a shallow angle and repeatedly pass it over the surface in a back-and-forth motion. This process helps to level the compound and remove any high spots.
- Squeegee method: For self-leveling compounds, use a squeegee with a rubber blade to spread the compound across the floor, guiding it to any low spots or uneven areas. The self-leveling nature of the compound will help it settle and create a smoother surface.
- Feathering: Feathering is the technique of blending the edges of the leveling compound with the surrounding floor. Use a trowel or a float to feather out the edges by gently smoothing and blending them with the existing floor surface. This creates a seamless transition and prevents any uneven edges from standing out.
- Sanding: If needed, after the leveling compound has fully cured, you can use a sanding block or sandpaper to gently sand any minor imperfections or bumps on the surface. Be careful not to remove too much of the leveling compound and maintain an even finish.
Read more: How To Clean Concrete Basement Floors
Applying Finishing Touches for a Polished Appearance:
- Inspect the surface: After smoothing out the leveling compound, take a close look at the entire surface to spot any remaining imperfections or ridges. This will help you identify areas that require further attention.
- Fill small imperfections: Use a trowel or putty knife to fill any small indentations or imperfections in the leveled surface with a thin layer of leveling compound. Smooth it out and allow it to dry before proceeding.
- Check for levelness: Use a straightedge or level to verify that the surface is level and even. This step is crucial, especially if you plan to install flooring materials directly on top of the leveled floor.
- Clean the surface: Before proceeding with any further steps, make sure to thoroughly clean the surface to remove any dust or debris that may have accumulated during the smoothing process. This will ensure proper adhesion for any subsequent flooring installations.
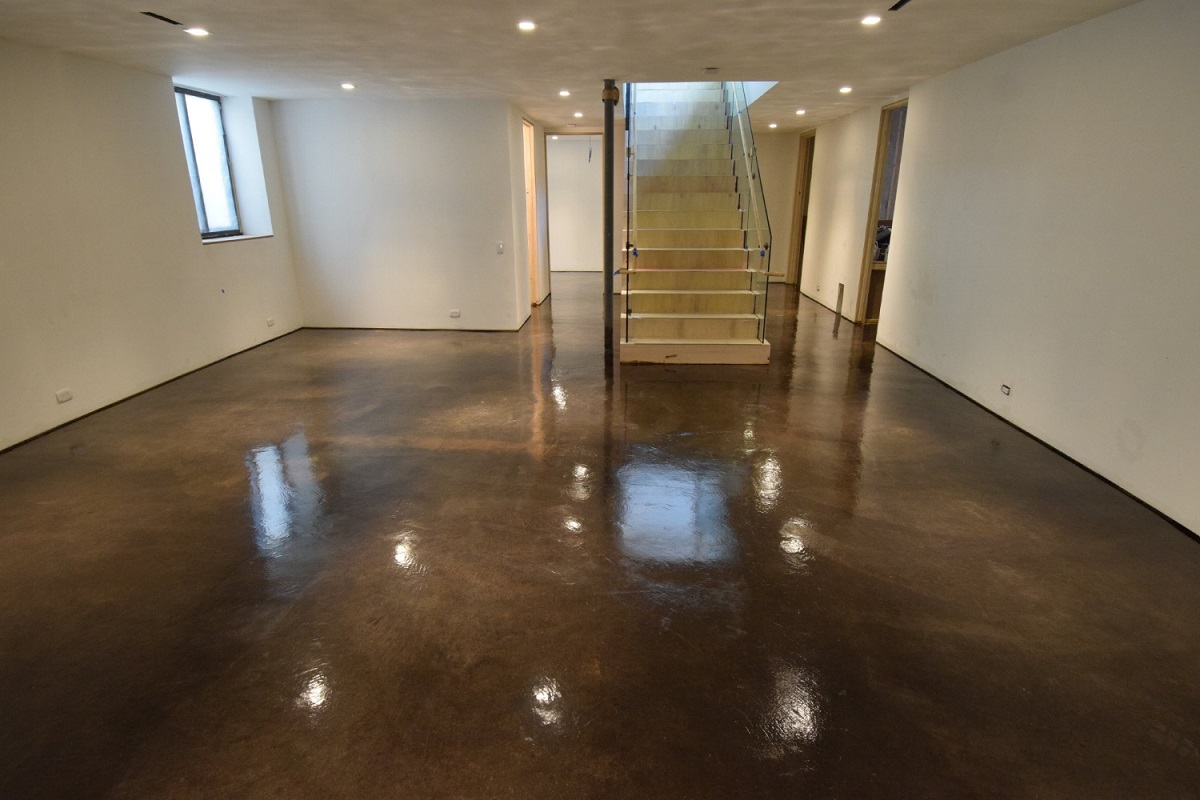
By using the recommended tools and techniques for smoothing out the leveling compound and applying finishing touches, you can achieve a level, even, and polished appearance for your basement floor. Once the leveling compound is smoothed and finished to your satisfaction, it’s time to move on to the next stage: curing and drying. This is a crucial step in ensuring the stability and longevity of the leveled floor surface.
Curing and Drying: Guidelines for the Curing and Drying Process – Factors to Consider for Optimal Drying Time
After you have finished smoothing and applying the leveling compound to your concrete basement floor, the next step is the crucial process of curing and drying. Curing and drying the leveling compound properly is essential for achieving a strong and durable floor surface. Here are some guidelines for the curing and drying process and factors to consider for optimal drying time:
Guidelines for the Curing and Drying Process:
- Follow the manufacturer’s recommendations: First and foremost, it is vital to read and follow the specific guidelines provided by the manufacturer of the leveling compound. They will have detailed instructions regarding the curing and drying process, including recommended drying times and conditions.
- Allow sufficient time for curing: Curing is the chemical process that allows the leveling compound to harden and reach its full strength. Follow the manufacturer’s recommended curing time, which is typically stated on the product packaging or in the instructions.
- Create favorable conditions: During the curing process, it’s important to create a favorable environment to facilitate proper drying. This includes maintaining a consistent temperature and humidity level in the basement. Avoid excessive heat, cold drafts, or high levels of moisture that may interfere with drying.
- Provide adequate ventilation: Good ventilation is crucial for allowing moisture to evaporate and facilitating the drying process. Open windows or use fans to circulate air in the basement. However, be mindful of any dust or debris that may be stirred up, as it can settle on the leveling compound while it’s still wet.
- Avoid foot traffic and heavy loads: During the curing and drying period, it’s essential to avoid walking on or placing heavy objects on the leveling compound. This can cause damage or leave imprints. Follow the manufacturer’s recommendations regarding the recommended timeframe for allowing foot traffic or the installation of flooring materials.
- Monitor the drying process: Regularly inspect the leveling compound for signs of moisture or tackiness. As the compound dries, it should gradually become firm and dry to the touch. If you notice any areas that are not drying properly or appear to have retained moisture, consult the manufacturer’s recommendations or seek professional advice.
Factors to Consider for Optimal Drying Time:
Several factors can affect the drying time of the leveling compound. It’s important to take these factors into consideration to ensure the optimal drying time and a successful leveling project:
- Ambient temperature: The temperature in the basement can significantly impact the drying time. Higher temperatures generally speed up the drying process, while lower temperatures can prolong it. Aim for a temperature range within the manufacturer’s recommended guidelines for optimal results.
- Humidity levels: High humidity slows down the drying process, as moisture in the air can hinder the evaporation of water from the leveling compound. Use dehumidifiers or fans to regulate and reduce humidity levels as needed.
- Type of leveling compound: Different types of leveling compounds may have varying drying times. Some compounds may dry faster, while others require more time for proper curing. Refer to the manufacturer’s instructions for specific details regarding the expected drying time.
- Thickness of the leveling compound: Thicker layers of leveling compound will typically take longer to dry compared to thinner layers. If necessary, consult the manufacturer’s instructions for guidance on adjusting drying times based on the thickness of the applied compound.
By following the guidelines for the curing and drying process and considering the various factors that can influence drying time, you can ensure that the leveling compound on your basement floor cures properly and achieves its desired strength. Once the leveling compound has fully cured and dried, you can move on to the final stages of your basement renovation project.
Read more: How To Self-Level Concrete Floor
Additional Considerations: Tips for Preventing Future Floor Issues – Maintenance and Care Instructions
As you near the completion of leveling your concrete basement floor, there are additional considerations to keep in mind to ensure the long-term durability and stability of the floor. By following these tips for preventing future floor issues and maintaining the leveled surface, you can prolong its lifespan and enjoy a functional and aesthetically pleasing basement:
Tips for Preventing Future Floor Issues:
- Address underlying structural problems: If you have identified any underlying structural issues during the leveling process, it’s important to address them before proceeding further. This may involve consulting with a professional or contractor to assess and rectify any significant foundation or structural problems.
- Provide adequate drainage: Proper drainage is crucial for preventing water accumulation and potential damage to the basement floor. Ensure that your basement has a well-maintained and functional drainage system, including proper grading, gutters, downspouts, and sump pumps if necessary.
- Invest in moisture mitigation: Basements are prone to moisture-related issues, which can affect the flooring. Consider using moisture barriers, dehumidifiers, or proper ventilation to reduce moisture levels in the basement and minimize the risk of moisture-related floor problems.
- Choose appropriate flooring materials: When selecting flooring materials for your leveled basement floor, choose options that are suitable for basement environments. Consider moisture-resistant materials like vinyl, tile, or engineered hardwood that can withstand potential basement moisture and temperature fluctuations.
- Practice proper maintenance: Regularly inspect your basement floor for any signs of wear, damage, or moisture issues. Clean up spills immediately and use appropriate cleaning products to maintain the integrity of the flooring materials. Follow the manufacturer’s instructions for maintenance and care to ensure longevity.
Maintenance and Care Instructions:
Follow these general maintenance and care instructions to keep your leveled basement floor in excellent condition:
- Sweep or vacuum regularly: Removing dirt, debris, and dust from the floor surface on a regular basis prevents scratches and enhances the overall appearance.
- Use recommended cleaning products: Consult the manufacturer’s guidelines and use appropriate cleaning products for your specific flooring material. Avoid harsh chemicals or abrasive cleaners that can damage the surface.
- Wipe up spills promptly: Accidental spills should be wiped up immediately to prevent staining or damage to the floor. Use a damp cloth or mop and avoid excess moisture on the floor surface.
- Place mats and rugs strategically: Use mats or rugs in high-traffic areas or entryways to reduce wear and protect the floor from dirt and moisture. Ensure they are non-slip and have a moisture barrier underneath to prevent damage to the floor below.
- Trim pet nails: If you have pets, keep their nails trimmed to prevent scratches on the floor surface.
- Avoid dragging heavy furniture: When moving furniture or other heavy objects, make use of furniture sliders or ask for assistance to avoid scratching or damaging the floor.
By implementing these tips for preventing future floor issues and maintaining your leveled basement floor properly, you can ensure that it remains visually appealing, functional, and durable for years to come. Regular maintenance and care will help extend the longevity of your investment and provide a comfortable space for various activities in your basement.
Now that you have a comprehensive understanding of the entire process of leveling a concrete basement floor and the necessary considerations for maintenance and care, you’re prepared to enjoy the fruits of your hard work and transform your basement into a beautiful and functional space.
Conclusion: Recap of the Key Steps in Leveling a Concrete Basement Floor – Importance of a Well-Leveled Basement Floor and Its Benefits
Leveling a concrete basement floor is a crucial step in renovating or remodeling your basement. It involves a series of steps, from assessing the condition of the floor to applying the leveling compound and ensuring proper curing and drying. Let’s recap the key steps in leveling a concrete basement floor and highlight the importance of a well-leveled basement floor along with its benefits:
To start, it’s essential to assess the condition of the concrete basement floor. This includes inspecting for cracks, unevenness, or dips, which can affect the integrity and functionality of the space. Once you have identified any issues, gather the necessary tools and materials for the leveling process. This includes items like a trowel, level, and the leveling compound itself.
Next, prepare the basement by clearing the area, removing any obstacles, and cleaning the concrete surface. This provides a clean and debris-free environment for the leveling process. Then, mix the leveling compound according to the manufacturer’s instructions, ensuring the right consistency for optimal results.
Applying the leveling compound requires a step-by-step process, including pouring, spreading, and leveling the compound to achieve an even and smooth surface. Various tools like a trowel and float can be used for this purpose. Once the compound is applied, the smoothing and finishing stage involves techniques like feathering and sanding to create a polished appearance.
Curing and drying the leveled surface properly is crucial, and it’s important to follow the manufacturer’s guidelines for the recommended curing time and conditions. Monitoring the drying process and creating a favorable environment with adequate ventilation and controlled temperature and humidity levels are key.
Considering additional factors like addressing underlying structural problems, providing adequate drainage, and choosing appropriate flooring materials contribute to preventing future floor issues. Regular maintenance and care, such as sweeping, using recommended cleaning products, and promptly addressing spills, help to keep the leveled basement floor in excellent condition.
The importance of a well-leveled basement floor cannot be understated. It provides a solid foundation for the rest of your basement renovation project, ensuring that flooring materials can be installed correctly and securely. An even and smooth floor surface enhances the aesthetics of the space, making it more visually appealing and increasing the overall value of your home.
Additionally, a well-leveled basement floor contributes to the functionality and safety of the area. It eliminates tripping hazards and prevents further damage to the floor, such as cracks or unevenness, which can compromise the structural integrity of the space. A level floor also allows for easier installation of furniture, fixtures, and other elements in the basement.
In conclusion, leveling a concrete basement floor involves careful assessment, preparation, application, and maintenance. It ensures a solid, even, and smooth surface that enhances the overall functionality, safety, and aesthetics of your basement. By following the key steps and considering the necessary factors, you can create a well-leveled basement floor that provides a durable foundation for your basement remodeling endeavors and brings enjoyment and peace of mind for years to come.
Frequently Asked Questions about How To Level A Concrete Basement Floor
Was this page helpful?
At Storables.com, we guarantee accurate and reliable information. Our content, validated by Expert Board Contributors, is crafted following stringent Editorial Policies. We're committed to providing you with well-researched, expert-backed insights for all your informational needs.


0 thoughts on “How To Level A Concrete Basement Floor”