Articles
How To Make A Wooden Walkway
Modified: October 18, 2024
Learn how to make a stunning wooden walkway with our informative articles. Enhance your outdoor space and create a charming path that will impress.
(Many of the links in this article redirect to a specific reviewed product. Your purchase of these products through affiliate links helps to generate commission for Storables.com, at no extra cost. Learn more)
Introduction
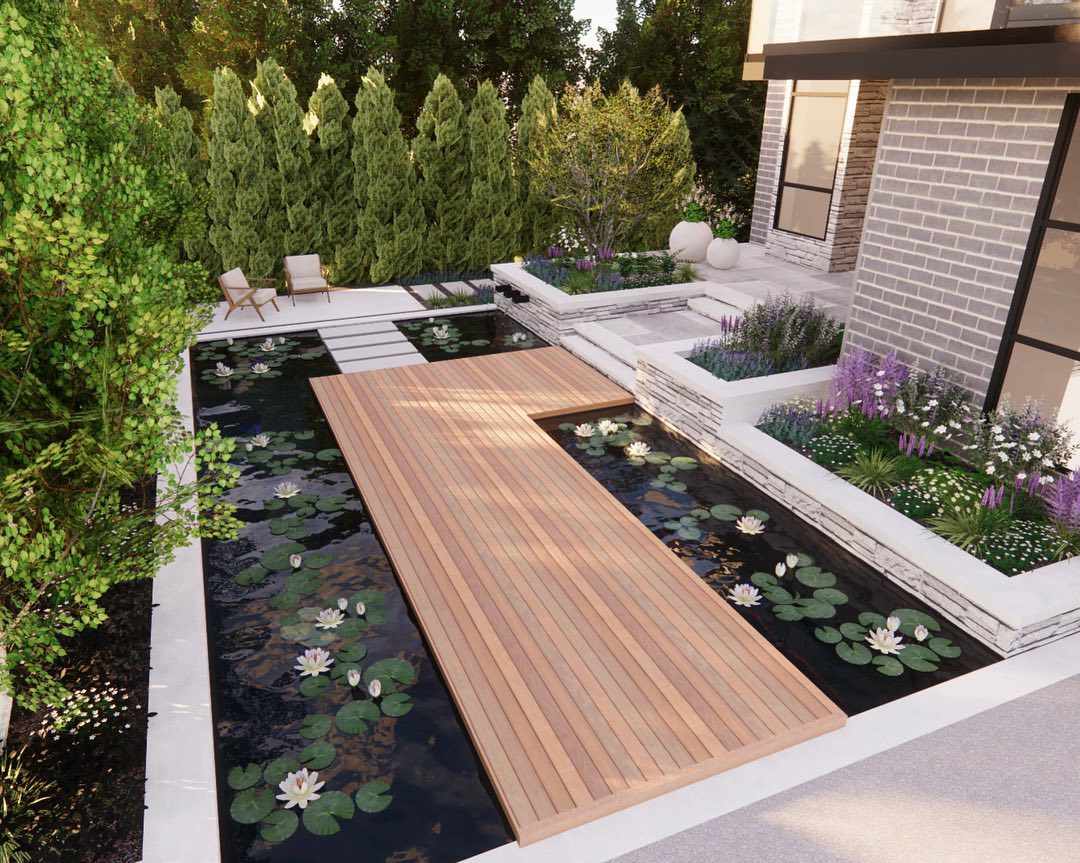
Creating a wooden walkway is a fantastic way to enhance the aesthetic appeal of your outdoor space while providing a practical pathway. Whether you want to connect different areas of your garden, guide visitors to your front door, or add a charming feature to your backyard, a wooden walkway can be a great addition to any landscape.
In this article, we will guide you through the process of making a wooden walkway, from planning and preparation to construction and finishing touches. With a few simple tools and materials, you can create a beautiful and functional walkway that blends seamlessly with your surroundings.
Before we dive into the step-by-step instructions, let’s go over the supplies you’ll need for this project.
Key Takeaways:
- Creating a wooden walkway involves careful planning, precise measurements, and high-quality materials to ensure a durable and visually appealing pathway that seamlessly blends with your outdoor space.
- Adding finishing touches such as edging, lighting, and landscaping enhances the charm and functionality of your wooden walkway, creating a stunning feature that can be enjoyed for years to come.
Read more: How To Make A Mosaic Walkway
Supplies needed for making a wooden walkway
Before embarking on your wooden walkway project, it’s essential to gather the necessary supplies. Here are the key items you’ll need:
- Pressure-treated wooden planks: These planks will serve as the foundation of your walkway and should be resistant to decay and insect damage. Choose a size and length that suits your needs.
- 2×4 lumber: This will be used for creating support beams underneath the planks.
- Gravel or crushed stone: This will be used to create a stable base for your walkway.
- Landscape fabric: This will help prevent weeds from growing through the walkway.
- Gravel or sand: This will be used for leveling the walkway and filling any gaps between planks.
- Drill and screws: You’ll need these to secure the wooden planks and support beams together.
- Saw: A circular saw or handsaw will be necessary to cut the planks to the desired length.
- Measuring tape and level: These tools will ensure that your walkway is straight and level.
- Shovel and rake: You’ll need these for clearing the area and leveling the ground.
- Safety equipment: Don’t forget to wear gloves, safety glasses, and ear protection when working with tools.
It’s important to choose high-quality materials to ensure the longevity and durability of your wooden walkway. Pressure-treated wood is a popular choice due to its resistance to rot and decay, making it suitable for outdoor projects.
Once you have gathered all the necessary supplies, you can proceed with the planning and construction of your wooden walkway. Let’s move on to the first step: planning the walkway.
Step 1: Planning the walkway
Before you start clearing and constructing your wooden walkway, it’s crucial to plan out its design and placement. Consider the following factors:
- Location: Determine where you want your walkway to go and what purpose it will serve. Will it connect different areas of your garden? Or will it lead visitors to your front door?
- Pathway width: Decide how wide you want your walkway to be. Consider the amount of foot traffic it will have and ensure there is enough space for people to walk comfortably side by side.
- Curves and turns: If you want to add visual interest, you can incorporate curves or turns into your walkway design. Keep in mind that these may require extra planning and cutting of the wooden planks.
- Accessibility: If you have individuals with mobility challenges, consider incorporating ramps or gentle slopes into your walkway design to ensure easy access for everyone.
- Landscaping integration: Think about how your walkway will blend with the surrounding landscape. Consider incorporating plants, flowers, or lighting fixtures along the sides of the walkway to enhance its beauty.
Take measurements of the designated area and mark out the path using stakes and string. This will give you a visual representation of how the walkway will fit into your outdoor space.
Once you have a clear plan in mind, you can move on to the next step: clearing and leveling the area.
Step 2: Clearing and leveling the area
Now that you have planned the layout of your wooden walkway, it’s time to prepare the area by clearing any vegetation and ensuring a level surface for construction. Follow these steps:
- Remove any existing vegetation: Clear the area of grass, weeds, rocks, or any other obstacles that may interfere with the construction of your walkway. Use a shovel or a garden rake to thoroughly remove the debris.
- Level the ground: Use a rake to even out the surface of the walkway path. This will ensure that the wooden planks will lay flat and provide a smooth walking surface. Check the level with a measuring tool to ensure an even grade.
- Create a border: If desired, you can install a border along the sides of the walkway using plastic or metal edging, stones, or bricks. This will help to define the edges and keep the soil and gravel in place.
- Excavate if necessary: Depending on the depth of the wooden planks and the type of base you want to create, you may need to excavate the area to a certain depth. Remove the soil and ensure that the excavated area is level.
By clearing and leveling the area properly, you will establish a solid foundation for your walkway. This will ensure stability and longevity once the construction is complete.
With the area prepared and leveled, you’re ready to move on to the next step: marking the path and measuring the wood.
Step 3: Marking the path and measuring the wood
Now that you have cleared and leveled the area, it’s time to mark the path of your wooden walkway and measure the wood you’ll need. Follow these steps:
- Use stakes and string: Start by placing stakes at the beginning and end of your walkway path. Then, run a string between the stakes to outline the desired path and create a straight guideline for the construction.
- Measure the length: With the string in place, use a measuring tape to determine the length of the walkway. Be sure to account for any curves or turns that you have included in your design. Write down this measurement as it will guide you in cutting the wooden planks to the appropriate size.
- Measure the width: Use the measuring tape to determine the width of your walkway. This will help you determine the number of wooden planks you’ll need and the overall coverage area.
- Calculate the number of planks: Based on the width of your walkway, calculate the number of wooden planks needed to cover the entire pathway. Keep in mind the desired spacing between planks for water drainage and aesthetic purposes.
Take accurate measurements and double-check your calculations to ensure you have enough wood to complete the project without any unnecessary waste.
Once you have marked the path and measured the wood, you’re ready to move on to the next step: preparing the wooden planks.
When building a wooden walkway, use pressure-treated lumber to prevent rot and decay. Additionally, consider using a gravel base to improve drainage and stability.
Read more: How To Make A Walkway In Backyard
Step 4: Preparing the wooden planks
With the path marked and the measurements in hand, it’s time to prepare the wooden planks for your walkway. This step involves cutting and treating the planks to ensure their longevity. Here’s what you need to do:
- Cut the planks to length: Use a saw, such as a circular saw or handsaw, to carefully cut the wooden planks to the desired length. Follow the measurements you took earlier, considering any curves or turns in your walkway design. Take your time and make precise cuts to ensure that the planks fit well.
- Treat the wood: Since your walkway will be exposed to the elements, it’s essential to protect the wooden planks from rot and decay. Apply a weather-resistant wood preservative or sealant to all sides of the planks, including the ends. Allow the treatment to dry completely according to the manufacturer’s instructions.
By cutting the planks to size and treating them with a protective coating, you are ensuring that your walkway will be durable and resistant to moisture and other environmental factors.
Once the planks are cut and treated, you’re ready to move on to the next step: laying the foundation for your walkway.
Step 5: Laying the foundation
With the wooden planks prepared, it’s time to lay the foundation for your walkway. This step involves creating a stable base to support the planks. Follow these steps:
- Excavate the pathway: If you haven’t already done so, dig a shallow trench along the marked path. The depth will depend on the desired height of the walkway, but generally, aim for about 2-3 inches of depth.
- Add a layer of gravel or crushed stone: Pour a layer of gravel or crushed stone into the trench to create a stable base for your walkway. Use a rake or shovel to spread and level the gravel, ensuring an even and compact surface.
- Compact the gravel: Use a tamper or the backside of a shovel to compact the gravel firmly. This will help create a solid foundation and prevent future sagging or shifting of the walkway.
- Add landscape fabric: To prevent weed growth and maintain a clean walkway, lay landscape fabric over the compacted gravel. Trim the fabric to fit within the borders of your walkway path, and secure it with landscape fabric staples or pins.
By creating a well-prepared foundation, you are ensuring the stability and durability of your walkway. The gravel layer provides drainage and prevents moisture from accumulating, while the landscape fabric acts as a barrier against unwanted weed growth.
With the foundation in place, you’re ready to move on to the next step: securing the wooden planks together.
Step 6: Securing the planks together
Now that the foundation is set, it’s time to secure the wooden planks together to create your walkway. This step involves attaching the planks to the support beams and ensuring they are properly aligned. Follow these steps:
- Place the support beams: Lay the 2×4 lumber or other support beams perpendicular to the direction of the walkway, spaced evenly along the length of the path. These beams will provide structural integrity and support for the wooden planks.
- Attach the planks: Position the first wooden plank onto the support beams, ensuring that it is aligned with the marked path. Use a drill and screws to secure the plank to the support beams. Repeat this process for the remaining planks, leaving a small gap between each board for water drainage.
- Check for level: As you attach each plank, use a level to ensure that it is flat and level. Make any necessary adjustments to maintain a smooth walking surface.
- Trim the planks: If needed, use a saw to trim the end of the final plank to fit the desired length of your walkway. Ensure a snug fit without any overhang or gaps.
Take your time during this step to ensure that each wooden plank is securely attached and level with the others. It is important to maintain consistency in the spacing between planks and their alignment with the marked path.
With the planks secured, you’re almost done! The next step involves adding the finishing touches to complete your wooden walkway.
Step 7: Adding finishing touches
Congratulations! You’re in the final step of creating your wooden walkway. This step involves adding some finishing touches to enhance the appearance and functionality of your walkway. Follow these steps:
- Fill any gaps: Take a moment to inspect the walkway and fill any small gaps between the wooden planks. You can use sand, gravel, or a wood filler to achieve a seamless appearance.
- Add edging or borders: If desired, install edging or borders along the sides of your walkway to give it a polished look. Depending on your preference and the style of your outdoor space, you can choose from various materials such as stones, bricks, or metal edging.
- Consider lighting: To make your walkway more inviting and safe, you can incorporate lighting fixtures. Choose solar-powered or low-voltage lights to illuminate the path during nighttime hours. Strategically place the lights to highlight the walkway’s features and ensure proper visibility.
- Add plantings or landscaping: Enhance the beauty of your walkway by adding plants or landscaping elements alongside it. Consider planting flowers, shrubs, or ground cover plants that complement your outdoor space and create a visually appealing atmosphere.
- Maintain regular upkeep: To ensure the longevity and beauty of your wooden walkway, it’s important to perform regular maintenance. Sweep away debris, wipe down the surface, and periodically reapply a protective coating to keep the wood in good condition.
By paying attention to these finishing touches, you can transform your wooden walkway into a stunning feature of your outdoor space. These details add charm, functionality, and personalization to the overall design.
With the finishing touches in place, step back and admire your completed wooden walkway. You have successfully created a beautiful and functional pathway that will be enjoyed for years to come.
Read more: How To Make A Concrete Walkway
Conclusion
Creating a wooden walkway is a rewarding DIY project that adds both charm and functionality to your outdoor space. By following the step-by-step guide outlined in this article, you can successfully construct a beautiful pathway that seamlessly blends with your landscape.
From planning the walkway and clearing the area to measuring and preparing the wooden planks, each step is crucial in ensuring a sturdy and visually appealing result. Remember to take your time, measure accurately, and use high-quality materials to guarantee the durability of your walkway.
By giving attention to details such as leveling the ground, securing the planks together, and adding the finishing touches, you can create a walkway that not only serves its purpose but also becomes an attractive feature in your outdoor space.
As you enjoy your wooden walkway, don’t forget to perform regular maintenance to keep it in top condition. Sweep away debris, clean the surface, and reapply a protective coating as needed to ensure its longevity.
So, whether you want to guide visitors to your front door or create a serene pathway through your garden, a wooden walkway provides a touch of elegance and functionality. Embrace your creativity, gather the necessary supplies, and start building your own wooden walkway today!
Frequently Asked Questions about How To Make A Wooden Walkway
Was this page helpful?
At Storables.com, we guarantee accurate and reliable information. Our content, validated by Expert Board Contributors, is crafted following stringent Editorial Policies. We're committed to providing you with well-researched, expert-backed insights for all your informational needs.


0 thoughts on “How To Make A Wooden Walkway”