Home>Construction & Tools>Building Materials>How To Make A Wooden Brick Mold
Building Materials
How To Make A Wooden Brick Mold
Modified: February 18, 2024
Learn how to make a wooden brick mold for your building materials project with our step-by-step guide. Create custom molds for your construction needs.
(Many of the links in this article redirect to a specific reviewed product. Your purchase of these products through affiliate links helps to generate commission for Storables.com, at no extra cost. Learn more)
Introduction
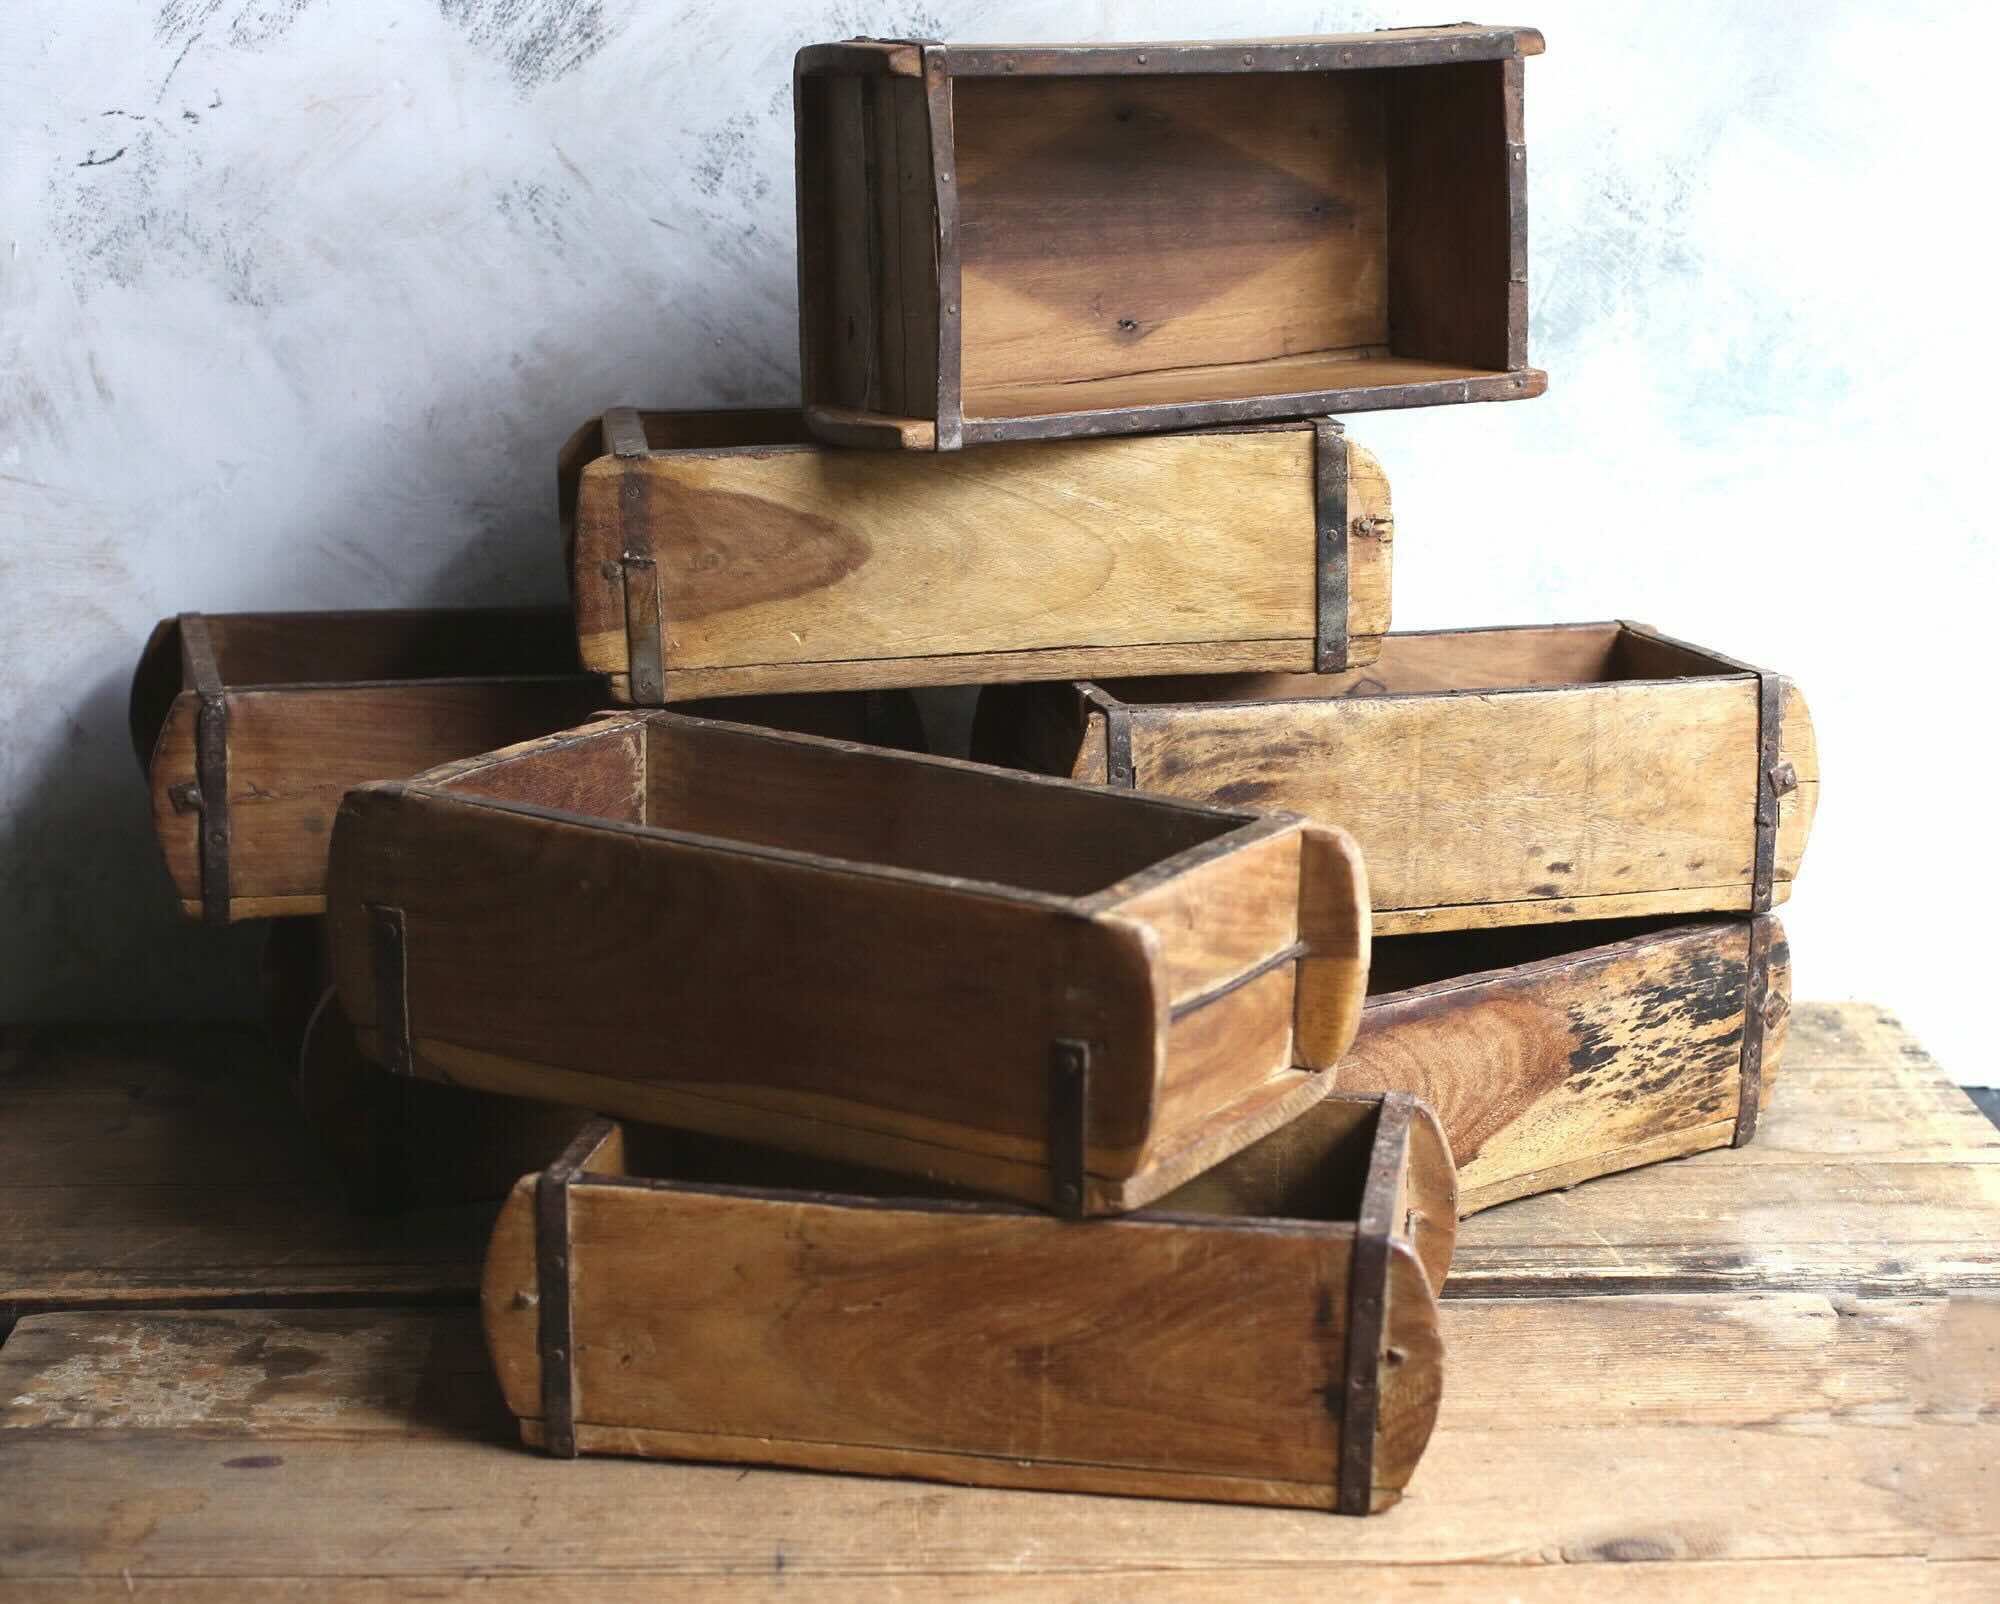
Creating your own wooden brick mold can be a rewarding and practical project for anyone interested in DIY woodworking and construction. A wooden brick mold, also known as a formwork, is an essential tool for crafting bricks from a mixture of sand, cement, and water. By constructing your own mold, you can customize its dimensions to suit your specific brick-making needs, whether for a small garden project or a larger construction endeavor.
In this comprehensive guide, we will walk you through the step-by-step process of making a wooden brick mold. From gathering the necessary materials and tools to cutting the wood, assembling the mold, and adding the finishing touches, you will gain valuable insights into the craftsmanship involved in creating a functional and durable brick mold.
By following this guide, you will not only acquire the skills to build a wooden brick mold but also gain a deeper understanding of the construction process. Whether you are a seasoned woodworker or a novice enthusiast, this project offers an opportunity to hone your woodworking skills and produce a practical tool that can be used for various building projects.
So, roll up your sleeves, gather your tools, and let's embark on this woodworking journey to create a custom wooden brick mold that will serve as a valuable asset in your construction endeavors. Let's dive into the materials and tools needed to get started on this exciting DIY project.
Key Takeaways:
- Crafting a wooden brick mold involves selecting high-quality wood, precision cutting, meticulous assembly, and refined finishing. This DIY project combines craftsmanship and practicality to create a durable and functional tool for brick-making.
- The process of making a wooden brick mold not only hones woodworking skills but also fosters a deeper understanding of construction principles. It symbolizes the fusion of creativity and practicality, transforming raw materials into a purposeful tool.
Read more: How To Make Brick Molds
Materials and Tools Needed
To embark on the journey of creating a wooden brick mold, you will need a selection of materials and tools to ensure a smooth and successful construction process. Here's a detailed list of the essential items required for this DIY project:
Materials:
-
Wood: Select high-quality wood for the construction of the brick mold. Opt for durable and sturdy wood such as pine, cedar, or redwood, ensuring that it is free from knots and defects that may compromise the integrity of the mold.
-
Wood Glue: Choose a reliable wood glue to securely bond the wooden components of the mold. A high-quality wood glue will provide the necessary strength and durability to withstand the pressure and moisture involved in brick-making.
-
Sandpaper: Acquire a variety of sandpaper grits, including coarse and fine grades, to smoothen and refine the wooden surfaces of the mold. This will contribute to achieving a polished and professional finish.
-
Wood Finish (Optional): Consider using a wood finish or sealant to protect the wooden mold from moisture and environmental elements. A suitable wood finish will enhance the longevity of the mold and preserve its structural integrity over time.
Tools:
-
Measuring Tape: A reliable measuring tape is essential for accurately determining the dimensions of the wooden components required for the brick mold. Precise measurements are crucial for ensuring the mold's functionality and compatibility with standard brick sizes.
-
Saw: Depending on your preference and expertise, choose a suitable saw for cutting the wood to the desired dimensions. A handsaw or a power saw, such as a circular saw or a miter saw, can be utilized for this purpose.
-
Clamps: Secure the wooden components in place during assembly using sturdy clamps. Clamps are indispensable for ensuring that the pieces are aligned correctly and the wood glue can set effectively.
-
Woodworking Square: A woodworking square is indispensable for ensuring that the angles and edges of the wooden components are perfectly aligned and perpendicular, contributing to the structural integrity of the mold.
-
Safety Gear: Prioritize safety by wearing protective gear, including safety goggles and gloves, to safeguard yourself during the woodworking process.
By gathering these materials and tools, you will be well-equipped to commence the construction of your wooden brick mold. With these essentials in hand, you are ready to proceed to the next step: cutting the wood.
Step 1: Cutting the Wood
The initial phase of crafting a wooden brick mold involves precision and accuracy in cutting the wood to the specified dimensions. This step is crucial as it sets the foundation for the structural integrity and functionality of the mold. Here's a detailed walkthrough of the wood cutting process:
Read more: How To Attach Brick Molding
1.1 Selecting the Wood
Begin by selecting high-quality wood that is well-suited for constructing a durable brick mold. Opt for a type of wood known for its strength and resistance to moisture, such as pine, cedar, or redwood. Ensure that the wood is free from knots and defects that could compromise the integrity of the mold.
1.2 Measuring and Marking
Using a reliable measuring tape, carefully measure and mark the wood according to the desired dimensions of the brick mold. Precision is key at this stage, as accurate measurements will ensure that the mold aligns with standard brick sizes and specifications.
1.3 Cutting the Components
Once the wood is accurately marked, proceed to cut the components using a suitable saw. Depending on your preference and expertise, a handsaw or power saw, such as a circular saw or miter saw, can be utilized for this purpose. Exercise caution and ensure that the cuts are made precisely along the marked lines.
1.4 Ensuring Precision
Utilize a woodworking square to verify that the angles and edges of the wooden components are perfectly aligned and perpendicular. This meticulous approach will contribute to the overall structural integrity of the mold, ensuring that the bricks produced are uniform and of high quality.
Read more: How To Replace Brick Molding On Windows
1.5 Fine-Tuning
After cutting the wood, use sandpaper of varying grits to smoothen and refine the surfaces of the wooden components. This step is essential for achieving a polished finish and removing any rough edges or imperfections that could affect the functionality of the mold.
By meticulously following these steps, you will successfully complete the wood cutting phase, laying the groundwork for assembling the wooden brick mold. With the wood cut to precision and the components prepared, you are now ready to progress to the next stage: assembling the mold.
Step 2: Assembling the Mold
With the wooden components meticulously cut and prepared, the next pivotal phase in creating a wooden brick mold is the assembly process. This step involves combining the individual pieces to construct a sturdy and functional mold that will facilitate the shaping of bricks. Here's a detailed exploration of the assembly process:
2.1 Planning the Layout
Before commencing the assembly, carefully plan the layout of the wooden components to ensure a systematic and efficient construction process. Lay out the pieces in the designated order, referring to the predetermined dimensions and specifications to guarantee accurate alignment.
2.2 Applying Wood Glue
Once the layout is established, apply a generous amount of high-quality wood glue to the adjoining surfaces of the wooden components. The wood glue serves as a crucial bonding agent, ensuring the structural integrity and durability of the mold once assembled.
Read more: How To Get Rid Of Mold On Brick
2.3 Securing with Clamps
After applying the wood glue, securely clamp the wooden components together to facilitate a strong and uniform bond. The clamps hold the pieces in place, exerting pressure to ensure that the wood glue sets effectively, creating a solid and reliable assembly.
2.4 Verifying Alignment
Utilize a woodworking square to verify that the assembled components are perfectly aligned and perpendicular. This meticulous verification process is essential for guaranteeing the accuracy and integrity of the mold's structure, contributing to the production of uniform and well-formed bricks.
2.5 Allowing for Drying Time
Once the wooden components are securely assembled and aligned, allow sufficient time for the wood glue to dry and set. This crucial step ensures that the bond between the components is strong and resilient, preparing the mold for the subsequent stages of the construction process.
2.6 Removing Excess Glue
After the wood glue has dried, carefully remove any excess glue using a suitable tool, such as a chisel or scraper. This meticulous cleanup process contributes to achieving a refined and professional finish, ensuring that the mold is free from any residual adhesive.
By meticulously following these steps, you will successfully complete the assembly of the wooden brick mold, culminating in the creation of a robust and reliable tool for crafting bricks. With the mold assembled and the components securely bonded, you are now prepared to advance to the final phase: sanding and finishing the wooden brick mold.
Read more: How To Make Wooden Stairs
Step 3: Sanding and Finishing
The sanding and finishing phase is a critical component of creating a wooden brick mold, as it contributes to the overall quality, durability, and aesthetic appeal of the finished product. This step involves refining the wooden surfaces, removing imperfections, and applying a protective finish to enhance the longevity of the mold. Here's a detailed exploration of the sanding and finishing process:
3.1 Smoothening the Surfaces
Begin by using coarse-grit sandpaper to smoothen the surfaces of the wooden brick mold. This initial sanding process aims to eliminate any rough spots, uneven edges, or imperfections that may have resulted from the assembly phase. By meticulously sanding the surfaces, you will achieve a uniform and polished foundation for the subsequent finishing steps.
3.2 Refining with Fine-Grit Sandpaper
Following the initial sanding, transition to fine-grit sandpaper to further refine the wooden surfaces. This finer sandpaper grit will effectively smooth out any remaining roughness, ensuring that the mold's exterior is impeccably polished. Pay close attention to detail during this stage, as it significantly contributes to the overall visual appeal and tactile quality of the mold.
3.3 Applying Wood Finish (Optional)
Consider applying a wood finish or sealant to protect the wooden brick mold from moisture, environmental elements, and wear over time. A high-quality wood finish not only enhances the natural beauty of the wood but also provides a protective layer that safeguards the mold from potential damage. Whether opting for a clear sealant to maintain the wood's natural appearance or choosing a colored finish for added vibrancy, the application of a wood finish can significantly prolong the lifespan of the mold.
Read more: How To Make A Wooden Walkway
3.4 Ensuring Even Coverage
If applying a wood finish, ensure even coverage across all surfaces of the mold. Utilize a brush or cloth to meticulously coat the wood with the finish, paying attention to any intricate details or recessed areas. Consistent and thorough application of the wood finish will result in a uniform and resilient protective layer, fortifying the mold against the rigors of brick-making and prolonged use.
3.5 Allowing for Drying and Curing
After applying the wood finish, allow the mold to thoroughly dry and cure according to the manufacturer's recommendations. This crucial step ensures that the wood finish effectively adheres to the wooden surfaces, forming a durable and resilient protective barrier. Patience during the drying and curing process is essential to achieve optimal results and maximize the protective benefits of the wood finish.
By meticulously following these steps, you will successfully complete the sanding and finishing phase, culminating in the creation of a refined, durable, and visually appealing wooden brick mold. With the mold now meticulously sanded, polished, and protected, it stands ready to serve as a reliable tool for crafting high-quality bricks, showcasing the craftsmanship and attention to detail invested in its creation.
Conclusion
In conclusion, the process of creating a wooden brick mold encompasses a journey of craftsmanship, precision, and practicality. By embarking on this DIY woodworking project, you have delved into the art of transforming raw materials into a functional tool that holds the potential to shape countless bricks for various construction endeavors.
Throughout this comprehensive guide, we have explored the meticulous steps involved in crafting a wooden brick mold, from selecting high-quality wood and cutting it to precision, to assembling the components with care and refining the mold through sanding and finishing. Each phase of the construction process has been infused with attention to detail, ensuring that the resulting mold embodies durability, functionality, and visual appeal.
As you reflect on the journey of creating a wooden brick mold, it becomes evident that this endeavor transcends the mere act of woodworking. It represents a fusion of practicality and creativity, where raw materials are transformed into a purposeful tool through the application of skill and ingenuity. The wooden brick mold, born from your dedication and craftsmanship, stands as a testament to your ability to shape and mold the world around you.
Moreover, the knowledge and experience gained from this project extend beyond the creation of a singular tool. It fosters a deeper understanding of woodworking principles, precision in measurements, and the transformative power of craftsmanship. Whether you are a seasoned woodworker honing your skills or a novice enthusiast venturing into the realm of construction, this project has provided valuable insights and practical experience that can be applied to future woodworking endeavors.
As you admire the completed wooden brick mold, envision the countless bricks it will shape and the structures it will help bring to life. From garden pathways to architectural marvels, the mold you have meticulously crafted holds the potential to leave a lasting imprint on the built environment, embodying the essence of craftsmanship and functionality.
In essence, the creation of a wooden brick mold transcends the act of construction; it symbolizes the fusion of creativity and practicality, the transformation of raw materials into purposeful tools, and the embodiment of craftsmanship. As you conclude this woodworking journey, take pride in the tangible result of your dedication and skill – a wooden brick mold ready to embark on its role in shaping the future of construction.
Frequently Asked Questions about How To Make A Wooden Brick Mold
Was this page helpful?
At Storables.com, we guarantee accurate and reliable information. Our content, validated by Expert Board Contributors, is crafted following stringent Editorial Policies. We're committed to providing you with well-researched, expert-backed insights for all your informational needs.


0 thoughts on “How To Make A Wooden Brick Mold”