Home>Articles>How To Repair Brick Or Block Walls And Prevent More Damage
Articles
How To Repair Brick Or Block Walls And Prevent More Damage
Modified: August 27, 2024
Learn how to repair brick or block walls and prevent future damage with our informative articles. Discover expert tips and techniques to keep your walls in top condition.
(Many of the links in this article redirect to a specific reviewed product. Your purchase of these products through affiliate links helps to generate commission for Storables.com, at no extra cost. Learn more)
Introduction
Welcome to the world of brick and block wall repair. Whether you’re dealing with a small crack or a more significant structural issue, knowing how to repair brick or block walls is a valuable skill. Not only can it save you time and money by avoiding the need for professional help, but it can also prevent further damage and maintain the structural integrity of your walls.
Over time, brick and block walls can be subjected to various issues such as cracks, loose bricks, water damage, or even complete collapse. Factors such as weather conditions, poor construction, or lack of maintenance can contribute to these problems. However, with the right knowledge and tools, you can tackle these repairs yourself.
In this comprehensive guide, we will take you through the step-by-step process of repairing brick or block walls and provide useful tips to prevent future damage. Whether you’re a seasoned DIY enthusiast or a beginner, this guide will provide you with the information you need to handle these repairs like a pro.
Before we dive into the repair process, it’s essential to assess the extent of the damage. Understanding the root cause and identifying the specific issues will help you determine the appropriate repairs and materials needed.
Next, we’ll discuss the tools and materials you’ll need for the job. From basic hand tools to specialized equipment such as a masonry saw or a mortar mixer, having the right tools is crucial for a successful repair.
Once you have gathered all the necessary tools and materials, it’s time to prepare the work area. This involves cleaning the damaged area, removing loose bricks or blocks, and ensuring a stable and level surface for the repair work.
With the work area prepared, you can now move on to the actual repair process. This includes mixing mortar, applying it to replace the damaged bricks or blocks, and ensuring proper alignment and leveling for a seamless repair.
After completing the repair, it’s important to finish the repaired area to blend it with the surrounding wall. This may involve using a brush or sponge to texture the mortar or applying a matching paint or sealant.
Lastly, we’ll provide you with helpful tips on how to prevent further damage to your brick or block walls. By implementing preventive measures such as regular inspections, proper drainage, and weatherproofing, you can prolong the lifespan of your walls and minimize future repairs.
By the end of this guide, you’ll be equipped with the knowledge and skills to tackle brick or block wall repairs with confidence. So let’s get started and restore the beauty and strength of your walls!
Key Takeaways:
- Master the art of brick and block wall repair by assessing damage, gathering the right tools, and executing the repair process with precision. Prevent future damage with regular maintenance and protective measures.
- From removing damaged bricks to applying mortar and ensuring proper alignment, this guide equips you with the skills to restore and maintain the strength and beauty of your walls.
Assessing the Damage
Before you begin repairing your brick or block walls, it’s crucial to assess the extent of the damage. This step is essential to understand the underlying issues and determine the appropriate repairs and materials needed.
Start by visually inspecting the walls for any visible cracks, loose or damaged bricks or blocks, and signs of water damage. Look for areas where the mortar between the bricks or blocks is deteriorating or missing. These are common indicators of underlying issues that require attention.
Next, gently tap on the bricks or blocks using a masonry hammer or a rubber mallet. A hollow sound indicates loose and deteriorated mortar, while a solid sound suggests stability. Pay close attention to areas where the walls meet windows, doors, or corners, as they are more susceptible to cracking and damage.
Additionally, inspect the surrounding area for signs of water penetration, such as dampness, mold, or efflorescence. These issues may indicate poor drainage or sealing and can exacerbate damage to your walls.
If you notice significant cracks or shifts in the walls, it’s recommended to consult a professional to assess the structural integrity. They will be able to provide expert advice on the extent of the damage and the necessary repairs.
Once you’ve assessed the damage, take note of the specific repairs required. This may include replacing loose or damaged bricks or blocks, re-pointing the mortar joints, or addressing underlying issues such as water drainage or weatherproofing.
By thoroughly assessing the damage, you will have a clear understanding of the repairs needed and can proceed with the appropriate tools and materials. Remember, it’s essential to address any underlying issues to prevent further damage and ensure the long-term stability of your brick or block walls.
Gathering the Necessary Tools and Materials
Now that you have assessed the damage and identified the specific repairs needed for your brick or block walls, it’s time to gather the necessary tools and materials. Having the right equipment for the job will ensure a smooth and successful repair process.
Here’s a list of essential tools and materials you’ll need:
- Masonry hammer: Used to remove damaged bricks or blocks.
- Chisel: Helps in chipping away mortar or separating bricks.
- Masonry saw: Used to cut bricks or blocks, if needed.
- Trowel: Essential for applying mortar for repairs.
- Masonry jointer: Used to shape and finish the mortar joints.
- Mortar mixer: Ideal for mixing large quantities of mortar quickly and efficiently.
- Bucket: For mixing mortar.
- Mortar hawk: A flat board used to hold and transport mortar.
- Mason’s level: For ensuring proper alignment and leveling during repairs.
- Mortar bags or caulking gun: Helps in applying mortar to joints.
- Brushes: Used for cleaning and applying a textured finish to the repaired area.
- Mortar mix: Choose the appropriate mortar mix based on the specific repair needs and material of your walls.
- Replacement bricks or blocks: If necessary, ensure you have enough to replace the damaged ones.
- Protective gear: Safety glasses, gloves, and a dust mask are essential when working with masonry materials.
When gathering your tools and materials, it’s important to choose high-quality products. This will ensure the durability and longevity of your repairs. Consult with a local hardware store or masonry supplier to ensure you select the right materials for your specific project.
Before starting the repair process, double-check that you have all the tools and materials at hand. This will prevent unnecessary delays during repairs. It’s also a good idea to read and follow any specific instructions or guidelines provided by the manufacturers of the materials you’ll be using.
By gathering the necessary tools and materials upfront, you’ll be well-prepared to tackle the repair process and achieve professional-quality results. So, let’s move on to preparing the work area and getting ready for the repairs!
Preparing the Work Area
Before you begin repairing your brick or block walls, it’s essential to properly prepare the work area. Taking the time to prepare will ensure a safe and efficient repair process.
Here are the steps to follow when preparing the work area:
- Clean the area: Start by clearing any debris, dirt, or loose mortar from the damaged area. Use a brush or a vacuum to remove dust and loose particles. Cleaning the area thoroughly will provide a clean surface for the repair and help the new mortar adhere properly.
- Secure the surroundings: Protect any adjacent surfaces or objects that may be affected during the repair process. Cover nearby plants, windows, doors, and other delicate surfaces with plastic sheets or drop cloths to prevent damage from dust, debris, or accidental splatters.
- Stabilize the wall: If the damaged area is unstable or if there are loose bricks or blocks, secure them before proceeding with the repairs. Gently tap the loose bricks or blocks back into place using a rubber mallet. If needed, apply a small amount of mortar to hold them in position temporarily.
- Level the surface: Use a mason’s level to ensure that the surface to be repaired is level and straight. Adjust as necessary to ensure a smooth and even repair.
- Protect yourself: Wear appropriate protective gear, including safety glasses, gloves, and a dust mask to protect yourself from debris, dust, and any potential hazards.
By cleaning and preparing the work area, you will create an optimal environment for the repair process. This will help ensure that the new mortar adheres properly and that the repair blends seamlessly with the existing wall.
Once the work area is prepared, you’re all set to move on to the next step: removing the damaged bricks or blocks. Stay tuned for our next section, where we will guide you through this process in detail.
Removing Damaged Bricks or Blocks
With the work area prepared, it’s time to remove the damaged bricks or blocks from your wall. This step is crucial to make way for the new ones and ensure a solid foundation for the repair.
Follow these steps to remove damaged bricks or blocks:
- Assess the condition: Before removing any bricks or blocks, examine them closely. Look for signs of severe damage or cracking that may extend beyond the surface. If you notice extensive damage, it’s recommended to consult a professional before proceeding.
- Start at the top: Begin removing the damaged bricks or blocks from the top row and work your way down. This will prevent any debris or mortar from falling onto lower sections that are still intact.
- Loosen the mortar: Use a masonry hammer or chisel to gently chip away the mortar surrounding the damaged brick or block. Start by chipping away the vertical joints on both sides of the brick or block, then move to the horizontal joints above and below.
- Remove the brick or block: Once the mortar is loosened, carefully remove the damaged brick or block by tapping it gently with a masonry hammer or using a chisel to pry it out. Take care not to damage any neighboring bricks or blocks during this process.
- Clean the cavity: Once the damaged brick or block is removed, clean out any remaining mortar or debris from the cavity. Use a wire brush or a vacuum to ensure a clean and smooth surface for the replacement.
If you’re working with a load-bearing wall or a complex structure, it’s advisable to consult a structural engineer or a professional mason. They can provide guidance on proper removal techniques and potential support needed during the process.
Remember to handle the bricks or blocks with care, as they can be heavy and potentially sharp. Use appropriate lifting techniques and wear gloves to protect your hands. If the bricks or blocks are salvageable, you can set them aside for cleaning and reuse later on.
With the damaged bricks or blocks removed, you’re now ready to move on to the next step: cleaning the surface. This is essential to ensure proper adhesion of the new mortar and achieve a seamless repair. Stay tuned for our next section to learn more about this process.
Read more: What Is Brick And Block Construction
Cleaning the Surface
After removing the damaged bricks or blocks from your wall, it’s crucial to clean the surface to ensure proper adhesion of the new mortar and achieve a seamless repair. Cleaning the surface will remove any debris, dust, or loose particles that could interfere with the bonding process.
Follow these steps to effectively clean the surface:
- Brush away debris: Use a stiff brush or a wire brush to remove any loose debris or mortar residue from the area where the bricks or blocks were removed. Sweep away the debris, ensuring a clean and clear surface.
- Remove stubborn stains or mortar: If there are any stubborn stains, dried mortar, or residue on the surrounding bricks or blocks, use a mixture of water and mild detergent. Scrub the area gently with a brush to lift the stains and rinse with clean water. Avoid using harsh chemicals or abrasive materials that could damage the surface.
- Rinse the area: After removing the debris and stains, rinse the cleaned area with water to remove any soap or detergent residue. Allow the wall to dry completely before proceeding to the next steps.
- Inspect for remaining debris: Take a closer look at the cleaned area and ensure that no unwanted debris or dust remains. Use a clean brush or a vacuum to remove any remaining particles, ensuring a smooth and clean surface for the repair process.
Cleaning the surface is a critical step in the repair process, as it provides the ideal conditions for proper adhesion of the new mortar. A clean surface will also help achieve a seamless and professional-looking repair.
Once the surface is clean and dry, you’re now prepared to move on to the next steps, which involve mixing mortar and applying it to replace the damaged bricks or blocks. Stay tuned for our upcoming section as we guide you through these crucial steps in detail.
When repairing brick or block walls, make sure to use the appropriate mortar mix for the type of bricks or blocks being used. Using the wrong mix can lead to further damage.
Mixing Mortar
Now that the surface is clean and prepped, it’s time to mix the mortar for your brick or block wall repair. Mortar acts as the bonding material that holds the bricks or blocks together, ensuring a strong and durable repair.
Follow these steps to mix mortar effectively:
- Choose the right mortar mix: Select the appropriate mortar mix based on the type of bricks or blocks you’re using and the specific repair needs of your wall. Mortar mixes come in different ratios of cement, sand, and lime, so consult a local hardware store or masonry supplier to determine the best mix for your project.
- Measure the materials: Use a bucket or a mortar box to measure the required amount of mortar mix. Follow the manufacturer’s instructions or the recommended ratios for the mix you’re using. The quantities will vary depending on the size of your repair project.
- Add water gradually: Begin adding water to the mortar mix gradually. It’s important not to add too much water at once, as it can lead to a runny consistency. Aim for a workable and sticky consistency that holds its shape but can be easily spread.
- Mix thoroughly: Use a hoe or a trowel to mix the mortar and water together. Make sure to scrape the sides and bottom of the container to ensure all the dry mix is incorporated. Continue mixing until you achieve a smooth and uniform consistency without any lumps or dry pockets.
- Checking the consistency: To test the consistency of the mixed mortar, take a small amount on your trowel and hold it upside down. If it stays in place without sagging or dripping, it’s at the correct consistency. If it is too dry, add a small amount of water and mix again. If it is too wet, add more mortar mix and remix until the desired consistency is achieved.
It’s important to follow the manufacturer’s instructions and recommendations for the specific mortar mix you’re using. Different mortar mixes may have slightly different mixing ratios and requirements, so read the packaging carefully.
Remember to wear protective gloves and safety glasses while mixing the mortar to prevent any irritation or injuries. Avoid breathing in the mortar dust, and work in a well-ventilated area if possible.
By mixing the mortar correctly, you’ll ensure a strong and secure bond when replacing the damaged bricks or blocks. With the mortar mixed and ready, you’re now prepared to move on to the exciting part of the repair process—applying the mortar to replace the damaged bricks or blocks. Stay tuned for our upcoming section as we guide you through this crucial step in detail.
Applying Mortar to Replace Bricks or Blocks
With the mortar mixed to the right consistency, you’re ready to tackle the next step in repairing your brick or block walls—applying the mortar to replace the damaged bricks or blocks. This process involves carefully placing the new bricks or blocks and securing them with mortar to ensure a strong and stable repair.
Follow these steps to apply the mortar effectively:
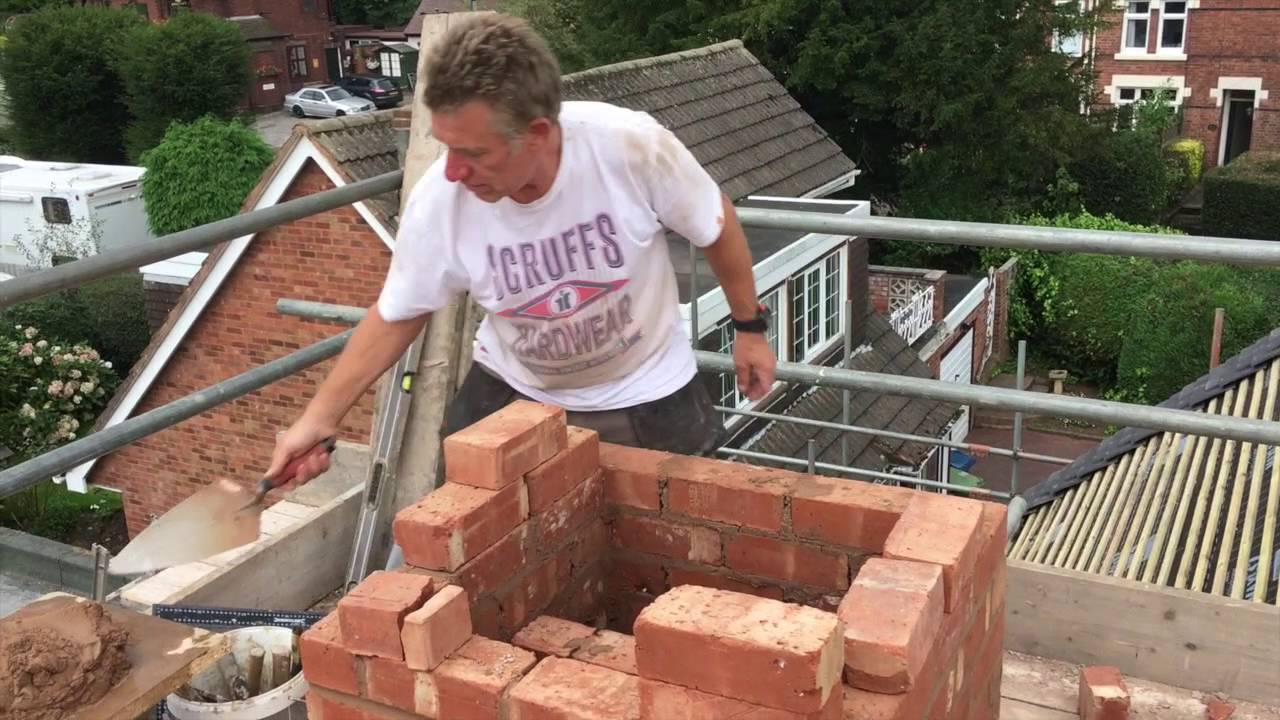
- Start with a scratch coat: Before placing the new bricks or blocks, apply a thin layer of mortar, known as a scratch coat, to the cleaned and dampened surface. This scratch coat provides a rough surface for the bricks or blocks to adhere to. Use the flat side of the trowel to spread and level the mortar, covering the area where the new bricks or blocks will be placed.
- Apply mortar to the brick or block: Take a scoop of mortar with your trowel and spread a layer on the bottom and sides of the replacement brick or block. Ensure the mortar is evenly distributed and covers the entire surface that will come into contact with the existing wall.
- Set the brick or block in place: Carefully place the replacement brick or block into the cavity, pressing it firmly into the mortar. Wiggle it slightly to ensure a good bond and proper seating in the mortar. Check for alignment and adjust as necessary.
- Check for level: Use a mason’s level to ensure the brick or block is level and aligned with the surrounding ones. Adjust the placement if needed by tapping gently with a rubber mallet or a wooden block.
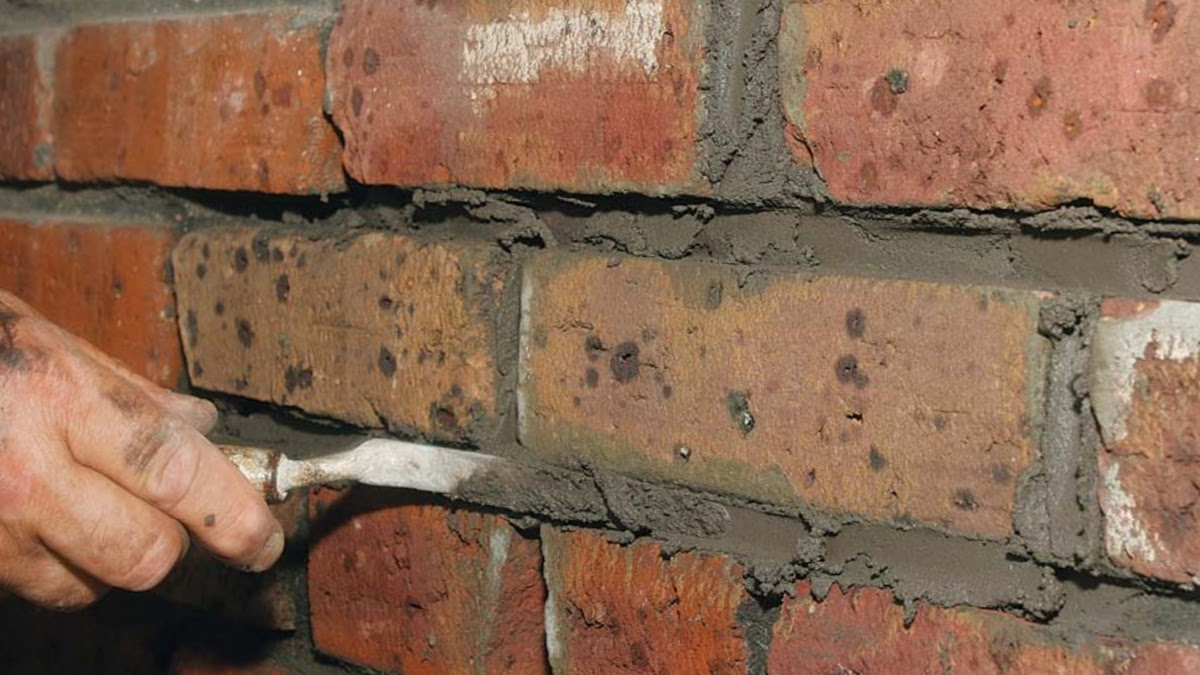
- Repoint the mortar joints: Once the brick or block is in place, use a pointing trowel or a mortar bag to apply mortar to the vertical and horizontal joints around it. Fill the joints completely and ensure a smooth and even finish.
- Tool the joints: After applying the mortar, use a pointing tool or a jointer to shape and finish the joints, matching the style of the existing wall. This will help create a seamless appearance and improve the overall aesthetics of the repair.
- Remove excess mortar: As you work, periodically remove any excess mortar from the surface of the bricks or blocks using a trowel or a brush. This will help achieve cleaner and neater results.
It’s important to work in small sections at a time to ensure the mortar stays workable and doesn’t dry out before placing the bricks or blocks. Take your time and be patient during this process to ensure a high-quality repair.
Continue these steps for each damaged brick or block that needs replacement. Remember to clean your tools regularly and keep your work area organized to maintain an efficient and tidy workspace.
Once you’ve replaced the damaged bricks or blocks and completed the mortar joints, allow the mortar to cure according to the manufacturer’s instructions. This usually involves misting the repaired area with water regularly to prevent rapid drying and ensure proper curing.
With the new bricks or blocks securely in place, you’re ready to move on to the final steps of the repair process—ensuring proper alignment and leveling. Join us in the next section as we guide you through these important final touches.
Ensuring Proper Alignment and Leveling
Now that you have applied the mortar and replaced the damaged bricks or blocks, it’s crucial to ensure proper alignment and leveling. This step will help create a visually appealing and structurally sound repair.
Follow these steps to ensure proper alignment and leveling:
- Check for alignment: Use a mason’s level to verify that the new bricks or blocks are aligned with the surrounding ones. Place the level horizontally and vertically against the edges of the bricks or blocks to ensure they are flush and even. Make any necessary adjustments by tapping gently with a rubber mallet or a wooden block.
- Double-check the course line: Verify that the new bricks or blocks are in line with the existing course of bricks or blocks. Use a straightedge or a string line as a guide to check the alignment. Adjust the position of the bricks or blocks as needed to maintain a consistent course line.
- Ensure horizontal leveling: It’s important to ensure that the repaired area is horizontally level. Lay a straightedge or a level across the tops of the new bricks or blocks to check for any unevenness. If you detect any discrepancies, adjust the placement of the bricks or blocks until the surface is level.
- Confirm vertical leveling: Similarly, check the vertical alignment of the repaired area. Use a level along the vertical joints to ensure that the bricks or blocks are in line with the adjacent ones. Adjust as necessary to achieve a straight and plumb wall.
By ensuring proper alignment and leveling, you not only enhance the aesthetic appeal of the repair but also maintain the structural integrity of your brick or block wall.
Once you’re satisfied with the alignment and leveling, allow the mortar to dry and cure according to the manufacturer’s instructions. This typically involves covering the repaired area with a damp cloth or plastic sheeting and misting it with water regularly to prevent rapid drying and promote proper curing.
With the repaired area properly aligned and leveled, you’re almost finished with the repair process. In the next section, we’ll cover some important final steps to complete the repair and provide tips on preventing further damage to your brick or block walls.
Finishing the Repaired Area
With the bricks or blocks replaced, the mortar applied, and the alignment and leveling perfected, it’s time to focus on finishing the repaired area. This final step will help blend the repair seamlessly with the existing wall, creating a polished and professional-looking result.
Follow these steps to finish the repaired area:
- Brush or sponge the mortar: Once the mortar has started to set but is still workable, use a stiff brush or a damp sponge to texture the mortar. This will help it match the texture of the surrounding mortar and create a cohesive appearance. Gently brush or sponge the mortar, blending it with the existing wall.
- Clean the excess mortar: Use a trowel or a brush to scrape off any excess mortar from the surface of the repaired area. This will ensure a neat and clean finish. Be careful not to disturb the newly placed bricks or blocks.
- Allow the mortar to cure: After finishing the repaired area, allow the mortar to dry and cure completely. Follow the manufacturer’s recommendations for curing time. It’s important to protect the repaired area from excessive moisture and direct sunlight during the curing process.
- Inspect and touch up: Once the mortar is fully cured, inspect the repaired area and surrounding wall. Look for any inconsistencies, rough edges, or areas that may require touching up. If necessary, use a small trowel or a brush to apply a thin layer of matching mortar to achieve a seamless finish.
- Paint or seal (optional): Depending on the desired aesthetic and finish, you may choose to paint or seal the repaired area. This can help further blend the repair with the existing wall, providing a uniform appearance. Choose a paint or sealant that is suitable for masonry applications and follow the manufacturer’s instructions for proper application.
By taking the time to finish the repaired area, you’ll achieve a cohesive and visually pleasing result. The repaired section will seamlessly blend with the rest of the wall, enhancing its overall appearance. In addition, properly finishing the repaired area helps protect it from potential weathering and extends its longevity.
After completing the finishing touches, step back and admire your handiwork. You have successfully repaired your brick or block wall, restoring its structural integrity and aesthetic appeal.
Now that the repair process is complete, it’s important to take preventive measures to avoid further damage to your brick or block walls. In the next section, we’ll provide you with some helpful tips to keep your walls well-maintained and protected for years to come.
Preventing Further Damage
Now that you’ve successfully repaired your brick or block walls, it’s crucial to take proactive steps to prevent future damage and maintain the longevity of your structure. By implementing preventive measures, you can safeguard your walls and minimize the need for future repairs.
Follow these tips to prevent further damage to your brick or block walls:
- Regular inspections: Conduct regular visual inspections of your walls. Look for any signs of cracks, loose mortar, or water damage. Catching these issues early on can help you address them before they worsen.
- Proper drainage: Ensure that your walls have appropriate drainage systems in place. Poor drainage can lead to water seepage, which can cause significant damage to your walls. Clear out gutters, downspouts, and drains to ensure proper water flow away from the structure.
- Weatherproofing: Consider applying a weatherproofing treatment to your walls. This can help protect them from moisture penetration and minimize the risk of damage due to freeze-thaw cycles or constant exposure to harsh weather conditions.
- Maintain mortar joints: Check the condition of the mortar joints periodically. If you notice any deteriorating or crumbling mortar, consider re-pointing or repairing those areas promptly. This will help maintain the structural integrity of your walls.
- Proper ventilation: Ensure that there is adequate airflow around your walls. Good ventilation can help prevent moisture build-up and reduce the risk of mold or mildew growth, which can weaken the structure over time.
- Trim vegetation: Keep trees, shrubs, and vines trimmed and away from your walls. Overgrown vegetation can cause damage to the mortar and create a pathway for moisture to seep into the structure. Maintain a suitable distance between vegetation and the walls to minimize the risk of damage.
- Protective coatings: Consider applying a protective coating or sealant to your walls. This can add an extra layer of protection against water infiltration, staining, and other external factors that may cause damage.
- Address foundation issues: Keep an eye on the foundation of your structure. If you notice any shifting or settling, consult a professional to assess and address any underlying foundation issues promptly. Foundation problems can directly impact the stability of your walls.
By implementing these preventive measures, you’ll be taking proactive steps to protect your brick or block walls from future damage. Regular maintenance and early intervention are key to preserving the integrity and appearance of your walls.
With these tips in mind, you can enjoy the beauty, strength, and longevity of your brick or block walls for many years to come.
Congratulations on successfully repairing your walls and taking the necessary steps to prevent further damage!
If you have any other questions or need further assistance, feel free to reach out. Happy wall maintenance!
Conclusion
Congratulations on completing the comprehensive process of repairing your brick or block walls! By following the step-by-step guide and implementing the necessary precautions, you have successfully restored the structural integrity and visual appeal of your walls.
Throughout this journey, you assessed the damage, gathered the necessary tools and materials, prepared the work area, removed damaged bricks or blocks, cleaned the surface, mixed the mortar, applied the mortar to replace bricks or blocks, ensured proper alignment and leveling, finished the repaired area, and learned how to prevent further damage.
Remember, brick and block wall repair is a valuable skill that not only saves you time and money but also ensures the longevity and strength of your walls. Taking the time to address any issues promptly and properly maintain your walls will help prevent future damage and costly repairs.
Whether you’re a seasoned DIY enthusiast or a beginner, this guide has provided you with the knowledge and techniques needed to handle brick or block wall repairs like a pro. However, always exercise caution and seek professional assistance for extensive damage or structural issues.
By investing your time, effort, and attention to detail, you have successfully extended the lifespan of your brick or block walls and preserved their beauty and strength.
Now that you have completed the repair process, remember to periodically inspect, maintain, and implement preventive measures to ensure the continued health of your walls. Regular inspections, proper drainage, weatherproofing, and prompt repairs of any damage or deterioration will go a long way in maintaining the integrity of your walls.
Thank you for joining us on this repair journey. We hope this guide has been informative, useful, and empowering, allowing you to undertake future brick or block wall repairs with confidence.
If you have any further questions or need additional assistance, don’t hesitate to seek professional advice or consult a local masonry expert. Happy wall maintenance and restoration!
Frequently Asked Questions about How To Repair Brick Or Block Walls And Prevent More Damage
Was this page helpful?
At Storables.com, we guarantee accurate and reliable information. Our content, validated by Expert Board Contributors, is crafted following stringent Editorial Policies. We're committed to providing you with well-researched, expert-backed insights for all your informational needs.


0 thoughts on “How To Repair Brick Or Block Walls And Prevent More Damage”