Articles
How To Replace Garage Door Window Inserts
Modified: May 6, 2024
Learn how to replace garage door window inserts with our informative articles. Step-by-step guides and tips for a hassle-free installation.
(Many of the links in this article redirect to a specific reviewed product. Your purchase of these products through affiliate links helps to generate commission for Storables.com, at no extra cost. Learn more)
Introduction
Replacing garage door window inserts not only enhances the aesthetic appeal of your garage but also improves functionality and energy efficiency. Over time, window inserts can become worn, cracked, or damaged, compromising both the appearance and insulation of your garage. Fortunately, with the right tools and materials, replacing these inserts is a straightforward task that can be accomplished by most homeowners.
In this guide, we will walk you through the step-by-step process of replacing garage door window inserts. Whether you have a single-car or double-car garage, the process remains relatively similar. By following these instructions, you can restore the appearance and functionality of your garage door, giving it a fresh, updated look.
Before diving into the process, let’s take a moment to gather the necessary tools and materials. Having everything prepared ahead of time will streamline the task and ensure a smoother installation process.
Key Takeaways:
- Replacing garage door window inserts is a straightforward DIY project that can enhance the appearance and functionality of your garage. From gathering the necessary tools to maintaining the new inserts, this guide provides a comprehensive step-by-step process for a successful installation.
- Accurate measurements, thoughtful selection of replacement inserts, and proper installation are key to achieving a seamless and secure fit for your garage door window inserts. Following these steps will ensure a refreshed and functional garage space for years to come.
Read more: When To Replace Garage Door
Step 1: Gather the necessary tools and materials
The first step in replacing garage door window inserts is gathering all the necessary tools and materials. Having these items on hand before you start will save you time and frustration. Here’s a list of what you’ll need:
- Safety goggles and gloves: These will protect your eyes and hands from any debris or accidents during the installation process.
- Tape measure: This will be used to measure the dimensions of the window opening.
- Screwdriver or drill: Depending on the type of screws or fasteners used in your garage door, you’ll need either a screwdriver or a drill to remove and install the window inserts.
- Window inserts: These are the replacement panels that will fit into the window frame. Make sure to measure the dimensions of your existing window inserts to ensure a proper fit.
- Window cleaner and microfiber cloth: Before installing the new window inserts, it’s a good idea to clean the window frames and remove any dirt or grime.
- Double-sided tape or adhesive: This will be used to secure the new window inserts in place.
- Caulk and caulk gun: Caulk is used to seal any gaps or openings around the window frame, preventing drafts and improving insulation.
- Paint and paintbrush: If you plan on painting the window inserts or the window frames, have the appropriate paint and brushes ready.
Once you’ve gathered all the necessary tools and materials, you’re ready to move on to the next step: removing the old window inserts.
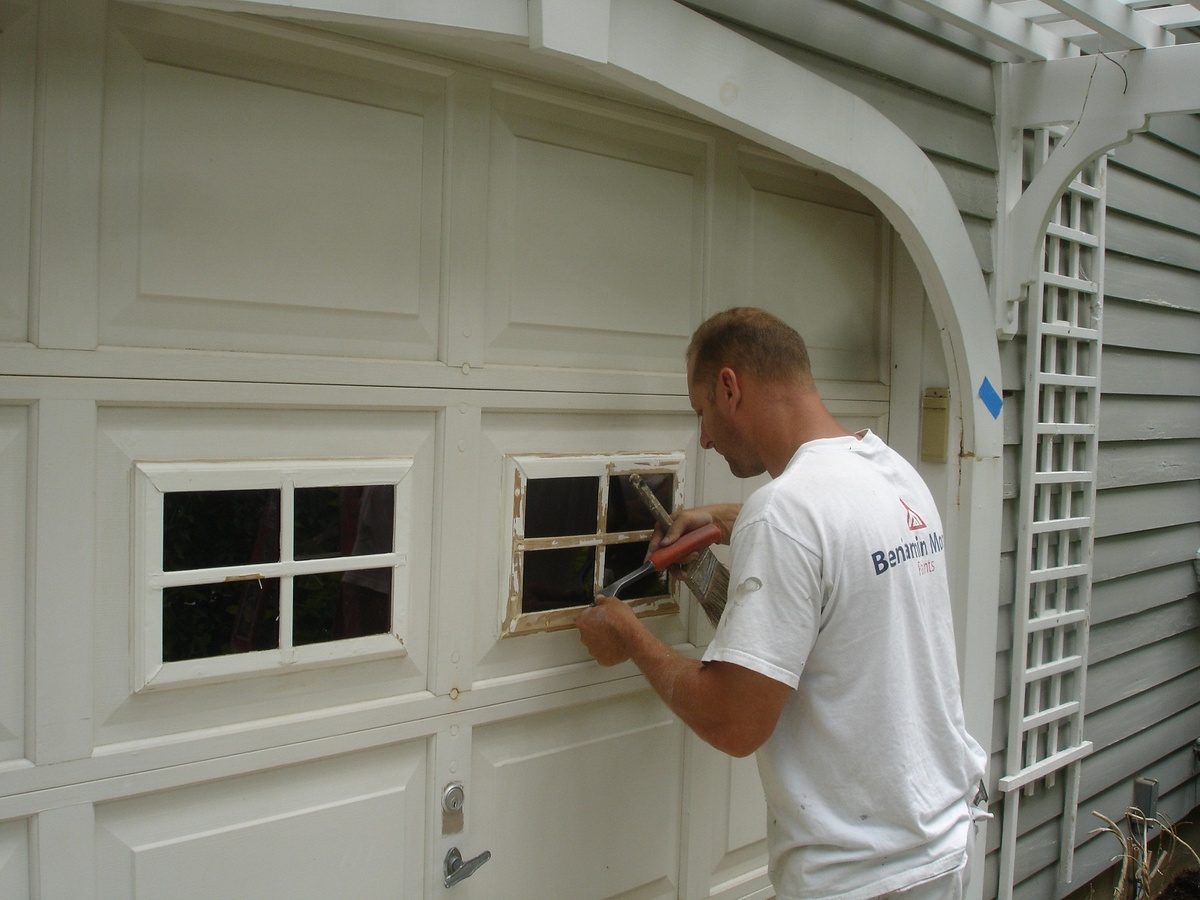
Step 2: Remove the old window inserts
Now that you have all the necessary tools and materials, it’s time to remove the old window inserts. Follow these steps to ensure a smooth and safe removal process:
- Put on your safety goggles and gloves to protect yourself from any potential hazards.
- Using a screwdriver or drill, carefully remove the screws or fasteners that are securing the old window inserts in place.
- Gently pull out the old window inserts from the frame. Be careful not to force them or use excessive pressure, as this could cause damage to the window frame.
- Set the old window inserts aside or dispose of them properly.
- Inspect the window frame for any damage or debris. Clean the frame using a window cleaner and a microfiber cloth to ensure a clean and smooth surface for the installation of the new window inserts.
With the old window inserts removed and the window frame clean, you’re ready to move on to the next step: measuring the window opening.
Step 3: Clean the window frame
After removing the old window inserts, it’s important to thoroughly clean the window frame before installing the new inserts. A clean surface will ensure a secure and proper fit for the new windows. Here’s how to clean the window frame:
- Start by gathering a window cleaner solution, a microfiber cloth, and possibly a scraper or soft brush if there is stubborn dirt or grime.
- Spray the window cleaner solution onto the window frame, ensuring that all areas are covered.
- Use the microfiber cloth to wipe away the dirt and grime. Pay extra attention to the corners and edges of the frame.
- If there are any stubborn spots, use a scraper or soft brush to gently remove the dirt or debris.
- Once the window frame is clean, use a dry section of the microfiber cloth to remove any excess moisture.
By thoroughly cleaning the window frame, you’ll remove any dirt or contaminants that could interfere with the installation process. This will also provide a clean and inviting surface for the new window inserts to be placed.
With the window frame now clean, it’s time to move on to the next step: measuring the window opening.
Step 4: Measure the window opening
Before you can proceed with purchasing and installing the new window inserts, you need to accurately measure the window opening. This step will ensure that the replacement windows fit properly and provide a seamless and secure fit. Here’s how to measure the window opening:
- Gather a tape measure and ensure it is in good working condition.
- Start by measuring the width of the window opening. Place the tape measure at one side of the opening and extend it to the opposite side. Take note of the measurement in inches or centimeters.
- Next, measure the height of the window opening. Place the tape measure at the bottom of the opening and extend it to the top. Again, take note of the measurement.
- Double-check your measurements to ensure accuracy. It’s always a good idea to measure the width and height in multiple spots to account for any slight variations in the opening.
Once you have the accurate measurements of the window opening, you can proceed to the next step: choosing the replacement window inserts.
Note: If you are unsure or uncomfortable with taking measurements, consider consulting a professional to ensure accurate measurements for your replacement window inserts.
Read more: How To Replace Garage Door Lock
Step 5: Choose the replacement window inserts
With the measurements of the window opening in hand, you can now begin the process of selecting the right replacement window inserts. There are several factors to consider when choosing the inserts:
- Size: Ensure that the replacement window inserts are the correct size based on the measurements you took in the previous step. It’s important to find inserts that will fit snugly into the window frame without gaps or overlaps.
- Material: Window inserts come in various materials, including glass, acrylic, and polycarbonate. Consider factors such as durability, energy efficiency, and aesthetic appeal when choosing the material for your replacement inserts.
- Design and style: Select replacement window inserts that complement the overall design of your garage and meet your aesthetic preferences. This could include factors such as the number of panes, decorative patterns, or frosted/glass options.
- Energy efficiency: If energy efficiency is a priority, look for window inserts with a high insulation rating. These will help to keep your garage cooler in the summer and warmer in the winter, reducing energy costs.
- Budget: Consider your budget when choosing replacement window inserts. Various options are available at different price points, so be sure to find a balance between quality and affordability.
Take your time to research and compare different options, and consult with an expert if needed. Once you have selected the replacement window inserts that meet your requirements, it’s time to move on to the next step: installing the new window inserts.
When replacing garage door window inserts, make sure to measure the dimensions accurately before purchasing new inserts to ensure a proper fit.
Step 6: Install the new window inserts
Now that you have chosen the replacement window inserts, it’s time to install them into the window frame. Follow these steps to ensure a proper and secure installation:
- Begin by positioning the new window inserts in the window frame, aligning them with the opening.
- Check that the inserts fit properly and adjust if needed. If the inserts are too large, you may need to trim them slightly to ensure a proper fit. Use a saw or a utility knife to trim the inserts, following the manufacturer’s guidelines.
- Carefully place the new window inserts into the window frame, ensuring they are aligned and level.
- If using double-sided tape or adhesive, apply it to the backside of the window inserts. This will help secure them in place.
- Gently press the window inserts into the frame, making sure they adhere properly.
- Check that the inserts are correctly positioned and centered within the frame.
It’s important to be careful during the installation process to avoid damaging the window inserts or the frame. Take your time to ensure a precise and secure installation.
Once the new window inserts are in place, it’s time to move on to the next step: securing the inserts to the window frame.
Step 7: Secure the inserts in place
After installing the new window inserts, the next step is to securely fasten them to the window frame. This will ensure that they stay in place and function properly. Follow these steps to secure the inserts:
- Depending on the type of fasteners provided with the window inserts, use a screwdriver or drill to attach them to the frame. Follow any specific instructions provided by the manufacturer.
- Place the fasteners evenly around the perimeter of the window inserts, ensuring they are snug but not overtightened.
- If using double-sided tape or adhesive, ensure it is properly adhered to the backside of the window inserts. Press down firmly to secure the inserts in place.
- Check that all fasteners and adhesive are secure, and double-check that the window inserts are level and centered within the frame.
Properly securing the inserts is important for their longevity and functionality. This will ensure that they do not come loose or shift out of position over time.
With the new window inserts securely in place, you’re ready to move on to the next step: testing and adjusting the window operation.
Step 8: Test and adjust the window operation
After securing the new window inserts in place, it’s important to test their operation to ensure they open, close, and lock properly. Follow these steps to test and adjust the window operation:
- Attempt to open and close the garage door several times, paying attention to how the window inserts move and interact with the frame.
- Check for any friction or resistance when opening or closing the window. If there is any difficulty, you may need to make minor adjustments to the inserts.
- Inspect the alignment of the inserts within the frame to ensure they are properly centered and level. If needed, reposition the inserts and secure them again.
- Test the window locks or latches to ensure they engage properly and securely hold the window inserts in place.
- If any adjustments are necessary, make them gradually and systematically to achieve the desired fit and functionality.
It’s essential to test and adjust the window operation to ensure smooth and effortless functionality. This will also help prevent any potential issues down the line and ensure the long-term performance of the window inserts.
Once you’re satisfied with the window operation, it’s time to move on to the final step: maintaining and cleaning the new window inserts.
Read more: How To Replace Rollers On Garage Door
Step 9: Maintain and clean the new window inserts
Now that you have successfully installed the new window inserts, it’s important to properly maintain and clean them to keep them looking pristine and functioning effectively. Follow these steps to maintain and clean your new window inserts:
- Regularly inspect the window inserts for any signs of damage, such as cracks or chips. Address any issues promptly to prevent further damage.
- Use a soft, lint-free cloth to dust the surface of the window inserts regularly. This will help remove any dirt or debris that accumulates on the surface.
- For tougher stains or marks, gently wipe the window inserts with a damp cloth or sponge. Avoid using abrasive cleaners or scrubbing tools that could scratch or damage the surface.
- If your window inserts are made of glass, you can use a glass cleaner specifically designed for window surfaces. Spray the cleaner onto a cloth or directly onto the glass and wipe it clean.
- For acrylic or polycarbonate window inserts, use a mild soap or detergent mixed with warm water to clean the surface. Rinse with clean water and dry with a soft cloth.
- Periodically check the sealant or caulk around the window frame for any signs of wear or deterioration. If necessary, reapply or replace the sealant to maintain proper insulation and prevent drafts.
Regular maintenance and cleaning will help extend the lifespan of your window inserts and keep them looking their best. By keeping them clean and well-maintained, you’ll ensure optimal functionality and enhance the overall appearance of your garage.
Congratulations! You have successfully replaced the garage door window inserts, improving the aesthetic appeal and functionality of your garage door. By following these steps and properly maintaining the window inserts, you can enjoy their benefits for years to come.
Remember, if you have any concerns or encounter any difficulties during the installation or maintenance process, it’s always recommended to consult a professional for assistance.
With your newly replaced window inserts, enjoy the enhanced beauty and functionality they bring to your garage!
Is there anything else I can assist you with?
Conclusion
Replacing garage door window inserts is a simple and rewarding DIY project that can significantly enhance the appearance and functionality of your garage. By following the step-by-step process outlined in this guide, you can successfully replace the old window inserts with new ones that fit seamlessly into the window frame.
Starting with gathering the necessary tools and materials, you can then proceed to remove the old window inserts and clean the window frame, ensuring a fresh surface for the new inserts. Taking accurate measurements of the window opening is crucial in selecting the replacement inserts that will fit perfectly.
Choosing the right replacement inserts that meet your style and energy efficiency needs will further enhance the look and efficiency of your garage. From there, the installation process involves securely positioning the new window inserts within the frame and fastening them in place.
After installation, it is necessary to test and adjust the window operation to ensure smooth opening, closing, and locking. Ongoing maintenance will help preserve the condition of the window inserts, as regular cleaning and inspections will keep them looking their best for years to come.
By following the steps outlined in this guide, you can confidently tackle the task of replacing garage door window inserts and enjoy the benefits of a refreshed and functional garage space.
Remember, if you are unsure or uncomfortable with any aspect of the installation process, it is always wise to seek assistance from a professional.
Now, armed with the knowledge and understanding of how to replace garage door window inserts, you can begin your journey to transform and upgrade your garage.
Is there anything else I can assist you with?
Ready to take your home improvement skills further? After mastering garage door window inserts, why not tackle another project that spruces up your home’s exterior? Installing window boxes can dramatically improve your home's curb appeal and provide a lush, mini-garden to admire. Whether you're looking to enhance your view or simply want to add a personal touch to your living space, setting up window boxes is a handy next step. Don't miss our detailed guide on window installation with ease and confidence.
Frequently Asked Questions about How To Replace Garage Door Window Inserts
Was this page helpful?
At Storables.com, we guarantee accurate and reliable information. Our content, validated by Expert Board Contributors, is crafted following stringent Editorial Policies. We're committed to providing you with well-researched, expert-backed insights for all your informational needs.


0 thoughts on “How To Replace Garage Door Window Inserts”