Home>Storage Ideas>Kitchen Storage>How To Build A DIY Brick Outdoor Kitchen
Kitchen Storage
How To Build A DIY Brick Outdoor Kitchen
Modified: October 20, 2024
Discover creative kitchen storage ideas for your DIY brick outdoor kitchen! Maximize space and organization with these helpful tips and tricks.
(Many of the links in this article redirect to a specific reviewed product. Your purchase of these products through affiliate links helps to generate commission for Storables.com, at no extra cost. Learn more)
Introduction
Welcome to the world of outdoor cooking! If you love grilling and entertaining guests, then a DIY brick outdoor kitchen is the perfect addition to your backyard. Not only does it provide functionality and convenience, but it also adds a touch of elegance and charm to your outdoor living space.
Building your own outdoor kitchen allows you to customize the design to suit your needs and personal style. Whether you’re a master griller or a novice chef, having a dedicated space for cooking outdoors will elevate your culinary experience and create countless memories with family and friends.
In this article, we will guide you through the step-by-step process of building your very own DIY brick outdoor kitchen. From planning and gathering materials to adding the finishing touches, we will cover everything you need to know to create a stunning and functional outdoor cooking area.
Before we dive into the construction process, it is important to note that building an outdoor kitchen requires adequate space, time, and effort. It is not a weekend project, but with proper planning and dedication, you can have a beautiful outdoor kitchen that will last for years to come.
So, let’s roll up our sleeves and get started on creating your dream outdoor kitchen!
Key Takeaways:
- Planning, patience, and attention to detail are essential for creating a durable and stylish DIY brick outdoor kitchen. From layout design to appliance installation, each step contributes to a functional and inviting outdoor cooking space.
- The finishing touches, such as outdoor lighting, decorative elements, and storage solutions, add personality and convenience to your outdoor kitchen. Regular maintenance ensures the longevity and enjoyment of your culinary oasis.
Step 1: Planning Your Outdoor Kitchen
The first step in building your DIY brick outdoor kitchen is to plan out the design and layout. This crucial step will ensure that you have a clear vision of what you want to achieve and will help you make informed decisions throughout the construction process.
Determine the Purpose
Start by considering how you intend to use your outdoor kitchen. Are you primarily going to use it for grilling and barbecuing? Do you plan to entertain large gatherings or have intimate dinners with your family? Understanding the purpose will help you determine the size and features your outdoor kitchen should have.
Choose the Location
Next, choose the perfect spot in your backyard for your outdoor kitchen. Consider factors such as proximity to your indoor kitchen, existing structures like patios or decks, and the level of sunlight and wind exposure. It’s also important to check for any local building codes or homeowner’s association regulations that may affect where you can build your outdoor kitchen.
Create a Layout
Sketch out a rough layout of your outdoor kitchen, taking into account the placement of key elements such as the grill, sink, countertops, storage cabinets, and seating areas. Ensure there is sufficient workspace for food preparation and enough room for comfortable seating and movement.
Select Materials
Choose the materials for your outdoor kitchen carefully, as they need to withstand the elements year-round. Brick is a popular choice for its durability and timeless appeal. Stainless steel appliances and countertops are also recommended for their resistance to rust and easy maintenance.
Consider Utility Connections
Think about the utility connections such as gas, water, and electricity. Ensure that you have access to these services in the chosen location or plan for their installation if necessary. Consulting with professionals or hiring a licensed contractor may be required to handle these connections safely.
By investing time in proper planning, you will have a clear roadmap for the construction of your outdoor kitchen. Take measurements, gather inspiration from design magazines or online resources, and make a detailed list of your requirements and must-have features. With a well-planned outdoor kitchen, your dream cooking space will soon become a reality.
Step 2: Gathering Materials and Tools
Now that you have a solid plan in place for your DIY brick outdoor kitchen, it’s time to gather the necessary materials and tools. By collecting everything you need before you start construction, you’ll save time and minimize interruptions during the building process.
List of Materials
Here is a general list of materials you will typically need for building a DIY brick outdoor kitchen:
- Bricks or concrete blocks
- Mortar and cement
- Stainless steel grill and other appliances
- Countertop materials (such as granite, concrete, or tile)
- Outdoor cabinets or storage units
- Sink and faucet
- Gas lines or propane tank
- Electrical wiring and outlets
- Plumbing materials (if necessary)
- Sealers and adhesives
- Outdoor-rated lighting fixtures
- Hardware (such as hinges, handles, and knobs)
It’s important to note that the specific materials you’ll need may vary depending on the design and size of your outdoor kitchen. Consult your plan to determine the exact quantities and types of materials required.
Tools and Equipment
In addition to the materials, you’ll need various tools and equipment to facilitate the construction process. Here are some essential tools to have on hand:
- Tape measure and level
- Masonry trowel and jointing tool
- Mixing bucket and wheelbarrow for mortar
- Brick chisel and masonry hammer
- Power drill and screwdriver
- Tile saw (if using tile for the countertop)
- Wire cutters and stripper (for electrical work)
- Plumbing wrenches and connectors (if installing a sink)
- Safety equipment such as gloves, goggles, and dust mask
Before you start the construction, ensure that you have all the necessary tools in good working condition. If you don’t already own these tools, consider borrowing, renting, or purchasing them to ensure a smooth building process.
Gathering all the materials and tools before you begin construction will save you from running back and forth to the store and ensure you have everything you need at your fingertips. So, take the time to compile a comprehensive list and gather all the items necessary to bring your outdoor kitchen to life.
Step 3: Choosing the Perfect Location
The location of your outdoor kitchen plays a vital role in the overall functionality and aesthetic appeal of the space. Careful consideration should be given to factors such as accessibility, convenience, and existing elements in your backyard. Here’s a guide to help you choose the perfect location for your DIY brick outdoor kitchen.
Proximity to Indoor Kitchen
One of the key factors to consider when selecting the location is the proximity to your indoor kitchen. You’ll want to have easy access to your indoor kitchen for convenience when preparing and transporting food. The closer your outdoor kitchen is to your indoor kitchen, the easier it will be to move back and forth between the two spaces.
Ventilation and Smoke Considerations
Grilling and cooking outdoors can produce smoke and odors. It’s important to consider the direction and strength of prevailing winds in your backyard to ensure that the smoke is directed away from your living spaces. You may also want to incorporate a ventilation system or place your outdoor kitchen in a position where the smoke does not interfere with outdoor seating areas or neighboring properties.
Shade and Sun Exposure
Take note of the sun’s movement throughout the day to determine the best location for your outdoor kitchen. If you live in a particularly hot climate, consider positioning your kitchen in an area that receives natural shade. If natural shade is not available, you can incorporate a pergola or umbrella to provide protection from the sun’s rays during cooking and dining hours.
Existing Structures and Utilities
Consider the existing structures and utilities in your backyard, such as patios, decks, or existing outdoor power and water sources. Building your outdoor kitchen near these elements can help minimize installation and construction costs. It’s also important to ensure that you have easy access to electricity, gas lines, and water connections for your appliances and utilities.
Entertaining and Seating Space
Think about how your outdoor kitchen will integrate with the existing seating and entertainment areas in your backyard. Design the layout in a way that creates a cohesive and functional outdoor living space. This can include incorporating a dining area, bar seating, or a lounge space that provides a comfortable and inviting atmosphere for your guests.
By carefully selecting the location of your outdoor kitchen, you can optimize its functionality and seamlessly integrate it into your backyard space. Take into consideration the proximity to your indoor kitchen, ventilation, shade, existing structures, and entertaining areas. Once you have chosen the perfect spot, you can move on to the next step of creating a solid foundation for your DIY brick outdoor kitchen.
Step 4: Creating a Solid Foundation
Creating a solid foundation is an essential step in the construction of your DIY brick outdoor kitchen. A stable and level base will ensure the longevity and structural integrity of your kitchen. Here’s a guide on how to create a solid foundation for your outdoor kitchen.
Read more: How To Build A Trellis
Clear and Level the Area
Start by clearing the designated area of any debris, plants, or obstructions. Use a shovel and a rake to remove rocks, roots, and other objects that may interfere with the foundation. Once the area is clear, use a level to check if the ground is even. If there are any high or low spots, fill them in or remove excess soil to achieve a level surface.
Mark the Layout
Using stakes and string, mark the layout of your outdoor kitchen on the cleared area. This will serve as a guide during the construction process and ensure that your kitchen is properly aligned. Double-check the measurements and make any necessary adjustments before proceeding.
Excavate the Foundation
Begin excavating the foundation area to a depth of at least 6 inches. This will create a stable base for the kitchen structure. Use a shovel or a rented excavation equipment, such as a mini excavator, to remove the soil. Ensure that the excavation is even and smooth, without any high or low spots.
Add a Layer of Gravel
Once the foundation area is excavated, add a layer of gravel or crushed stone to the dug-out space. Spread the gravel evenly and use a rake or tamper to compact it. This will provide drainage and stability for the foundation.
Read more: How To Build A Brick Mailbox
Install a Concrete Footing
Next, install a concrete footing around the perimeter of the foundation area. This will act as a support for the brick base and ensure its stability. Use wooden forms to create a mold for the concrete footing, following the marked layout. Mix and pour the concrete into the forms, making sure it is level and smooth. Allow the concrete to cure according to the manufacturer’s instructions.
Construct a Rebar Grid
To further strengthen the foundation, create a rebar grid within the concrete footing. Place the rebar in a crisscross pattern, ensuring that it extends to the edges of the foundation. Use wire to secure the rebar in place. This grid will reinforce the concrete and provide additional support for the structure.
Allow the Foundation to Cure
After completing the foundation, allow it to cure and harden for the recommended time specified by the concrete manufacturer. This typically takes several days. Avoid placing any weight or pressure on the foundation during this curing period to ensure its strength and stability.
By creating a solid foundation, you are setting the groundwork for a sturdy and long-lasting outdoor kitchen. Clearing and leveling the area, excavating, adding gravel, installing a concrete footing, and reinforcing with a rebar grid are essential steps to ensure the stability and durability of your DIY brick outdoor kitchen. Once the foundation is cured, you can move on to the exciting step of constructing the brick base.
Step 5: Constructing the Brick Base
Now that you have a solid foundation in place, it’s time to move on to constructing the brick base for your DIY outdoor kitchen. The brick base will provide support and serve as the foundation for the countertops and cabinets. Here’s a step-by-step guide to help you construct the brick base for your outdoor kitchen.
Read more: How To Build Brick Steps
Prepare the Mortar
Start by preparing the mortar according to the manufacturer’s instructions. Mix the mortar thoroughly until it reaches a smooth consistency. Using a trowel, scoop the mortar onto a mortar board or directly onto the area where the bricks will be placed.
Lay the First Course
Begin by laying the first course of bricks along the outside perimeter of the marked layout. Apply a layer of mortar to the foundation where the brick will be placed, then press the brick firmly into the mortar. Use a level to ensure that the bricks are level and aligned. Leave a small gap between each brick for the mortar joints.
Continue Building the Layers
Once the first course is in place, continue building subsequent courses by applying mortar to the top of the first layer of bricks and placing the next layer on top. Offset the joints to create stability and strength in the structure. Use a trowel to remove any excess mortar and ensure a neat appearance.
Check for Level and Plumb
As you build each layer of bricks, regularly check for levelness and plumbness. Use a level to ensure the bricks are even horizontally, and a plumb line or level to ensure they are straight and aligned vertically. Adjust as necessary before the mortar sets.
Read more: How To Build A Brick Grill
Install Brick Support Angles or Metal Lintels
If your outdoor kitchen will have countertops or overhead cabinets, you may need to install brick support angles or metal lintels to provide additional support. These will help carry the load and prevent any sagging or cracking. Consult the manufacturer’s instructions for proper installation of these support elements.
Allow the Mortar to Cure
After completing the construction of the brick base, allow the mortar to cure and harden according to the manufacturer’s instructions. This typically takes a few days. Avoid placing any weight on the brick base until the mortar is fully cured to ensure its strength and stability.
Constructing the brick base is an important step in creating a sturdy and visually appealing outdoor kitchen. By properly laying the bricks, checking for levelness and plumbness, and allowing the mortar to cure, you’ll have a solid foundation for the countertops and cabinets. With the brick base complete, you’re now ready to move on to the next step of building the countertop and cabinets for your outdoor kitchen.
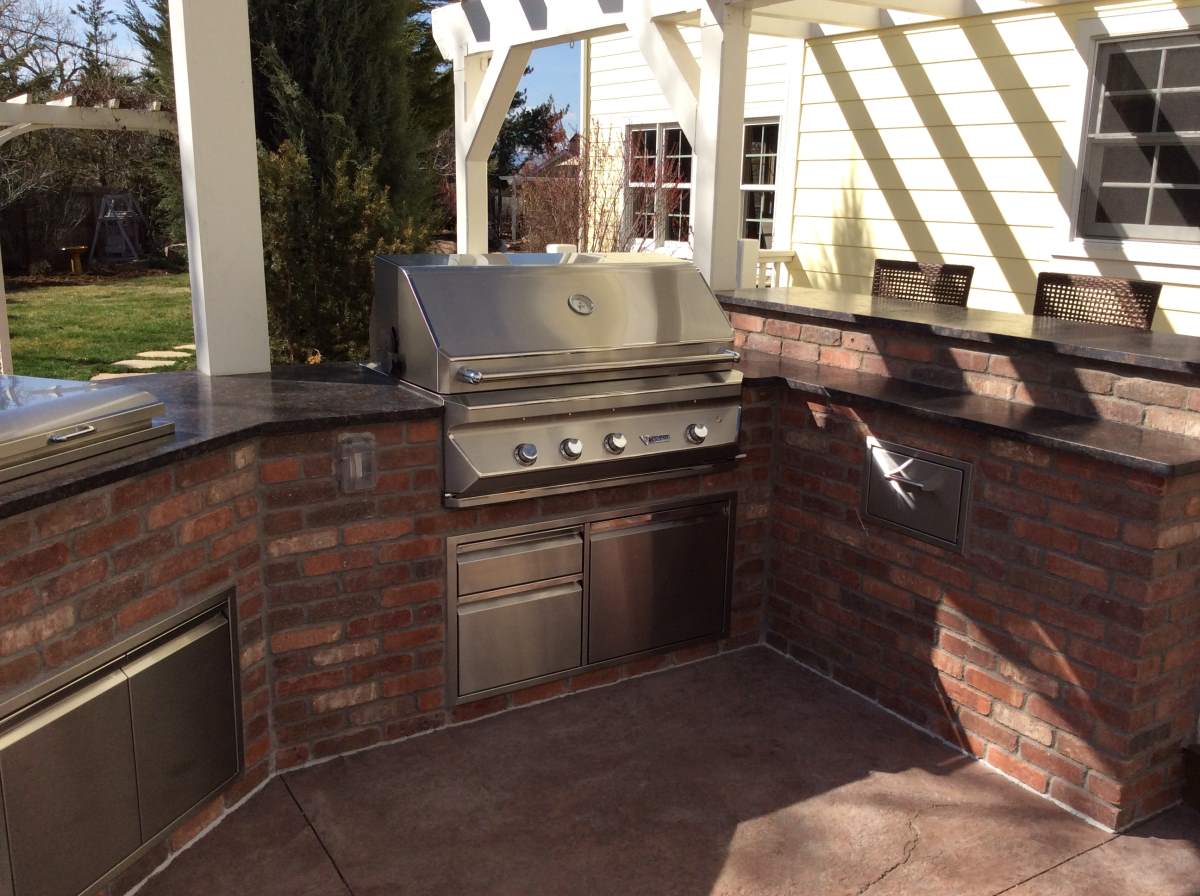
Step 6: Building the Countertop and Cabinets
Building the countertop and cabinets for your DIY brick outdoor kitchen is an exciting step that will bring functionality and style to your outdoor cooking space. The countertop will provide a durable and easy-to-clean surface for food preparation and serving, while the cabinets will offer storage for utensils, cookware, and other essentials. Here’s a step-by-step guide to help you construct the countertop and cabinets for your outdoor kitchen.
Measure and Cut the Countertop Materials
Start by measuring the dimensions of your outdoor kitchen space and determine the size and shape of your countertop. Choose a material such as granite, concrete, or tile that is suitable for outdoor use. Using a saw or appropriate cutting tools, cut the countertop material to fit the measurements you have taken.
Read more: How To Build A Brick Column
Install the Countertop
Place the cut countertop material onto the brick base, ensuring it fits securely and aligns properly with the edges. Use adhesive or mortar to attach the countertop to the brick base, following the manufacturer’s instructions. Press the countertop firmly into place, making sure it is level and even.
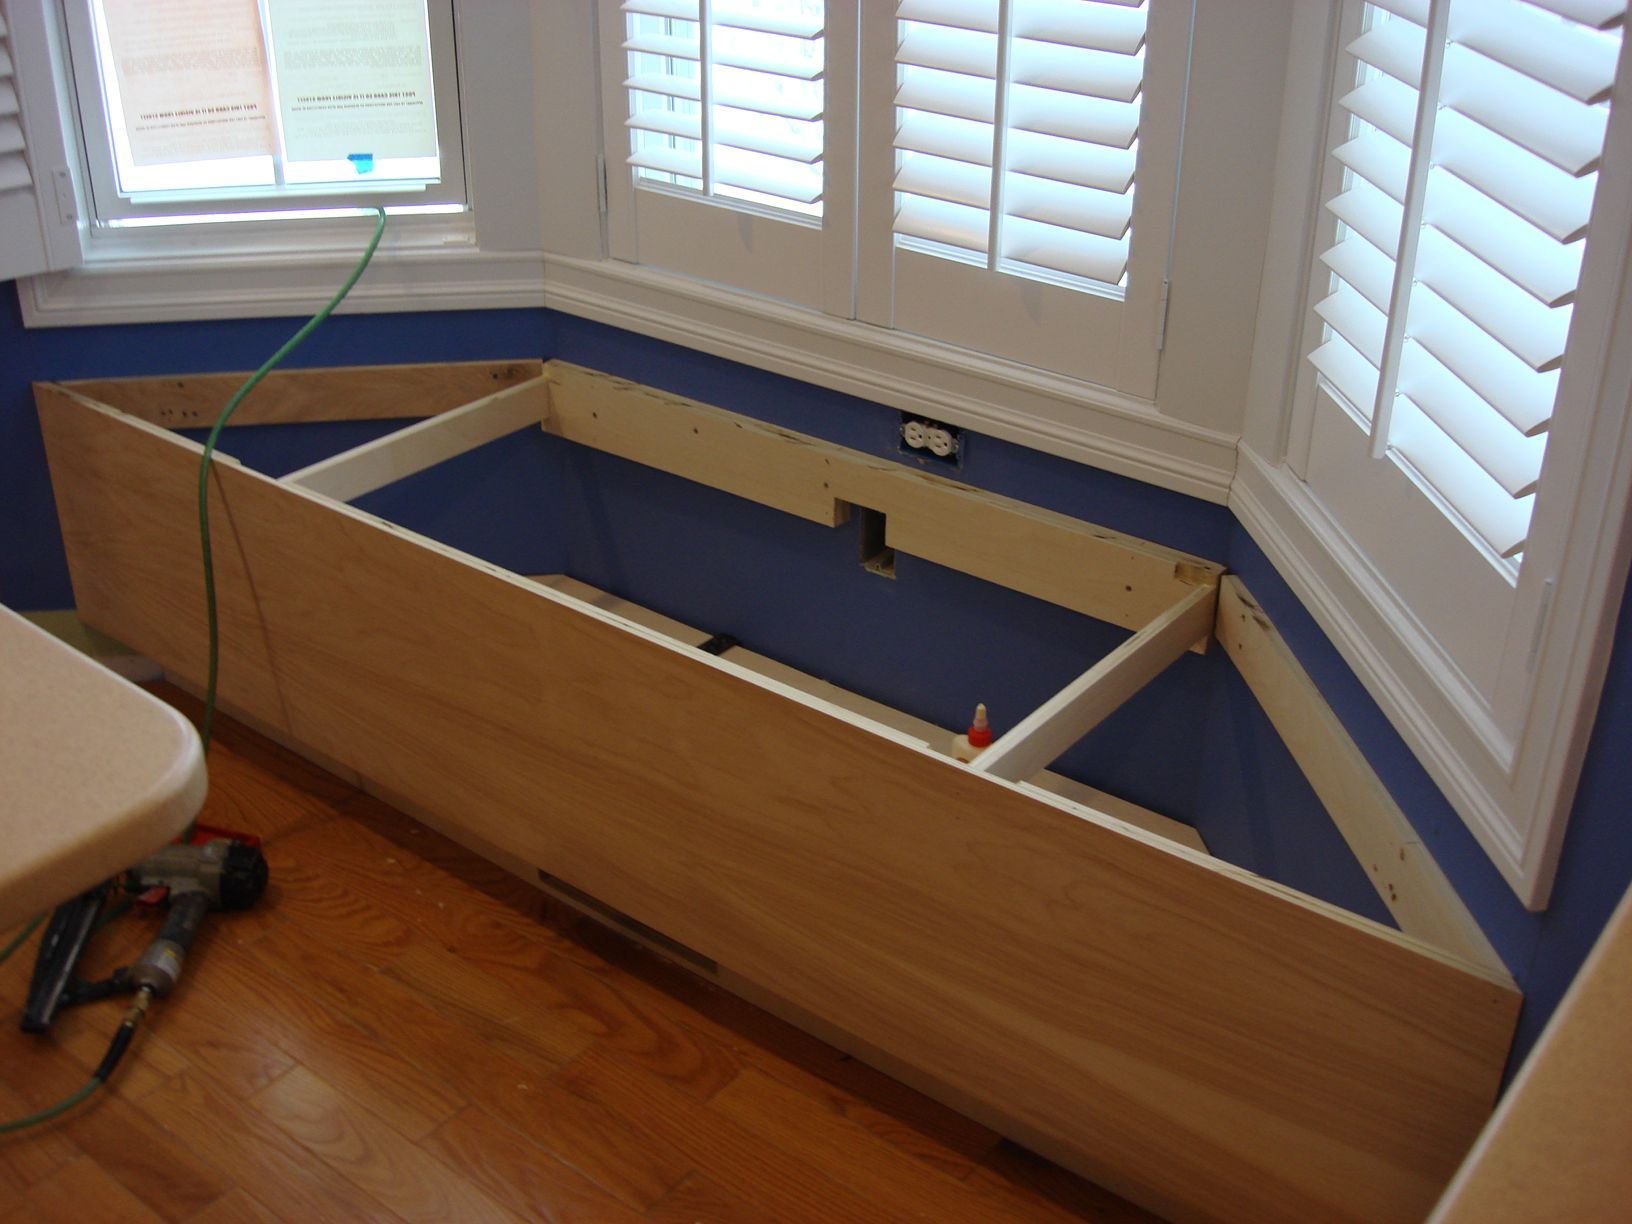
Build and Install the Cabinets
Constructing the cabinets requires careful planning and attention to detail. Measure and cut plywood or outdoor-rated boards to the desired dimensions for the cabinet boxes. Assemble the boxes using screws or nails, making sure they are square and sturdy. Attach the cabinet doors, hinges, and handles according to your chosen design.
Attach Cabinet Doors to the Brick Base
When attaching the cabinets to the brick base, place them in the desired location and use screws or brackets to secure them to the brick. Make sure the cabinets are level and properly aligned. Double-check that the doors open and close smoothly without any interference.
Install Drawers and Shelves
If your cabinets have drawers or shelves, install them according to the manufacturer’s instructions. This will provide additional storage space and organization options for your outdoor kitchen essentials. Make sure the drawers and shelves are properly aligned and operate smoothly.
Read more: How To Build A Brick Hearth
Seal the Countertop and Cabinets
After the countertop and cabinets are installed, it’s essential to seal them to protect them from the outdoor elements. Apply a high-quality sealant or waterproofing agent that is suitable for your chosen countertop material and cabinets. Follow the manufacturer’s instructions for proper application and allow sufficient drying time.
Building the countertop and cabinets for your outdoor kitchen adds both functionality and aesthetic appeal. By measuring and cutting the countertop materials, installing the countertop securely, constructing and installing the cabinets, and sealing them for protection, you’ll have a well-equipped and visually pleasing outdoor cooking space. With the countertops and cabinets complete, it’s time to move on to step 7 – installing appliances and utilities.
Step 7: Installing Appliances and Utilities
Now that the countertop and cabinets are in place, it’s time to install the essential appliances and utilities that will make your outdoor kitchen fully functional. From the grill to the sink, these components will enhance your cooking experience and allow you to create delicious meals in your DIY brick outdoor kitchen. Let’s dive into the step-by-step process of installing appliances and utilities.
Gas and Electrical Connections
If your outdoor kitchen requires gas-powered appliances such as a grill, make sure to consult with a licensed professional to handle the gas line installation. They will ensure that the connections are safe and up to code. For electrical connections, hire a qualified electrician to install outlets and connect any electrical appliances or lighting fixtures.
Installing the Grill
Place the grill in the designated area on the countertop. Follow the manufacturer’s instructions to securely attach and connect the grill to the gas or propane line. Ensure that the grill is level and properly aligned with the countertop, allowing for adequate clearance on all sides. Test the grill to make sure it is working correctly before proceeding.
Read more: How To Build A Brick Arch
Adding a Sink and Faucet
If you plan to have a sink in your outdoor kitchen, install it in the designated area on the countertop. Connect the sink to a water source, either by using existing plumbing or by adding a separate line. Install a faucet that is suitable for outdoor use and connect it to the water supply. Test the sink and faucet to verify that there are no leaks and that the water flows properly.
Installing Other Appliances
Depending on your needs and preferences, you may choose to install other appliances such as a refrigerator, pizza oven, or warming drawer. Follow the manufacturer’s instructions for each appliance to securely attach and connect them to the respective gas, electrical, and plumbing sources.
Configuring Ventilation and Exhaust Systems
Proper ventilation and exhaust systems are crucial for outdoor kitchens, especially when using gas-powered appliances. Install an appropriate ventilation hood or exhaust fan to ensure that smoke, fumes, and odors are effectively removed and that the air quality in your outdoor kitchen remains safe.
Testing and Ensuring Safety
Once all the appliances and utilities are installed, thoroughly test each component to ensure proper functionality and safety. Check for gas leaks, verify that electrical connections are secure, and confirm that water flows correctly. It is essential to prioritize safety and make any necessary adjustments or repairs before using your outdoor kitchen.
Installing appliances and utilities completes the functional aspect of your DIY brick outdoor kitchen. With the grill, sink, and other appliances in place, you are now ready to move on to the final step – adding the finishing touches that will enhance the aesthetics and style of your outdoor cooking space.
Read more: How To Build A Brick Pathway
Step 8: Adding Finishing Touches
With the appliances and utilities installed, it’s time to add the finishing touches to your DIY brick outdoor kitchen. These final details will elevate the aesthetics and functionality of your space, creating a welcoming and stylish outdoor cooking area. Let’s explore the step-by-step process of adding the finishing touches.
Outdoor Lighting
Install outdoor lighting fixtures to illuminate your outdoor kitchen during evening gatherings. Consider using LED lights that are suitable for outdoor use and have a warm, inviting glow. Place the lights strategically to provide adequate lighting for food preparation, cooking, and dining areas. Additionally, accent lighting can be added to highlight specific features, such as the countertops or cabinets.
Decorative Elements
Add decorative elements to personalize and enhance the aesthetic appeal of your outdoor kitchen. This can include potted plants, colorful cushions for seating, outdoor artwork, or decorative tiles. These elements will add charm and character to your space, making it feel more inviting and visually appealing.
Seating and Dining Area
Create a comfortable seating and dining area that complements your outdoor kitchen. Consider adding a table and chairs, bar stools, or even a built-in seating area. Choose weather-resistant materials that can withstand outdoor conditions and opt for comfortable cushions or seating options. This will create a welcoming space for you and your guests to enjoy meals together.
Read more: How To Build A Brick Chimney
Storage Solutions
Incorporate storage solutions to keep your outdoor kitchen organized and tidy. Install shelves, cabinets, or drawers within the cabinets to accommodate utensils, cookware, and other essentials. Consider using weather-resistant storage containers or bins to protect items from the elements. Having a well-organized and easily accessible storage system will enhance the functionality and efficiency of your outdoor kitchen.
Accessorize with Style
To truly make your outdoor kitchen your own, decorate with style by adding accessories and personal touches. Hang decorative hooks to keep grilling tools within reach. Install a weather-resistant clock or thermometer to monitor cooking times and temperatures. Consider adding a small outdoor speaker system to enjoy music while cooking. These accessories will add convenience and personality to your space.
Maintaining the Space
Regular maintenance is essential to keep your outdoor kitchen looking its best. Clean the countertops, cabinets, and appliances according to the manufacturer’s instructions. Cover or protect the outdoor kitchen during inclement weather to prevent damage. Regularly inspect and fix any loose or damaged elements to ensure the longevity and functionality of your outdoor kitchen.
With the finishing touches added, your DIY brick outdoor kitchen is complete. You now have a functional, stylish, and inviting outdoor cooking space where you can entertain guests and create culinary delights. Enjoy your outdoor kitchen and make cherished memories as you cook and dine surrounded by the beauty of your own backyard.
Conclusion
Congratulations on completing your DIY brick outdoor kitchen! By following the step-by-step guide in this article, you have created a functional and visually appealing space where you can enjoy cooking and entertaining in the great outdoors.
Building your own outdoor kitchen allows you to customize the design to suit your specific needs and personal style. From the initial planning stages to the finishing touches, you have put in the time and effort to create a space that reflects your creativity and enhances your outdoor living experience.
Remember, the key to a successful DIY outdoor kitchen project is proper planning and attention to detail. Take the time to carefully measure, gather materials, and follow the instructions for each step. This diligence will result in a well-constructed and durable outdoor kitchen that will withstand the test of time.
Now that your outdoor kitchen is complete, it’s time to gather family and friends to enjoy delicious meals and create lasting memories. Whether you’re grilling up a steak, preparing a gourmet feast, or simply enjoying a casual barbecue, your outdoor kitchen will be a centerpiece for entertaining and connecting with loved ones.
As you use and maintain your outdoor kitchen, don’t forget to prioritize safety. Regularly inspect gas lines, electrical connections, and any other components to ensure they are in good working condition. Clean and maintain the countertops, cabinets, and appliances according to the manufacturer’s recommendations to prolong their lifespan.
Lastly, continue to explore and expand your culinary horizons in your outdoor kitchen. Experiment with recipes, try new cooking techniques, and make the most of this wonderful space you have created. Enjoy the freedom of cooking and dining under the open sky, savor the flavors of your grilled masterpieces, and relish the joy of outdoor living.
Thank you for joining us on this journey of building your own DIY brick outdoor kitchen. We hope this guide has been helpful and inspiring, and we wish you many memorable moments and delicious meals in your new outdoor cooking oasis.
Frequently Asked Questions about How To Build A DIY Brick Outdoor Kitchen
Was this page helpful?
At Storables.com, we guarantee accurate and reliable information. Our content, validated by Expert Board Contributors, is crafted following stringent Editorial Policies. We're committed to providing you with well-researched, expert-backed insights for all your informational needs.

0 thoughts on “How To Build A DIY Brick Outdoor Kitchen”