Home>Construction & Tools>Building Materials>How To Sand Down Brick
Building Materials
How To Sand Down Brick
Modified: August 20, 2024
Learn how to sand down brick effectively and efficiently with our expert tips and techniques. Discover the best tools and methods for sanding building materials. Start your project today!
(Many of the links in this article redirect to a specific reviewed product. Your purchase of these products through affiliate links helps to generate commission for Storables.com, at no extra cost. Learn more)
Introduction
Welcome to the world of brick renovation! Whether you're a seasoned DIY enthusiast or a novice homeowner looking to spruce up your living space, the process of sanding down brick can breathe new life into your surroundings. Sanding down brick is a transformative endeavor that can revitalize the appearance of your interior or exterior walls, fireplaces, or other brick surfaces.
Sanding down brick is a meticulous task that requires the right tools, techniques, and a bit of elbow grease. This comprehensive guide will walk you through the steps of sanding down brick, ensuring that you achieve a professional-looking finish while maintaining the structural integrity of the brick.
In this guide, we'll delve into the essential tools and materials needed for the job, discuss important safety precautions to keep in mind, and provide detailed instructions on preparing the area, mastering sanding techniques, and tidying up post-sanding. By the end of this guide, you'll be equipped with the knowledge and confidence to tackle your brick sanding project with skill and precision.
So, roll up your sleeves, gather your supplies, and let's embark on this brick beautification journey together!
Key Takeaways:
- Transform your living space by sanding down brick with the right tools and safety precautions. Achieve a professional finish and revitalize your surroundings with patience and attention to detail.
- Prioritize safety, ventilation, and dust management when sanding brick. Clean and organize your workspace for a satisfying DIY renovation experience.
Read more: How To Knock Down A Brick Wall
Tools and Materials Needed
Before embarking on your brick sanding adventure, it’s essential to gather the necessary tools and materials to ensure a smooth and efficient process. Here’s a comprehensive list of what you’ll need:
Tools:
- Angle Grinder: Equipped with a diamond masonry wheel, an angle grinder is ideal for efficiently smoothing down rough brick surfaces.
- Wire Brush: A wire brush will help remove loose mortar and debris from the brick, preparing it for the sanding process.
- Sanding Block or Sanding Sponge: These handheld tools are perfect for smoothing out smaller areas and achieving a uniform finish.
- Dust Mask: Protect your respiratory system from airborne particles and dust with a high-quality dust mask.
- Safety Goggles: Safeguard your eyes from debris and dust during the sanding process.
- Protective Gloves: Durable gloves will shield your hands from rough surfaces and potential abrasions.
- Vacuum Cleaner: A vacuum with a brush attachment is essential for cleaning up dust and debris as you work.
- Broom and Dustpan: These basic cleaning tools will help tidy up the work area post-sanding.
Materials:
- Coarse Grit Sandpaper: Opt for coarse grit sandpaper to effectively smooth down the brick surface.
- Medium Grit Sandpaper: A medium grit sandpaper will help refine the surface and achieve a polished finish.
- Painter’s Tape: Use painter’s tape to protect adjacent surfaces from accidental scratches or damage during the sanding process.
- Drop Cloths or Plastic Sheeting: Cover and protect surrounding areas from dust and debris with durable drop cloths or plastic sheeting.
- Water and Sponge: Keep a bucket of water and a sponge handy for cleaning the brick and removing excess dust.
- Masonry Sealer (Optional): Consider applying a masonry sealer to the sanded brick surface for added protection and a polished look.
By ensuring you have these tools and materials at your disposal, you’ll be well-prepared to tackle the brick sanding process efficiently and safely.
Safety Precautions
Prior to diving into the brick sanding process, it’s crucial to prioritize safety to prevent potential hazards and ensure a secure working environment. Here are essential safety precautions to observe:
Read more: How To Take Down A Brick Chimney
Protective Gear:
Equip yourself with the necessary protective gear before commencing the sanding process. This includes wearing a dust mask to shield your respiratory system from airborne particles, safety goggles to safeguard your eyes from debris, and durable gloves to protect your hands from rough surfaces and potential abrasions.
Ventilation:
Work in a well-ventilated area to minimize the inhalation of dust and airborne particles. If sanding indoors, consider using fans and opening windows to promote air circulation and reduce the concentration of dust in the working space.
Dust Management:
Brick sanding generates a significant amount of dust and debris. To mitigate the risk of respiratory issues and maintain a clean work environment, use a vacuum with a brush attachment to promptly remove dust as it accumulates. Additionally, consider dampening the brick surface before sanding to minimize the dispersion of fine particles.
Electrical Safety:
If you’re using power tools such as an angle grinder, exercise caution when working with electrical equipment. Ensure that power cords are in good condition, avoid exposing them to moisture, and use ground fault circuit interrupters (GFCIs) when working in potentially damp areas.
Read more: How To Sand A Dresser
Stable Working Platform:
When working at heights or on ladders to sand elevated brick surfaces, ensure that the ladder is stable and securely positioned. Avoid overreaching or leaning excessively while sanding to prevent falls and injuries.
Protecting Surrounding Surfaces:
Prior to sanding, use painter’s tape and drop cloths to protect adjacent surfaces, such as walls, floors, and fixtures, from accidental scratches or damage caused by the sanding process.
First Aid Preparedness:
Keep a first aid kit readily accessible in case of minor injuries. Familiarize yourself with basic first aid procedures and know how to address minor cuts, abrasions, or splinters that may occur during the sanding process.
By adhering to these safety precautions, you’ll create a secure and controlled environment for sanding down brick, minimizing potential risks and ensuring a smooth and incident-free renovation process.
Preparing the Area
Before commencing the brick sanding process, thorough preparation of the work area is essential to ensure a smooth and efficient renovation experience. Follow these steps to prepare the area for sanding:
Read more: How To Store Sand
Cleaning the Brick Surface:
Begin by cleaning the brick surface to remove any loose debris, dirt, or grime. Use a wire brush to gently scrub the surface and eliminate loose mortar or stubborn particles. If the brick surface is particularly dirty, consider using a mild detergent solution and a stiff-bristled brush to effectively clean the area. Once cleaned, allow the brick to fully dry before proceeding with the sanding process.
Protecting Surrounding Surfaces:
Take measures to safeguard adjacent surfaces, such as walls, floors, and fixtures, from potential damage during the sanding process. Apply painter’s tape to edges and corners to prevent accidental scratches or abrasions. Cover floors and nearby items with drop cloths or plastic sheeting to shield them from dust and debris generated during sanding.
Securing Ventilation and Containment:
Ensure that the work area is properly ventilated to minimize the concentration of airborne dust. If sanding indoors, use fans to promote air circulation and consider opening windows to facilitate the dissipation of dust. Additionally, consider creating a containment area using plastic sheeting to confine dust and prevent it from spreading to other parts of the property.
Setting Up Workstation:
Organize your tools and materials in a convenient and accessible manner. Position your angle grinder, sanding blocks, wire brush, and other necessary tools within reach. Prepare your vacuum cleaner, water and sponge, and any additional cleaning supplies to facilitate a tidy workspace throughout the sanding process.
Read more: How To Sand Glass
Checking Electrical Outlets and Cords:
If using power tools, ensure that electrical outlets are in good condition and can safely support the equipment. Inspect power cords for any signs of damage or wear and avoid exposing them to moisture during the sanding process. Additionally, use ground fault circuit interrupters (GFCIs) when working in potentially damp areas to prevent electrical hazards.
By meticulously preparing the area for brick sanding, you’ll create an organized and secure environment for the renovation process, setting the stage for a successful and satisfying outcome.
Sanding Techniques
Mastering the art of brick sanding involves employing effective techniques to achieve a smooth and refined finish. Follow these steps to execute the sanding process with precision and finesse:
Choosing the Right Grit:
Begin by selecting the appropriate grit of sandpaper for the initial sanding phase. Coarse grit sandpaper, typically between 40 to 80 grit, is ideal for smoothing down rough and uneven brick surfaces. Once the initial sanding is complete, transition to medium grit sandpaper, ranging from 100 to 150 grit, to refine the surface and achieve a polished finish.
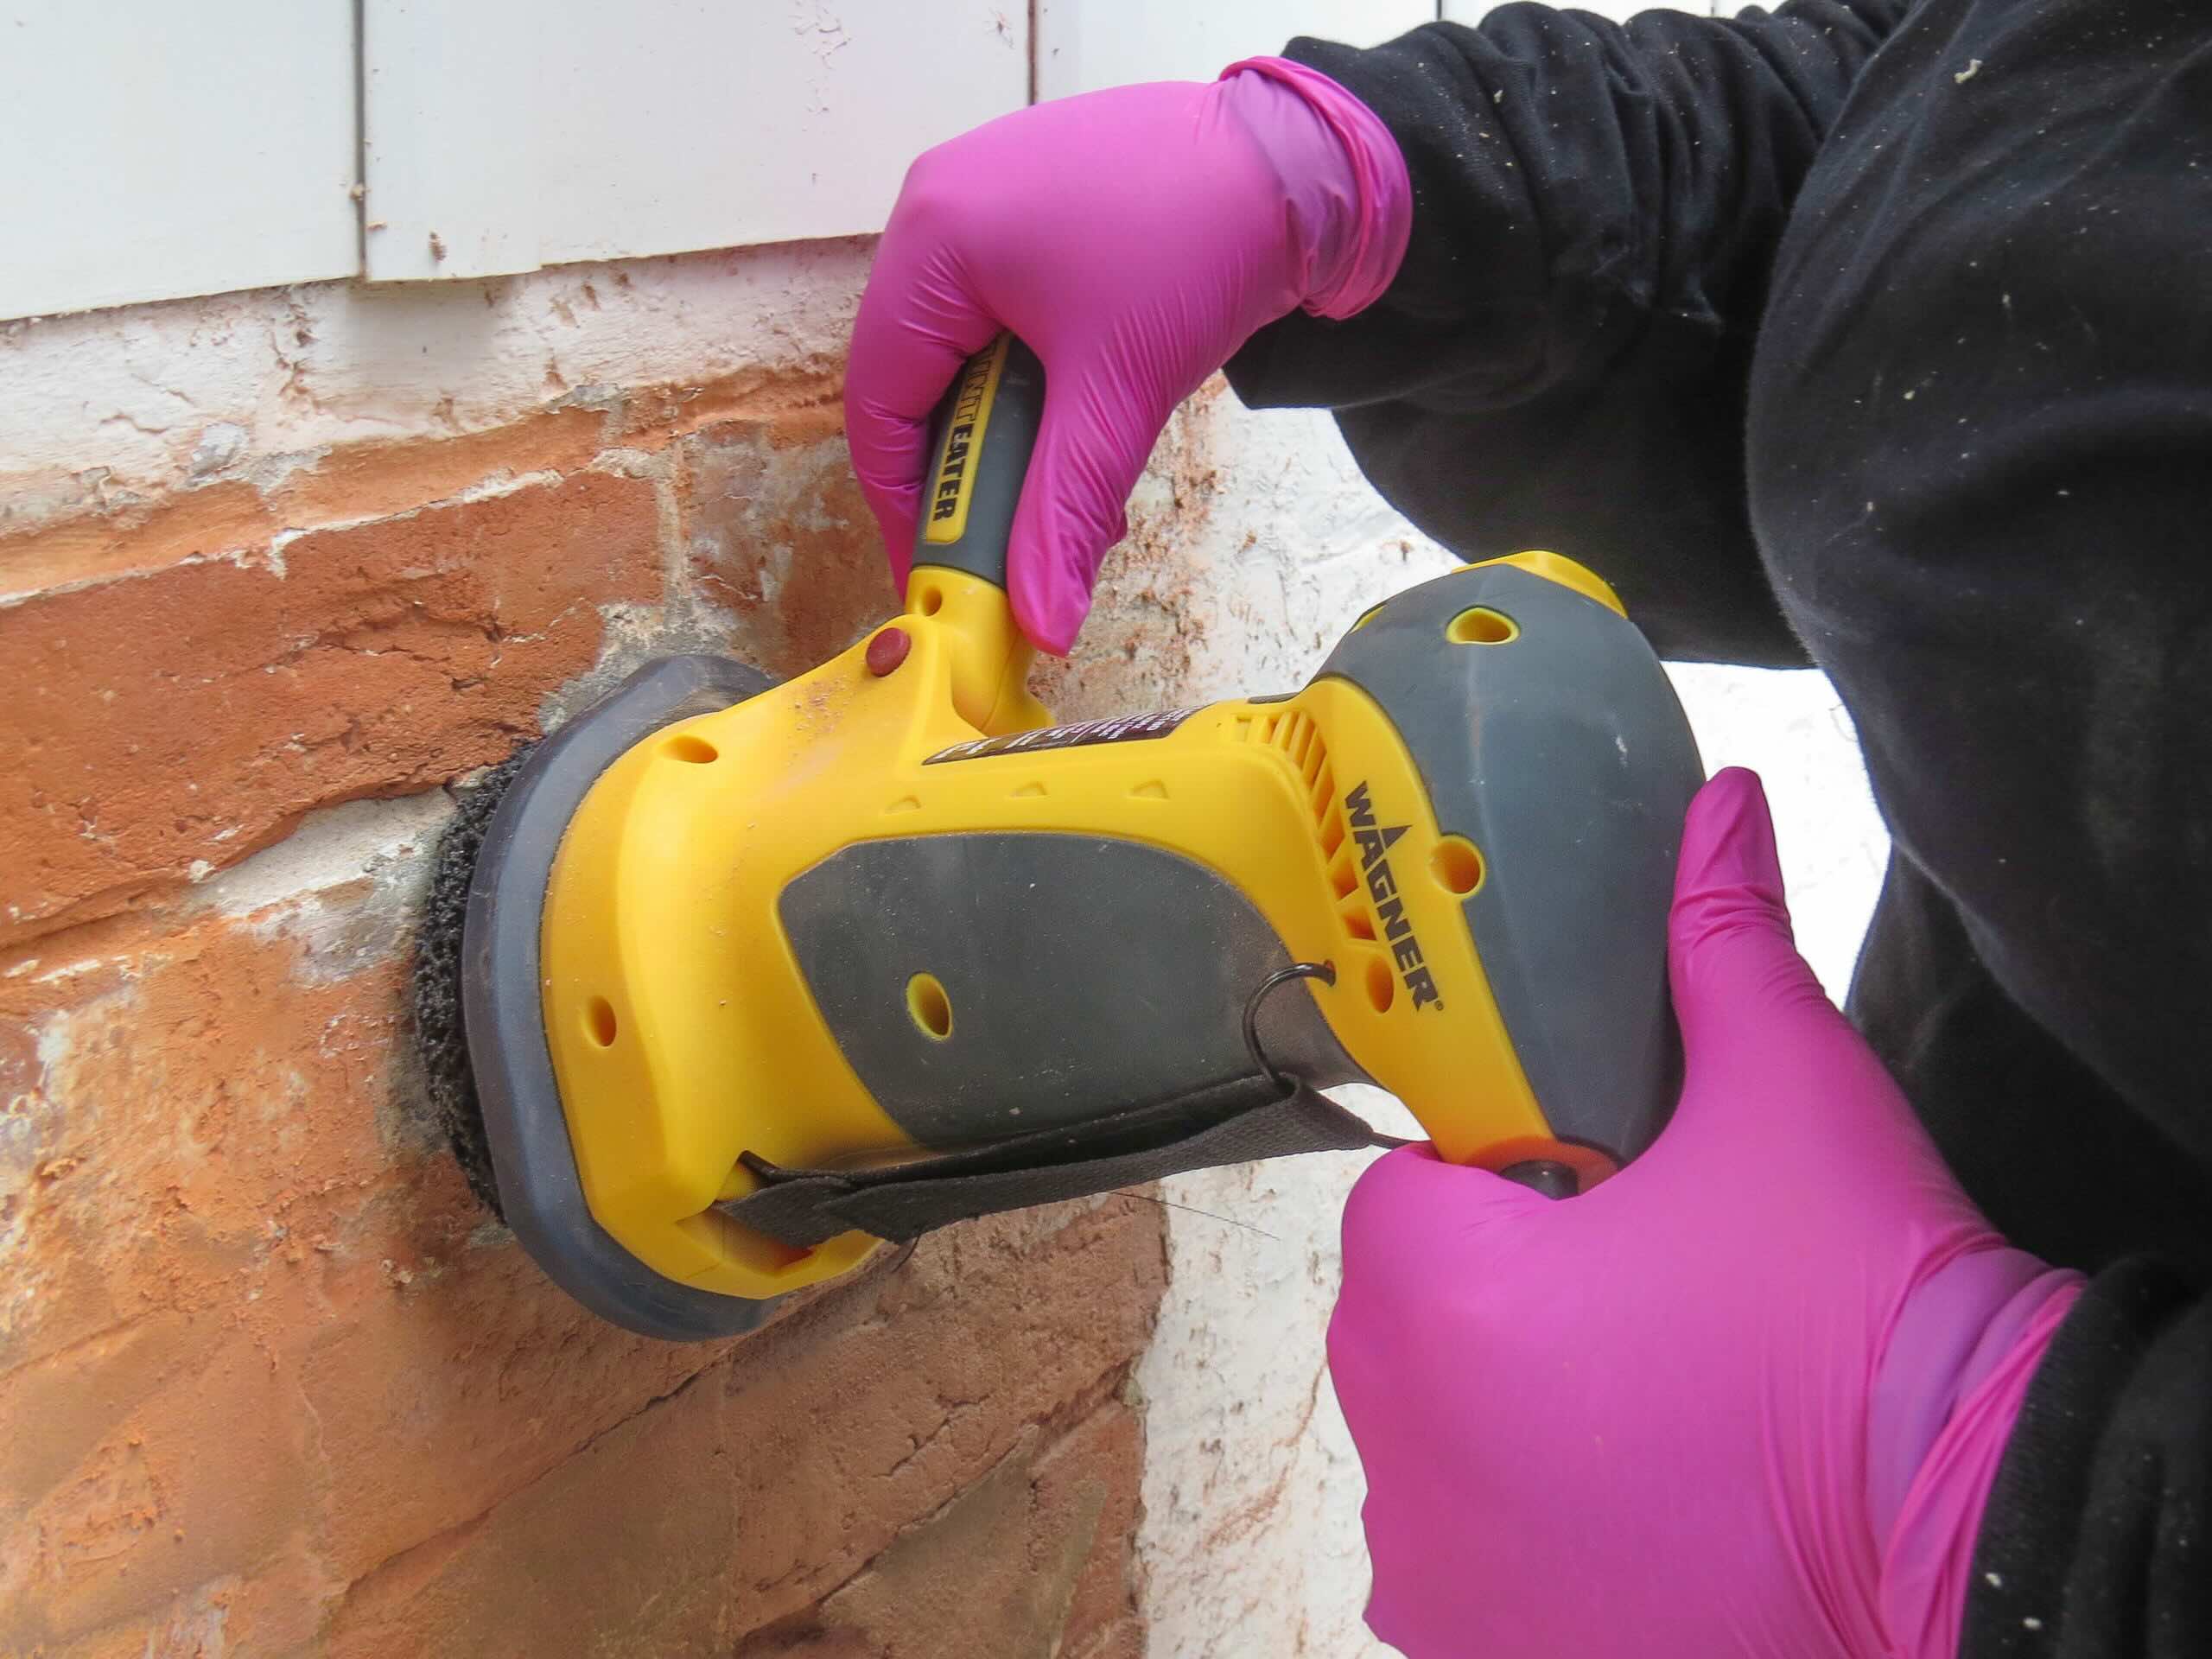
Using the Angle Grinder:
If utilizing an angle grinder for sanding, ensure that it is equipped with a diamond masonry wheel suitable for brick surfaces. Hold the angle grinder with a firm grip and maintain a consistent pressure as you move it across the brick, allowing the diamond wheel to effectively smooth out imperfections and rough areas. Exercise caution to avoid applying excessive pressure, which may result in uneven sanding or damage to the brick surface.
Read more: How To Store Sand Fleas
Applying Even Pressure:
Whether using an angle grinder or handheld sanding block, apply even pressure as you sand the brick surface. Consistent pressure helps achieve uniform results and prevents the formation of uneven patches or indentations. Pay attention to areas with stubborn mortar remnants or irregularities, ensuring thorough sanding to create a cohesive and visually appealing finish.
Managing Dust and Debris:
Throughout the sanding process, use a vacuum with a brush attachment to promptly remove dust and debris as it accumulates. This not only maintains a clean work environment but also provides better visibility of the sanded areas, allowing you to assess the progress and ensure a comprehensive sanding job.
Refining the Surface:
After the initial sanding with coarse grit sandpaper, transition to medium grit sandpaper to refine the surface and achieve a smoother texture. Focus on eliminating any remaining rough spots and ensuring that the entire brick surface exhibits a consistent and uniform appearance.
Inspecting and Touching Up:
Upon completing the sanding process, inspect the sanded brick surface to identify any areas that may require additional attention. Use a sanding block or sanding sponge to touch up specific spots or edges, ensuring that the entire surface maintains a cohesive and refined look.
By employing these sanding techniques with care and attention to detail, you’ll transform your brick surfaces into visually appealing features that exude charm and sophistication.
Read more: How To Sand Patio Furniture
Cleaning Up
As the brick sanding process draws to a close, thorough cleaning and tidying up are essential to restore the work area and showcase the newly revitalized brick surfaces. Follow these steps to effectively clean up after sanding down brick:
Removing Dust and Debris:
Utilize a vacuum with a brush attachment to carefully remove dust and debris from the sanded brick surface. Work systematically, starting from the top of the area and progressing downward, ensuring that all residual dust is effectively eliminated. Pay special attention to corners, edges, and intricate details to achieve a comprehensive cleaning result.
Damp Cleaning the Brick:
Prepare a bucket of water and use a sponge to damp clean the sanded brick surface. Gently wipe the brick with the damp sponge to remove any remaining fine particles and ensure a pristine finish. Allow the brick to air dry completely before proceeding with any additional treatments or sealants.
Tidying the Work Area:
Remove drop cloths, plastic sheeting, and painter’s tape from adjacent surfaces, taking care to dispose of any accumulated debris in a responsible manner. Use a broom and dustpan to sweep the work area, collecting any residual dust and ensuring that the surroundings are left clean and free from sanding-related remnants.
Read more: How To Sand A Wood Floor
Inspecting for Residue:
Thoroughly inspect the work area, including adjacent surfaces and fixtures, to ensure that no dust or debris has been left behind. Address any areas that may require additional cleaning or touch-ups, ensuring that the entire space maintains a polished and well-maintained appearance.
Organizing and Storing Tools:
Clean and organize your tools and equipment, ensuring that they are properly stored for future use. Wipe down and maintain your sanding tools, vacuum cleaner, and other materials to prolong their longevity and readiness for upcoming projects.
Disposing of Waste:
Dispose of any waste materials, such as used sandpaper, debris collected during cleaning, and disposable protective gear, in accordance with local waste disposal regulations. Separate recyclable materials and dispose of non-recyclable items responsibly to minimize environmental impact.
By diligently cleaning up after the brick sanding process, you’ll not only showcase the beauty of the revitalized brick surfaces but also ensure a safe and organized environment for future endeavors.
Conclusion
Congratulations on successfully navigating the intricate process of sanding down brick! By embarking on this transformative renovation journey, you’ve revitalized your living space and breathed new life into your brick surfaces. Through the meticulous application of essential tools, safety precautions, and effective sanding techniques, you’ve achieved a polished and visually appealing finish that enhances the aesthetic appeal of your surroundings.
As you reflect on your brick sanding endeavor, remember that attention to detail and patience are key ingredients in achieving a professional-looking outcome. The careful selection of grits, consistent pressure application, and thorough cleaning and tidying up have collectively contributed to the success of your renovation project.
By prioritizing safety and maintaining a clean and organized work environment, you’ve not only transformed your brick surfaces but also cultivated a sense of accomplishment and pride in your DIY skills. The revitalized brick walls, fireplaces, or other features now stand as testaments to your dedication and craftsmanship.
As you bask in the renewed allure of your brick surfaces, consider the potential for further enhancements, such as the application of masonry sealers to protect and accentuate the sanded brick. Embrace the opportunity to explore additional projects and continue infusing your living space with personalized touches that reflect your creativity and ingenuity.
Emboldened by the knowledge and experience gained from this endeavor, you’re now equipped to tackle future renovation projects with confidence and proficiency. Whether it’s sanding down brick, refinishing wood surfaces, or venturing into new DIY ventures, your newfound expertise sets the stage for a myriad of exciting possibilities.
Remember, the journey of home improvement is a continuous evolution, and each project serves as a canvas for your creativity and passion. As you revel in the beauty of your revitalized brick surfaces, take pride in the transformation you’ve orchestrated and the inviting ambiance you’ve cultivated within your living space.
So, as you savor the fruits of your labor, let the allure of your newly sanded brick surfaces inspire future endeavors and serve as a testament to the transformative power of DIY craftsmanship.
Frequently Asked Questions about How To Sand Down Brick
Was this page helpful?
At Storables.com, we guarantee accurate and reliable information. Our content, validated by Expert Board Contributors, is crafted following stringent Editorial Policies. We're committed to providing you with well-researched, expert-backed insights for all your informational needs.


0 thoughts on “How To Sand Down Brick”