Home>diy>Architecture & Design>How To Calculate Area In CAD

Architecture & Design
How To Calculate Area In CAD
Modified: January 9, 2024
Learn how to calculate area in CAD with our comprehensive guide. Perfect for architecture and design professionals looking to streamline their workflow.
(Many of the links in this article redirect to a specific reviewed product. Your purchase of these products through affiliate links helps to generate commission for Storables.com, at no extra cost. Learn more)
Introduction:
Welcome to the world of Computer-Aided Design (CAD), a revolutionary technology that has transformed architectural and engineering industries. CAD software provides designers with the tools they need to create precise and accurate digital representations of physical objects and spaces. One crucial aspect of CAD design is the ability to calculate the area of various elements within a design, whether it’s a 2D drawing or a complex 3D model.
In this article, we will explore the methods and techniques for calculating area in CAD software. We will cover both 2D and 3D CAD environments, discussing commonly used commands and tools, as well as manual calculations. By the end, you will have a solid understanding of how to accurately determine the area of different elements in your CAD designs.
Key Takeaways:
- Mastering area calculations in CAD software is crucial for precise designs, efficient space planning, and accurate material estimation. Embrace the power of automated commands and manual calculations to unleash your creativity and optimize your design process.
- Understanding units of measurement and leveraging the “Area” and “Region” commands in CAD software empowers designers to accurately determine the area of 2D shapes and 3D surfaces. Apply area calculations for space planning, material estimation, cost analysis, and structural integrity, enhancing the overall design process.
Read more: How To Calculate The Construction Area
Understanding CAD Software:
CAD software is a sophisticated computer program that enables designers and engineers to create detailed technical drawings, models, and simulations. These digital representations allow for more precise and efficient design processes, reducing the need for manual drafting and physical prototypes.
CAD software provides a range of powerful features and tools that help designers conceptualize, visualize, and refine their designs. It allows for the creation of 2D drawings, 3D models, and even simulations of real-world environments. With CAD, designers can easily manipulate and modify design elements, add annotations, and analyze various aspects of their designs such as dimensions, angles, and, of course, area.
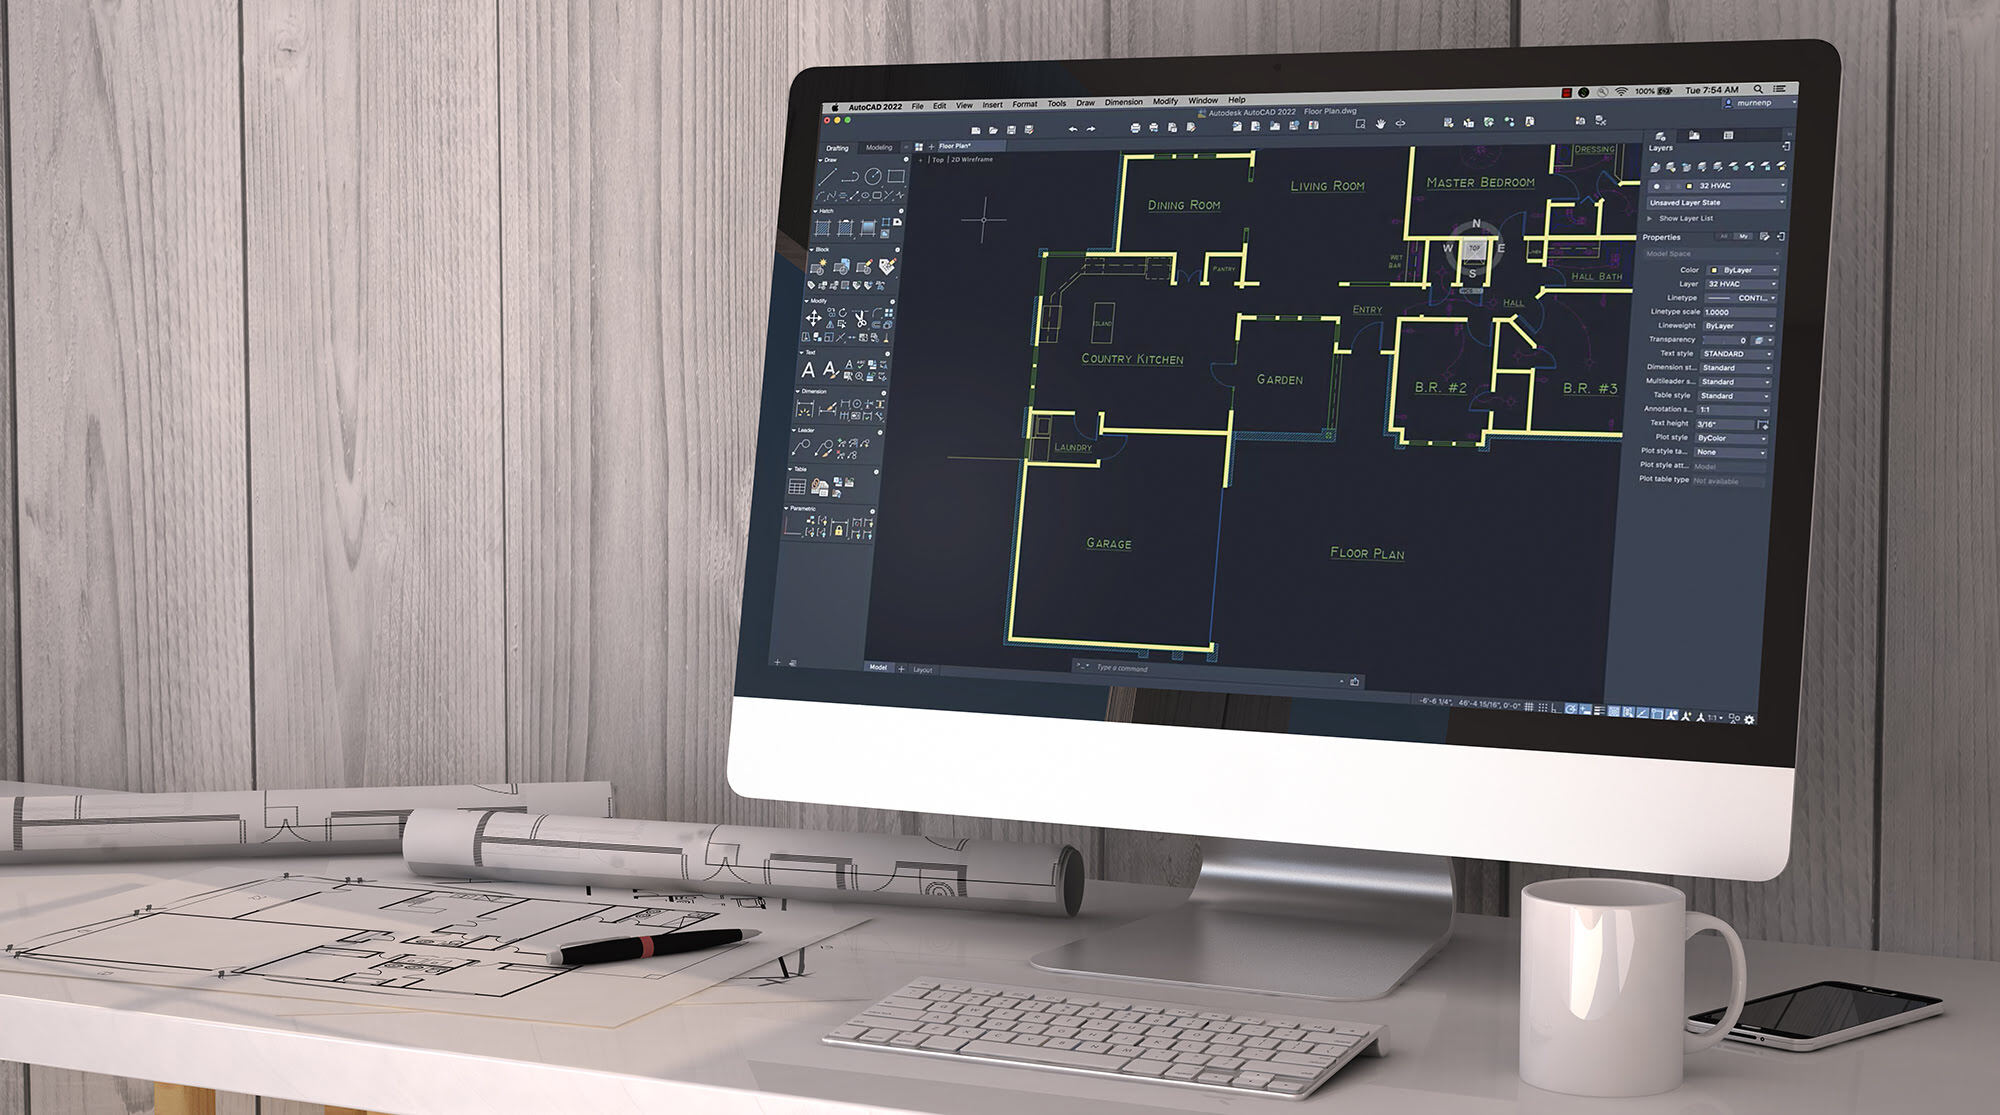
Some popular CAD software programs include AutoCAD, SolidWorks, Rhino, and Fusion 360. These programs offer a wide range of tools and functions, tailored to specific design needs. Depending on the complexity of the design and the intended use, different CAD software may be more suitable. However, the principles for calculating area in CAD remain largely consistent across different software platforms.
It’s important to note that CAD software varies in terms of the user interface and workflow. While the core functionality might be similar, the specific commands and steps can differ from program to program. In this article, we will focus on general techniques that are applicable to most CAD software, with examples from widely used programs such as AutoCAD.
Units of Measurement:
Before diving into calculating area in CAD, it is crucial to understand the units of measurement used in the software. CAD software allows designers to work with various units, such as millimeters, inches, feet, or meters. Choosing the correct unit is vital to ensure accurate area calculations and to maintain consistency throughout the design process.
When starting a new CAD project, you will typically specify the desired unit of measurement. It is important to set the unit to match the intended scale of your design. For example, if you are designing a building, it is common to use feet or meters. On the other hand, if you are working on a small mechanical part, millimeters or inches might be more appropriate.
It is crucial to confirm the units of measurement being used in your CAD software and verify that they match your design requirements. This can usually be done in the software settings or preferences menu. Working with the correct units ensures accurate calculations and seamless collaboration with others involved in the design process.
Additionally, when calculating area, you need to be aware of the square unit corresponding to the chosen linear unit. For example, if working in millimeters, the area would be expressed in square millimeters (mm²). If working in feet, the area would be expressed in square feet (ft²).
Keep in mind that conversions between units may be required in some cases. CAD software often provides built-in tools for unit conversion to streamline the process and prevent errors. Familiarize yourself with the unit conversion features of your CAD software to ensure accurate area calculations when working with designs that require different units of measurement.
Calculating Area in 2D CAD Drawings:
Calculating the area of 2D objects in CAD software is a fundamental task for designers. Whether you need to determine the area of a room, a section of land, or any other two-dimensional shape, CAD software provides convenient methods for accurate calculations.
One common method for calculating area in 2D CAD drawings is by using the “Area” command. This command allows you to select closed shapes and automatically calculates their area. The steps to use the “Area” command may vary slightly depending on the CAD software you are using, but the general principle remains the same.
To calculate area using the “Area” command:
- Select the “Area” command from the toolbar or menu.
- Select the closed shape or shapes for which you want to calculate the area. This can be done by clicking on the boundary of the shape.
- The CAD software will calculate and display the area of the selected shape in the desired unit of measurement.
- If you have multiple shapes that need to be added together to get the total area, you can repeat the process and add the individual areas.
Alternatively, in some cases, CAD software allows you to manually calculate the area of 2D shapes. This can be useful when dealing with irregular shapes or when the “Area” command is not available. To manually calculate the area, you can break down the shape into simpler geometric shapes (e.g., rectangles, triangles, circles) and sum up their individual areas.
It’s important to note that when calculating area manually, you need to ensure that all measurements are in the same units as specified in your CAD software. This ensures accurate calculations and avoids inconsistencies.
By utilizing the “Area” command and manual calculations, you can accurately determine the area of various 2D shapes in your CAD drawings. This information is valuable when designing spaces, estimating material quantities, or performing analysis on your designs.
Using the “Area” Command:
The “Area” command is a powerful tool available in most CAD software that automates the process of calculating the area of selected closed shapes. This command streamlines and simplifies the area calculation process, saving time and reducing the chance of errors.
Here are the general steps to use the “Area” command in CAD software:
- Activate the “Area” command by selecting it from the toolbar or menu. The command may be represented by an icon or a text label.
- Select the closed shape or shapes for which you want to calculate the area. This can be done by clicking on the boundary of the shape.
- Once the shape is selected, the CAD software will automatically calculate the area and display it in the desired unit of measurement.
- If you have multiple shapes that need to be added together to get the total area, you can repeat the process and add the individual areas.
The “Area” command is particularly useful when dealing with complex or irregular shapes. CAD software can accurately calculate the area, even for shapes with curved boundaries or intricate geometries.
It’s important to note that the “Area” command relies on closed shapes. Therefore, it is necessary to ensure that all shapes you want to calculate the area for are completely closed, with no gaps or open ends. Incomplete or overlapping shapes may result in inaccurate area calculations.
Some CAD software may offer additional options or settings for the “Area” command. For example, you might be able to specify the precision of the area calculation or change the display units. Familiarize yourself with the specific features and capabilities of your CAD software to optimize your workflow and obtain the desired results.
The “Area” command is a valuable tool for accurately determining the area of 2D shapes in your CAD drawings. By utilizing this command, you can save time, improve efficiency, and ensure precise calculations for your design projects.
When calculating area in CAD, ensure that all the lines are properly connected and closed to form a complete boundary. Use the appropriate area calculation tool in your CAD software to accurately measure the enclosed space.
Read more: How To Calculate Floor Area Ratio
Manually Calculating Area:
While CAD software provides convenient tools like the “Area” command, there may be instances where you need to manually calculate the area of 2D shapes. This can be necessary for irregular shapes that are not easily measured using automated methods or when working in software that doesn’t have an “Area” command.
When manually calculating area, the key is to break down the shape into simpler geometric components and sum up their individual areas. This approach works well for shapes like polygons, circles, or irregular shapes that can approximate simple components.
Here are the general steps to manually calculate the area of a 2D shape:
- Identify the simpler geometric components within the shape. For example, you might identify rectangles, triangles, circles, or a combination of these.
- Measure the necessary dimensions of each component, such as the length and width of rectangles or the radius of circles.
- Apply the appropriate area formulas for each component. For example, the area of a rectangle is calculated by multiplying its length and width, while the area of a triangle is calculated using the formula (base * height) / 2.
- Calculate the area for each component and add up the individual areas to determine the total area of the shape.
It’s important to use the same units of measurement consistently throughout the calculations to ensure accurate results. If necessary, convert measurements to a common unit before applying the area formulas.
Keep in mind that manual calculations may result in approximation errors, particularly when dealing with complex shapes or curved boundaries. The accuracy of the manually calculated area depends on the precision of your measurements and the accuracy of the formulas being used.
Although manual calculations can be time-consuming, they provide a valuable alternative when automated methods are not available or when you require a high level of precision for irregular shapes. By utilizing basic geometry principles and formulas, you can accurately determine the area of 2D shapes in your CAD drawings.
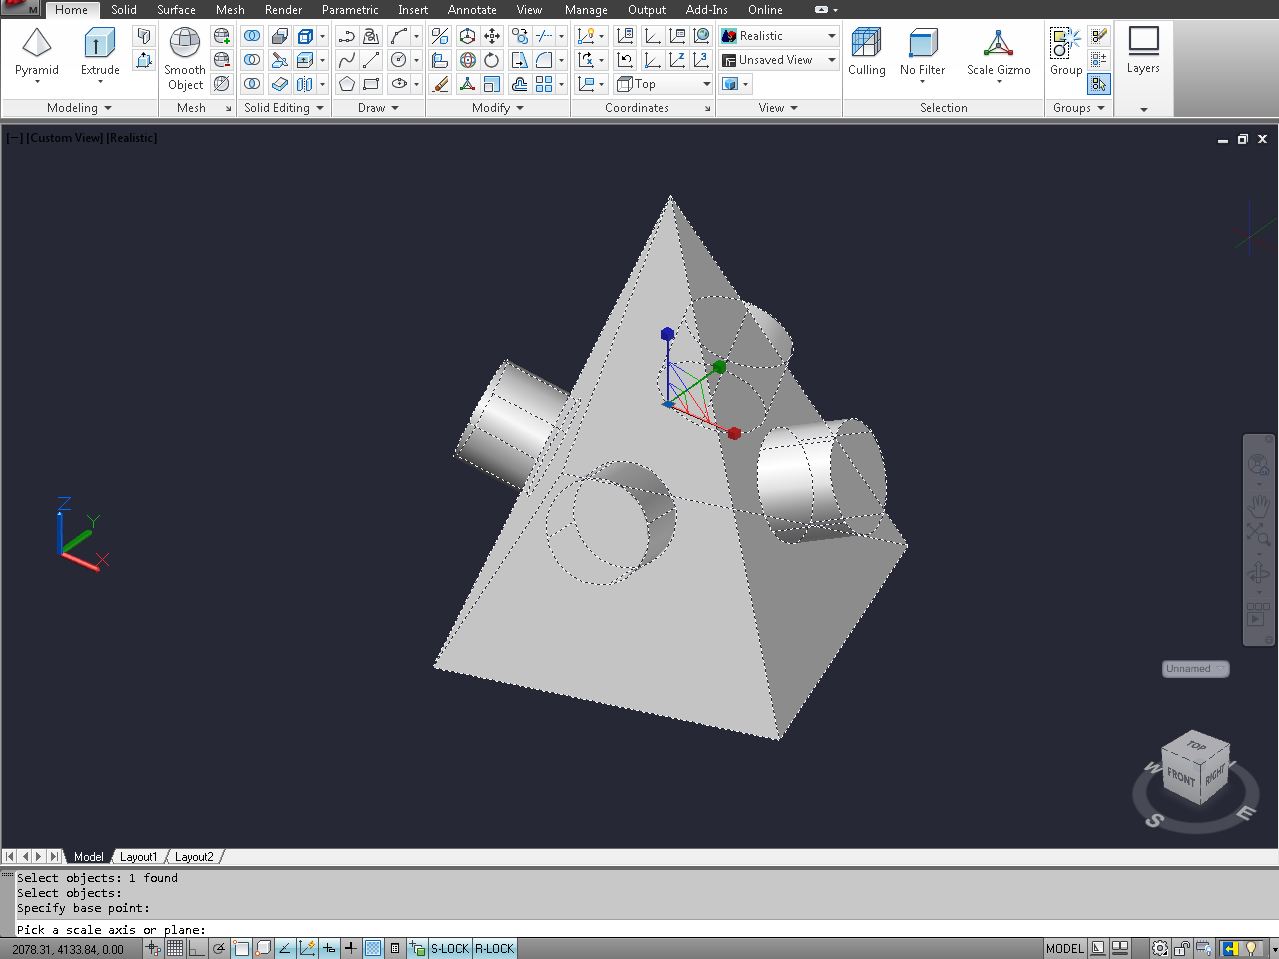
Calculating Area in 3D CAD Models:
Calculating area in 3D CAD models involves determining the surface area of complex three-dimensional shapes. This is a crucial task for designers who need to understand the material requirements, visualize surface areas for coatings or treatments, or perform structural analyses.
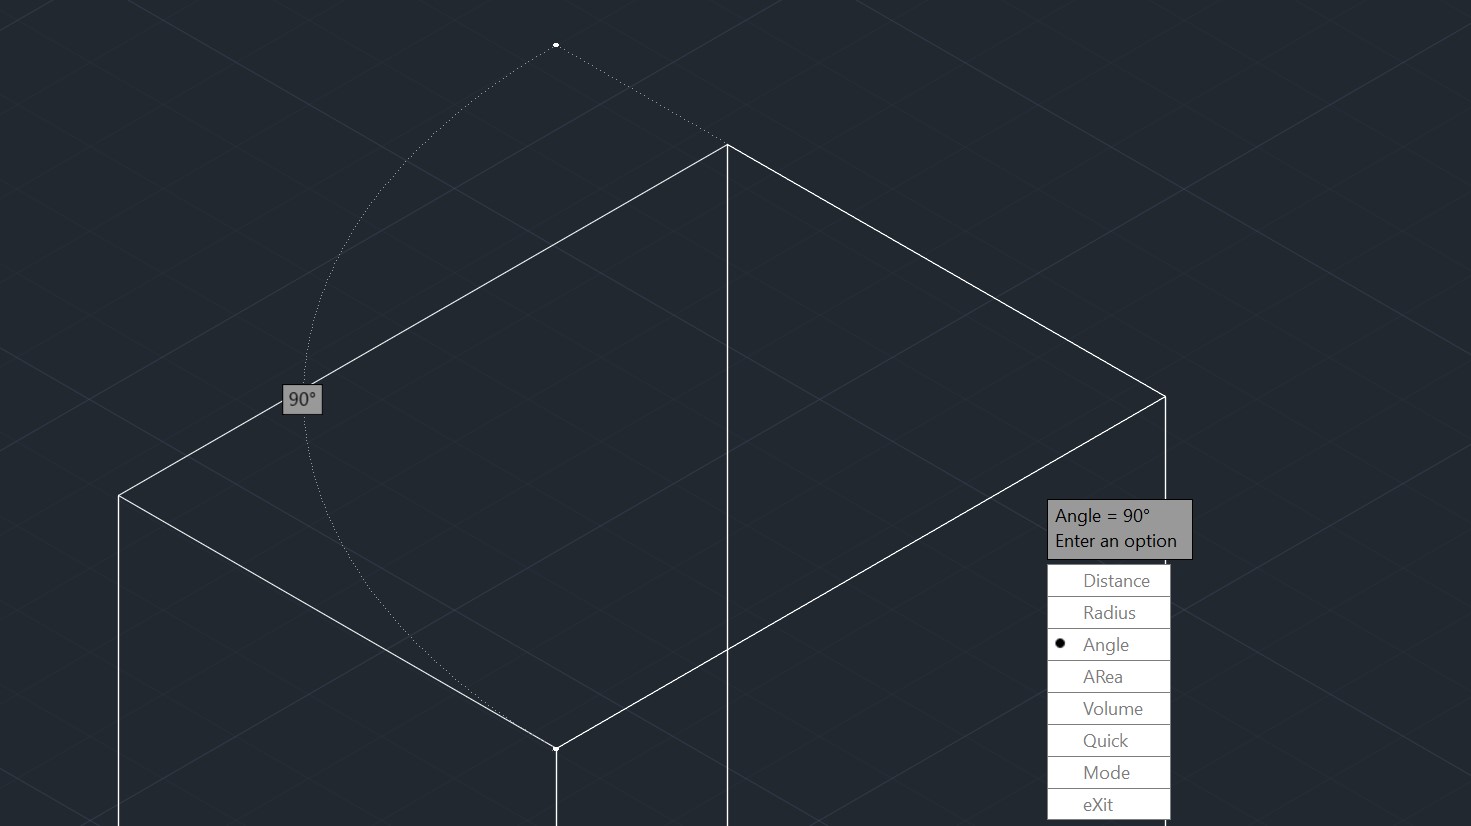
One commonly used method for calculating area in 3D CAD models is through the use of the “Region” command. This command allows you to select a closed region or mesh within the 3D model and extract its surface area.
To calculate area using the “Region” command:
- Select the “Region” command from the toolbar or menu in your CAD software.
- Choose the region or mesh for which you want to calculate the surface area. This can be done by selecting the boundaries or surfaces that define the closed region.
- The CAD software will calculate and display the surface area of the selected region, typically in square units corresponding to the linear units used in the model, such as square millimeters (mm²) or square inches (in²).
The “Region” command works well for closed volumes or meshed surfaces within 3D CAD models. It accurately calculates the surface area of complex geometries that may include curves, tapered elements, or irregular features.
It’s worth noting that the accuracy of the calculated surface area depends on the quality and level of detail in the 3D model. The more refined and precise the model, the more accurate the calculated area will be. Therefore, it’s essential to ensure that your 3D CAD model is properly constructed with closed regions and accurate geometries.
While the “Region” command is a powerful tool, it may not be available in all CAD software programs. In such cases, alternative methods, such as manually dividing the surface into simpler geometric components and summing their areas, or using third-party plugins or scripts specifically designed for calculating surface area, may be necessary.
By utilizing the appropriate tools and techniques in your CAD software, you can accurately calculate the surface area of 3D objects in your designs. This information is crucial for various applications, including material estimation, structural analysis, and visual representation of your 3D models.
Using the “Region” Command:
The “Region” command is a powerful tool in many CAD software programs that allows you to calculate the surface area of closed regions within 3D models. This command is especially useful when you need to determine the surface area of complex three-dimensional shapes.
To use the “Region” command in your CAD software, follow these general steps:
- Select the “Region” command from the toolbar or menu. The command may be represented by an icon or a text label.
- Choose the closed region or mesh within your 3D model for which you want to calculate the surface area. This can typically be done by selecting the boundaries or surfaces that define the closed region.
- Once the region is selected, the CAD software will automatically calculate and display the surface area of that specific region. The result is usually presented in square units corresponding to the linear units used in the CAD model.
The “Region” command is particularly helpful when working with intricate three-dimensional shapes that may have curved or irregular surfaces. It accurately calculates the surface area, taking into account the complexities of the geometry.
It’s important to note that the accuracy of the calculated surface area depends on the quality and detail of the 3D model. A well-constructed and detailed model will yield more accurate results. Therefore, it’s essential to ensure that your 3D CAD model is properly built, with well-defined closed regions and accurate geometries. If there are any gaps or inconsistencies in the model, the calculated surface area may be inaccurate.
While the “Region” command is widely available in many CAD software programs, there may be cases where it is not present or the specific software you are using has a different command or approach for calculating surface area. In such instances, it’s recommended to consult the software’s documentation or online resources to identify the appropriate method to calculate surface area.
By utilizing the “Region” command or similar tools in your CAD software, you have the capability to accurately determine the surface area of closed regions within your 3D models. This information is essential for various applications, including material estimation, structural analysis, and visual representation of your 3D designs.
Applying Area Calculations in CAD Designs:
Once you have calculated the area of various elements in your CAD designs, you can apply this information in several ways to enhance your designs and improve decision-making processes. Here are some key ways to apply area calculations in CAD designs:
- Space Planning: When designing spaces such as rooms, buildings, or landscapes, knowing the area allows for efficient space planning. You can allocate the appropriate amount of space for different functions, ensuring optimal utilization.
- Material Estimation: Area calculations are essential for estimating the amount of materials required for a project. Whether it’s flooring, paint, or fabric, knowing the area helps you accurately determine the quantities needed, reducing waste and saving costs.
- Cost Estimation: By combining area calculations with material cost data, you can accurately estimate the overall cost of a project. This is particularly useful for budgeting and determining project feasibility.
- Structural Analysis: Calculating the area of structural components in a CAD design allows for accurate analysis of load-bearing capacity and structural integrity. Engineers can use area calculations to determine the stress distribution and ensure optimal design performance.
- Visualization: Surface area calculations contribute to visual representation in CAD designs. Applied materials, textures, or patterns can be accurately portrayed based on the calculated areas, providing a realistic and visually appealing representation of the final product.
- Project Documentation: Area calculations serve as vital information for project documentation. Architects, engineers, and contractors can include the area details in technical drawings, specifications, and reports, ensuring clarity and precision in project documentation.
The application of area calculations in CAD designs goes beyond these examples. Depending on the specific project and design requirements, you may find additional uses for area calculations. Remember that accuracy and attention to detail are crucial when incorporating area calculations into your designs, as any inaccuracies can lead to significant errors or discrepancies.
Utilizing area calculations in your CAD designs adds a level of precision and efficiency, allowing you to make informed decisions and streamline various aspects of the design process. By harnessing the power of area calculations, you can optimize space planning, estimate materials and costs, perform structural analyses, visualize designs, and ensure comprehensive project documentation.
Read more: How To Calculate Attic Ventilation Area
Conclusion:
In the world of CAD design, accurately calculating area is essential for a wide range of applications. Whether you are working on 2D drawings or complex 3D models, understanding how to calculate area in CAD software is a fundamental skill for designers and engineers alike.
Throughout this article, we explored various methods for calculating area in CAD, both through automated commands like “Area” and “Region” and through manual calculations. We discussed the importance of units of measurement and the need for accuracy when working with complex shapes.
By leveraging the power of CAD software, designers can easily determine the area of different elements within their designs. This information can be applied in various ways, including space planning, material estimation, cost estimation, structural analysis, visualization, and documentation.
It is important to continually improve your CAD skills and stay up-to-date with the latest advancements in CAD technology. Familiarize yourself with the specific commands and tools available in your chosen software, as well as any additional features or plugins that may assist with area calculations.
In conclusion, mastering the art of calculating area in CAD software opens up a world of possibilities for designers and engineers. By accurately determining the area of 2D shapes and 3D surfaces, you can make informed decisions, optimize design processes, and create innovative and impactful designs.
So, the next time you embark on a CAD project, remember the importance of area calculations and the valuable insights they provide. Embrace the power of CAD software, unleash your creativity, and let your designs thrive with precise and accurate area measurements.
Frequently Asked Questions about How To Calculate Area In CAD
Was this page helpful?
At Storables.com, we guarantee accurate and reliable information. Our content, validated by Expert Board Contributors, is crafted following stringent Editorial Policies. We're committed to providing you with well-researched, expert-backed insights for all your informational needs.


0 thoughts on “How To Calculate Area In CAD”